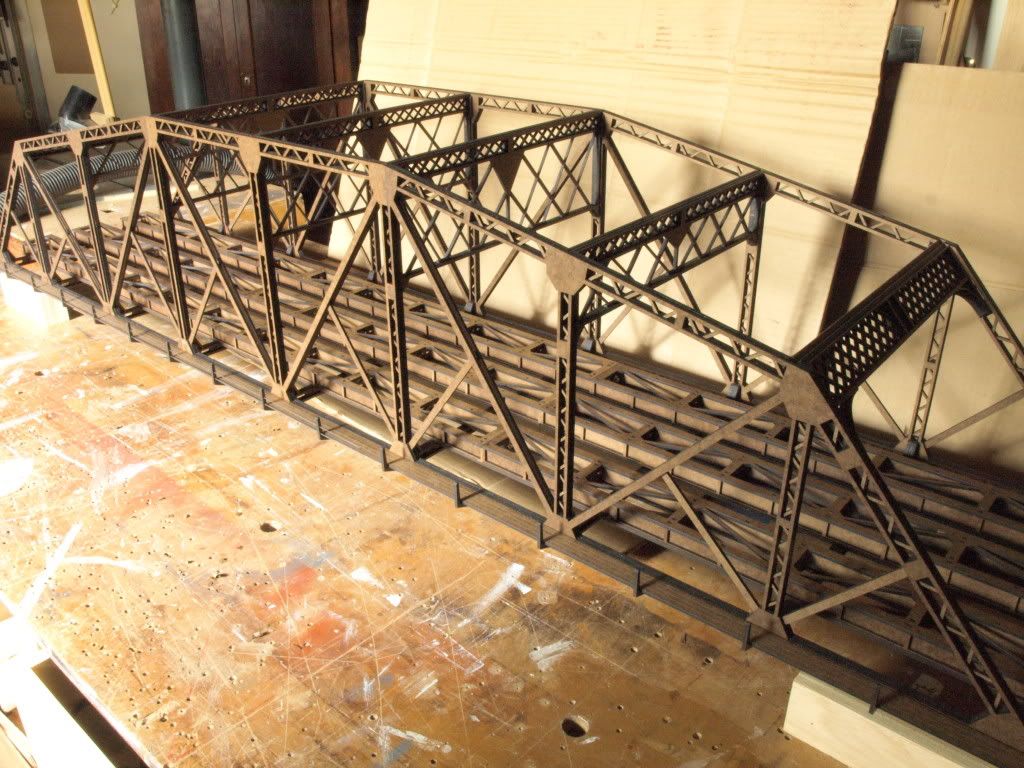
I would like to scratch build a 55" warren truss bridge. What materials would be best to use; wood, metal, or plastic?
To me, wood seems the most economical to use and easiest to fasten together. I have found .75" x .75" wood strips for sale at home depot at $6 per 8ft strip. To me this seems too thick. What do you guys think?
What suggestions can you offer for this project?

Thanks

Dave
Original Post

Replies sorted oldest to newest

Hi Dave


The "best" material comes down to how much load it has to support and how detailed do you want to get.


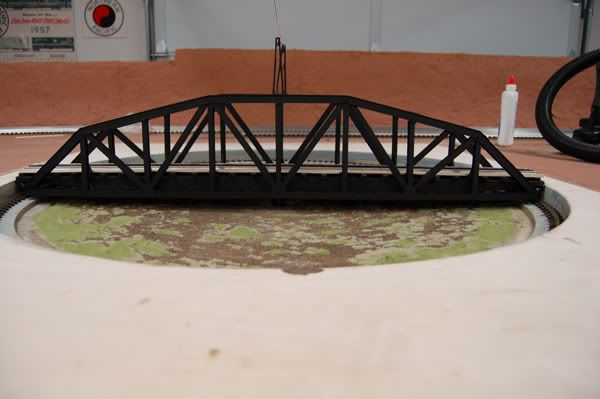
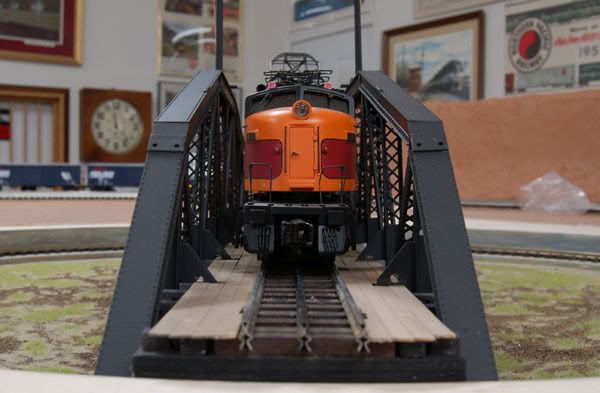
Load isn't too tough to calculate.  You want a good safety factor, so estimate high.  If this is a single track bridge a 55" span could have to hold the weight of two diecast articulated engines.  That could be as much as 50 pounds.  That's a pretty serious load.  If it's a double track bridge its could have to hold 100 pounds.  Whatever you build it needs to be STRONG!  Most commercially available bridges include at least some metal so that they can support the load of diecast steamers.  The closest commercial model to what you are considering is the 40" Atlas Pratt bridge.  It uses two steel bars surrounded by plastic detail for its primary structural support.  It's a pretty design, and something you might want to mimic if your looking for a high level of detail.  Here's a couple photos of a Milwaukee turntable bridge I modeled a few years ago.  This was built by scratch/bashing two Atlas Pratt bridge kits with a 3/4" X 1 1/2"  aluminum bar.


If you aren't looking for a lot of fine detail, wood could be a good material.  In this case you would be looking for the trusses to be functional.  The quality of joinery work will be critical to building a strong reliable bridge.  The 3/4" strip wood you mentioned is probably pine or fir.  At 3/4 size you could build a strong structure.  But as you guessed, it's not very scale.  The top cord on most truss bridges is not much bigger than 24" square (1/2 square in O scale).  If you want to keep the proportions closer to scale I would suggest using bass wood strip.  It's readily available, not too expensive, stronger than fir or pine, and less likely to warp over time.


Do you have a particular prototype bridge you want to duplicate?

Thanks Dave,


I dont have a specific bridge to model just a gap to be bridged.

I researched types of RR bridges and decided that the Warren Truss would be the least complicated design. I'm not looking for great detail, just good function.

Your bridge looks awesome. Very much like what I want to do except I plan mine to be straight across the top instead of arched.


I researched materials and am still searching for the best materials at the best cost.  I can get bass wood at Hobby Lobby in .5 x .5 inch but its $3 for a 3 foot strip. Can 5 or 6 foot strips be purchased any where?


I have also read about building model bridges out of manilla folders and glue. They are surprisingly strong. But they are also much more labor intensive.

Lowes and Home Depot carry small square stock such as 1/4", 5/15", 3/8" and more.  Cheaper and stronger than the stuff at Hobby Lobby.  This stuff also works very well for building threstles. 


Also, while you're there, check out the 8 foot lenghts of aluminum tile trims.  They are light weight, yet strong, and cost less than $10.  I've built several deck bridges for my hidden areas using this material that are around 50" or so long.


I built 3 bridges using 1/4"x1/4" and 1/4"x1/2" pine. I ripped a wider 1/4" thick pine into 1/4" and 1/2" using a table saw. I used prototype designs, to 1:48 scale, and they are very strong. I got the designs from a  published book on model railway bridges. Pine, plus wood glue with gussets made from old orange crates (which are about 1/16" thick)


I drew the bridges to full O-scale, then cut the wood joints to fit the drawing. when gluing, I used a plastic sheet to keep the glue from sticking to the drawing. This way the drawing acted as a template to ensure the glued pieces stayed the correct shape.


I have included some pictures of the bridges and how I constructed them.


The first bridge is a double track bridge, 40" long. I made a single track version as well.


Coffee stir sticks were used for the smaller bracing. These were used for the lighter cross bracing. 

IMG_0007

IMG_0009

unpainted engineers view

IMG_0005


The second bridge is a compressed model of the CP Stoney Creek Bridge. This was a complex bridge, requiring a lot of different part lenghts and angle cuts. I numbered the pieces to keep track of things.


stoney creak bridge 004

stoney creak bridge 010

stoney creak bridge 016

stoney creak bridge 022

stoney creak bridge 024


There was lots of cross bracing on this bridge, so the strength was very good.

stoney creak bridge 052


A third bridge (obove the stoney creek bridge) was a single track bridge, identical to the double track bridge

stoney creak bridge 064


This was a fun project. it looks more complicated that it really was. I just read some books on railway bridges, chose the designs I liked, drew a template to O-scale size and cut the pieces, one at a time using s fine blade saw, and a mitre box for safety.


I usded wood glue, which is very strong. A few clamps helped hold things together.


Hope this helps: Joe K

Attachments

Images (11)
  • IMG_0005
  • IMG_0007
  • IMG_0009
  • unpainted engineers view
  • stoney creak bridge 004
  • stoney creak bridge 010
  • stoney creak bridge 016
  • stoney creak bridge 022
  • stoney creak bridge 024
  • stoney creak bridge 052
  • stoney creak bridge 064

Joe K,

You are tough act to follow.  Very nice bridges.


Most of my homemade bridges are in hidden areas.  Therefore, strenght is my greatest concern.  I've made 8 or 9 of various materials.  Most are 48 to 49 inches.  My longest is 51".  I have trippled headed diesels across it with no signs of flexing.


With that said, here are some photos.


raw material

Whats Behind door #1

49 inch bridges

SANY0094

32 inch turntable bridge

40inch bridge with plastic lionel upperworks

black 14 inch deck bridge

SANY0098

Attachments

Images (8)
  • raw material: raw material
  • Whats Behind door #1: hidden area behind door
  • 49 inch bridges: 49" to 51" bridges removable to allow access to full sized freezer
  • SANY0094: notice the wood support block under the grey one.
  • 32 inch turntable bridge: 32" turntable bridge in stagging area under layout
  • 40inch bridge with plastic lionel upperworks: 40" wide with cheap plastic Lionel upper works
  • black 14 inch deck bridge: 18" black deck bridge to right of the timberwork
  • SANY0098: Left side mount of 51" bridge
Originally Posted by dvbull:

Lowes and Home Depot carry small square stock such as 1/4", 5/15", 3/8" and more.  Cheaper and stronger than the stuff at Hobby Lobby.  This stuff also works very well for building threstles. 


Also, while you're there, check out the 8 foot lenghts of aluminum tile trims.  They are light weight, yet strong, and cost less than $10.  I've built several deck bridges for my hidden areas using this material that are around 50" or so long.


I havent checked Lowes yet but I havent found any wood smaller than .75 x .75 inch at HD. Where might I look?

I did look at the aluminum strips but dont know how I would fasten them together. Rivets maybe?

Regarding my trestle in the photos.  It's 136" long and made up of 31 bents spaced 3.5" apart. 


The piles are 3/8" round dowels.  The top plate is 3/8" X 3.5" long square dowel, the bottom plate is 1/2" X 4.25" square dowels.  The stringers are all 36" lenghts of 1/4" square dowels.  All of the above was purchased at Home Depot.


The side braces were cut from 1/4" x 3/32' x 24" lenghts of bass wood purchased at Michaels. I if I ever build another I would find something stronger than basswood.


The key to sucess here was started by buying a book.  "Model Railroad Bridges & Trestles" by Kalmback Books.  Tons of information and how to do projects..... including how to build the jig for mass producing the trestle bents.  It really wasn't that difficult to do and made a better than anticipated entrance for my new hidden yard.


If you aren't going to load it with a pair of articulateds, I'd recommend using two of the Atlas bridges kit-bashed together.  Replace the steel strips with longer ones a bit larger and open up the openings in the girders to accomdate the larger size.  Another 1/8" should not be a problem.


This proceedure would get you the Warren truss that you want, BTW:  despite the erroneous label, the Atlas bridge is a Warren, not a Pratt.

Post
×
×
×
×
Link copied to your clipboard.
×
×