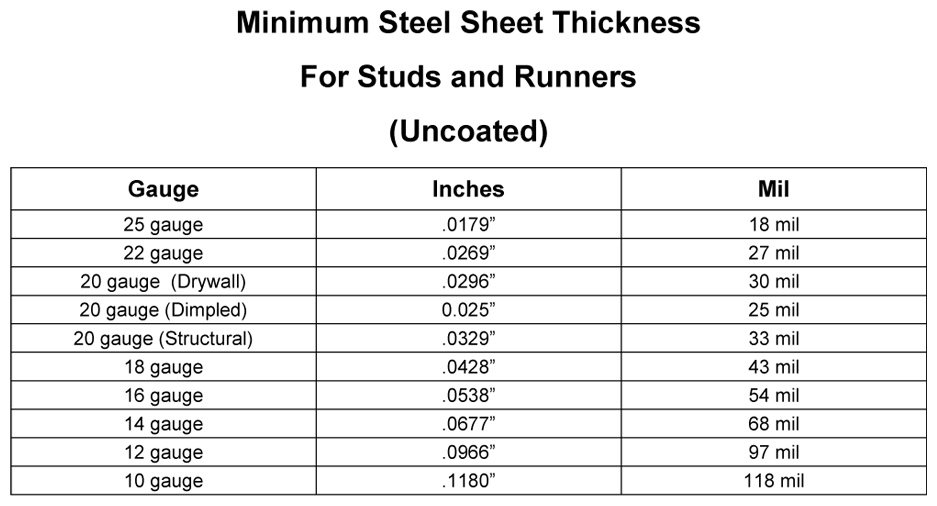
(1.) Do you know the gauge/thickness of your studs?? Metal studs are different thicknesses. Some are very thin metal, can be easily drilled with out a drill tip screw.
IMO you want at least the 20 gauge (Structural) stud. Blocking would be a plus. IMO

(2.) Drywall attachment to metal studs or wood also involves adhesives for additional holding power.
(3.) Are the studs 16" on center, (4 to 5 screws per 6 ft. shelf ) or 24" on center( 3 to 4 screws per 6 ft. shelf). Commercial installation you will often see carpenters installing blocking for shelving or cabinets to be installed.
(4.) Standard drywall screws are #6 or #8 Glenn Snyder shelving recommends # 10 X 1 1/2". E-mail or call Glenn Snyder with your question.
From the GSDS website Installation instructions.
Glenn Snyder Display Systems are easy to install. You will need the following tools: An electric drill, 1/8" and 3/16" drill bits, a level, #10 x 1-1/2" round head, pan head or truss head sheet metal screws for each stud and spacing blocks. Spacing blocks should be as high as the distance between the shelves, generally between 5-1/2" or 6" for O gauge. Studs are usually located 16" or 24" apart on center. Electrical outlets are generally attached to the side of a stud, which is the easiest way to locate one, or may be found with a magnetic stud finder.
Installation Instructions: Using the level, draw a line where you would like the bottom shelf to be located. Locate the studs along this line. Mark the stud spacing and transfer the marks to the back of the shelf. Using the 3/16"drill bit, drill clearance holes in the shelf from the back, using the groove to locate the tip of the drill bit. Using the1/8" drill bit, drill pilot holes in the studs and fasten your shelf with the #10 x 1-1/2" long sheet metal screws. (We use them instead of wood screws as they are threaded to the top of the screw giving them more fastening power.) Once the bottom shelf is fastened, place the spacing blocks on the top of the rails, equal distance apart. Place the next shelf on top of the blocks and mark where each fastener hole is to be drilled. Remove the shelf, drill the holes in the shelf and in the studs and attach the second shelf. Continue installing the shelving by using the spacing blocks until installation is complete.
Use of Connecting Pins: On walls where longer shelves are needed or uneven areas, use the connecting pins that are supplied. Tap ends of pins open with a center punch or similar tool. Slide one end onto a rail and gently tap it with a hammer until the pin is all the way on the rail. Take the second shelf and locate the open end of the pin on the Corresponding rail. Tap the pin halfway back until the two shelves meet, then fasten the shelf to the wall. If your walls are uneven, place screws through washers where needed between the shelf and the wall until the shelving remains straight when the screws are tightened.
Contact Glenn Snyder about the metal studs.
Glenn Snyder Display Systems
260 Oak Street
Buffalo, NY 14203
1 877 852 4676
Fax 1 716 852 4677


