Happy Model Railroading,
Mark Boyce
Butler, Pennsylvania
|


|
Replies sorted oldest to newest
Hi Mark,
I have attic ceiling layout I put up 6 years ago. It was made by a company called inter rail and it arrived in kit form. I purchased it through a hobby shop at the time. The size of the layout is 6' at the narrowest and 10' at the widest by 22' long. I have gargraves O on the inside loop and G scale aristo craft track on the outer loop.
George, It looks really nice. As I see it there are two ways to mount it; hang it from the ceiling like yours or from the wall on high shelves. For my thinking, I would rather buy a kit to try to hang from the ceiling, where I could do the shelves on the wall without a kit and save some money. However, doing it by hand may look a little tacky. My woodworking skills aren't the neatest. On a regular layout I can cover up messy benchwork with scenery. Thank you very much for the idea.
Mark
I hadn't seen that one. It looks pretty nice. Thank you very much!
Mark
Hi Mark,
These ceiling systems are beautiful,but if your looking to spend very little money. I built mine with MDF medium density fiber board and 5 inch L brackets. Then I just painted it black. If I remember I think I spent 70.00 dollars for everything.
Alex
Hi Mark:
I am building a layout in our kitchen, 15" below the ceiling, and incorporating the area above the cabinets. I've posted pictures and a brief description in the Photos section.
Alex, Yes I definatly have a tight budget. Two girls in college and a fixed income for the last 4 years has put the crimps on model railroad spending.![]() Your photos look very good, and I like the price. Are the L-brackets the metal kind you can buy in the hardware store, or did you make them out of wood? I haven't been able to pick them out in the photos. Actually that is a good thing. Thank you for the idea.
Your photos look very good, and I like the price. Are the L-brackets the metal kind you can buy in the hardware store, or did you make them out of wood? I haven't been able to pick them out in the photos. Actually that is a good thing. Thank you for the idea.
Mark
Rick, your photos look great. The wooden brackets look very nice. I am surprised they are spaced do far apart. What material did you use for the shelves themselves?
Thank you,
Mark
If you want a very cost-efficient design here's one I built. I used fishing line between the safety fence posts for better visibility.
Stu

Then here's a different approach from the G gauge forum...
Stu,
That looks like a good arrangement to me for guards. The brackets are what I was envisioning. I will have to use brown on my paneled wall.
Thanks,
Mark
Alex, Yes I definatly have a tight budget. Two girls in college and a fixed income for the last 4 years has put the crimps on model railroad spending.![]() Your photos look very good, and I like the price. Are the L-brackets the metal kind you can buy in the hardware store, or did you make them out of wood? I haven't been able to pick them out in the photos. Actually that is a good thing. Thank you for the idea.
Your photos look very good, and I like the price. Are the L-brackets the metal kind you can buy in the hardware store, or did you make them out of wood? I haven't been able to pick them out in the photos. Actually that is a good thing. Thank you for the idea.
Mark
Hi Mark the brackets all 5 inch metal from Home depot,If you want more info or photo's I will be glad to post them. Just let me know.
Alex
Alex,
Thank you. Yes, I think something like yours will work nicely. I will have to think what color to paint it. Two walls are dark paneling, one wall is tan brick, and the fourth is the heating duct bulkhead painted white to match the ceiling. I would like some more photos if you have them. It will be in a 12 x 11 section of family room right off the room that will eventually be my layout room when my one daughter finally moves out. Right now she is using the layout room for her art studio.
Happy Model Railroading,
Mark Boyce,
Butler, Pennsylvania
If you stain it the color will blend with most any colored walls. The metal brackets can be sprayed to blend into the wall color they're attached to.
Hi Mark here's some close up photos. I used 1/2 MDF for the bottom base, for the backing I used 1/4 inch MDF with 4 inch brackets I thought they where 5 inch at first.
I also glued everything with carpenters glue it makes it very strong. Those are G gauge trains I have so they are much heaver than O gauge and it doesn't even budge
Also each bracket is lined up with a stud in the wall and there's 3 inch screws going into the stud. Very solid, it is a must to use carpenters glue.If you need any other info just let me know.
Alex
I was thinking of painting the MDF. I hadn't thought of staining it. That's a good idea. Thanks Stu.
Thank you for the extra photos, Alex. Now I see how you did it to hide the brackets. Very neat.
I will have to give both some consideration. I hope to start the project Christmas week, and will post photos when done.
Mark
If you're able to reverse the metal brackets and install them above the shelf instead of below it, you will likely not see them at all. I screw (or bolt) from above down through the bracket into a 3/4" shelf. Then run shim strips along the length of the shelf between the brackets to elevate the track enough to clear each bracket. No bracket shows under the shelf and, if you bolt, only carriage bolt heads will show.
Stu
I built a ceiling layout in my basement. I used .75" width pine boards 8" wide & 10' long. I screwed them to metal shelf brackets just like the fellas in the previous post. I used no MDF boards, and there was very very little noise. The shelving was very strong, and I put some building flats against the wall behind the train for scenery. I purchased 3" trim head screws, (very tiny square drive head), and screwed them every 12" then strung florist wire around the top of each one for a guard rail. The screws were black as well as the wire & you couldn't see them at all. You could glue a piece of trim to the edge of your shelf to dress it up a little if you like- but my kids loved the "high train" just the same. I even put a wireless camera on the train pointing down into the room, and hooked it up to a TV upstairs. During parties, people upstairs would comment on the downstairs activities, everyone had a great time. I purchesd clear christmas light & stapled them to the subfloor above the train between the floor joists. This casted a super soft illumination down on the track, looked great at night.
I did mine with 3/4" MDF, 6" for the single track, 12" for the passing siding, and painted black to match the ceiling and crown moulding. Standard metal shelf brackets that match the room decor in the bar & gameroom, MDF brackets were made for the section that is suspended from the ceiling, and Gargraves track with Ross #6 switches for the siding. The only thing I didn't do, which I am going to add in this new year, is some black foam roadbed. It's pretty loud running around above your head.


Mark,
I have two ceiling tracks in two separate rooms (yea, being a bachelor has its perks!). My first was built with the help of an employee at a local train shop. It is essentially cut plywood about 4" wide suspended from the ceiling about 8"-9" by threaded rods and angle irons. The second room's ceiling track is from a kit from a vendor. Both are really nice. The one draw back I have is that what you can do with scenery is limited as an O scale building looks cramped up there. I do have track signal lights, portals, a bridge, Miller Engineering signs, and street lights on either side of the bridge. My dream was to have double tracks in the larger room but the budget could not swing it. I must say, the ceiling tracks draw alot of interest and are unique. One of mine goes in and out of a closet. I say go for it, life is short. The tracks can be removed if you choose to later. It is a nice touch to a home and to have your favorite diesel, electric or steam engine (or trolley) chugging around. BTW, both are powered by MTH's DCS. All my wires and DCS brains are hidden in a closet and all I do is flip on the remote at my desk to see a bit of magic.
Thank you RogerPete, Laidoffsick and Jerry,
I do think I want some kind of guard rail or wire. The low visibility idea sounds good.
I see the transition on the photos between the shelf bracket and ceiling hanger, and the last photo where it is painted black makes it blend in well.
All good ideas. Thank you,
Mark
I was just curious what width would I build my shelf if I just wanted one loop around my ceiling walls? I'm thinking I would just use traditional lionel track (not Fastrack.)
6" is a good width for a single track, and also a standard if you're looking for commercial made shelf brackets ![]()
6" is a good width for a single track, and also a standard if you're looking for commercial made shelf brackets ![]()
I assume you mean an actual 6 inches and not a 1 x 6 which, of course, be narrower.
yes
I have done it for s gauge, I used 6" commercial shelves and 6" board, The only hard part is the curves. I used plywood and cut the turns , It worked nice but its load when you run them, I had two loops and loved it..
We built a ceiling layout with relatively inexpensive materials at our old house out in Colorado. Here we have a more traditional benchwork layout in the garage, but I'm finding I REALLY miss that shelf layout. The kids and I used to read books with the train running or just sit there and watch it.
Anyway... Here are a few pics of ours and some notes, if useful:
-Room is approx 10x12
-Brackets (triangular support pieces) and rear support pieces were made using pine 1x4s. I built those in 3 to 8 ft sections with brackets spaced every 18" or so, then attached the sections to the wall one at a time (at the studs), then added the shelf on top. I countersunk all the mounting screws and filled/painted over the holes for aesthetics.
-The shelf itself is made of MDF. Multiple sections were cut from a large 4x8 sheet. Used a router to do the corner pieces and all ends are biscuit jointed together.
-The bridge (necessary to clear the alcove for the door) is an O-72 curved truss bridge from Bridge Boss, attached to a ceiling joist at the center (via the threaded rod contraption shown below) for additional support. Only downside to using the bridge is certain locos with large overhang (such as a RK Allegheny) hit the sides and can't clear the bridge.
-We did corners that were approx O-42. That left a decent sized area for adding scenery in the extra space, which we built up on layers of foam insulation to make it visible.
-We used cork roadbed to keep the noise down, and mounted the train controls in the closet to keep them out of the way.
I like the white shelves in the bright room. My room is in the basement and has dark paneling with little light. I got started last winter and pulled off for the summer. One thing after another came up, and I haven't been able to return to the project. The shelves I did put up, have made a good place for static display of my equipment. Not what I intended. I still have the rest of the material to finish the project, but spring will be here before I know it.
check out this site I found I awhile back I was going to do a layout in my theater room .
I appreciate all the photos. What a great way to support a ceiling layout inexpensively!
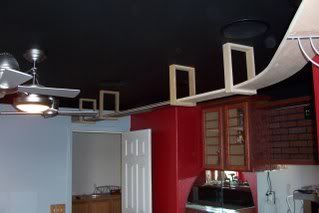
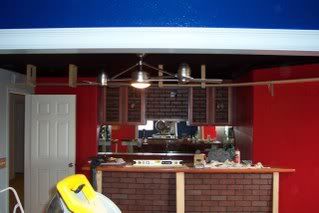
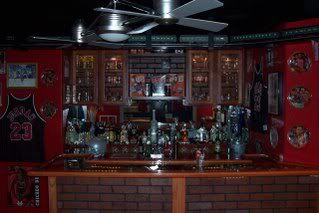
Since I started this thread, it is about time I show some photos of what I have done so far. The photos aren't the greatest, since the only digital camera I have is on my phone, but here they are. The first three show what has been built. The fourth shows the corner where the brick wall is where I am changing methods. I actually got some anchors in the ceiling today, and cut some all thread to hang these shelves by. I'm no carpenter, but it is not bad. The area is about 12' by 11'.
Looks good Mark...
The way I see it Nobody can say they "Don't Have Room For A O Gauge Layout"
Mark quick question your room is a 12' x 11' how many cars you pulling??
I will be starting my ceiling layout soon it's in a 12' x 10'
what did you do for the door way?
Hi Mark, I run two lines of standard ga. at about 14 inches from my basement ceiling. I have no picture to offer. The track is based on melamine ? , a plastic coated particle board. It is white. I have very small Christmas lights behind the 3/4 inch foam board road bed that the track rides on, and against the wall. It lights the basement room nicely. Very nice pictures, GOOD LUCK.
I spent the past 2 days pulling all my track loose to install the WS foam track bed under my overhead layout. I regretted not having some type of roadbed (sound deadener) after running trains in there with the noise level so high, having wood flooring in the bar and game rooms. It's soooo much better now. I also redid a couple of the curves that were a little tight for body mounted Kadees on 21" passenger cars. After learning quite about about the DCS system since being on this forum, I also split my loop into 2 blocks to stop the double signals I got with my MTH engines. After putting up the foam track bed, I now know that I have 73' of mainline and a 24' siding.
Here's mine...in my 3-car garage. It was the only place I could call my own.
Built in '92, dismantled in '08.Twin shelf, 5 track, 14x32 in 18'H. kitchen/b'fast room. Designed to accommodate spouse's requirement of all wood, stained. Initially powered by three pw ZWs, later five 180 PowerHouses and added TMCC.
Very nice looking woodwork.
Looks good Mark...
The way I see it Nobody can say they "Don't Have Room For A O Gauge Layout"
Thank you Jerry and Mike. It works. ;-)
Access to this requires an OGR Forum Supporting Membership
