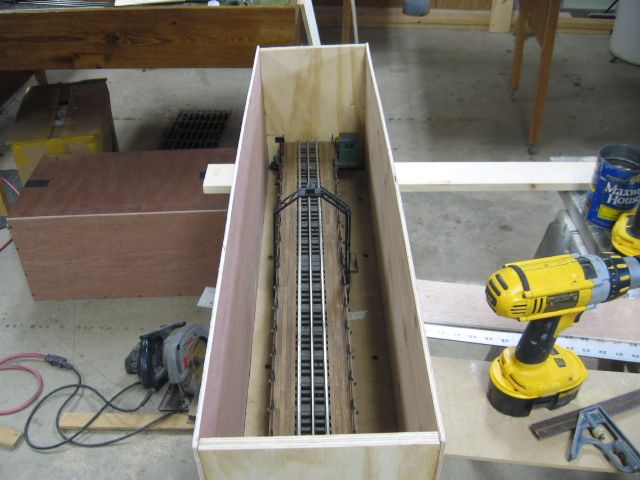
Hello Fellow Railroaders, 

I'm sorry to bother all of you, but I was hoping you could answer a couple of questions for me please? I decided to go with the module concept. My question is I looked up everything I could on How to build a module for model railroading on You-Tube?

I even looked up in my books and magazines and all I could find was mainly for HO and N-Scale. Is it OK to have the entire Layout done in the module concept? What is the standard size for a module in O Gauge? 

What would you recommend what kind of tracks to use in the following areas: Starting with the Train Shed that is under The Terminal Station, The Yard, Mainline & Branch lines, Bridges and the Subway & Elevated lines?

Thank you so much for your help I'm hoping to hear several comments on this subject. 

Sincerely 

Allan Martinez 

Original Post

Replies sorted oldest to newest

Not a bother. Of course it is OK to build an entire layout in a modular fashion. I did it on my attic layout with no regrets. There really isn't a "standard" size. It really depends upon the layout. In the case of my club modular layout, the modules are 32x48. That was originally done in an attempt to get three tops cut out of a 4x8 sheet of plywood.

Track is a slippery slope. I bought all the FasTrack I needed to build my layout. Then I sold it all essentially for $0.50/1.00 and turned around and bought Stainless Steel Gargraves with Ross Switches. Wish I had gone that way first. At the end of the day, I spent $500-750 more than if I had just gone with Gargraves/Ross first.

PICT4661PICT4704

Attachments

Images (2)
  • PICT4704
  • PICT4661
Last edited by Gilly@N&W

The East Penn traction site contains published standards for 0 gauge module construction. The standard size is 48 inches in length. The standard leg length is 36 inches. These "standards" were created for the purpose of enabling modules to be semi-portable, and transported to train shows for connection with other peoples modules.

Last edited by Tommy

If you want to take your layout on the road or meet with others with like modules to build giant layouts for fun or display, then a module is what you need following a set of specifications that the others also follow.

If you want the ease of moving or perhaps reconfiguring a layout, then think sectional, like Gilly's. Forum member Scrapiron Scher is building his new layout in sections after tearing down a framed layout.

The NMRA has standards posted. There are the FreMo standards, which are global. There are few clubs that publish their standards, like the National Capital Trackers and North Penn O Gaugers. There is the Lionel LCCA module standards which are specific for FasTrack.

There is potential confusion about the term modular as one reads various posts.. One use means building bench work in smaller sections so that the layout can be reconfigured or moved more easily. Another meaning refers to modular club standards that allow modules built by various members of a club to connect together to form larger layouts at shows or club gatherings. Such standards include size, height, wiring, track positioning and others so that modules built by different members can connect together. There is not one standard, different clubs have different standards. There is little need to follow rigorous club module standards if one never plans to hook up with others.


So for those of us building home layouts that we want to move or reconfigure, the first definition applies and is a very good way to construct layouts.

Bill

Last edited by ogaugenut

For modular clubs who are always assembling and disassembling modules (in changing configurations), there are a lot of challenges that are not a priority for a home layout built as modular for future relocation.  Standardized track spacing, where track ends relative to the end of a module, designing scenery to withstand transport, weight and size, etc. can be a lower priority as the layout is semi-permanent.  My club, the NCT, has published standards based on years of experience setting up modular layouts and you can glean a lot of information on what has worked for us on module frame construction and wiring even if the track standards are not important to you.

A significant challenge for portable modules is wiring and connectors that promote plug and play and reliable operation.  Wiring can be simplified for semi-permanent modules by eliminating connectors between modules but I recommend reviewing the wiring standards published by modular clubs and follow the same principles - discrete power and ground wires for each main line, color coded wiring, suitable gauge (12 or 14) wires, and enough slack between modules to permit cutting/splicing when modules are moved.  Using Euro terminal blocks instead of plug connectors may be a viable inter-module wire connection for semi-permanent layouts.  On color coding wiring, the big box stores don't carry much beyond black, white, red, and green.  I buy white wire and spray paint it for a custom color.

As for module size, I built dozens of modules over the years in sizes 2x8, 3x7, 4x6, 4x4, and lots of 32x48" and 24x48" modules.  These days, the largest  module I care to lift (with difficulty) is a 4x4 turntable.  My largest module sizes, or over-built (i.e. heavy), have proven too big and hard to handle for transport and setup in club shows, and now sit in a semi-permanent loft layout or have been converted to work tables.  To keep weight down, I use 1x3 frames and 1/4" ply for the deck.  The 1/4" ply flexes somewhat and I use 1x2 "joists" to stiffen it up.  Thicker ply adds weight but reduces the number of stiffening members required.  Half inch ply probably needs no stiffening on a 24" deep module.  I have walked on my modules built with 1/2" ply.  Remember that any track, scenery, and sound deadening attached to the module adds weight.

Also consider moving completed modules to a new space - are they too big to get up and down attic/basement steps with the attached scenery?

Have fun designing your layout. 

John

My 28'x14' around the wall layout consists of modules that are of similar design but different dimensions: 2'x4', 2'x8', and 3'x4'.  There are  a couple of triangular 1' and 2' triangles that I use to fill in some inside corners to allow the use of large diameter curves.

Modules are connected together using 1/4" thumbscrews and wingnuts.  Perhaps a little overkill since I haven't disassembled any modules in 4 years.  Well, maybe not.

I wired for TMCC.  Each module has eight 12 gauge stranded wires of differnt colors running the entire length and terminate on screw terminal strips..  Four are power (one for each handle on my ZW), and four are for ground.  Power drops make their connection using suitcase connectors. I use jumper wires between the terminal strips to interconnect the modules.  Sometime in the future The jumpers will(?) be replaced with connector plugs.

Except for the first module placed, each module has only two legs as it hangs off the previously placed module.  Each leg has a screw foot for leveling.

It took a few weeks to find all the special parts I used in the necessary quantities and colors, but I feel it was worth it.

Jan

To the 1st 9 of you who responded my help I really appreciate it what all of you have to me. My thanks also goes to the people who included photos. Now what I've got to do next is to look at the photos and videos as well as read the c omments, so when I come back to respond to you all I will know what to do. 

Before I end this reply for now let me tell you a little about myself. I'm 60yrs of age I'm a member of several railroad clubs L.O.T.S. , L.C.C.A. , T.T.O.M. , T.C.A. , M.T.H. and L.R.C.O.ST.L.I've gotten several different responses from the club members and their all OK, but I needed more information so this is why I went to the O.G.R. forum. 

This is the worst part about myself I have too say to anybody.I'm permanent disabled. I can stand as well can walk, but I need the use of the walker and a pair of canes. I  can only stand for a short period of time. If I'm on a roller under the table I would have a hard time getting up from the floor. Worst of all I have no experience in any field ( Carpentry, Planning and Especially Electronics What so ever. 

I hope to start this project soon someday I'm willing to learn because I don't want someone to do the entire project so if anything ever happened to the layout in trouble shooting I would be able to understand what is happening. I'm sorry for this long letter l'll get back to you all with some questions. 

Thank you for taking the time to read my questions and my comments. 

Sincerely 

Allan Martinez 

Hello Fellow Railroad Club Members, 

This is Allan again I like to say Thank you once again for your help I really appreciate it very much. Gilly you said in your letter that you started to use Fastrak in the beginning, but you realized that you made a mistake and so you took up your tracks and started over this time using Gargraves Track / Ross Switches. What did you like about Gargraves & Ross Switches? Which is better to use Nickel Silver or Steel Tracks? Say Tommy the standard size of 48" in length and the legs are 36" high Is that for shows only? or Can anyone use these measurements for they're own layout?

Hi Mike CT you said that on your  layout I use C-Clamps to hold the table together on the legs. Now I don't know If this will work, but If I added blocks of wood under the table In the corners and then screwed them In together (By the way do Hardware Stores big or small ones carry long enough screws to connect the two modules together? That's 2 per corner). Hey Alan how about that we have the same name. Anyway good luck on your layout Please keep me posted. If anyone wants to keep In touch with me my E-mail Is : alfonzothebeef1956@gmail.com. Bob (Ogaugenut) Thank you for your comments as well.

Sirt, Your photos and videos are very good Thank you. The only downside I have with your videos Is that I wish I could do what you did. Besides I don't have any of these tools I wish I could learn how to do small projects like that. Tracker John Thank you for your comments there very helpful. You mentioned something about building a module specifically for the turntable only. Should I build one small enough to fit the turntable? Jan I wish I would know more about wiring. Do you recommend using 100ft of speaker wire? If so should that be made as a bussline?

Well my friends Thank you for help. How can I get In touch with you Folks If I need to ask you anything else In the future?

THANK YOU FOR TAKING THE TIME TO READ MY QUESTIONS AND MY COMMENTS, I ALSO HOPE TO HEAR FROM ANYONE IN THE  FORUM.

Sincerely 

Allan Martinez 

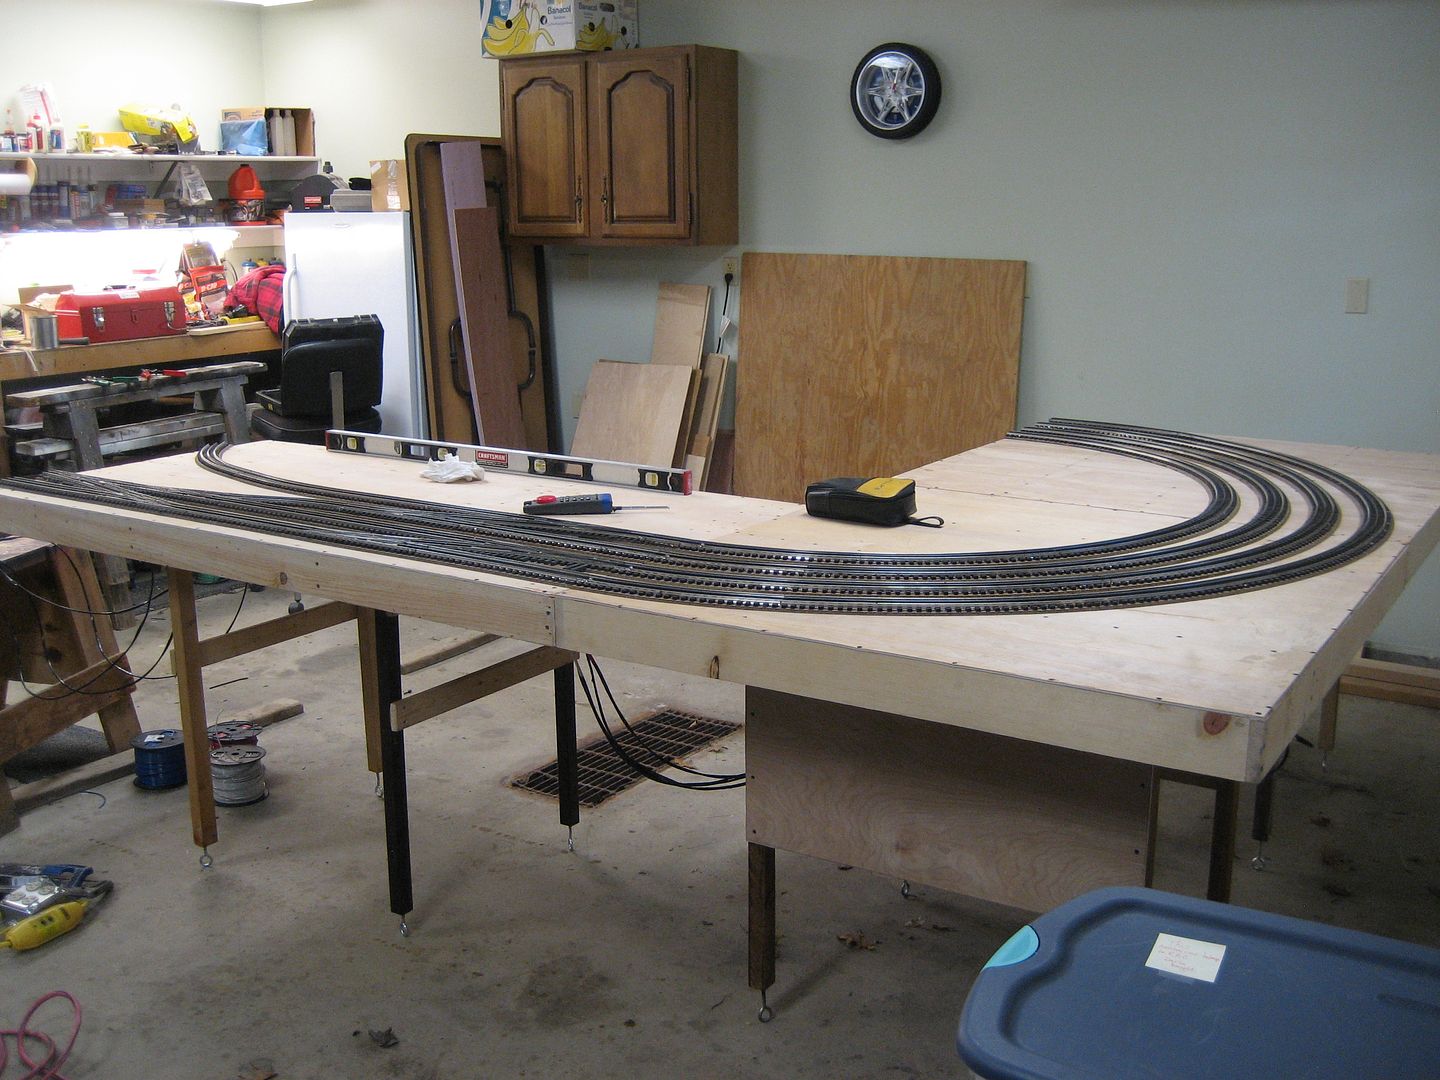
There are clamp boards for the legs.  (2) legs are a unit, it takes two sets of legs for a module.

Clamp boards. The four frame members pictured (2) are moveable and are held to the fixed board with 5/16" or 3/8" carriage bolts and a spring assembly.  There are two wing nuts that clamp the boards to the leg assembly.

Note the leg assemblies stacked on top of these stored modules.

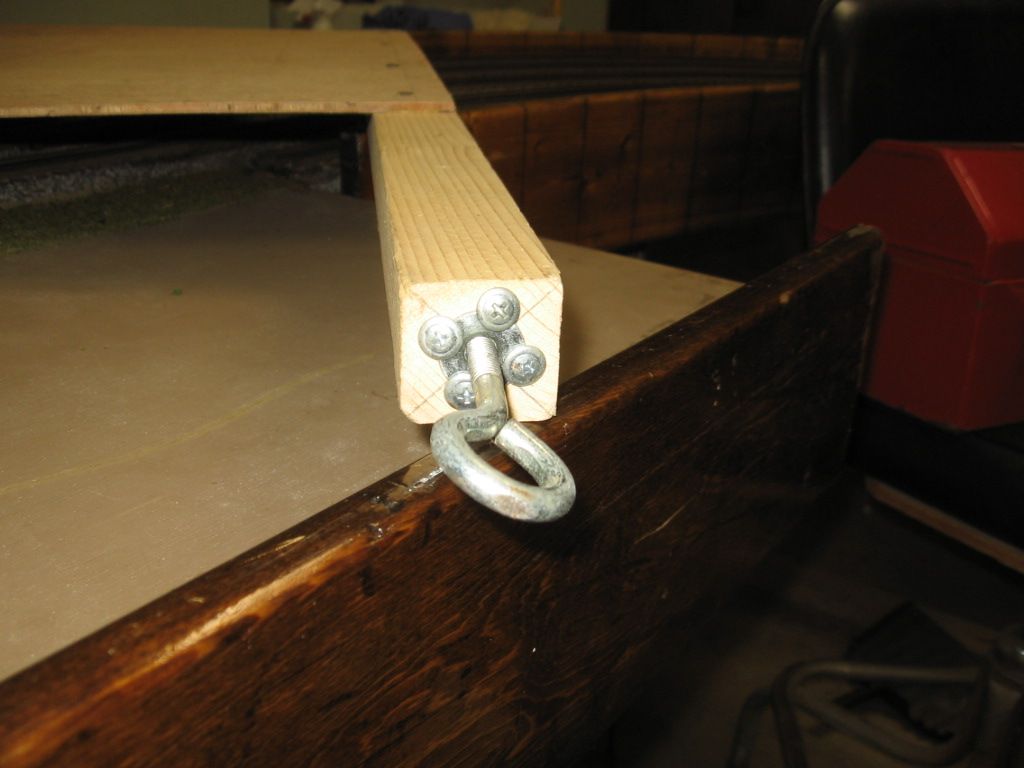
Each leg assembly uses a 5/16" X 5" eye bolt and star assembly to level the module.

Note the legs installed and the leveling bolts bottom of each leg.   4" C-clamps also pictured,  are being used to hold the module to the saw horses for a work session.  tracks are aligned and the C-clamps hold the ends of the modules together once leveled.  We use a good (4 ft.) level when setting-up the layout.  

Eyebolt leveling  assembly.


The turntable module and Rounhouse are heavy and have sets of cross braces for the legs, made from 1/2 emt conduit.  Note the cross braces right and behind the power supply.

Turntable, Round house and "Y" module in for some repair.

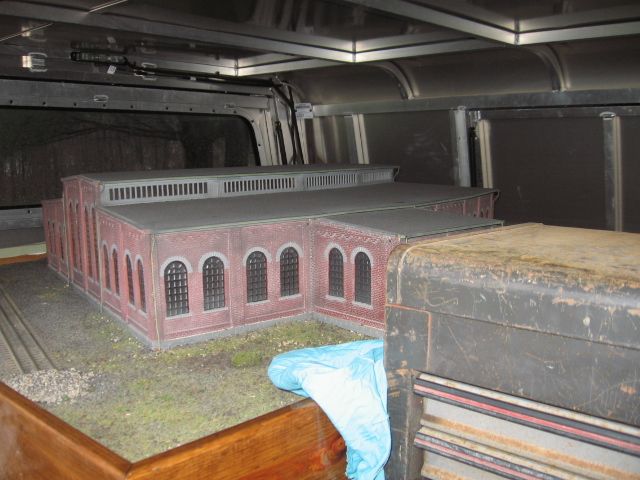
Three modules pictured.  (1.) House, (2.) Turntable, (3.) "Y" module. 

Connected to one of the (4) corner modules.

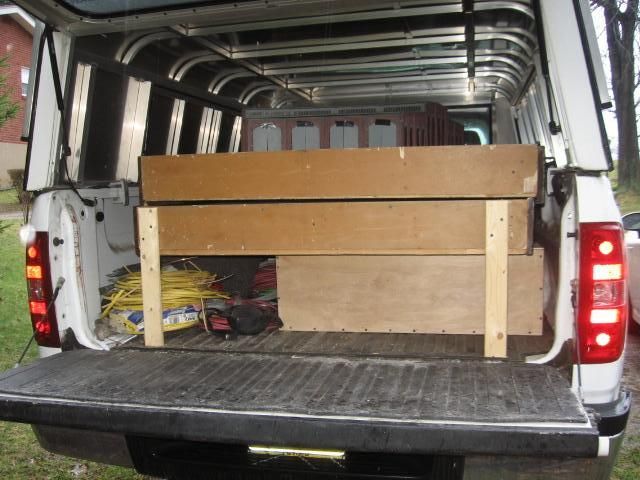
House and turntable stacked in my truck for transportation to York a couple of years ago.  Turntable bridge is in the box on the floor of the truck.

Turntable bridge boxed.


Last edited by Mike CT

I tried to apply the module standard of the Independent Hi-Railers by using Gargraves track material and I'm happy with that, because the modules can be set up in the basement (or outdoor in the backyard/garden) and easily transported to local exposition events as well. The modular concept of the Independent Hi-Railers with a simple geometry is easy to adopt and to adjust to the personal needs, more complex or more simplified track layout, longer or shorter modules, higher or lower legs, etc. Here are more MPEG's as example.

Allan,

Here is where I got my wire https://bulkwire.com/  Wire comes in 100', 500', and 1000' reels.  I needed 100' reels of each colored wire and 500' for the ground.  You'll be surprised the amount you will need.

Here is a picture of the underside of a module at one end.

20161017_140850

Those are 16 pair terminal strips.  I am using only 8 pairs for track power but have room to add feeds for accessories and other electronics.  I used fork crimp terminals on every wire. 

The green area is the underside of the painted Homasote that tops my tables.  It is supported across the table width every foot of length.  I've done this 60 years without any problems with it sagging.  I used to walk on it, but that was 150 pounds ago.  Others will underlay it with luaan to 3/4" plywood.

I would not use speaker wire.  It all looks identical to me.  Colored wire allows me to identify a circuit anywhere on the layout.

Table height and width will be of concern for you so you will need to think hard about this.

Jan

Attachments

Images (1)
  • 20161017_140850

Alan,

the points stated above are excellent and what I have may be saying the same thing.. but I hope it helps.. My whole 24' x 52' O Scale model RR is made with modules. The reason isn't that I take it or pieces around to shows.. it is because I change things from time to time.. So when I want a change, I make the new module down here in the shop and when done, I take out the old one and insert the new one.. Thus, taking apart the old when to eventually use the old module for new purposes.. etc etc..  I like this because it is easy to make changes and I make the dust etc all down here and not in the layout room.. 

Here are those suggestions..

Having built a few layouts.. to the one I now have in my own barn.. I would consider these valuable lessons.

-While measuring the room, I use masking tape where the table edges are going to be. I tape right to the floor.. This way, I know how it will be and all.  Once I have the table made, I pull the tape.. You can also lay the track on the floor to make sure everything fits.. works well... helps with visioning the layout.
 

-No duck unders..  Having those suck. Especially for those with back, leg, hip issues.. if you feel you need a duck under.. then built the walkway area with a lift out bridge or something similar. because ducking under sucks! 

-reach.. only make the benchwork as far as you can reach.. if it's outta reach, that is where your issues will be. If you can get to the tables from both sides, then your reach to center from each side is your width.

-height.. I would have made mine Chest height.. It isn't.. and I contemplate raising the layout every day.

-electrical... do that before scenery.. at least the bus wires.. get them run under the layout. 

-height of scenery works better to the eye then depth of scenery.. 

-make all benchwork modular. So if you don't like something or want a change, taking out the old and inserting a new piece is easier...  Plus you can work on the new piece while the old one is still in place and you can still run trains. 

-For O-Scale, use 3/4" plywood sub road bed.. For the areas where sometimes where risers get a little wide, the plywood being a little thicker, won't sag. because 1/2" will. Don't use flake board.. that stuff sucks for model RR. If you get flake board and use water against it for scenery, the flake board seems to expand and never contract. 

-Wide isles.. A must, you can do it with the room you have.. 30x50.. Trust me, it is worth the effort to have these.. I have two spots where the isles gets close, but they ope right up to wide ares.. I also didn't make those areas points of interests.. make your points of interests where the isles are wide. so people can gather easier without hitting benchwork.. 

-If your thinking of having a turn table.. One where the tracks are coming out all around it, that becomes an area of interest and people gather around it.. I did mine where the mainline went behind the house and people can see into the roundhouse.. and also get right up to the table to see the loco's turn.. This turntable idea came to me this past spring and I changed the whole yard and turn table area into another part of the layout in another area of the room to accommodate this. It works out great now.. 

-Also, with your yard, well, before i forget, have a staging yard.. one hidden under mountains or there of.. then your yard itself won't be cramped with cars as mine was till I did this.. (I am also ridding cars of later dates because my model RR is set around 1977. So this purge is setting up nicely as I now have room for the cars that fit the timeline.) Also, keep switches within easy arm length.. repair is easer etc..  I did redesign the yard as stated above, and am going to again because of the railcar purge etc.. Plus, the yard is smaller and more manageable. well, the whole layout is..

Also, keep this in mind when you design.. 1) model the places as scenes you love as a kid, adult.. just don't put track down for the sake of putting track down.. you will get bored with it. I learned this on the first layout here in the barn.. I thought I had all the room and when the layout was up.. it sucked.. so a friend came over and told me it sucked and gave me this advice.. number 1 again, model scene you love, figure out the top five scenes you love and design them into the layout, then the next five and so one. you find that the layout fills out nicely and you will want to work on it all the time.. Mine is (3) years old now and it is awesome to me! I;m not biased or anything! HA! But I can't wait to work on it when i have the time.. Or add to it or whatever.. I am always designing for the better.. I love running it, showing it, etc.. with these changes too, I have to write into this mag to show my updates as the model RR was published in O-Gauge at about two year ago.. 

Anyhow, designing and building is fun! Good luck!   I hope this points help?

Dan


BXCXDAN,

HI Dan my name is Allan and I want to Thank you for your comments and suggestions about building a module. What Brand of Railroad Tracks would you say is best suited for a module unit? I have several large freight and passenger cars and my layout consists of a double mainline throughout with a occasional double sidings on both straights and curved lines. Do you think I'm doing the right thing by making the 4 main curves on the layout starting with the minimum 72° radius following that 78° then 84° and ending with 90° radius for a smooth turn and minimal overhang? Do I need more than 1 wiring busline? Example: 1) All the Tracks - (So the feeder wires can connect with the main), 2) All the Switch Motors, 3) All the Operating Accessories and 4) All other Accessories  (Street Lights, Interior and Exterior Lighting on Buildings and Homes). I've seen a lot of people using these terminal strips under the table. What I would like to know is Can I take 1 or 2 terminal strips per module and use it as a bus mainline?

I'm surethat I'll have more questions some other time, but now I would like to Thank you for taking the time to read my questions and comments also I hope to hear from you soon. Can we keep in touch by email? My email address is alfonzothebeef1956@gmail.com and my Cellphone number is 1 (314) 537-4733. 

Sincerely 

Allan Martinez 

Add Reply

Post
The Track Planning and Layout Design Forum is sponsored by

AN OGR FORUM CHARTER SPONSOR

OGR Publishing, Inc., 1310 Eastside Centre Ct, Ste 6, Mountain Home, AR 72653
800-980-OGRR (6477)
www.ogaugerr.com

×
×
×
×
Link copied to your clipboard.
×
×