I was curious what everyone uses/recommends for covering benchwork and foam on the edge of layouts. We have 2"x4" frame, 1/2" OSB top and 3/4" in foam on top of that. Any input would be greatly appreciated.
Thanks,
SuperChief
|


|
I was curious what everyone uses/recommends for covering benchwork and foam on the edge of layouts. We have 2"x4" frame, 1/2" OSB top and 3/4" in foam on top of that. Any input would be greatly appreciated.
Thanks,
SuperChief
Replies sorted oldest to newest
1/4" masonite cut in narrow strips. You can paint it black to create a nice clean frame to the layout.
I used 1 x 8 and 1 x 6 pine. Unpainted at the moment, but probably a dark color down the road. I used 1 x pine as I had several pieces left over from work around the house. Different sizes because I have some pullout items under portions of the table that the 1 x 8s didn't allow clearance for.
One issue I had is angle cuts on the 1 x 8s, my miter saw isn't big enough so had to finish cuts with a hand saw and lots of filing. The 1 x 8s give better coverage however, especially with 2" foamcore + 3/4" plywood + 2 x 4 framing. The masonite many use on the forum does look really good and I would recommend that as well.

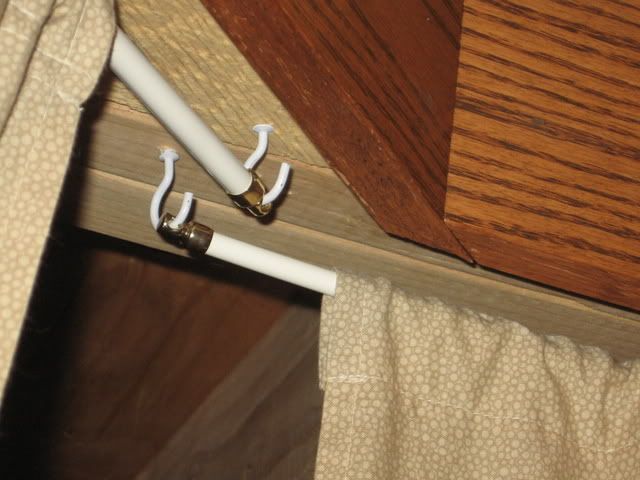
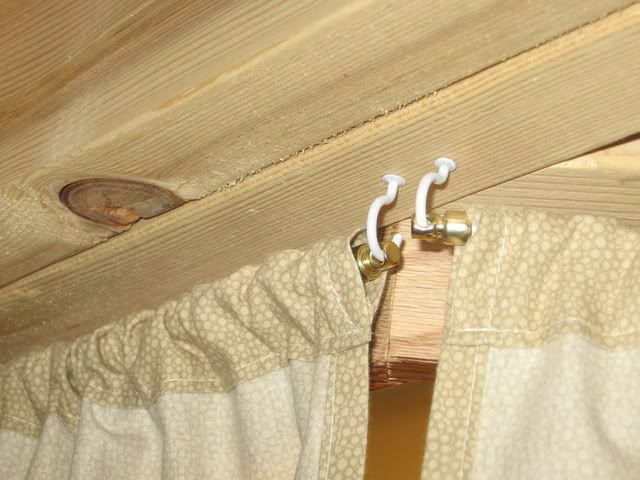
Fascia and skirts. Click on the underlined phrase for a slideshow. Red Oak trim with an OG cut top edge. Boards slightly longer than the layout framing to cover the top of the skirts and the support rods. My sweetheart, (46 years),![]()
![]()
![]() did the skirts for me.
did the skirts for me.
Early construction photos of my attic layout. This is before I put on the tops and laid the track. Currently, I'm wiring switches.
Right now there's construction mess everywhere. Hopefully later this year, I'll get everything cleared. I want to get pictures before buildings get set.
On the unfinished side of the attic, I used white PVC to trim the edge of the plywood and form a curb. I can't afford to have trains bouncing off the floor!
I have a combination of trim and coverings around my layout along the viewing aisles:
I mounted vertical sheets of 3/4" plywood, painted green, to provide a barrier against children reaching or crawling underneath. Each is held in place by two "carriage-bolts" which I can remove easily when I wish to gain access to the storage space behind. These vertical boards are approx. 3" above the layout level itself, to provide a safety edge against trains falling off to the floor.
I used fabric in places where I want quick access anytime. There are shelves and file cabinets immediately behind the drapes . Trim strips and molding complete the tops of these areas.
 The short piece of plastic trim seen here
is slightly curved to allow for the swing-open of the cellar-to-garage door (you can see its doorknob in the lower righthand corner of the photo immediately above.)
FrankM
P.S. I admire how beautifully Tom "Gilly" and Mike CT have finished-off the fronts of their layouts. Both are very, very well done, IMHO.
To the OP: Great topic and clever way to see some pics of our layouts. I need to add a facia board to my layout and I'm planning on using 4-5" wide strips of flexible masonite. I then plan to glue images of retaining wall to the masonite not unlike a backdrop. Will post pics to this thread.
Mike CT posted:
....Boards slightly longer than the layout framing to cover the top of the skirts and the support rods. My sweetheart, (46 years),
did the skirts for me.
What did you use for support rods for the skirts, Mike?
Allan Miller posted:Mike CT posted:
....Boards slightly longer than the layout framing to cover the top of the skirts and the support rods. My sweetheart, (46 years),
did the skirts for me.
What did you use for support rods for the skirts, Mike?
My sweetheart purchased the small curtain rods we used. Cup hooks and the rods. Most likely the stuff came from JoAnn Fabrics, she spends a lot of time there. Stuff would also be available, Walmart.


Expandable curtain rods. There is a range for which each rod can be used. Longer spaces would require longer rods.
??? LED rope lighting ???

Similar to what Mike posted above. Red oak boards (4 1/2" x 3/4") with a 1/4" roundover on top. Top of boards is 3/4" above table top to catch any stray tools, scenery, rolling stock or motive power. I think the finished oak gives the layout a more furniture-ish (made up word of the day) look. Skirting is something my mom did as a Christmas gift.
I also like what Dave, Mike and Gilley have done.
Tom
Mike CT posted:??? LED rope lighting ???
RGB LED
RSJB18 posted:1/4" masonite cut in narrow strips. You can paint it black to create a nice clean frame to the layout.
That's exactly what I do, and this is what it looks like:
Smooth flowing curves, not a square corner or even an angle anywhere in the room.
SUPERCHIEF, regardless of what you decide to use, do not allow your fascia to touch the edge of your OSB or foam. If you still have bench work to build, build it slightly wider then what the surface material will be. Or, if this is finishing work, you can glue dense cardboard to the sides of your 2 x 4 frame work to shim the fascia out away from the surface material a bit. I use the cardboard dividers that are used to separate the wine bottles in a box of wine. (Buy your wine by the case or hit up the state store when they put their trash out. ![]() ) When your trains are running, the edges of the surface material contains allot of condensed vibration. If the fascia is installed tight up against the edges of that material, the fascia will turn the vibrations into vertical sound waves that are a higher pitch then the horizontal sound waves we get emitting upward above the layout and downwards under the layout. I learned the hard way after I noticed a change in noise level and had to pull off my fascia to shim it out. I also saw an increased noise level on my decibel meter app which showed allot more high pitched spikes on the graph. After shimming it out, the spikes decreased. Installing heavy skirting, when your done, will also cut down the noise coming from under the layout.
) When your trains are running, the edges of the surface material contains allot of condensed vibration. If the fascia is installed tight up against the edges of that material, the fascia will turn the vibrations into vertical sound waves that are a higher pitch then the horizontal sound waves we get emitting upward above the layout and downwards under the layout. I learned the hard way after I noticed a change in noise level and had to pull off my fascia to shim it out. I also saw an increased noise level on my decibel meter app which showed allot more high pitched spikes on the graph. After shimming it out, the spikes decreased. Installing heavy skirting, when your done, will also cut down the noise coming from under the layout.
David Minarik posted:Mike CT posted:??? LED rope lighting ???
RGB LED
Red Green Blue (RGB) LED. ?? So you can change the light color with one of the small handheld controllers ??
Mike CT posted:David Minarik posted:Mike CT posted:??? LED rope lighting ???
RGB LED
Red Green Blue (RGB) LED. ?? So you can change the light color with one of the small handheld controllers ??
Yes!
Cool ![]()
Mike CT posted:Cool
and cheap!
The LED has changed the way we think about a lot of lighting. Replace incandescent lighting, an easy 80% savings on energy used. Replace fluorescent lighting, not quite as dramatic, a 50% savings.
You wonder what the next technology will do to, or for, our world.
The Red, Green, Blue combination with the controller allows for just about every color available, white the combination of all three.
Big_Boy_4005 posted:
Did you have to do anything to the Masonite (like soak it in water or steam it) to make it curve w/o splitting or breaking ?
The doors shown open all the way and provide full access to the 'underneath'. Since the frame construction is all 2x4's, there are few legs and the area is relatively wide open for easy wiring and maintenance. The aisle curtains hang from rods, which rods are supported by 3/4" x 3/4" X 1-1/2" blocks with holes to accept the rods.
The corner doors also open.
This used to be a maintenance-only aisle, as it is only 20" wide. But soon it became a viewing aisle as well, and gave me a lot more real estate for scenery.
Alex
Neat idea Alex. Also one great looking layout! I am going to have to go back and read your build thread! Its always good reading and very informative! Thanks for sharing~!![]()
Richie C. posted:Big_Boy_4005 posted:Did you have to do anything to the Masonite (like soak it in water or steam it) to make it curve w/o splitting or breaking ?
Nope, but I never tried to make really sharp curves. There a couple spots on my layout with some tight outside corners where I pushed the limits and it started to get stress cracks. I was able to sand those out. If you need a really sharp corner, you could laminate a couple of 1/8" pieces. That method might get you down to perhaps as small as 6" radius.
I applied mahogany veneer over poplar 1Xs.
Wally
The latest NGSL has an article in it on incorporating a shelf into the edge fascia. It's worth a look.
I fudged a bit. I stretched astroturf carpet tightly over my plywood layout surfaces and stapled the astroturf excess to the under side of the plywood. Provides a soft landing for derailments, etc. So all the plywood edges are covered, the plywood surface has some sound buffer to the frame supports, and the layout has instant grass scenery.
You can see still see under the layout, but you do so at your own risk.
Access to this requires an OGR Forum Supporting Membership
