
I am preparing to tackle my first scratchbuild project for my upcoming layout. Perhaps I should start with something small, like a shed, or an outhouse, but I have made the decision to begin with a train station that will be one of the focus points of the layout. I plan on taking my time and planning on paying attention to every detail, making this structure look as close to the original as possible. Obviously this will not be possible without your help.

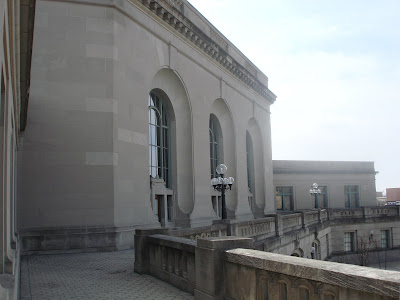
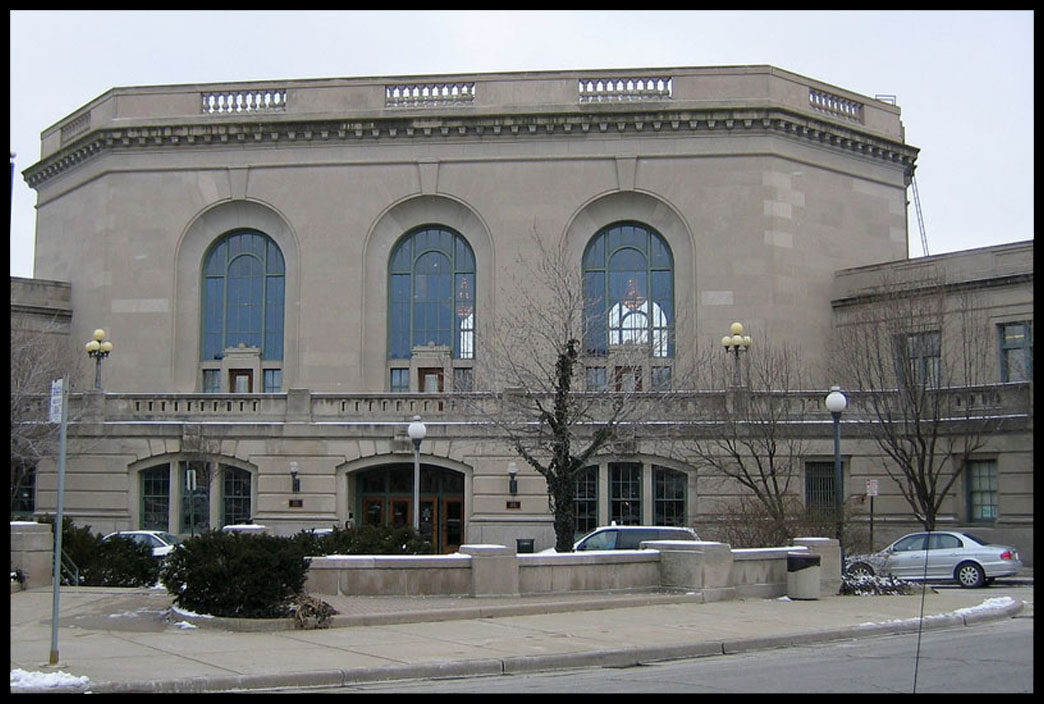
The building is Union Station, Joliet Illinois.


This building was designed by Jarvis Hunt, and built in 1912.

http://en.wikipedia.org/wiki/Joliet_Union_

Here is a picture of how it appears today:


The main theme of my layout will be the EJ&E Railway out of Joliet Illinois, in the 1920s. Today this station is boardered by the old Rock Island Lines to the South, which today primarily runs CSX, Metra. The lines to the east of the station are BNSF. EJ&E very briefly operated on the tracks next to the station, however it is an essential building to my layout.

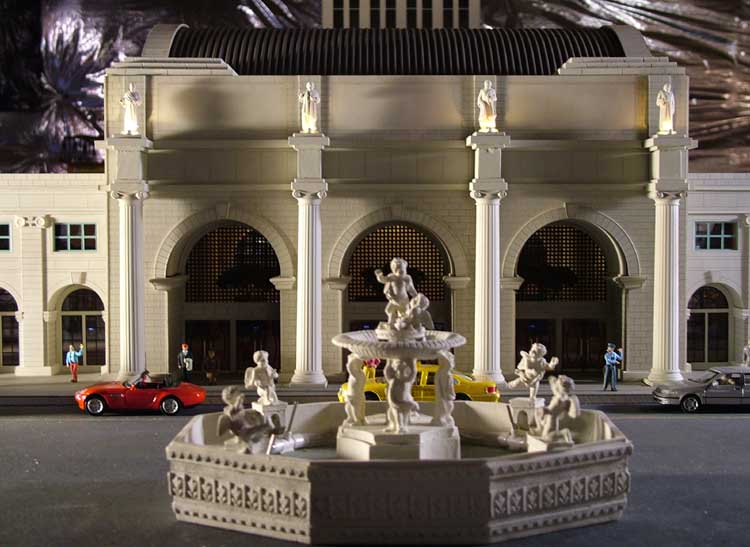
I plan on building this structure to scale, 1:48 or course. It will be approximately 3 feet wide by 3 feet long. I still have to take a walk around the building and take some measurements.

Right now my plan is to use a wooden structure, covered with 1/4" MDF. I probably should plan on finishing parts of the interior because of the large windows.

Here is where I need your help. I dont want to make any major mistakes right off the bat, so suggestions, any at all, are greatly appreciated.

So to start off I have a question or 2:

1. CSX AL I repeatedly return to your Union Station project here:
http://home.roadrunner.com/~st...o/Union_Station.html

You state that your "Block work is hand scribed." Can you please elaborate on this? Your block work has the exact appearance I am looking for. Also I see your building is just MDF, Will it be overkill or unnecessary for me to place MDF over a 1/4" wood base?

2. Is there a tool that any of you expert modelers can recommend? I am going to need something that can cut precisely, such as window openings, and maybe also have an attachment for sanding.

3. Any suggestions for a paint finish or technique for the exterior?

Thats all for now. I plan on starting construction next week, and will of course post construction photographs for your viewing pleasure. Should hopefully be a fun project, which will give me some knowledge for the next building on my list, which I can already tell will be a nightmare!

Thanks guys!

Last edited by Zett
Original Post

Replies sorted oldest to newest

Looks like a big project, literally! But, I assumes that your track plan that's going to go into your space (nice space, btw!) will reasonably absorb something this size.

Depending on how far back into the layout and how high it sets might impact on how much interior you need, but windows of that size generally do call from some interior.

I've never built anything of that size and not used MDF for structures either; looking forward to seeing how this goes!
It looks like a great project. You can use 1/4 MDF with some interior bracing but I wouldn't build it over plywood. As far as making a 1/48 scale model, you may find that your 3' x 3' footprint is too small for the main building with its angled wings plus associated train sheds. Even if you have the space, you may wish to consider using selective compression. Otherwise, it could very well overpower the rest of your layout.
Looks like a fun project. You can use just plane 1/4 MDF. MDF is strong enough to hold itself up without any wood structure inside. Just be carefull if you use a brad nailer. I am almost done with my first scratch build using MDF, I started out using a brad nailer with 5/8 nails and found out some of the nails created dimples in the MDF. I then used just Titebond wood glue and that held the structure together just fine. Good luck and look at SIRTs Macy wharehouse project. That is mostly MDF.
http://en.wikipedia.org/wiki/Joliet_Union_Station

Lets see if this link works, the one posted above is not working.

The main table on the track plan is 22' by 8 to 10', and I plan on locating the station in the corner of the layout. The actual station has tracks that run north/south, and then east/west that intersect at 90 degrees. My layout will have 3 lines running the perimeter of the table, and I am assuming the inside track will be O-72. This inside track will go around the station.

My rough measurements of the building so far are 150' x 150' which would be roughly a 3' by 3' footprint for the building. It is in an L shape. The pictures of the building you are looking at show the front, the tracks are on the back. The building is angled on the back as well, so that should help me to set the building into the turn more.

Dan, I know what you mean with the plans for the future. No one has money right now, especially Joliet, so I dont know how they will spring for all of that construction. I hope it doesnt happen because the new-age streamline and glass construction looks like crap when placed around a beautiful building like this one.

Dennis, if I chose to go smaller than scale, how small could I go and still end up happy with the finished project? I was thinking of 'cheating' a little but I would rather have it look right. Im going to have a downtown area to the layout, then the river, and a yard area on the other side. I am not going to try to cram 80 scenes into my space, because I dont have too much room.
Zett,

I used a Squadron Scribe tool, (actually two) dulled the first one about half way through the station project I did. I sketched out my block lines on the MDF then using a steel ruler I scribed the lines with the tool. I took 2-3 passes to get the depth I wanted. Here is a photo of the tool.


My LHS carries a whole line of tools like these but here is a source online

http://www.hobbylinc.com/htm/squ/squ10202.htm

Window openings I cut out with a jig saw then went back and used an electric sander to smooth the cut edges. For the ached windows I used a sanding drum on my drill to sand them. Rockler sells them as a assorted size drum kit with the sanding drums. You could also put it into a drill press and use them also if you have a press.
http://www.rockler.com/product.cfm?page=1220&rrt=1


Wow, that looks like a fun project! I envy you - you're just embarking on a new train station build.

I echo the observations made above - 1/4" MDF is all that's needed, and might even turn out to be overkill even by itself, depending on exactly what you plan to do with the windows, doors, interior, etc. All openings in the exterior will be 1/4" deep (1 foot in O scale), and so any "glass" you mount on the inside will not be very flush with the exterior surface. This may or may not be a problem, depending on your design preferences and the look you're going for.

Have a look at these other train station projects for ideas on construction, design, selective compression, etc.:

Great Train Stations of O Gauge

I used laser-cut 0.06" styrene for my station, but that is very unconventional, expensive, and involves doing vector designs in CAD software. I really envy guys like Al who can achieve such great results without resorting to the solution I went with.

Good luck, and for dang sure keep us updated. I obviously have a huge affinity for big urban stations, and yours is bound to be a beauty.

Have fun,

John
Actually, Al's interpretation was my take on it too, but of course only SIRT can confirm what he meant.

At any rate, selective compression is more art than science, and you'll have to experiment with different designs to see what appeals to you. You probably don't want to just scale the entire building - including the windows & doors and everything else - down to a smaller size. If you end up placing O scale figures next to doors that are more like S scale or even HO scale, well, it just doesn't look good.

This is one thing I really liked about designing in software - it was very easy to scale the whole design, or individual components, to get a sense for how it would look, before committing to implementing it.

Either way, that's a great train station to model, and I'm sure you can come up something that will make a wonderful centerpiece to your layout.

John
CSX Al, thanks for the reply. I am going to order a few of those scribing tools tomorrow. I also really liked your work with the brass finishings on the overhangs, really adds a lot of kick and realism to your project.

Johnboy, I think I spent almost 2 hours on Thursday reviewing your Washington Station. Your building is also amazing. I am experienced with CAD and looked into the lazer cutting, but I think I am going to go with CSX Als method for the walls. One question I do have for you though is your paint finish on the roof, the green exterior roof. Is the real building an aged copper?


Zett,
You may want to investigate constructing all or part of the structure with printed cardstock mounted to MDF, styrene or similar. The advances in digital photography, scanning and color printing make it feasible.

Two interesting articles on the process:
Finescale Railroader, December 2005 - How To Model With Cardstock
The Modelers' Annual, Winter 2009 - A Cardstock Boxcar in 1:48
(this article contains tips on materials, scribing, sealing...etc.)

Enjoy your project! Smile

Matt
quote:
One question I do have for you though is your paint finish on the roof, the green exterior roof. Is the real building an aged copper?


Negative. That was one of several "artistic liberties" I took in building my interpretation. You can see more of these liberties here: The Prototype and the Model.

I don't blame you - laser-cutting is a serious pain in the tush, and costly. I am really looking forward to learning more about manual scribing, so I sincerely hope you will post as many in-progress pictures and text as you can bear. I like that station - IMO it's a great size building to model in O gauge.

John
Made my first of what will probably be many trips to the Union Station on Wednesday. I took about 40 pictures of the station and collected quite a few measurements. I have quickly realized that I already need to make a return trip.


Here are two pictures. There are more pics as well as larger ones posted on my blog. The trip was ok so far, I didnt have anyone come up to me and ask "What the hell are you doing." so that was good. In some areas the station looks just as beautiful as probably looked in 1912. In other areas... ehh, not so much.

I have been doing a lot of studying on the structures of the downtown area, and standing at the station, looking around, I got that feeling that I think is very unique to this hobby. An appreciation of history is one element to model railroading that makes it completely different than, well, whatever hobbies you want to compare model railroading to. Looking out over the city, I kind of got a sense of sadness, comparing what is here today, and what was here, and what this area once was 100 years ago. Watching the BNSF engines hum down the tracks today, and missing what as recent as 70 years ago, would have been a majestic steam engine, rolling past, surely would have shaken what would seem to be the entire world. I think that is one reason why this hobby is so great, we get to recreate scenes of yesterday.
Im about 20 hours into the project, and I have just completed scale drawings of the upper level of the station. 6 trips to the station so far, and I have taken measurements for everything. I made the rough semi-scale drawings on graph paper which worked very well and I could freehand many details. For the scale drawings I used a steel ruler, and of course a calculator.

Rough Semi-scale drawing:


Scale drawing:


So far this project has been a blast and I cannot wait to begin actual construction of the building. Right now I am experimenting with using MDF and hardboard. I cannot find 1/8" MDF so hopefully hardboard will be suitable to use in certain areas. Most of the window sills are 6" which would be an 1/8" difference.

With regards to creating my own windows, has anyone used a clear PVC? I saw some small sheets of this at the hobby store and think it may work well.

I always appreciate suggestions!
Zett,
I'm a little late to the party here, but this looks like a really cool project. Have you considered using Sintra PVC foam board? It's all i use now for scratch building. I find it very easy to work with. Here's a pic of a deco style city building i'm working on. The whole thing is scratch built with sintra, sheet and strip styrene and lexan for glazing.


Good luck, and please continue to post pics!

Nick
Nick I am not familiar with what you are using there... are you adding layers of that foam one layer on top of another to achieve that detail?

I have run into a problem with my project. I am having all sorts of trouble cutting out the windows. I am using a jigsaw, however I cannot get a straight cut. I even found a band saw to try to use, which is not helping much. Besides finding someone that can laser cut out the windows, I am not sure what I am going to do. I can get the lines pretty straight, but thats not good enough. The slightest curve just makes it look fake, and as much time as I have put into the project so far, I dont want to settle.

I am thinking of using my steel ruler as an edge, cutting the window openings out close with a jigsaw, and then using a file to sand them down up against the ruler. I have not tried this yet, but that is my next thought.

Looking ahead, I need to find 3 chandeliers for the main hall. I have quickly found out that they are going online for about 250 bucks a pop! Guess I have to get creative there too!

As of right now almost all of the walls are cut out, and I am starting to scribe in the block detail. CSX Al, thanks for your method because it is working great. My only worry there is that the paint will cover up this detail.

I will try to post some updated pictures tonight.
I have wondered how to do such windows and make these cuts. I've never understood how to do that without ending up with spaces between the windows and the walls. So, I'm very interested in the suggested solutions. Hopefully, SIRT, CXS AL or JOHNBOY will answer your request so we can all learn the technique. All of them (and others, of course) have done great jobs on interesting window shapes on Union Stations and/or factory type buildings.

Jerrman
I don't know how people cut out perfect (or even near perfect) windows into raw material like that. I did it for my West Park Tower building, but it was absolutely not something I ever wish to repeat again. Trying to cut out even a simple rectangle out of the middle of a side of a building is very difficult to do without advanced tools, imo. Not only was it painstaking, difficult, and very, very time consuming, but even after all that effort, the windows really did not come out very well. I did it for all 600+ windows of that first skyscraper, and after that I knew I needed a different solution.

Arches are even more difficult. I don't think I could even cut open one half-circle arch out of any kind of material that would look any good. Honestly, I can't even do that into paper with scissors! But even if I got one arch close to perfect, there's absolutely no way I could get two more to match it on either side. And that was just the front face of the main building of my station:


There are 69 more of these arches throughout the rest of my station. Eek

That's why I went with laser-cutting. I tell the CAD software that I want a half-circle arch of a certain diameter, and it draws it for me instantly and perfectly. I can scale it up or down, make it exactly match the width of the rectangle that forms the rest of the portal. Once I have it looking right, I simply copy & paste it two more times, and I instantly have all three perfectly matching arch portals, aligned and centered with mathematical precision.

You combine that with the etchings to get the brick relief and other details such as lettering, add-on detail parts, and all of this comes back from the laser shop implemented for you, and each piece is literally laser perfect.

It was well worth the money for me, because I just don't know how I'd carve all that stuff by hand.

I'm sure interested in learning how others do it though! Eek

John
Zett:

I found 1/8" MDF ... Owl Lumber. They have locations in Lombard, Des Plaines(up the street from Des Plaines Hobbies) and somewhere else. The have a website, you can Google it for exact locations.

I bought 2 sheets of 4 x 8 1/8" MDF from the Des Plaines store (its actually a little larger, I think). Approx. $10 a sheet. Luckily they cut it in half at the store so I could fit it (barely) in my car.

Good stuff.

CTA Fan
quote:
Originally posted by JohnBoy:


That's why I went with laser-cutting. I tell the CAD software that I want a half-circle arch of a certain diameter, and it draws it for me instantly and perfectly. I can scale it up or down, make it exactly match the width of the rectangle that forms the rest of the portal. Once I have it looking right, I simply copy & paste it two more times, and I instantly have all three perfectly matching arch portals, aligned and centered with mathematical precision.

You combine that with the etchings to get the brick relief and other details such as lettering, add-on detail parts, and all of this comes back from the laser shop implemented for you, and each piece is literally laser perfect.

It was well worth the money for me, because I just don't know how I'd carve all that stuff by hand.

I'm sure interested in learning how others do it though! Eek

John


Ok, now I get it. You just send it to John and HE does it :-)
John, just so I understand, did you invest in the laser cutter or do you send it out for someone to do it after you do the CAD drawings/specs?
Thanks.

Jerrman
Last edited by Jerrman
I outsource it to Pololu: Pololu laser cutting

It typically ran me somewhere between $35 and $65 per sheet of 0.06" black styrene, to get a single side of a building done. It depends almost entirely on how many linear inches of etchings/cuts you have in your design.

Pololu is fantastic to deal with, and the results always impressed me.

I looked into getting a laser machine, but they are crazy expensive ($10,000+ for what you'd need to cut 24"x24" styrene, ABS, acrylic, wood, etc.)

It's also not for a typical basement. Depending on what material you're processing, lasering produces dangerous gases that must be vented outside your house, and in some cases captured by a filter system and disposed of properly. (I just don't even want to know what paper-work that involves...) You also need a license to own/operate one in most municipalities.

Once I got used to the software, it really became pretty easy - fun even - to design things in CAD, and then send it off to get implemented for you. That's how I ended up making my videogame machines:


pinball machines:


and cell tower kits:


It's a lot of fun, and opens up a lot of modeling opportunities that would otherwise be closed to me.

John
quote:
Originally posted by Zett:
Nick I am not familiar with what you are using there... are you adding layers of that foam one layer on top of another to achieve that detail?


Zett, In a word, yes. The project progresses. See what can be done.


I use a plain old mat cutter to cut the sintra into strips and pieces. You can also buy specialty compass cutting tool for perfect round cuts in sintra board.


The rest was done with a personal digital cutter. I bought a digital paper cutter called an 'eCraft'. It's like a poor man's laser cutter. It cuts just about anything you can draw or create on a computer onto thin sheet styrene. I made all the windows on the building this way. It's a neat tool, and only about $250, vs. 10k for CO2 laser engraver.

The only answer i can think of for your window openning problem is a dremel with this saw attachment. It makes accurate cuts, it might work for you.


You might also consider a rotary saw. Or the similar dremel attachment.

Good luck,
Nick
quote:
Originally posted by Zett:
Looking ahead, I need to find 3 chandeliers for the main hall. I have quickly found out that they are going online for about 250 bucks a pop! Guess I have to get creative there too!


Zett,
Before you do something crazy like buy a $250 o scale chandelier, take a look at this. I have been musing on this for a while, and think the best solution is fiber optic strands and thin brass tubing. This is a lousy picture, but you get the idea.


Brass tubing is not all that expensive, and i was able to buy a fiber optic experimenters kit at micromark for about $12. Just a thought.

Nick
Well, I thought I made some decent progress. By the time I finish uploading pictures and write a description, it looks like I have not accomplished a lot.

Sorry for the long wait between updates, but as is the case with everyone, I have summer projects to work on. The lawn isnt going to look like Augusta on its own.

I am almost finished with block work. Here are two pictures showing some of that detail:


I am extremely happy with this method. Thanks CSX Al. My only worry is that when it is painted that a lot of this detail will be lost. I have some trim pieces made of bass wood that I will be adding next.

The actual station has a recessed border to the windows that I have to add. It is 9" wide, so the piece I have to make is pretty small, and I am not sure how I am going to do that. Kind of hard to explain... Ill figure it out!

Here are two pictures of the lower level of the station. This work has been very tedious. I have remade pieces dozens of times. Some tools have gone flying across the room, but once a piece comes out the way I want it to, its worth the time and frustration.


I think this area will turn out fantastic once it is painted and is all the same color. The darker pieces are 1/8" hardboard. I attached them using wood glue which seems to give a really good hold. I have not had a piece loosen up yet, and I have been handling them quite a bit.

Heres a final picture showing an overall progress shot of the top area of the station.


For reference the track is O-72. The caboose is an o-27 EJ&E. I am already drooling over the amazing scenes I will hopefully be able to recreate. The more work I complete, the more it is helping me with my track plan. The building will be large, probably too large for the space I have, but I made a decision to make certain important buildings on my layout as scale as possible.

Hopefully another update will come soon. This hobby rules....
Zett, just came across this thread. Looking good. I spent many an hour waiting in that station for the Rock Island commuters. It's an impressive structure and I'll have to pay closer attention to progress. I can't wait to see it done.

I always thought it would an interesting place to model with the railroads that went past and through the diamonds there.

If you are modeling the EJ&E in the 20's, there is a good chance my grandfather could be the conductor on one your trains.
quote:
Originally posted by JohnBoy:
Once I got used to the software, it really became pretty easy - fun even - to design things in CAD, and then send it off to get implemented for you. That's how I ended up making my cell tower kits:


John


Interesting. I actually used your cell tower bracket design on my cell/communication facility, but made all the cuts by hand with an exacto knife. I guess that would be cumbersome for mass-production, huh?

Add Reply

Post

OGR Publishing, Inc., 1310 Eastside Centre Ct, Ste 6, Mountain Home, AR 72653
800-980-OGRR (6477)
www.ogaugerr.com

×
×
×
×
Link copied to your clipboard.
×
×