Replies sorted oldest to newest

I removed the drivers, turned down the flanges, and the regauged them on the axles with an NMRA gauge so they'd run on code 148 scale track. I also replaced the front and rear pilot wheels and tender wheels with scale wheels from NWSL. It wasn't converted to 2 rail though. The whole process was done without a lathe and took around an hour. Easy to do. I also removed the reversing unit and wired the motor up for DC power. I didn't do any other visual customization though. I never took pics of that engine though and don't have it anymore.
I have:

  • Added Builder Plates (Lima)
  • Cab figures (MTH)
  • A real coal load
  • Shortened the hook connecting the engine to the tender. It still goes around 036 curves well, but it tightened up the gap.
  • After purchasing the Trainsounds tender, a buddy of mine relettered the original tender for Pere Marquette.
  • The original drive board failed. It is currently running a WbB board. Starts in forward and runs about 1/2 the original speed.

Gilly
Last edited by Gilly@N&W
I too, added the LED to the observation. I wanted to find the right combination of light source, red paint, and operating current/voltage to duplicate the movie. You'll note in the movie 'still' below that the bulb is not of blinding intensity. It's "glassy" with a faint "hot spot" in the center.


I tried the Trainsounds tender, but hated it. So I installed a Digital Dynamics RS-4 unit into the original tender.

Increased the smoke output by changing the series resistor inline with the smoke unit. (Eliminating the series resistor caused problems, too.) 5-ohms instead of 10-ohms helped.

I installed a flickering "fire" onto the disappearing Hobo car platform. It still flips over (and turns off) to make the hobo disappear. Cool Pics below.


So I've added the LED to the observation car, painted the rubber parts, and I also got rid of the puppet silhouettes on the windows of the "puppet car" (I thought they were creepy and a really dumb part of the movie}. Getting them off just took a bit of gasoline and scrubbing. I'm still going to paint the gates silver or adobe red to match.

I love what "Springoflife" has done with his. Thinking of doing the same, since I could never afford the hobo car they make.
I have access to coal for a boiler. I ran a sample through a #200 sieve. As for the tender, I put a coat of Elmers glue down and then gave it a good covering with coal. Using a paper towel, I pat it down well. After drying, I sprayed it with alcohol and then applied Woodland Scenics glue. Basically the same process as ballasting. Then I gave it a couple of coats of Dulcoat.

Gilly
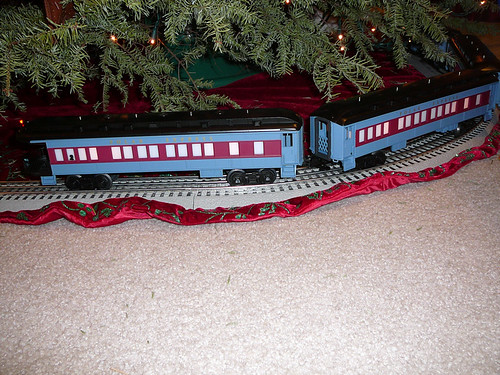
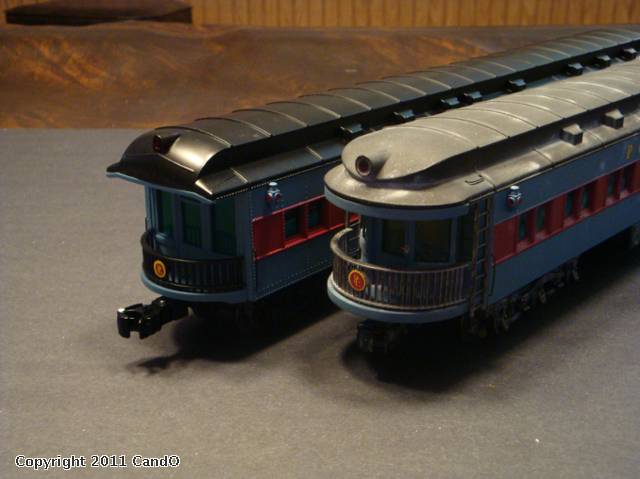
I modified two observation cars.
I have the scale PE. My observation car underwent a heavy modification by me. I started out wanting ladders with roof grab irons...for the boy to climb up to the roof...


Next, I added a hobo and campfire with Evan Designs FIRE LED kit...


Then I started making a new deck, railing, larger drumhead, rear roof with larger taillight, and piece to hold the three deck LEDs...


Let the cutting and real construction begin...


One was painted with Floquil Graphite for the roof and weathered for Winter(seen with a stock observation car)...


Click here for my snow effect how-to

Another was painted satin black for the roof and made to look original...

quote:
Originally posted by Tiffany:
Hello CandO.........
WOW, you are REALLY good doing plastic body work on your observation car!!!! I am IMPRESSED !!!

the woman who loves toy trains
Tiffany

Thank you very much, Tiffany.
These are the first two cars I ever modified. I figured I could do it...the hardest part was getting up the nerve to make the first cuts into the car. I used various sizes of styrene and ABS sheet.
quote:
Originally posted by bluecometk:
CandO,
That is just an awesome job! You are a true Craftsman. That car looks better than factory!


Cando has probably the nicest, most accurate Polar Express out there..heck he should start to provide upgrade kit for the scale version as well as the traditional version and be pretty busy...
Anyway it's always a pleasure to see his work in pictures/ videos
quote:
Originally posted by gunrunnerjohn:
quote:
Originally posted by Big Jim:
quote:
I installed a flickering "fire" onto the disappearing Hobo car platform. It still flips over (and turns off) to make the hobo disappear.

Spring,
I would like to know how you went about doing this.
I'd think you could take apart one of the fake votive candles and use that flickering LED for the fire.


GUNRUNNERJOHN is correct, in that I used the guts of a flickering votive candle to replace the fire. But keeping the hobo "flippable" and making the fire turn off when upside-down are the keys to this mod. I would be willing to post a tutorial; but if OGR magazine would be interested in publishing it, I would have no "unpublished" photos to give them. So I am hesitant to post anything more at this time.
Springoflife,
Great idea for illuminating the hobo fire. That would be a good how-to article.

quote:
Originally posted by Lafondue:
quote:
Originally posted by bluecometk:
CandO,
That is just an awesome job! You are a true Craftsman. That car looks better than factory!


Cando has probably the nicest, most accurate Polar Express out there..heck he should start to provide upgrade kit for the scale version as well as the traditional version and be pretty busy...
Anyway it's always a pleasure to see his work in pictures/ videos

bluecometk and Lafondue, thank you both for the very nice comments.
In case anyone does a custom job that includes painting, I have a match for the blue.

For my observation custom I had to paint the new rear section. That meant matching Lionel's PE blue. So I sat down with some Floquil paints and came up with this...

Polar Express Blue Formula
• 4 parts Reefer Gray
• 1 part CSX Blue(GLOSS)
• slowly add Reefer White-not quite 1 part

Mix it per bottle directions for airbrushing.
I clear coated it with equal parts Floquil Crystal Cote and Floquil Flat.
quote:
Originally posted by Marek:
CandO,

How did you fashion that roof? Putty, clay...???

Is it rock hard? Or do you have to be careful after...just curious how you made that.

I'm new to scratchbuilding...

Amazing job, thanks for posting!

Marek

Good questions. Thank you.
The roof is rock hard. I built up some bracing under the roof and used Squadron putty, epoxy putty, Bondo, white styrene, and gray ABS.
Here are some more photos that show the roof being created.


For the lower roof, I had to make some framework. I cut a curved piece of thicker gray ABS. I made sure it was level and attached it to the car with Plastruct Bondene. I also made an upper half circle using styrene and made some styrene braces to connect both pieces and provide strength. The middle area, of the white styrene piece, was cut out so the LEDs would fit.


That lower roof was then filled with white Squadron Putty. I fill it little by little each day. It took several days to dry completely. Once dried, I started sanding it with sanding sticks(coarse, then medium, then fine). I also blended it into the car's plastic. Any little pits in this area will be filled latter.


The upper roof is tricky because it slopes both toward the rear and off to the sides. You can't bend styrene two directions like that. So, I cut a piece of sheet styrene, and cut a half curve at one end. I bent it by applying heat from a hair dryer while flexing the styrene. I then test fit it and cut off the necessary length from the straight end.


To address the slope to the sides, I cut another piece of styrene and heated with a hair dryer. I matched it to the slope of the roof and then added some styrene bracing under it. All was attached with Bondene. I taped the piece to a metal ruler so it would stay straight while it dried.


I built up some side walls with two layers of styrene. These were cut down, with a dremel, to fit with the upper roof piece. The reddish stuff is Bondo Glazing and Spot Putty. It was used to fill any gaps and then sanded smooth.


Now for the rear slope of the new roof piece. I used Epoxy Putty because it is strong and easy to sand. It dries rock hard in 15 minutes. I applied it to half the roof area, sanded and added some more. Roof piece is not attach at this point, only resting on the car to check fit.


Once I had the shape I desired, I made a new and larger light housing, from tube styrene. Then a hole was drilled through for an Evan Designs LED.


A new taillight lens was made by cutting a red plastic section from a spare Lionel cab window. I put masking tape on both sides of the lens, to protect is. I then glued a piece of brass tubing to one side, so it could be inserted in a Dremel. To make it round, I turned on my Dremel and belt sander and touched them together. Canopy Glue was used to mount the new lens, after painting.
Last edited by Michigan & Ohio Valley Lines
You're welcome Marek Smile

quote:
Originally posted by pennsynut:
CandO: Everytime I see your posts on your PE modifications, I hear the bell. Amazing work! It must be a real site to see run. I bet it is fun to run.

Thank you! It is a blast to run and looks great on my new O-72 curves.

I posted a video of my set on this week's Weekend at the Movies thread. It also shows my Polar RR freight including a Cocoa barrel car(barrels have PE logos) and a log dump car that I custom painted. It's all about having fun! Here is a link...
Weekend at the Movies
Originally Posted by springoflife:
quote:
Originally posted by gunrunnerjohn:
quote:
Originally posted by Big Jim:
quote:
I installed a flickering "fire" onto the disappearing Hobo car platform. It still flips over (and turns off) to make the hobo disappear.

Spring,
I would like to know how you went about doing this.
I'd think you could take apart one of the fake votive candles and use that flickering LED for the fire.


GUNRUNNERJOHN is correct, in that I used the guts of a flickering votive candle to replace the fire. But keeping the hobo "flippable" and making the fire turn off when upside-down are the keys to this mod. I would be willing to post a tutorial; but if OGR magazine would be interested in publishing it, I would have no "unpublished" photos to give them. So I am hesitant to post anything more at this time.

Spring, has or is this mod going to appear in OGR or any other magazine? If not, will you post a detailed "how to" with photos on this forum? Your expertise sure would be helpful, valuable and greatly appreciated by many of us.

Last edited by ogaugeguy
Originally Posted by ogaugeguy:
Originally Posted by springoflife:
quote:
Originally posted by gunrunnerjohn:
quote:
Originally posted by Big Jim:
quote:
I installed a flickering "fire" onto the disappearing Hobo car platform. It still flips over (and turns off) to make the hobo disappear.

Spring,
I would like to know how you went about doing this.
I'd think you could take apart one of the fake votive candles and use that flickering LED for the fire.


GUNRUNNERJOHN is correct, in that I used the guts of a flickering votive candle to replace the fire. But keeping the hobo "flippable" and making the fire turn off when upside-down are the keys to this mod. I would be willing to post a tutorial; but if OGR magazine would be interested in publishing it, I would have no "unpublished" photos to give them. So I am hesitant to post anything more at this time.

Spring, has or is this mod going to appear in OGR or any other magazine? If not, will you post a detailed "how to" with photos on this forum? Your expertise sure would be helpful, valuable and greatly appreciated by many of us.

Mike, if you recall I'd emailed you toward the end of summer about this mod and you'd replied sending me some info and that you'd would send additional info and photos once you located those files on your computer. After waiting three or so months to hear from you again I then emailed you again but have since received no response. I hope everything is now okay for you and that you can possibly email me or post a full turorial with pics on your P.E. hobo car mod. I know it would be greatly appreciated by not only myself but other P.E. fans and modelers as well.

Last edited by ogaugeguy

Add Reply

Post

OGR Publishing, Inc., 1310 Eastside Centre Ct, Ste 6, Mountain Home, AR 72653
800-980-OGRR (6477)
CONTACT US
www.ogaugerr.com

×
×
×
×
Link copied to your clipboard.
×
×