After some discussions with Lionel about the wild difference in the brightness of the number boards in the powered and Cabbage units, we all came to agreement that the powered unit was probably too bright vs. the Cabbage unit being too dim.  After Jon Z. pointed the way, I decided to take a look and see if that could be rectified.

First off, after open the shell, I was pleased to see that the wiring fix was obviously applied.  The lighting board wires are out of the line of fire of the flywheel, that's a good thing.

F40PH Number Board Fix N1

When I got the lighting board out, I could see a lot of residue left from the board manufacturing, so I cleaned that off, it's probably my OCD nature.   Since it was only the thru-hole components, I suspect those were hand-soldered, all the surface mount was clean. 

A lot of lights on this board, the cab lights can be seen on the bottom, and there are seven LED's on the top.

F40PH Number Board Fix N2

I grabbed the resistor drawer and started trying some values.  I have all the electronics disconnected, and I'm just using on little 1.5mm connector with the leads to the connector for the number boards.  3.9K looked pretty good, it achieved the result I was looking for.  Since that's in series with the 1.0K, that's 4.9K to do the trick.  I didn't have 4.9K, but I do have 4.7K, close enough.

F40PH Number Board Fix N3

Here's the brightness level now, much better!

F40PH Number Board Fix N4

I don't have an "after fix" photo, but it's hard to tell the difference.  You'd just see a 4.7K resistor in place of R10 that is now a 1.0K resistor.  Popped it all back together and it looks much better now.  You do have to be careful as there are still some wires that could be pinched putting the shell on, that would doubtless spoil your whole day.

F40PH Number Board Fix N5

I hasten to add, this is not a repair for the novice.  Nothing especially difficult, but I wouldn't want to be put in the position of recommending something and having you cook an expensive board. 

Attachments

Images (5)
  • F40PH Number Board Fix N1
  • F40PH Number Board Fix N2
  • F40PH Number Board Fix N3
  • F40PH Number Board Fix N4
  • F40PH Number Board Fix N5
Last edited by gunrunnerjohn
Original Post

Replies sorted oldest to newest

The larger the resistor value for a given voltage, the lower the current and the heat.  The resistor value I used results in about .06 watts of dissipation, and it doesn't even get warm. 

LED's are current mode devices, and you control the brightness by controlling the current.  I dropped the current around 5x to the bulbs.  LED's are have fairly linear light output in relation to current.  So, dropping the current 5x dropped the light output around 5x as well.

Attachments

Images (1)
  • mceclip0

i like the idea of digital control of the various leds... but i'm clearly in the minority.  I don't think the HW would be expensive but to do what I want lionel would have to spend money to do it, and then marketing is not clear for getting new sales:  "This new engine now has the option to individually dim or brighten all LEDs through command control -- flickering is even supported.  Imagine the possibilities!   Yes now you can have a dodgy number board on your layout all with the push of a button!"


Just to put a "bow" on this topic, I put both the powered and Cabbage unit on the tracks to see how they looked after the intensity mod for the powered unit.  The Cabbage unit number boards were way too dim for my liking.  Even after the mod to the powered unit dropped the current 5x, the Cabbage unit number boards were much dimmer. 

In for a dime, in for a dollar, so I opened it up and checked out how the number boards were powered.  Turns out they're powered the same as the powered unit, with track power, a resistor, and back-to-back LED's.  When I traced it out, I discovered a 22K resistor for the current limiting!  Yes, that's not a typo, a 22K resistor!   Stands to reason why they're pretty dim, they were getting less than a milliamp of power!  I skywired a 5.6k resistor across the 22k, that worked pretty well.  So, I replaced the 22k with a 4.7k, the same as I used in the powered unit.  I used a lightly larger size resistor, the old one was a 0603 size, I used the 0805 size.  This gives a bit more power handling as it's passing four times the current now.  On this one I actually took the picture after the mod.

This is a different board design, it has a processor managing most of the lights, but not the number boards.  The Cabbage unit also uses a version of the RCDR board and not the full RCMC of the powered units or the other dummies I've worked on.  Interesting tidbit, but not important for the problem I was addressing.

F40PH Cabbage Number Board Fix

What do you know, the two units now have similarly lit number boards, just the way I'd expect, job done!

As before, be aware if you screw something up, you've probably bought it.  The connectors are pretty small and pulling on the wires is the kiss of death many times, so you have to exercise caution.  I use husky tweezers  to work the connectors out.  Obviously, soldering on these boards requires something a little more sophisticated than your typical Weller 100/140 gun as well.

Attachments

Images (1)
  • F40PH Cabbage Number Board Fix

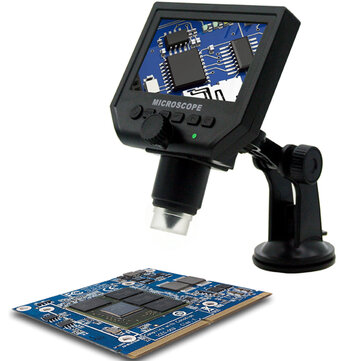
I was looking at these the other day and wondering if they would be better then a regular old magnifying lamp? They are only like $39 so I wonder how good the picture would really be as opposed to the one shown in the ads? Here's a link to one, but there are others out there. I saw a youtube video of someone using one of these, but I think they had a much more expensive one, like maybe several hundred $$.

Last edited by rtr12

Nick, in this case, it was pretty easy.  Once I found out that they were track powered, I just had to locate the resistor and install the correct value.  As I said, the hardest part is getting to the resistor, you have to be careful with the little 1.5mm connectors, the wires are small and break easily if you yank on them.  For the powered unit, I'm glad I now know the wiring is really out of the way of the flywheel, that's certainly killed a lot of these.  That was the only red flag I saw looking inside.

Some thought was put into the lighting mechanical design on these, most of the lights are on the one board.  I suspect that makes it easier to build and test.

It is interesting that one resistor was too low in value, and the other resistor was too high in value.  There was a 22:1 difference in light output for the number boards between the two units! 

There's an old saying about the right hand knowing what the left hand is doing...

I'm happy with the final outcome, they look like they belong together now.

Someone either goobed the math on the needed resister or fed the wrong resisters into it...  i always thought the surface mount stuff was only done by machine but google shows otherwise.

Still prefer a different way:  the digital pot chips are pretty cheap and have serial line interfaces which is easy...  but no takers.

Since the lighting boards are a different design, I presume there were two bill of materials and a separate run to assemble them.  Obviously, since the number boards were powered the same way on both, they should have had at least the same value resistor you would think.  In any case, mine now have matching intensity on the number boards, and I feel a little better about what's inside having looked them over while they were open.

Au Contraire!  Note large red arrow, it points to the microprocessor that controls the lights on this board for the Cabbage unit.  The powered unit indeed just has LED's and resistors.

In any case, I don't get this determined drive to alter the brightness of the LED's, why so hard-over on this seemingly minor feature?  Do you really think anyone is going to go to the trouble of designing and laying out this board to do that?  Have you ever done the mechanical design for a board like this that has lots of tolerances to fit all the lighting into the proper places?  I guess I just don't understand why you're putting so much work into this, there are plenty of neat things you can do that would make a difference if you're going to that amount of effort.

D&H 65 posted:

John: I can't believe you just didn't grab the ole' Bernz-O-matic torch to do that soldering job....LOL.

 I suppressed the urge.

Attachments

Images (1)
  • mceclip0
Last edited by gunrunnerjohn

Me?  Oh Im just thinking of what I'd really like.  I'd rather like individually addressable LEDs on these engines...  I mean as an option.   In fact the spiffy RGB LEDs are very appealing to me...

So you know I was just thinking 'bout it in to what you were doing here ...  My first blush was the board was a stupid "slave" ... but I see now it has a brain. 

Kinda cool really.

But I only know enough to be dangerous as the saying goes.

I have designed but 1 circuit in my life which consists of a couple of chips and some wires, resisters and all that.  And dang it if it doesn't work.  But I did this on paper and some prototyping boards.

I did download and install Eagle but I got frustrated very quickly. 

So no, not a HW person though in reality, just dabbling a bit -- and no pay either, hardly motivating at times.

I would not expect anyone to do what I was just suggesting although if it seemed do-able I might try it myself.  But I've got plenty of other "projects" so to speak... just thought it was within the realm of possibility.

However given that little processor chip there,  no I would say no it's not possible to roll your own and keep the main boards that are supplied... which is what I thought but 15 min go.

Forget Eagle, try DipTrace if you want to do a little circuit tinkering.  I started with Eagle, but creating parts was a giant PITA.  As long as the parts were in the Eagle library, it wasn't bad to use, but Heaven help you if you needed to create a new part with a new footprint!

There's a bit more than meets the eye to doing a board like the lighting boards for these locomotives, having all the stuff fit properly in the shell takes a bit of mechanical engineering.  All the lighting has to line up with the matching holes & bezels in the shell.  That step only happens after you get the electrical design completed.

Excellent advice.  Already have it installed!  But I'm a fumble fingers with it as well.  Still I have a remote need not an immediate need.  What I've done could be a PCB if it really works.  And while it works as in 'works' its not clear it exactly what I need... so I see some revision and this will take time as in weeks or months if I stick with it before going with a PCB ...  perhaps I shouldn't have said a thing about the light module so to speak considering that ... but i thought it was novel and perhaps fun sounding.

The lights are controlled from the main RCMC for the powered F40PH, all that lighting board has is LED's and resistors.  OTOH, the Cabbage unit uses a fairly simple TMCC receiver and the uP on the lighting board actually does most of the heavy lifting as far as controlling the lights.

They use the light board as they can mechanically mount all the LED's on one fairly small board, there are nine LED's on that little board.  The headlights and ditch lights are the only front lights not on the lighting board.

-------------------------

As far as the PCB layout packages, it'll take a few hours to get comfortable with any of them.  You'll also find out that creating your own parts is pretty much mandatory if you do anything remotely out of the simple mainstream, so that capability is pretty important.  I have even learned to morph some 3D part models into something that resembles different parts do the 3D view feature works.   This is handy to visualize what your board will look like assembled.

Attachments

Images (1)
  • mceclip0
gunrunnerjohn posted:
rtr12 posted:


Looks good, that might be something that would help me!  I ordered one.   I'm using a desk magnifier, but this would allow me to sit back more comfortably.

I ordered one too. After looking at it a second time to post here, I just couldn't resist.  

Looks like ours should be arriving about the same time!

rtr12 posted:

I was looking at these the other day and wondering if they would be better then a regular old magnifying lamp? They are only like $39 so I wonder how good the picture would really be as opposed to the one shown in the ads? Here's a link to one, but there are others out there. I saw a youtube video of someone using one of these, but I think they had a much more expensive one, like maybe several hundred $$.

Those are okay but for the same or a little less $$$ can buy a USB HD Led lighted microscope. I have one to do smd work as I solder "under" the thing. USB microscope is hooked up to a laptop that powers a 32" HD display mounted on the wall.

I guess I am in the same camp as GRJ and wanting something smaller as well. The USB device sounds nice, but I have a desktop computer with 24" monitor on my workbench right now that I am desperately trying to find another place for to free up the space. 

Then I will be able to make a much larger pile of electronic junk and other items on the bench after the desktop is relocated. 

John,
How about that "Microscope" review?
I haven't had a chance to actually use mine yet, other than charge it up. I did have a bit of a problem doing that because the two-prong plug was too loose in the AC adapter. While trying to set the 'scope in a secure place to charge, each small movement caused the plug to unseat itself from the AC adapter.
I also noted a lack of good instructions and some way to contact anyone if help is needed...as in getting a proper fitting charging cable. 
It looks like this thing will come in handy while trying to cut very small PE parts from their sprue.

Bruk posted:

I knew it, they were different valued resistors. 99% of the time the number boards are always powered off the track power. Glad you decided to dig into this and figure it out for sure.

It just annoyed the crap out of me that the appearance was so different.  If they were both one intensity, I probably wouldn't have bothered, but since they weren't...  Besides, after all the wiring issues, I wanted to look closely at the wire routing inside to see if I was going to have an exploding engine.

Big Jim posted:

John,
How about that "Microscope" review?
I haven't had a chance to actually use mine yet, other than charge it up. I did have a bit of a problem doing that because the two-prong plug was too loose in the AC adapter. While trying to set the 'scope in a secure place to charge, each small movement caused the plug to unseat itself from the AC adapter.
I also noted a lack of good instructions and some way to contact anyone if help is needed...as in getting a proper fitting charging cable. 
It looks like this thing will come in handy while trying to cut very small PE parts from their sprue.

Funny thing, I threw that stupid adapter away, plug kept falling out!   Anyone need a Euro style power supply?  I just found one in my wall wart selection that matched the voltage and had a real plug, that's what I'm using.

I haven't used it in anger yet, but it seems to work OK.  I think my biggest beef is the stand is kinda of hard to actually use.  I also would like to be able to space it a little farther from the work, but I will experiment some more and see if I can overcome those issues.

Add Reply

Post
×
×
×
×
Link copied to your clipboard.
×
×