
Hi all, just finished installing the power to my new turn table from
CSXAL. This has no indexing, its powered by a HO rail power 1300 transformer
The movement is totally awesome, you don't need any indexing.
THANKS, ALEX
|
|
Hi all, just finished installing the power to my new turn table from
CSXAL. This has no indexing, its powered by a HO rail power 1300 transformer
The movement is totally awesome, you don't need any indexing.
THANKS, ALEX
Replies sorted oldest to newest
Alex, Thanks for posting the video. I've heard great things about turntables from CSXAL.
If there's no indexing, how do you manually align the turntable if there's a large locomotive on it blocking the view?
-bruce
If there's no indexing, how do you manually align the turntable if there's a large locomotive on it blocking the view?
-bruce
Well first, you had better align the rails PRIOR to running a locomotive onto the table bridge.
Alignment is accomplished by "eyeballing" the match of the rails, just like the real RR turntables and their operators do it.
I also have one of Al's up-grade drive system for my old Bowser #2" table, and it works very nice, especially for a Bowser.
Hi Bruce, the turn table moves so slow with such precision that its very easy
to line up the rails.Even if there's a big engine on it you just need to see
one rail.The only way you can use no indexing is if the turn table is close
enough to you, If it's far away you will have to use indexing.
THANKS, ALEX![]()
Yes, that's the beauty of Al's turntable, not to mention the build quality.
Very nice. One of these days I will be putting up a turn table. Nice job!
I was nodding off and the enjine still was shy of one full rotation. The whistle woke me ![]()
Thanks Dave and J Daddy
yes Dave the build quality is awesome
J Daddy when your ready to this turn table would be a great choice
THANKS, ALEX
Alex, Thank you and nice video of the turntable in action. I'm glad everyone likes our turntable performance and build quality. I really appreciate everyone's support here on the forum of my product. Looking forward to going to York and seeing you all there.
Take care
Thanks Todd for the nice comment's
Mike CT, great video and an awesome layout
CSXAL, your welcome and I thank you for a great product
THANKS, ALEX![]()
Alex, Hotwater, and Mike,
Thanks for the explanation about manual indexing. Eventually I plan to replace on of my reversing loops with a turntable from CSXAL.
Great thread!
-bruce
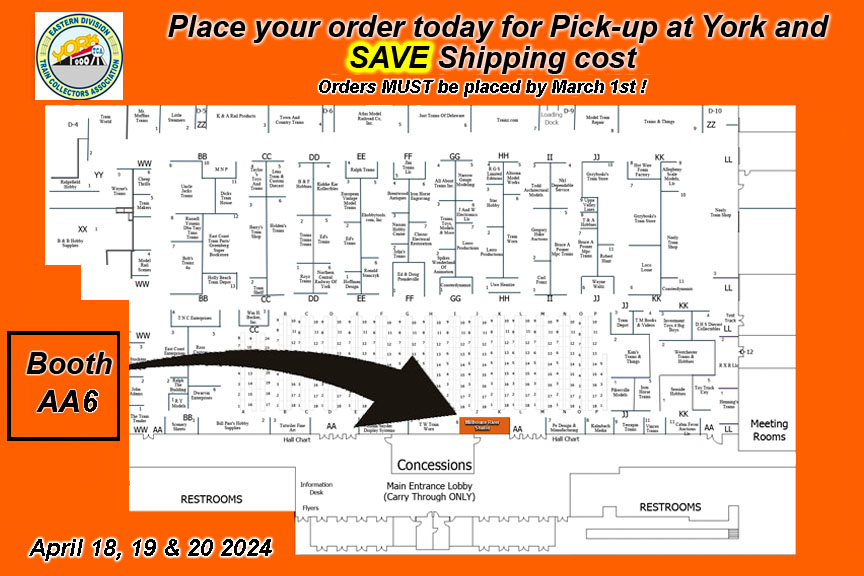
CSX AL, What is your location in the orange hall?
CSX AL, What is your location in the orange hall?
AA-08 I have it marked in yellow on the map below
Alex, thanks for the cool video. I also have a TT from CSX Al. I am very happy with it. It would crawl but I am having a hard time finding a PS that will make it do so. Mine is 2 rail and the only difference with 2 rail is since the rails are a little smaller they are a little harder to see especially when not right up close to it. Also 2 rail is a little less forgiving than 3 rail. If I do not want a derailment I must be lined up just right. What happens with mine is if I miss getting it aligned correctly on the first try (whether I overshoot it or undershoot it) I now have to move the TT a very small distance. As I turn up the voltage (even if I do it slowly) it will "jump" past the intended spot that would line it up. Then I have to go back and once again it "jumps" past the intended spot where it would be aligned. This could happen 4 or 5 times before I hit it just right to where it is aligned and obviously this is annoying and ruins the fun of the turntable. This is in no way a knock on Al's turntable. It is a great product and I would buy another one in a heartbeat. The TT will crawl. I have seen it. It just needs a good power supply that can supply enough power at a low voltage.
At first I used a DCC decoder to power the TT. This is where I first noticed this problem. Then I tried an HO power pack and I still had the same thing. Then on a website (I forge the name) where a guy is building this extremely large 2 rail layout he said he used a motor control circuit from an electronics supply place. I bought that at $50 and although it is nice as you can turn it to the right and the TT goes to the right and if you turn it to the left the TT goes left (center position is off) I still have the same problem. None of them can put out a low enough voltage to make the TT crawl so that lining it up is easy to do on the first shot. Maybe I will go back to the decoder and try different settings.
What power supply do you use?
Hi Phil, I went with the suggested power supply that CSXAL
recommended. It's a HO Rail power 1300 PS, work's awesome.
Very happy with it.
THANKS, ALEX
Even when I first looked at it a little after 6:00am this morning it looked good. must have been about midnight your time. Nice job Alex. Don
Thanks Don, I'm pretty sure you said you were starting to do
some bench framing, how's it going.If you are I would like to see
some photo's.
THANKS, ALEX
Thanks for the reply Alex. I've never heard of HO Rail Power. Is it made by MRC? Approximately how much does it cost? I will look for it at my LHS.
Hi Phil yes it made by MRC
and list price was 39.95 I picked mine up
at a train show and paid 31.00
here's a quick photo of the box
THANKS, ALEX

Alex,
I use the same power pack. I have mounted it under the table so I can sneak my hand underneath when operating. One issue I found is that my yard is 48" high and the turntable is 2.5 feet from the edge of the layout. I now must get on a stool to do a proper alignment of the rails. Works great. Very slow and powerful.
Eliot
Hi Eliot I did the same thing, I mounted it under the table also.
My turn table is only 12 inches away from the edge of the layout
so its pretty easy for me to see.I like Mike CT idea of putting marks
on the edge of the turn table, see mike's post above.Here's a quick
photo of where I mounted my transformer.
THANKS, ALEX


Thank you Eliot and Alex. I've been in contact with Al and if I can't get my Carl's Electronics controller to work better I am going to purchase the same PS as what you guys have. I like the way you guys mounted it too. Nice job.
Here's another way to mount the Railpower 1300, after a few small modifications. I took the 1300 apart and found there were far too many parts to nicely incorporate it into a turntable control panel. After a little tweeking it looked this this:

The output of the transformer with wall power input was 16v, so I cut that out and wired the board directly to 16v track power. Without wall power the on/off switch was superfluous, so it went with the transformer. The output connections were rather bulky and they followed the transformer into the bin. The direction slide switch was lifted off of the board and jumpers were installed from its input to a DPDT toggle switch wired for polarity reversal and from there to the turntable motor. The aluminum heat sink was drilled with appropriate holes and relocated relative to the circuit board and mounted on the back side of the control panel. The speed knob stud protruded through the 1/4 inch plywood far enough to use the original knob.


My only problem so far has been the sleep I've lost because I probably voided the warranty. ![]()
![]()
Why is it that we model railroaders pull our locomotives with the tenders in first when I do believe the correct way was smoke stack first?
Millhouse/CSXAL has the finest O scale turntables to date!


That's a good question.....I have always seen them pulled in nose first.

Here's another way to mount the Railpower 1300, after a few small modifications. I took the 1300 apart and found there were far too many parts to nicely incorporate it into a turntable control panel. After a little tweeking it looked this this:
Gary, That's what I did on my layout to my Railpower 1300.
Thank you Drew for the kind words.
For any of you guys going to York, I will have a 28" and a custom 30" turntable with me for sale if you want one and not wait for it to be built.![]() Drop me an email or call if you want me to hold one of these two for you. Have a great weekend everybody.
Drop me an email or call if you want me to hold one of these two for you. Have a great weekend everybody.
Gary, nice control panel I like the way it flip's down.
Yes as far as I know the engine's are suppose to go in
the the round house nose first. I back them in only for
the look's, I like to see the front.
ALEX![]()
That's a good question.....I have always seen them pulled in nose first.
It's called ease of use. Think about it . Because the back of each bay in a roundhouse is wider you have more room to work so if you back an engine in your going to be bumping in to each other when two engines are side by side trying to get them serviced. With the side rods at the back you have plenty of room to lube and oil the engine or whatever service it may need.
David
Very good points, definetly makes sense.
Access to this requires an OGR Forum Supporting Membership
