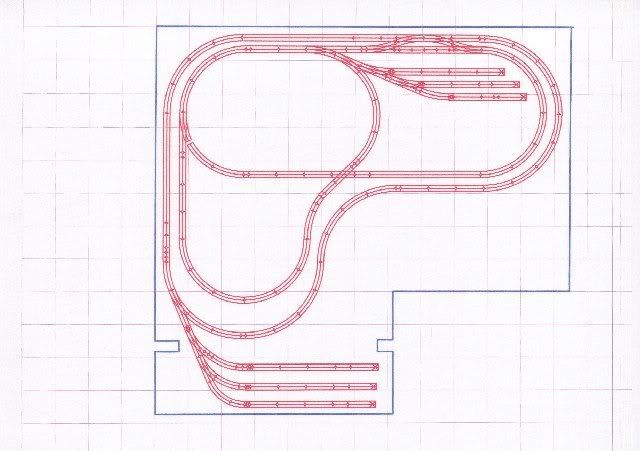
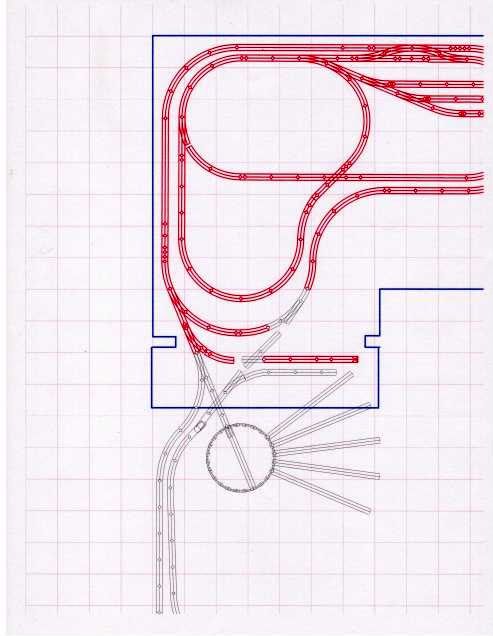
I have been granted permission to take over a side of our basement 12'10" x 14'10" with odd entrances to the room (old house, multiple additions...) This is the first time I'm trying to post photos so hopefully they show.  I played with SCARM for hours and came up with - the fact that this isn't my strong point. I do not have the vision that some of you obviously have on this forum.  Anyone that likes designing track and wants to take a stab at a layout will be GREATLY appreciated.


I'm conflicted on "around the walls" or "take up the whole space" layouts.   My experience with around the room has been that you see the train head on or going directly away from you more than anything else.  I like prefer to see the train from the side or diagonal so I can, see the train. 

I am not opposed to "trap door in the scenery /  pop-up" access. 


I would like to be able to have at least 2 train simultaneous operation so I can play with my kids and not have to think too hard about collision avoidance.   I would like to be able to switch the train from one track to another if desired. I do realize this at least creates the potential for collision.  I am skilled electronically and have set up automatic collision avoidance before so I can mitigate some of that if the kids are playing with each other. Ability to reverse direction is nice (one direction / simple loop gets boring quick).  Point-to-point is too tricky for the kids so it has to be able to run continuous but hopefully have enough switches, reverse loop, sidings to keep it interesting.


I greatly prefer multiple levels over everything flat on the board. 


I have a lot of Fastrack and like that I can put a track down quickly and not have to be screwing everything down. 


Use the widest curves you can.  I don't care for the longer engines and do not own anything that requires more than O31 but the trains do look nicer on the wider radius turns and I could change my mind about the engines some day.


I have conventional and TMCC engines and am familiar with block wiring, switching from conventional to command on different track / areas, etc.


My kids and I like operating accessories.  I have several manual accessories that will need to be up front so they can work the cranks / levers, load, collect the stuffs, etc:

Lionel 6-2788 Manual Coaling Station

Manual Culvert Unloader

Milk platform

Electric Culvert Loader

787 Log Loader

I'd like to acquire a #96 coal loader.


787 Log loader can be anywhere and it might be nice to pass logs from one main track to another.


The 3ft area on the right of the picture could be used as a yard or something extending off to the right rather than an opening.  It is a hallway but there is other access to it so it can be considered a closet that may be used (and I could even put a wall up on the far right end).  Length to the right is about 6 feet.


2

1


Looking forward to seeing what anyone comes up with.

Attachments

Images (2)
  • 1
  • 2
Original Post

Replies sorted oldest to newest

Although I cant send you a plan per se - I haven't any design software......I see a around the wall layout with an "island jutting into the center of the room running from thw NW corner down towards th SE corner.  Keep an aisle open....make the "around the wall" portion no wider than 3-4 feet.  I fully understand you said aren't keen on around the wall; but having aisle "fingers" wide enough for us old farts (I'm 58) to walk to the "corners" of your layout.  With 3 foot wide aisles and/or layout areas,  you could fairly well reach and fix a derailment.  If you had a layout centered in the room it would be a kinda mundane "loop de loops".......circles of track.  But a "stretched out" layout?????????    Man, you have room for 1 or 2 reverse loops....a yard........even a sort of "point to point layout".  For your straight runs don't forget a suggestion that Rich Melvin once made.....put a little curve here and there in your "straight runs".      It makes the trains look more interesting as they go by, AND real train tracks rarely run in perfectly straight lines.

   rots o' ruck


Last edited by redjimmy1955

I've got to say!  I've got to!  It just kills me to look at the issues of Model Railroad Planning and then Great Model Railroads and time after time after time after time you see all this great advice being dumped in the trash can between the two.  I'm sorry but there's nothing great when you have to constantly, routinely duck and crawl to operate a layout.  I've said it a million times.  Sooner or later you will be very sorry that you did.  I'm not trying to be a pain.  I'm trying to save someone the pain that will come. 

It would be foolish of me to not learn from others mistakes! 


If I understand redjimmy correctly...  

3

something like that...   That is definitely more interesting, in my opinion, than just around the walls.   This would give about  3ft width in each section.  The upper left still looks like it could be a problem to access as it would be about 5ft from the nearest point by the island to the corner.  I suppose that could just be scenery back there and then there shouldn't be an issue.   The turn arounds on the bottom right seem like they would be tight but I might be able to widen the ends and leave enough space to get into the middle. 

Attachments

Images (1)
  • 3

well what the heck! the first drawing you did was about spot on!  the others not so bad, but to me, the other plans are  still a bit of a "jungle " to walk around.  john c and rick c (are they the "C" twins?)lol are really correct in telling you your knees and back will kill you if you build a crawl under layout. It's your baby but I vote for the first drawing you did.

  it will be great no matter which u choose........


Originally Posted by John C.:

Please seriously consider an idea/plan that will give you walk-up non-duck under access to all portions of a layout.  Those totally filled rooms with the board covering everywhere will eventually become a major pain in the asphalt.  No kidding.

OH, how I learned that the hard way!  Terrible mistake on my part!

I've already posted that comment a ton of times on this website.  I'm always concerned about constantly making people want to kill me with seemingly negative comments.


Honest to goodness I'm just trying to save them from being really frustrated, angry and upset down the road because for the ka-zillionth time, sooner or later you're going to be sorry when you have to duck and crawl.  I realize that you have to regardless...everyone has access issues for maintenance cleaning, etc., but I'm talking about every time you go to the layout to operate it.  Oh!  Oh!  The pain again!  I'm just thinking about it.  

andy b....once in awhile I go back to look at your other choices.  The one i call Plan 3 isn't so bad either. Its the one with the island jutting from right middle to left. Yeah you have narrow walking lanes, but you gotta take what you have and work with it.  the center island would be a yard. Even a small yard is better than none.  and it looks like you may have room for TWO main lines.  look at the march/april issue of OGR and it shows that ol' Jim Barrett putting a "pull up bridge" crossing one part to the other of his new layout.  give that a thought..........


andy b, I have some questions...

Do you want an industrial area to handle the accessories? or just spread them around?

Do you have enough trains for storage or want a yard?


I see 048 and 036 fitting nicely in your area. If you want to go around the entire perimeter with a lift-out in front of the entrance you could use 072 & 084. 060 is just strange to me, the geometry using 060 FasTrack doesn't flow well, so I skip it. What do you think...block or don't block the entrance?

The 3ft x 6ft area could be tied in at any time as a place stage trains out of site. I would wait until you need it.


Then, I could shoot something your way with the SCARM file to play with to perhaps get you over the software block and start some ideas flowing.

You could just sketch on paper for shape and flow. You visualized the space usage well. If you get a sketch you like and want track details and fitment, post a picture of it and someone could build it in RR-Track or SCARM for very close track fitment and inventory.

 I WILL MAKE A SUGGESTION,

WIDEN THE PENINSULA TO 4 OR 5 FEET, AND REDUCE THE WIDTH OF THE AROUND THE WALLS PORTION EXCEPT WHERE WIDER CURVES ARE DESIRED. ALSO USE RADIUSED CURVES OR 45 DEGREE CUTS AT ALL INSIDE AND OUTSIDE CORNERS, IT LOOKS BETTER, GIVES A MORE FLOWING, NATURAL APPEARENCE. AND YOU WILL NEVER BUMP YOUR BODY INTO A SHARP CORNER . ONE CAN MODEL ALOT OF CONVINCING SCENERY IN 24"

Last edited by CLIFFORD

my observations:  keep areas against a wall below 24 inches, fiure a reach of 24 inches max, our backs get old and a fully sceniced layout is not one you want to have to stand or kneel upon to service.

think about a larger center portion and use elevations to "create" more space.

think twisted dog bone and don't forget a yard at one end..

always start with what you plan to run and design your layout around that

I will try and do up a plan but have to load some software in this new machine first!

and the last thing put in a stub end siding where you plan on going through the wall for the extension! :-)  

Originally Posted by CLIFFORD:

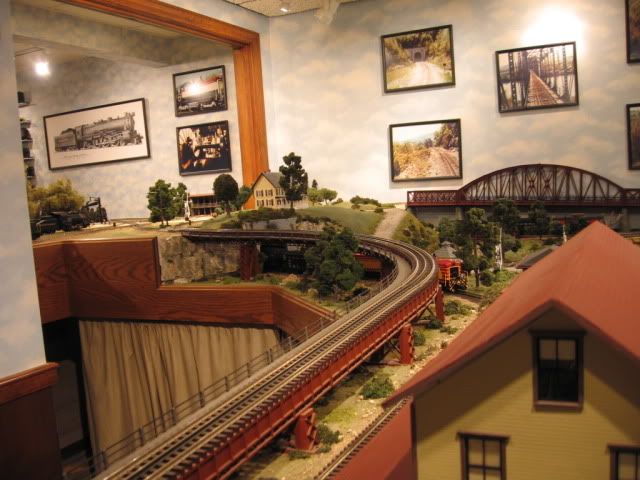
MIKE CT, WOW WHAT A GREAT USE OF SPACE.Thank you  THAT LONG EASY GRADE IS BEAUTIFUL AND FUNCTIONAL, GREAT JOB. MAYBE YOU CAN POST A FEW MORE PHOTOS SOMETIME.  YOUR TRACK PLAN IS NEAT AND TIDY TOO! IS THAT CLOUD WALL PAPER? Wall paper is from Sherwin Williams.  There are two different cloud patterns in the two rooms.  WHATEVER IT IS , IT WORKS! !  

Again, Thank you,

Mike CT


Moonman, Clifford & Mountain Man, I appreciate your questions and advice! I doubt this will be my last layout, but I'd rather not be causing myself undue trouble.  The suggestion to keep it to 24" along the walls... I would NEVER have thought to do that.  Greatly appreciate the photo showing how much you can do in just 24". To answer a few questions:


I  envision most of the accessories spread out. In my mind that allows more than one person to play without competing with each other to get in a common area. An industrial area for some of them that go together perhaps, such as the coal & logging accessories.  


If using the plan with the island coming down on a diagonal from the northwest, I see the left being the country side, etc where the logs are gathered, coal is mined, corrals... and the right being the town where the logs are dropped at the saw mill, coaling station, milk platform...


I currently have 5 trains... but you can never have too many right   4 are conventional, so need a parking place when the track is at 18v. They may have to go and be replaced with command control for simplicity.  My three year old is awesome with the conventional controller but our layouts have been simple carpet deals thus far and no larger than 5 x 7.   I'm thinking a LionChief might be more appropriate on a layout for him so he can control his train on what ever track from where ever.   A yard would be nice.  I do have the 3 x 6 area on the right that can be a yard which keeps from yarding up a bunch of the main room... though I have seen some excellent use of the inside of loops for yards that costs no extra space., such as Mike CT's layout example.

ANDY B,

          REFERING BACK TO THE SKETCH, IT IS JUST AN EXAMPLE. TRACKWORK SHOUD BE MUCH MORE INTERESTING, SHOULD NOT RUN ALONG THE WALLS, BUT SHOULD BE AT ANGLES. CROSSINGS, GENTLE S CURVES ETC.. IF YOU PUT A BACKDROP ROUGHLY DOWN THE CENTER OF THE LARGE PENINSILA, YOU COULD MODEL CITY/INDUSTRIAL ON ONE SIDE AND RESIDENTIAL/ COUNTRY/ FARMLAND ON THE OTHER. MAYBE HAVE A GENTLE DISAPPEARING GRADE FROM ONE CORNER ALL THE WAY TO NEAREST THE ENTRYWAY TO FACILITATE A LRGER, PARTIALY "HIDDEN" STAGING YARD. YOU HAVE PLENTY OF ROOM FOR AN EXCITING, CONVINCING RAILROAD EMPIRE REMEMBER THINK IN 3D! LEAVE ENOUGH ROOM TO BEND OVER, CRAWL AROUND AND GAIN ACCESS TO ALL AREAS OF THE LAYOUT. WALKWAYS MUST BE AT LEAST 24" WIDE, 30" WOULD BE BETTER. ON MY LAYOUT THE TRAINS DISAPPEAR BEHIND SCENERY, TUNNELS CUTS ETC.. IT IS EXCITING TO SEE THE TRAIN COME N GO WHILE TRAVELING FROM PLACE TO PLACE. OK ILL STEP DOWN OFF MY SOAPBOX FOR NOW. THANKS , CLIFFORD

020

Attachments

Images (1)
  • 020: R HAND VIEW OF MAIN LAYOUT

Clifford and John C.,

Thank you for the kind remarks, but I missed an important given...run at least two trains simultaneously with conventional control. FasTrack needed too many fitters and there was a fortune in switches.


andy b.,

Here's another layout for your consideration. Two mains, one elevated, two mountains and limited switches plus the closet yard. This let's you add bridges where you like to the elevated loop. The lower loop can have switches added any where for a passing siding and stubs to access your accessories along the front. I was thinking the left side mountain tunnel for mining (hidden parking).


andy b_3_Entrance View

andy b_3_Back Wall View

andy b_3+2d_Track View

Attachments

Images (3)
  • andy b_3_Entrance View
  • andy b_3_Back Wall View
  • andy b_3+2d_Track View
Files (1)
Last edited by Moonman

andy b.,

Here is a loop to help you visualize an actual around the room loop. It would need 2 Atlas 40" trestle bridges for an 80" lift-out section to cross the current size of the entrance.


This would get you a nice large loop for the scale locos and rolling stock. It could even be a shelf run at 6.5~7 feet and not need a lift out.


Just some food for thought...

Attachments

Images (2)
  • andy b 072 with lift_out
  • andy b. 072_3D
Files (1)
Last edited by Moonman

Moonman.  Wow.  Just wow.  Those are some great plans! Thank you so much for your time and talents.  I really think that second one will work.  Hidden parking in the mountain!


The loop with the lift out across the entrance is also a big help.  My 3 yr old son saw the other plans printed out and said, "What's that"  He eats, breathes, plays and sleeps trains. If it was up to him a train would come out of the pantry and deliver his bowl of cereal to the table in the morning.   I explained people are helping us figure out the track for our basement. "Here's where the door from the garage is," etc...  He immediately said, "That's not how it goes. It needs to go like this daddy." and penned in some track across the entrance... very similar to your third plan addition.  Now to get that part of the plan approved by the wife.  She initially was against crossing the entrance no matter how accessible it can be made.  The photos of the actual layouts has done a great deal to persuade around the unwanted things she was picturing in her head. There have been a lot of "Oh that does looks really nice.  We could do something like that" moments.  Thank you all for sharing your beautiful layouts.


Clifford, that is some top notch work.  A real feast for the eyes! I love how you embraced the support pillar rather than avoid it.

ahhh boy can moonman configure a layout. I'd have to say that his first suggestion(example) is my preferred one. That's the one with 3 tracks in the back. It really is the schizzle on account of you can get REAL busy and UN-BORED at making those trains cross over from 1 track to another and then back again.

       And it has reversing loops........that really helps in "play" value.  Now to counter my own mantra of "has to be around the walls" I must give huge respect to Mike C's plan. Yes it fill up the room (no walkways) but it's strength is in putting much scenery in the open spaces, And after you initially, before adding any scenery, make sure the trains and rails work (electrically) fine...do trains really derail that often.  Consider Mike C's as more scenery busy-able and moonmans' is something I wish I could/or would build. You might take moonmans' idea and STILL place a little bumout/spur in the middle, 


Last edited by redjimmy1955

andy b,

What I attempted to provide you was a base that would get you going with 2 trains running conventionally. It's plenty of work to get that far. I attached the andy b_3 SCARM file for you to download and modify to your liking. You'd really have to shrink the entrance to ~48" for the lift-out/up to be practical. Also, you may want to leave the mountain bottoms open or cut-out in the center to be able to access the eventual mishap or broken coupler. The kids may like watching the trains in there. In 3D mode you can remove the terrain and just see the track and supports. I removed the supports for a better 3D effect.


All of the suggestions by everyone were great and I took those into consideration. Using this foundation, you can add the yard later, add a peninsula later, and even change the elevated to the 072 loop and add it in.

In the b_3 layout, I reduced the amount of small fitters. You'll also see 5" pieces near tunnel ends where in the actual build a 10" or 30" will work. They were only for the 3D effect by SCARM's design. It ends tunnels at track ends.

I also tried to reduce the number of switches. Expensive buggers.(even for the real RR's) The reverse loops can use manual switches, except for the two on the yard r-loop, which you need control of there. The FasTrack non-derailing feature will let a train push through a switch with the points left in the wrong direction. So, you get alternating direction.


Nice to hear the whole family is getting involved. My inspiration comes from my 2 1/2 year old grandson. He's becoming the "Fat Controller" of our railroad. Yesterday, I stepped into the shop area while he was running the trains and I heard my scale Alaska diesel fire up. That's not his train yet, but I guess he thought it should be. Not LionChief, but Cab1 TMCC. I didn't teach him how to use it yet! And I thought I was safe.


Keep us posted as you progress. You'll find so much knowledge and experience on the forum. Most of all, Have Fun!


Last edited by Moonman

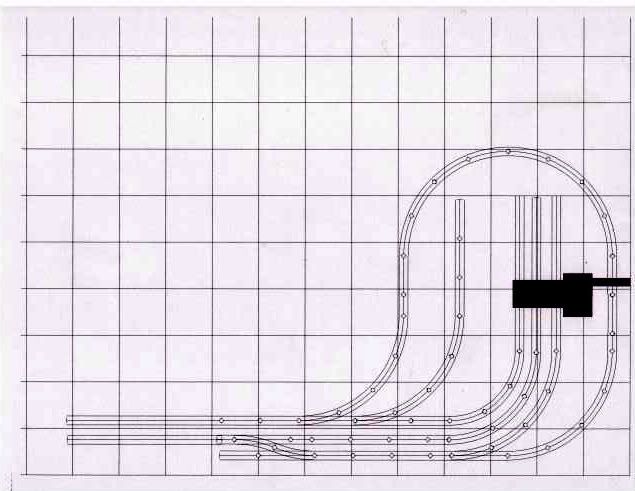
We were working 12' X14'  There is another added piece that has the two cross overs that allows for reversing direction and back again.
Final section of the layout.

Cross over was added near the throat of this part of the layout.   Note cross over added with a right and a left switch.


And the second cross over added with a left and a right switch.   Near the turntable.

Last edited by Mike CT
Originally Posted by CLIFFORD:

 RICKC,   THANKS FOR YOUR INTEREST.    HERE IS A TRACK PLAN AND A COUPLE PHOTOS  AND THE INFO, GO TO PHOTO ALBUMS, LOOK FOR LAYOUT PICS FROM FEB. 25, 2014 THEY ARE THERE ABOUT HALFWAY DOWN OR SO.  CLIFFORD

Nice layout Clifford! What size Curves do you have in there?

Last edited by Seacoast
Post
The Track Planning and Layout Design Forum is sponsored by

AN OGR FORUM CHARTER SPONSOR
×
×
×
×
Link copied to your clipboard.
×
×