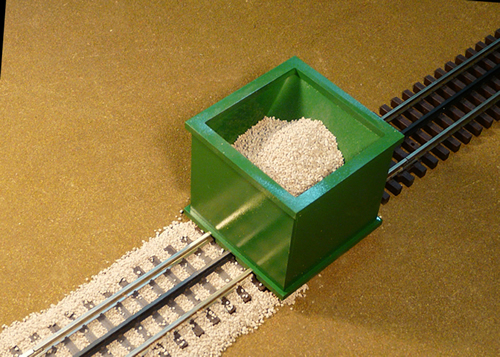
guys,  I bought some loose gravel ballast materials to add and build up the areas around the track.  I wondered what tools did you use to evenly apply the ballast to the sides of the track? some sort of funnel?  I tried this before and with no control at the end, became too hard to keep from unloading a ton at a time! 


any suggestions from the pros??  thanks Chris

Original Post

Replies sorted oldest to newest

I've done FasTrack ballasting not RealTrax but it's pretty much the same deal. The fastest/easiest I've come up with is to mask the rails and ballast edges with blue painter's tape. I then spray the remaining exposed areas with 3M General Purpose Adhesive. I buy this stuff at my local Big Box store.

I then apply the ballast with a plastic cough syrup cup, smooth it with a disposable paint brush. I soak the ballast real well with a spray bottle filled with alcohol. It is glued using an infant nasal syringe to apply Woodland Scenic Cement.


You didn't ask, but in between the rails get a coat of alcohol with a few drops of India Ink. The sides of the rails then get painted with a Floquil pen (Rail Tie and/or Rust Brown).


Have fun and take your time.


Gilly

Last edited by Gilly@N&W

A shaker like the ones offered by woodland scenics works well, sometimes for tricky areas I use something small like a spoon.


I'm not sure what look you are going for.I ballasted my fastrack by spreading  full strength elmers white glue on the plastic roadbed shoulders with a 1" foam  paintbrush.


This layer of glue holds the ballast onto the plastic roadbed, then I go over it with diluted white glue ( 60% water %40 glue or so,I pretty much mix it to a consistancy I like not terribly scientific), an empty glue bottle works very well for flowing the diluted glue. No masking required.


I still have to weather my track and between the rails but this will give you an idea.


002

009

Attachments

Images (2)
  • 002
  • 009

wow a car just for that purpose!  I thought of taking a funnel and taping the end part shut so I can control the flow.  the small box idea looks good also.  well, I guess I have to figure it out.  Ill post some pics, I just finished painting some areas and painted my roads and such.  the balast will be one of the last things to do. 


thanks guys!

Originally Posted by Chris D:

guys,  I bought some loose gravel ballast materials to add and build up the areas around the track.  I wondered what tools did you use to evenly apply the ballast to the sides of the track? some sort of funnel?  I tried this before and with no control at the end, became too hard to keep from unloading a ton at a time! 


any suggestions from the pros??  thanks Chris

Hi Chris,


I also have RealTrax and was thinking about doing this.  What color/brand did you end up buying?


Best!
~MattS

I have one of these (mine is gray). Bought it off of eBay from a fellow in Istanbul, Turkey. It does a wonderful job and I've used on Atlas and Gargraves track. However, I would never consider using it on Fastrack. The bulk of the ballast will go between the rails. With FasTrack you don't need any additional ballast between the rails. There are little slots directly above each rail. even is you taped off the center slot, the two side slots would still be dumping ballast where you don't want it to go.


This is my first reply to this forum, but I thought it was time to contribute since I've learned so much from the forum. I first hand painted the ties with Floguil brown and rails with Floquil rust. You don't have to be neat painting the ties, just keep the tie paint off the rails. I then applied Woodland Scenic Hob-e-adhesive to the outer angled edges and pour Woodland Scenics gray blend, course ballast over the adhersive only with a very small cup. Once this dried, I began placing the ballast by hand between the ties and used a dental probe to move the ballast off the ties and the rails. This part takes a lot of patience! I lightly saturate the newly placed ballast with rubbing alcohol from ear bulb syringe and then apply Woodland Scenic cement from an small Elmer's glue bottle. The result is pictured here. For the switches, I kept the moving parts area free of ballast. I plan to weather the track and ballast with an airbrush soon. 

Attachments

Images (1)
  • DSC02850: Realtrax Ballast
Last edited by ARC

I used smallest chicken grit, with some black and gray paint mixed in with batch of ballast, (to give it color).  Elmer's glue/water mix with turkey baster and masking tape on top and base of track to ensure straight and even lines. Actually taped the track entirely over the center and left only edges exposed, also taped the surface of the layout about 1/4"-3/8" I pulled masking tape up gently before it dried and was careful to not slop on the ballast to thick.  Here are a few pictures. 


I too know all about time. I've been working on my layout for 5 years and I'm still a long way from completion. We all know a layout is never complete, but I would like get the plywood covered. I try to work in small sections on the layout for scenery and ballast. It just my opinion, I think finishing your mountain coloring first is the right course of action. You don't want to get paint on finished ballast work. Looking good and enjoy!

Post
The Track Planning and Layout Design Forum is sponsored by

AN OGR FORUM CHARTER SPONSOR
×
×
×
×
Link copied to your clipboard.
×
×