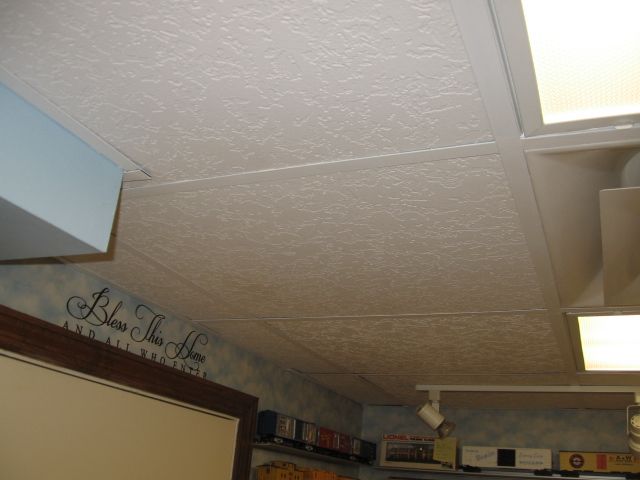
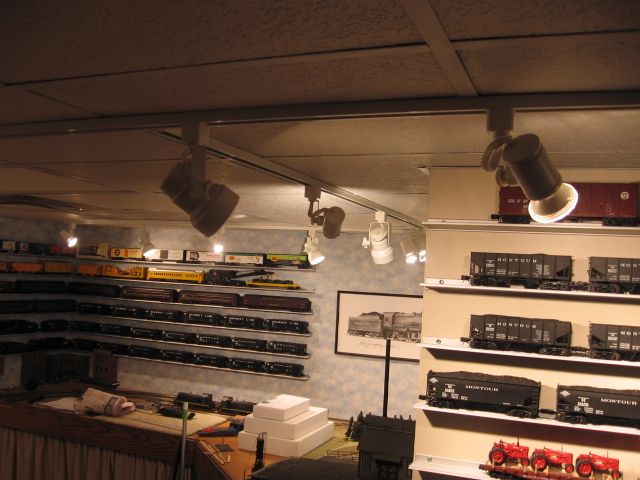
I’m learning to install a drop ceiling. I need to finish this annoyance before moving the layout into its final position.

I have the grid in place (mostly). All the grid pieces came from Home Depot.

My question is with regard to the 4 foot rails and the wall mounted “L” brackets that are screwed to the wall. Since the 4 ft rail has to sit on top of the horizontal part of the wall bracket, I assume that I need to cut of the tab (not just bend it out of the way) that sometimes go thru the vertical slot in the 12 ft long rail and to trim about an inch off the end of each ceiling panel that is nearest the wall in question.

Thank you in advance.

Original Post

Replies sorted oldest to newest

Rich -


I just checked my dropped ceiling that was installed by a professional contractor.  (I have also installed a ceiling in the basement.  You're correct, not an exciting phase of construction.)  The cross pieces just rest on the horizontal part of the wall bracket.  The cross piece is cut so that it is a snug fit when resting on the wall bracket.  It would probably be best to cut the tab off rather than fold it around, since that would provide a possible snag when installing or removing the ceiling panels in the framework.  I agree with Clifford, use tin snips to cut the rail.


Mike

Last edited by MdMikey

If you just rest the bracket on the wall "L", its flat bottom will not be on the same plane as the horizontal bottom of the "L" and you will see a small gap between the tile and the bottom.....that get more evident with time.


The  optimum solution is to cut the flat off of the bracket rail so that both horizontal surfaces are on the same plane, and thus the tile is on the same plane, not riding up hill in spots. Look how the center rails are flush at each bottom where they cross/connect. Theoretically, the tile sits flat on each piece w/ no gaps. The wall can be made the same way...with work.


Notice I said the ideal way. I sit typing this under my tiles I installed in 1996, looking at the small gap (equal to the thickness of the metal I did not cut out) that is along every wall joint. Does it bother me? Well, I have not changed any since the last one was installed. But knock yourself out if you are looking for perfection.


I wasn't, I just wanted it over! Greg

What is the room dimension?   There is a pretty good chance you need (two) of those 12ft long (main) tee bars.  Then the pieces you are cutting, that fit to the wall, are 2 ft or less.


Support wires, for the main (12ft tees), to the framing structure should be every 4 ft with the appropriate wire. More wires is better.


Recess light fixtures, (any light fixtures or heating vents) are to be supported independent of the drop ceiling, more support wires. At least two wires per 2ft X 4ft drop in fixture.
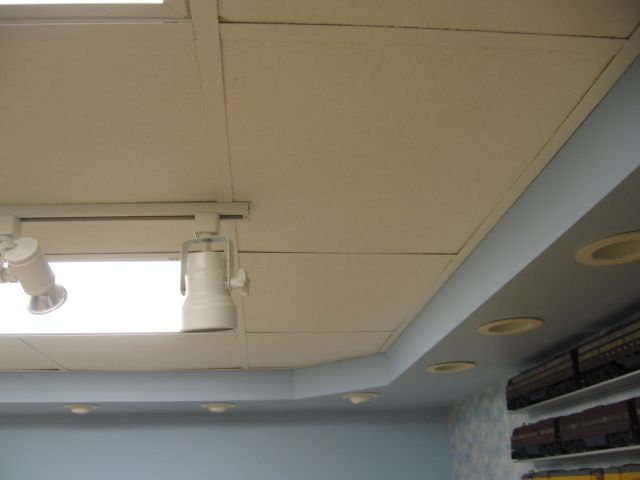
This picture shows the end of a light fixture centered in the room.  End of the light fixture is a main runner.  The other main runner is the other end of the light fixture(s). Two long mains in this room.  There is a short main piece also.   Note that the pieces, to the wall angle, are less than 4 ft.  I used the 2 ft cross pieces and installed 2ft X 2 ft tiles.

This room is similar.  The main tee bars, (two), are the ends of the light fixtures.  (2 foot) cross tee bars were also used in this room with a drop tile.  Idea is to keep the wall cut pieces as small as possible and center the tile in the room, not the tee bar. IMO.  

A few more pictures.

Last edited by Mike CT

This photo is a perfect picture of how the tile will ride up on each end if the cross member is rested on the wall rail, without cutting the bottom off to make it flush.

Note how the tile is flush in the  center by the wall, but rises on each end as it sits on the small metal strip that has not been cut off of the member. Most people put up with this, very few people bother to trim each piece on the end of that it fits flush. (I did not, anyway.)


Greg


Using a drop tile you can't notice the ride-up.  Can't say I've ever seen a commercial installer cut and fit tee bars to the wall angle as you have mentioned.  I have seen the entire grid raised the size of the drop on the tile and small legs bent down on the tee bar that sets on the wall angle then the double wall cut shown below is gone.  Saves quite a bit of time on tile installation. 

Using 2' X 2' tile also helps, the natural tendency of these fiber tiles is to sag in the middle causing the corners to lift, especially in a humid environment. 

All tile and grid pictured are 30 years old, some modification was done with the train room remodel.

The white grid was painted, originally black. 

All the flat tile was also painted.  It was painted in the garage laying flat on the work bench. After 30 years this Armstrong tile was still available.   If you attempt to paint the tile in place the paint moisture will cause the tile to sag/lift as has been mentioned.  If there are water stains on the tile, (brown spots), a stain blocking sealer is used before finish paint.  

The drop tile is a directional tile, there are arrows on the back side.  All arrows have to point in the same direction. You can notice this, if you place a tile 90 or 180 degrees out.
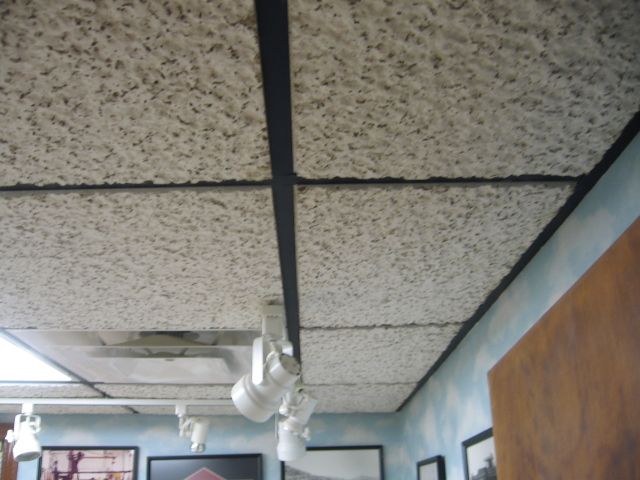


Last large commercial job I was on.  Even the power wires to the light fixtures had to be supported separately from the structure.  Nothing was to be laying on the tiles or supported by the grid other than the lay-in tile.  Some installation have clips that lock the tiles in place.  

There were inspectors who wanted (4) wires on each light fixture, most would go with (2) that I had previously mentioned.

Last edited by Mike CT

Do not install the ugly grids and panels that make your ceiling look like a office. Spend a few extra bucks and buy the planks that install on the outside of the grid work. These look soooooooo much better! I get comments on the ceiling I did everytime someone comes to the basement like: " I am impressed you did not do the plain drop ceiling"  I will post a picture shortly.


http://www.armstrong.com/resid.../_/N-1z141rfZ1z141qw

Last edited by moed321

I went to Home Depot and picked up one of the how to guides back in the ceiling grid section.  Your tiles should be symmetrical.  Find the center of the room and install the 12' pieces two foot from the room center line.  This will allow a 4' panel down the center of the room.  I cut the ends off and used a pop rivet to secure them in place.  I picked up one of those laser levels that spin and marked the walls all the way around to fasten the L brackets.  Get the drill attachment to install the wire screws in the joists.   

Originally Posted by jmiller320:

I went to Home Depot and picked up one of the how to guides back in the ceiling grid section.  Your tiles should be symmetrical.  Find the center of the room and install the 12' pieces two foot from the room center line.  This will allow a 4' panel down the center of the room. That's the way it should be done.  Most likely it will take (2) 12' Main runner pieces.  I cut the ends off and used a pop rivet to secure them in place.  I picked up one of those laser levels that spin and marked the walls all the way around to fasten the L brackets.  Get the drill attachment to install the wire screws in the joists.   


Originally Posted by moed321:

Do not install the ugly grids and panels that make your ceiling look like a office. ......................................  Many years back Armstrong had an invisible suspended grid system that worked with their 1' X 1' acoustical interlocking tile.  They still manufacture some of the same tile but not the inter-grid system.    It was a very good attempt at getting away from the 2' X 4' office ceiling tile look.

A suspended grid ceiling done 36 years ago.  Removed about 12 years ago to install duct work for heat/AC and re-installed.  Part of the ceiling was removed recently for a water leak, re-paired and re-installed the 2nd time.  The ceiling has been painted once in the 36 years.  There is an interesting spring clip installed along two walls that maintains tension, and allows for expansion/contraction of the ceiling. The room is 22' X 20'.


Last edited by Mike CT

You guys do nice work...

I took a little different approach and staggered the 2 footers to match the floor in the train room ..this way i didnt have to worry so much about a straight line in a long run..


Picture taking from the same spot -couldnt get ceiling and floor at same time...

DSC_0758


DSC_0757


 One thing i ran into was my beams sit at 8 ft at the bottom.. i was scratching my head ,how was i gonna attatch the L bracket to the steel. Once i got started i realized that i could just "hang"  the ceiling to it by just using another armstrong support instead of the L that usually goes against a wall.. This left a space between support and steel. had i planned it better i wouldnt of had to cut the tabs off.. i could of bent them behind the ceiling support. It still worked out ok and i got a few extra inches on the height...


DSC_0759

Attachments

Images (3)
  • DSC_0757
  • DSC_0758
  • DSC_0759
Last edited by Patrick H
Post

OGR Publishing, Inc., 1310 Eastside Centre Ct, Ste 6, Mountain Home, AR 72653
800-980-OGRR (6477)
www.ogaugerr.com

×
×
×
×
Link copied to your clipboard.
×
×