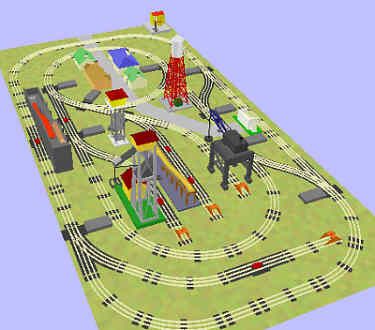
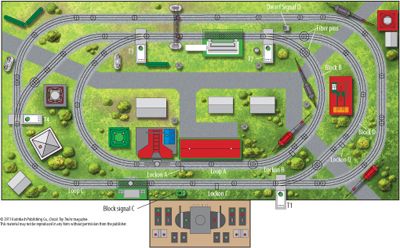
Here is a track plan I found, along with a couple that are 1 foot to long but I could probably shorten them to fit my 4' by 7' requirement.  The one thats an attachment is the initial plan that I like and fits my actual space.  These other 2 are 8' long.  The layout table will be built from 1x4's with a plywood top and bottom.  The bottom is very thin and in 2 pieces to allow access to layout wiring.  This will be hinged to a 1x? (as deep as I can get at Lowes) that is fastened to the wall studs with "L" brackets with those same brackets mounted inboard at each corner to build the frame.  Everything but the train table top will be stained with Spar Varnish like I use on my boat. I will paint the table top either green or white depending on which theme I decide on.  Track will all be Lionel postwar Tubular.  With my small 8' by 9' train room, building a layout of any kind has been a challenger. But I remembered this set up for a table my best friend's father built.  Now he had HO trains but I think the basic fold up idea will work for Lionel.  I will make the frame on the wall as deep as I can to minimize what I have to remove from the table after operation.  Will mostly be my 394 beacon ect that will be to tall, and possibly the ZW transformer.  The table will have 2 latches on the upper side corner to lock the table closed and two legs that fold down on each side to support the front with the hinges carrying the load at the rear.  The inside of the frame can then be made into a back drop of some kind.  The bottom/front of the closed table was cork board on my friends childhood set up, but I am going with varnished wood and the word "LIONEL" in the raised wood house letters you can get.  I will paint them orange.  I might get a couple nice prints and frame them and mount them on either side to give the whole thing a nice furniture grade look when closed.   Pics once I start construction, going to price the materials soon.   Mike P.S.  The pictures are just for the track plan, not all the accessories BTW.  


Attachments

Images (1)
  • 4x7 031 tubular
Last edited by artfull dodger
Original Post

Replies sorted oldest to newest

Just got back from Lowes, I can get 1x12x8's there so that is what I will use for the wall frame. Estimated just under $170 for all the materials other than screws and I already have those.   Just waiting on kitchen clearance to make the purchase, we didn't have the big truck to haul the 2 sheets of plywood tonight.  Wasn't gonna get it all my my wife's Ranger.  Mike

I was thinking about using piano hinge attached to your accessories so that they could be folded down and held down with a small hook or latch.


Now that I see you'll have a deep wall, that may work.


I was working with the track plan and see a problem with the switch motors for the 072 22.5° cross over switches. They don't seem to fit and may interfere with accessory placement.


Are you using 027 track? I used O.


Attachments

Images (1)
  • Artful Dodger
Last edited by Moonman

I will modify the plan to use Lionel 0-22 turnouts and all 0-31 track.  I could use 0-27 height track, but do not really like any of the remote turnouts in that size rail. The old 0-22's are bulletproof and already set up for constant powering from a ZW. I will have to tweek it to fit a bit, but its has most of what I want.  I probably will delete the front crossover at the beginning till I can afford to get enough turnouts.  Need 6 total, 3 right and and 3 left hand.  A few accessories, depending on what I get, will need to be removable.  Such as my 394 rotating beacon.  I wanted it deep enough to perminantly mount the ZW to one corner of the layout. I am getting ready to dig out my 1950 Lionel set manual to see what track plans it has in it.  Debating what 2343 set to recreate, passenger or freight.  Probably will be freight for now, since its cheaper.  Mike

About the ZW- Lionel's LCCA Modular plans use an 8 conductor 12awg wire with trailer type connectors.


I built my power table specifically for the modules. When you cut one of the cables in half, you have 8 wires to connect to the transformer(s) and 8 to the bus with a male and female connector. Easily unplugs to store the ZW elsewhere and then connect when it's train time.


Connector cable


Lose the weight and complication of making it fit.  Just a thought. I like your fold-up idea so much. Kinda like a '40's or '50's Murphy bed. A Murphy layout.

Last edited by Moonman

Here's my take:


Layout 1 (attachment)

- fits space.

- requires 7 turnouts.

- allows 2 trains to run unattended.

- provides crossover between ovals.

- allows trains to be turned.

- - turning train running clockwise requires backing up because there is a single reversing loop.

- single siding might not add enough interest to justify the cost.

Layout 2 (top photo).

- oversized

- - might be able to be compresses 1 track length if there is a straight section between the crossover turnouts (or if circle is deleted).

- - compressing with render some sidings useless because they will be too short.

- requires 10 turnouts adding to expense.

- - if compressed, some turnouts won't be needed.

- provides ample space to park cars.

- adds operational options with plenty of (costly?) sidings for moving cars around.

- circle at top seems completely useless and requires 2 costly turnouts.

Layout 3 (bottom photo).

- very similar to Layout 1 without the reversing loop.

- oversized.

- - easily compressed by removing straight sections from both ovals.

- - compression will shrink both ovals.

- requires only 4 turnouts decreasing costs significantly.

- also provides crossover between ovals.

- also allows 2 trains to run unattended.

- provides most space for landscaping.


Layout 1 would be my preference simply because I like revering loops. Having only 1 will force you to back up at times which may add to the operational enjoyment. Eliminating the reversing loop would reduce the cost and the inner oval would be larger than the one in Layout 3. If it weren't for the reversing loop, I like Layout 3 a little better, though I think compressing it to fit 4x7 might shrink the inner loop too much. When it comes to building, the turnouts for the reversing loop in Layout 1 could be added later.

I am working on a deal to get all the turnouts I would need, IF, I choose to go this route.  its between building this set up and picking up more Lionel 3 rail stuff from the early postwar era.  Or, I can scrap this idea and build a narrow shelf layout that goes around the walls of my small room for the 2 rail O scale stuff I have.  I am on the fence and cannot decide which way to go.  Mike

I guess it would depend on how often you run trains and how much hassle it ends up being to fold things down, put buildings and rolling stock back on the layout, etc. With a narrow shelf, you could run trains anytime without much hassle, maybe just a lift-out for entry to the room. FWIW, I once had an bi-level 8x8 HO & N layout on a pulley system above the car in the garage. It was pretty simple to back the car out, lower the layout and run trains. It was only 1x3's and 1/2" plywood and I never got to the landscaping stage because I got reassigned, but it was a lot of fun while it lasted.

The biggest hurdle to an around the walls layout is the lift out section needs to be about 3 feet long and in the middle of a curve. It would also have to be self supporting and "keyed" into the benchwork on each end to maintain precise track alignment for 2 rail scale flanges.  My friend and I were discussing this today and might have some ideas as to how to maintain that track alignment and allowing the section to be easily removed for access to the room and the closet in the room.  That is a requirement of my wife.  I do mostly love to run trains and that scale F unit runs really nice.  But I also love my 2343's, I guess I could always just use them for the xmas layout each year. To many choices and not enough, spare, time or money. Mike

I am proceeding to build the fold up layout.  We purchased all the lumber and hardware this past week and I scored every track switch I need for $35 at the show today!!  A gentleman had O72 turnouts for $8 each and 0-22 for $5 each.  I bought the 0-72's right away for the asking price.  Then after I found nothing else I needed right away, I pulled up my track plan on my smart phone and went back to get the 022 switches.  I paid him for 1 as thats all I could afford (I needed 3 total) and he up and gave me the other two I needed!     Mike

Here is a picture of the beginnings of the frame. The top is fully mounted to the wall, the sides are just held on with a couple screws for the moment.  The sides will get one of those heavy duty "L" brackets in each corner to add rigidity to the frame. I will put the bottom board up tomorrow.  My wife is sick and doesn't want to hear any more drilling today.  Atleast I was axle to make some progress.   Need to get rid of a few magazines now, time to reduce the clutter in the room.   Mike

20151206_153211

Attachments

Images (1)
  • 20151206_153211

Here is a progress picture, laid out all the track I have on hand.  Just short a few half sections and some custom length short pieces.  I do have all the turnouts for the dual loop including the 072 crossovers.  Not exactly sure how I will deal with all the wiring from the turnouts to the controlers, since the layout folds shut, a conventional control panel isnt going to work.  Unless it just sticks up in the air above the layout when its closed.  I have a local source for Lionel turnout controlers as he is converting his 40 turnouts to push button control.   I am not totaly sure I like the congested look with two loops of track.  Leaves little room for anything else.  An alternate track plan, much simpler in design, that I like is the Lionel D-146 display layout.  I can easily shorten it from 8' long to 7' and it has 2 nice long sidings for accesories and would not require the expensive dual train transformer or the four 072 turnouts.  20151214_204650

Attachments

Images (1)
  • 20151214_204650

The plan is no more "congested than the two RRT plan photos that you attached in the first post. Do you already have operating accessories and buildings that you want to use? I can convert the plan to RRT and place those for fitment. I see it as about a 50%/50% track to scenery. Busy yes, but a lot of action in the space that you have. The open areas of grassy fields and parks have been eliminated. Nothing wrong with that. Just need to check track spacing and perhaps reposition the inside spur using the RRT libraries. You can shoot me list offline or post them here.

The power and control panel could use something like trailer connectors to make the connections for switch controllers and such. (or DB 15 for switch control)If use multiple L-braces or corner brackets as they called at the local hardware store, you could cut channels into front face 2 x 4 and cover them. Then the bracket legs could slide in and hang when the layout was down. You need a place to store that puppy when the layout is up. Is there any clearance at the top when folded for connectors or would they need to be recessed into the  2 x 4?

That would remove the limitations and let you create a nice compact control center that would look like the extensions used on the dealer layouts, only detachable.

Since to you have some more small radius switches, making a figure 8 in the center would allow reversing in both directions. If you can live with one direction of travel for the train, eliminating the inner cross through the center and adding more spurs would work also. Either way, the crossovers are needed for some varied operation or you'll quickly get bored .

I guess its just harder for my mind to visualize how it will look with scenery, whereas the other plans had scenery on them giving me a base line to work from, I don't have any major accessories yet, but would like to put the milk car platform and the oil derrick in.  I do have the plasticville grandcentral station with the 2 wing platforms, a 154 crossing flasher, 394 beacon tower, Marx Girard station and a Marx hand crack derrick that can span the track.    As to the control panel, when closed the table closes against the frame, not into it. A face mounted panel, such as some of the factory display layouts had that are slightly slanted and just big enough to hold the transformer and turnout controlers could work as long as everything was securely mounted. When the table is close, there is probably 1.5 feet of open space before the ceiling.  I would rather not deal with a bunch of plugs and having to store the control panel.  At this point, I need to get all my 2 rail O equipment sold, then I can pick up the rest of the track, transformer and switch controlers.  Mike

Mike,

Here are some photos snips and a plan overview of the figure 8 and cross-overs. I used a Lionel 137 to approximate the foot print of the Marx Girard whistling station. Hand crank derrick not represented.

The derrick and tower could lay down before folding with a styrene piano hinge and stay on the table. Plasticville station height will close.

it doesn't look crowded. There are various routes to take, change tracks and reverse directions. You could still add a siding with a fifth small radius switch.

I didn't do trees and stuff, but there's room to detail it.

I have the SCARM or the RRT if you want the files.

Attachments

Images (3)
  • Artful dodger 3D1
  • Artful dodger 3D2
  • Artful Dodger 8 SCARM track plan
Files (1)
Last edited by Moonman
El Classico posted:

If you put the control panel in the corner, and leave space for it, you should be able to fit it on the layout

If not, how about hinging it somewhere along the front so that it folds down when the layout is raised? It will stick out at the top when closed, but that might be better than having to disconnect it and could be covered to make it less of an eyesore.

I don't mind it sticking up when the layout is closed. Yes its definatly better than having to deal with several plugs if it was removable.  I wish there was room in one of the corners, you might fit a single 1033 there, but thats about it.  The track plan pretty well fills the table top. I have to keep a 3/4 inch clearance around the edge so the table can close against the frame on the wall.  I have seen a couple track plans that had the one corner done differently so that a control area could be put there.  

Add Reply

Post
The Track Planning and Layout Design Forum is sponsored by

AN OGR FORUM CHARTER SPONSOR

OGR Publishing, Inc., 1310 Eastside Centre Ct, Ste 6, Mountain Home, AR 72653
800-980-OGRR (6477)
www.ogaugerr.com

×
×
×
×
Link copied to your clipboard.
×
×