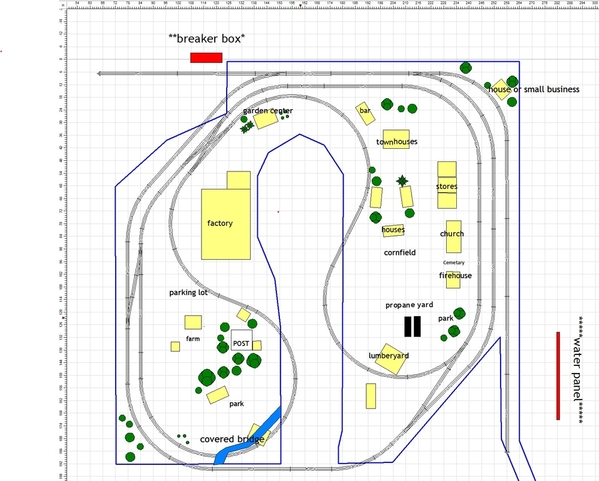
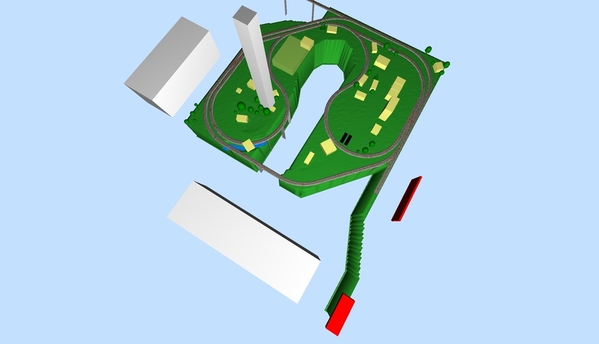
Hi, I'm a new member. Hubby and I are upgrading from the oval under the Christmas tree to a medium-sized basement layout. I designed the layout plan myself using SCARM (see attachments below). I would greatly appreciate your constructive criticism and suggestions.

Hubby wanted two independent but attached loops, with large enough curves to accommodate a big steam engine someday. He also wanted to utilize the entire length of two basement walls. I want to dabble in switching using a variety of rolling stock. We both want substantial room for scenery. I think I've accomplished all that in this design.

We are modeling rural southeastern PA in the (loosely) 1980's. The right half is a small town with a residential subdivision, stores, a church and cemetery, a firehouse, and a town park. There are also three light industries, a farm, and a covered bridge over a creek.

We will be running conventional locomotives only, at least initially. Inner loop is O54 minimum. The rest of the layout is O81 minimum. Track and switches are Atlas, although I am going to redraft this using Ross switches and another version with Gargraves track. Bench height will be about 30 or 32", as hubby and friends want to be able to sit in a regular height chair to watch the trains. There will be a hinged trestle bridge for access to the center aisle. There is an 18" aisle between the right side of the layout and the wall for emergency access to the water panel as well as the layout. There will be three access hatches (shown as black squares in the drawings). There will be liftout shelves in front of the water panel and the breaker box for additional access for repairs.

I am really looking forward to your input! Thanks!

Chessiechick

Attachments

Last edited by chessiechick
Original Post

Replies sorted oldest to newest

Overall it’s a nice concept with lots of room for scenery. The outside loop with the inside folded dog bone and reverse loops will give operating fun. The thing that concerns me is the junction between the two reverse loops, I would like to see a by-pass so more than one train can run on the inside loop with no fear of collision. I also would like to see the inside loops with broader curves. I took the liberty to put together an alternative plan that fixes my issues. It’s a few inches larger than the current plan; don’t know if that’s a problem.


The new plan is O80 outside loop and O72 inside so you can run big iron. All track is Gargraves/Ross.

A couple of things to think about…

Where is the viewing area? Are there guests? What do you want them to focus on?


You mention you want to do switching but you also are going to run this conventional. You will need to put your sidings and control panel near each other.


How complicated you want your switching sessions to be. Do you need a run- around?


Yard space…never can have enough.

Atlas Layout All V1Atlas Layout Al 3d V1

Attachments

Images (2)
  • Atlas Layout All V1
  • Atlas Layout Al 3d V1
Files (1)

I see a support pole is in the area of the layout.  It is important to organize a layout such that a visitor's attention is drawn to what you want him to see, and that can be done many ways.

One:  you might re-organize your scenery plan such that the "city" or urban area incorporates taller buildings, then hide the pole by (a) paint the pole black, and (b) building a tall structure AROUND the pole.   An example might be a high-rise apartment building.  The city itself (with buildings, vehicles, and details) will draw the attention away from the pole, and the 7 or 8 story building around the pole will direct the eyes to the tall building around the pole, rather than to the pole itself.

You could also consult with your builder or other expert about moving the pole while still adequately supporting the ceiling.

Chessie,

You are wise to think aboout minimum radius first. It only takes one long-wheelbase locomotive to make one wish for broader curves. Since you have a duck-under and access hatches anyway, check and recheck to see if you can make the "running" portion of your layout follow the outer walls--eliminating return loops entirely. If not, see if one of those return loops can go around the stairway (through a tunnel if necessary). It only takes one pair of return loops to give you an "infinite" main line: putting your main line into ovals in the middle of the room not only eats up a lot of space, it also makes most of your switching inaccessible. The modeler above who recommended taking yet another look at Ross switches is spot on. They are expensive (as all switches are) but they are beautiful and provide the best operation for switching operations. You have staging outside your ovals: it will not be long enough for decent O scale trains, so why not move the loops to the end and give yourself a true yard in the middle, allowing for through trains while otherwise switching. A yard doesn't have to be a giant classification yard: a rural interchange with a freight house, a team track, and maybe an ice house or stock facility can still offer hours of interesting switching--especially if you allow for the through trains to set out and pick up cars.

Sorry to be so "revisionist," but one of the best layout designs I ever saw was an around-the-basement-walls branch line by Jim Six. It was so simple and elegant, yet full of work to do while allowing for continuous running. And it was really adaptable to any scale from N to G. And the relatively narrow benchwork left the entire middle of the room for trainwatching.

Of course, I'm dreaming here about what I would do. But most model railroads I see are overbuilt--especially three-rail ones. They all end up looking the same because they're all a jumble of the same common stuff. Get "Peake" a nice brass Pennsy 2-8-0 for Father's Day and see how that affects your planning . . .

The railroad stakeholders have met and their decisions are noted below.

1. A hearty thank you was given to BillYo414, Edward G, Mike Wyatt, rattler21, and RDM for their time and their excellent suggestions.

2.The Ross crossover switch, while a great improvement, was voted down by the CFO, citing cost overruns.

3. The suggestion to increase the inner loop to O72 was applauded by all for its excellent visuals and operational improvement. Mrs. WideHips pointed out that the center aisle has been narrowed to approximately 10", which is incompatible with her own wider curves.

4. It was suggested to move the layout to the left to accommodate Mrs. WideHips. However, the Railroad Union Boss was unwilling to reduce the size of the crew lounge.

5. Regarding the additional track space needed at the bottom of the layout, the Superintendent of Buildings and Grounds stated that this area is the main walkway to the backyard and utility room. He was unwilling to grant an easement for the layout to encroach on this walkway.

6. Regarding the suggestion to make this an around the walls layout, the Superintendent of Buildings and Grounds noted that an access path is needed along the left wall to multiple windows. Space is needed along the right wall to allow the baseboard heater to operate effectively and to access the water panel.

7. The Structural Engineer and CFO voted a hard no on relocating the basement support post.

8.  Regarding disguising the post, the Town Planning Commissioner pointed out that this area is zoned Agricultural Preservation land on one side and a park on the other side. A multistory building may not be constructed here. The Historical Preservation Committee refused to paint the pole black, citing the historical precedent of white walls in the entire room. It was decided that additional large trees and rural outbuildings will be added to mitigate the distraction.

9.  The Electrical Engineer noted that the main controls will be in the area by the yard. He will install an additional "duplicate" controller for the inner loop only, located inside the center aisle. This will allow manual switching and manual coupling/uncoupling for the industrial spurs while the lift bridge is down.

10. The Track Designer agreed to rework the plan using Ross switches.

11. Regarding the small yard size, the Yard Manager pointed out that switching operations are not planned to be overly complicated at the present time. Additionally, the CFO has put a strict budget on rolling stock acquisitions, particularly given the Beautification Committee's desire to purchase only authentic scale freight cars. Thus, it will be quite some time before the yard overflows. However, should that happen, the Union Boss is willing to negotiate a reduction in the size of the crew lounge in favor of expanding the yard.

12. Regarding visitors, the Director of Marketing reports that attendance is likely to be quite low. Visitors will enter the room from the base of the stairs at the lower right. They will be directed inside the aisle to admire the town scenery, then encouraged to walk around the outer layout, finally stopping at the crew lounge for refreshments and running trains, if desired.

Respectfully (?) submitted,

chessiechick

Recording Secretary for the As Yet Unnamed Railroad

Last edited by chessiechick

LOL    Very clever posting here folks - sounds like the RR stockholders have a great working relationship with the planning committee. You guys are off to a good start and your design is amazing for a first effort. Something to consider with switches that are easily accessible is using ground throws to operate them. It adds a 'hands on' feel that is nice. Sounds as if you will have good expanses of scenery which is somewhat rare in the 3 rail world.

The best advice as one poster (RDM) pointed out above: "most model railroads I see are overbuilt--especially three-rail ones. They all end up looking the same because they're all a jumble of the same common stuff." So many of our layouts DO end up looking much the same with so many common structures crammed into a limited space. Try to keep with the quality scenery thinking!

Last edited by c.sam

OMG the RR stockholders are a tough group!!! LOL. With the assistance of my design magic 8 ball,  I have a new and improved plan. Gone is the crossover, moved the engine house long entrance to give more room on the right to shift and reshape the inside loop. The outside loop is now on the same footprint of your original design. The relocation of the loops will allow you to rework the aisle to more room. The outside loop is still O80 the inside O72 all Ross/Gargraves.  Just add scenery, sidings and go railroading...

Atlas Layout All V2Atlas Layout Al 3d V2

Attachments

Images (2)
  • Atlas Layout All V2
  • Atlas Layout Al 3d V2
Files (1)

Edward G - Thanks for all your work on this. I loved the new design. Unfortunately, hubby said he preferred less curves and more straight runs, just an aesthetic preference. I preferred the curves, but I decided to let him win this one. Especially since the straight runs made it a lot easier to fit my sidings into the tight areas available.

See below for the final (?) design.

I could use some ideas about the two hatches on the right side. It seems odd to have two so close together. But I need access to the switches at the top of the screen, and I need access to the middle of the right loop. The hatches are designed with just scenery on top, no track, so it will be good in that I can work on the scenery elsewhere and just drop it in. But it seems like a lot of extra work to build two hatches in the bench. However, I don't think I can omit them, and I don't think one huge combined hatch would be structurally sound. Suggestions?

Thanks!

Attachments

Last edited by chessiechick

Re the access hatches...  Age and physical ability can make it a challenge to get to the openings; even if you're fit now, think about the future.  A further challenge is to stand up while lifting the scenery and then finding a place to rest it while you're inside the hatch. It might be more desirable to build one narrower and longer opening and not put a scenic section in it.  Before you commit to a design, I suggest experimenting with how far you can effectively reach to work on things without knocking them over - that distance is shorter than most people realize.

Mallard4468, good suggestion. We will definitely do a reach test. I like to tease hubby that he has "freakishly long arms" so hopefully we'll be fine.

I did rework the track plan today to straighten out the top part so the rails were more parallel instead of wobbling around in a strangely random looking way. I was also able to extend the aisle a little closer to the wall at the top of the picture and widen the aisle a few inches.

Attachments

Images (2)
  • Track plan revised
  • Layout 3D rendering

I've made a few more tweaks in case anyone is still interested. I elevated the bottom portion of the left loop of the dogbone, which required relocating some sidings and switches. I added a hill inside the elevated portion, and some hills along the right side to elevate town's main street a bit. (Hill renderings need some work but hopefully you get the idea.)

I also added a long yard lead across the top at the suggestion of my brilliant friend Eric. If I come into some extra money, I'd like to add a 3 or 4 way switch at the yard entrance to gain more storage. Another option would be to put a curve where the yard is now and run a much longer yard all along the left side where the sofa currently is. Hmm... bigger yard vs. creature comforts?

Attachments

Images (2)
  • Version 26 OGR
  • Screenshot 2023-05-13 182725

Very nice plan!  A couple of thoughts... First, I would leave the track dead level, and just let the scenery change elevation.  Drop the scenery surface and put the track on a fill, or on trestle bents.  The resulting illusion will be much more effective than just putting a hump in your mainline.  You'll avoid operational difficulty in the long run.  Second- I would extend that "triple track trunk" from the right side all the way around the top, such that a train could proceed from the yard to the branch line on the right without getting on the main.

Not only would this allow a local from the yard to access the branch, it will allow you to switch the yard without fouling EITHER main line.  So you could independently operate up to three trains at once.  If you make this change, I also think you should extend your yard tracks around the corner to the sofa.  With a longer effective yard lead, you will still be able to "double" a full-length cut of cars from one yard track to another.  You should also add a pair of switches in the yard or on the yard lead to create an "engine escape."  This will enable the yard switcher to run around and get on the front of its train before it heads out on the mainline.

It seems like you're pretty well-versed with SCARM and the whole planning process.  But if you would like help, post your SCARM file and I can try to work these edits in so you can see what it looks like and test it with the MTS simulator.

Last edited by Ted S

chessiechick:

If you and hubby favor operating accessories for action and fun, sidings off the main line(s) are an ideal location for them, preferably with a related industrial building at each site, as;  Log Dump Car at a Log Loader or a Sawmill, a Milk Car & Platform at a farm going to a Diary, a Coal Dump Car at an Electric Power Generating Station, a Flat Car with automobiles on board at a Car Dealership, etc.

Such placements give a "reason" for your railroad to exist -- moving freight from a source to its logical destination; and for passengers traveling from a rural/suburban depot to a city terminal.

Although storage sidings are helpful, many hobbyists soon "run out" of space for storage sidings as they add more and more cars to their collection. Then wall storage shelves emerge -- or under-platform containers.

Carry on ...

Mike Mottler    LCCA 12394

Last edited by Mike H Mottler

@Ted S - Thanks for all the great suggestions. Trying to keep the budget for switches under control, but I'll definitely consider your suggestions for a later phase.

Regarding your idea of dropping the scenery versus elevating the track, I do understand what your are saying, but here was my thought process. We are keeping the benchwork simple, just plywood with homosote on top. I really don't want to get involved with open gridwork carpentry, call me lazy. I figured it would be easier to build up to make a few gently rolling hills. On the right side, I am planning to keep the track level and just slope up a bit towards the right edge where the Main Street buildings will be. On the left side, I wanted to elevate the bottom part of the inner loop of track, easing gently into it and never more than a 2 percent grade, with a slightly higher hill inside the loop. I thought it would be cool to see the inner loop train going up and down at an angle while the outer loop train stays flat. Do you think this is workable?

Thanks, here are my thoughts:  The "triple track trunk" with a dedicated yard lead will add a lot of operating fun, so think hard about it.  IMO, the biggest expense of a railroad is actually the space you're dedicating to it in your home (and also your time!)  In the context of that, what's a couple of switches?

I would keep all of the track on the right side dead level.  There are too many important things going on, switches, etc. to try to incorporate elevation change along the right edge.  You can absolutely get the effect you are seeking by building the city main street scene on lower ground, with the track going by at "second-story" building height.  If you don't want to go all-out with open grid benchwork, look into Woodland Scenics' SubTerrain system (see .pdf attached.)  The basic idea is that your tabletop is the lowest level -- elevation zero -- and using foam you build up from there.  The track would be elevated on foam supports all the way around.  The city scene would be lower, perhaps on the table-top itself, and the track would pass behind it on a fill or on piers.

On the left side, you could elevate the inner loop relative to the outer main.  You're right the grade has to begin and end gradually, and also level off gradually at the top.  It takes more run length than you might think!  You probably have enough room to gain a couple inches of elevation.  With open grid construction or the SubTerrain system, you could make the road on the left side go down, so you wouldn't have to raise the track as high or make the grade as steep.  My $.02.

Attachments

Last edited by Ted S

Edit:  After reading your posts more carefully in the proper order (sorry!)  I think what you're trying to do with the right side will work fine.  You really do seem to understand the process... For example, on the left side, you moved the crossover back to gain more run length for elevation, perfect!

I advise against using "special" switches like the 3-way and 4-way.  I personally avoid curved switches in my plans, too.  These special switches are expensive.  Many posts about locos shorting or stalling, requiring skilled custom work to resolve.  If you did extend the top track around to the left and put the yard tracks behind the couch, you would have plenty of capacity even with "regular" switches.

Last edited by Ted S

Your layout plan is coming along nicely.  While I haven't had any trouble with my one Ross curved switch, I have read of more folks than Mike and Ted who have had trouble with them.  Being over 65, I am in the camp with those who recommend building for accessibility.  If the bridge lifts up giving walk-in access, that is great.  Access hatches are good too if you don't 'fall apart' like I did.  None of us knows when we may find crawling into an access hatch to be difficult at best.

I definitely would think about the future and father time . Wish I had. Crawling under to hatches or just doing under the table work can be very difficult in later years. Also the. Unexpected injury that may happen. If you are planning on life time fun running  trains and building scenery please take time to think this through. Happy railroading. One reason I went deadrail .

I am ready to order my Ross switches and Atlas track. Two questions:

1. Recommended vendors for the track? Low price is important. I prefer to order online, but will buy locally (Lancaster/York area) if I can save significantly on shipping costs.

2. It dawned on me that I have two spots in my layout plan with two switches back to back (top right on the outer loop, and lower right inner loop siding). And one with four (where the dogbone connects the two inner loops and going left into the sidings). Also, on the right where the switches join the triple tracks, there is only a small piece of straight track between the two sets of switches. I've read a bunch of posts on this forum, and it sounds like these could cause a problem, or maybe not, depending on your specific locomotives, track laying and wiring skills, switch brands, and so on. I will be running a Weaver SD40, a Lionel steam engine from Mr. chessiechick's starter set, and in a year or so when it arrives, my new Lionel SD40E. Maybe a big steam engine someday as well. I will be running conventional with multiple transformers, with the possibility of adding DCC down the road.

I know back-to-back switches are not ideal. However, I really like my track plan (most recent version attached to this post) and I'm stumped how to fix this problem without expanding further into the room, which I don't want to do at this point. Plus, we really need to get started building benchwork.

I'm thinking of just going for it and testing with the locos we have so far before we install anything permanently. Good idea or bad idea? Thanks in advance.

Version 26 OGR

Attachments

Images (1)
  • Version 26 OGR
Last edited by chessiechick

Looking at your post here again.  Not sure what you intend to store in the yard  on the upper wall, staged trains or freight cars…, but replacing those 3 separate switches with a Ross 4 way switch will allow a significant increase in the length of storage available for all the tracks.  They can be spendy, but i do see them come up here used on the forum used at a discount.  I have one of these switches on my staging yard and it really is a space saver in compressing the space needed for a 1 to 4 track spread.

http://rossswitches.com/images...emplates/SW-4WAY.pdf

Re track... If you finalize a track plan and know exactly what you need, contact several forum vendors and ask if they will do a package deal.  I know that some of them did this a few years ago, but I can't speak for today.  Also suggest checking on the availability of your preferred type of track and making sure that you can get everything when you need it.  Atlas track was extremely hard to find for a long time.

I didn't see any mention of what you plan to do for benchwork. Unless you're going with something pre-fab, there are several sharp outside corners that you could soften - eliminates places that can jab you or rip clothing, and it will reduce some of the long reaches.

If I remember correctly, the problem with back-to-back switches (even with a small piece of straight track between the switches) is "maintaining" the power to the locomotive power pick-up rollers as the locomotive(s) run through the area.  This is a function of two things: (1) the distance between each locomotive's center rail pick-up rollers, and (2) how you wire the track and switches for power.   Since it's kind of difficult (if not impossible) to plan for roller-spacing distances among multiple locomotives (some of which you may not even own yet), the best thing to do is build and wire up your layout WITHOUT attaching anything permanently and then electrically test EACH piece of track and switch (with a meter, not an engine) to make sure there are no electrical dead spots.

Once you are sure there are no dead spots, then complete the permanent install while testing piece-by-piece again.  With some luck, electrical dead spots can be completely avoided.

Chuck

I have two places with back to back switches like in your plan.  I sort of took the approach Chuck suggested, in that I put in a few screws here and there just to hold track in place enough, then wired and tested before finally securing the track more permanently.  As for my back to back switches, I put in power feeds where the two switches meet.  So far, I haven't had any trouble, but I only put them in last winter, and probably haven't run every scenario on my layout.

@PRR1950 posted:

If I remember correctly, the problem with back-to-back switches (even with a small piece of straight track between the switches) is "maintaining" the power to the locomotive power pick-up rollers as the locomotive(s) run through the area.  This is a function of two things: (1) the distance between each locomotive's center rail pick-up rollers, and (2) how you wire the track and switches for power.   Since it's kind of difficult (if not impossible) to plan for roller-spacing distances among multiple locomotives (some of which you may not even own yet), the best thing to do is build and wire up your layout WITHOUT attaching anything permanently and then electrically test EACH piece of track and switch (with a meter, not an engine) to make sure there are no electrical dead spots.

Once you are sure there are no dead spots, then complete the permanent install while testing piece-by-piece again.  With some luck, electrical dead spots can be completely avoided.

Chuck

Testing each piece as it is installed AND before final attachment is great advice.  It's really easy to introduce a bad connection into the process, and really difficult to track it down afterwards.

Don't ask me how I know this.

Yes, but it is hard advice to follow faithfully because it really slows down the build process.  Perhaps, as a compromise, one could do the electrical testing after every 4 or 5 pieces (maybe 2 or 3 if using flextrack) of track are placed.

That said, it sure beats trying to track down an electrical problem (and fix it) after the build is done.

Chuck

Hi, I'm a new member. Hubby and I are upgrading from the oval under the Christmas tree to a medium-sized basement layout. I designed the layout plan myself using SCARM (see attachments below). I would greatly appreciate your constructive criticism and suggestions.

Hubby wanted two independent but attached loops, with large enough curves to accommodate a big steam engine someday. He also wanted to utilize the entire length of two basement walls. I want to dabble in switching using a variety of rolling stock. We both want substantial room for scenery. I think I've accomplished all that in this design.

We are modeling rural southeastern PA in the (loosely) 1980's. The right half is a small town with a residential subdivision, stores, a church and cemetery, a firehouse, and a town park. There are also three light industries, a farm, and a covered bridge over a creek.

We will be running conventional locomotives only, at least initially. Inner loop is O54 minimum. The rest of the layout is O81 minimum. Track and switches are Atlas, although I am going to redraft this using Ross switches and another version with Gargraves track. Bench height will be about 30 or 32", as hubby and friends want to be able to sit in a regular height chair to watch the trains. There will be a hinged trestle bridge for access to the center aisle. There is an 18" aisle between the right side of the layout and the wall for emergency access to the water panel as well as the layout. There will be three access hatches (shown as black squares in the drawings). There will be liftout shelves in front of the water panel and the breaker box for additional access for repairs.

I am really looking forward to your input! Thanks!

Chessiechick

Should track price get a little high, look at Menards tubular track as a great option. Also try to stay at O72 unless you run smaller engines as the big steamers need lots of Realestate

I wouldn't be concerned about the back-to-back switches.  All newer Lionel locos have at least 3 pickup rollers, which is robust enough to address most track configurations.  It's pretty easy to add a pickup roller to the tender of any starter set loco (if it doesn't have one already.)  A tether to the loco will provide an additional pickup point.  Configure the track as-needed for what you want to do, THEN worry about troubleshooting any loco issues that might arise.

Which brings me to my second point... When it comes to curved switches, double-slip switches, and even 3-way and 4-way, you may get into situations of derailments, stalling, or shorting out that can't easily be resolved.  To reiterate, I wouldn't substitute a 4-way switch near the top left of your plan.  If you need additional yard capacity, complete the curve and put your yard tracks along the wall behind the couch.  You should be able to reach the trains easily by kneeling on the couch.

Re: sourcing the track-- I bought a bunch of track directly from Ross, for a layout that I never finished.  They made it pretty painless.  Unless you really need O36 switches (which I can't convince Ross to make), why not use all Ross track?   This avoids the fuss of connecting two different brands of track with different connector systems and slightly different heights.

More about back-to-back switches on the layout ...

Inasmuch as you are installing larger-radius switches (not 031 or 036 or 042), those gentler curvature might not be a problem. If the testing-before-installing process shows a problem, add a half-section (or even a quarter section) of straight track for helpful mitigation.

My modest 15x19-feet L-shaped layout is fitted with Lionel tubular track and has ONE area with two back-to-back O42 switches. That location was a pesky problem for one of my larger Lionel locos, so I inserted a half-straight section between them. Presto Chango! Problem solved.

Prophetic Pronouncement ....
As time passes and "train fever" inevitably overcomes you and CFO hubby, you'll want to acquire BIG STEAM or BIG DIESEL locos for your basement empire. So pre-plan now to eliminate potential tight track situations.  Your future BIG BOY loco will thank you, and you'll hear "Gee Whiz!" sighs from your visitors.

You didn't mention "Junior Engineers" in your household during previous posts. Children, grandchildren, and great grandchildren can be delightful visitors/guests and enthusiastic participants in the "world's greatest hobby." Especially now that Lionel offers fantasy trains that capture the imagination of kids; i.e., the series of THOMAS trains, Frozen, Disney, Star Trek, and others.

In my extended family, an annually-changing holiday train layout around the Christmas tree was their layout. That tradition has continued for two generations, and is still active today.  Pic:  great grandson Hudson runs the THOMAS trains.

Along the way, I added a "Kid feature" to my year-round home layout .. a Dinosaur Park with two corrals - one for adults and one for juvenile beasts.  A Dinosaur Train by Lionel became a favorite. My oldest great grandson (then (8 years old) explained, "That train carries the dinosaurs to their summer feeding grounds." Pic: photo of Dino Park attached.

Now my youngest great granddaughter (Olivia, now 5) can operate the TMCC-equipped locos, but her favorite activity is operating the action accessories - especially the Culvert Loader and Unloader pair. Pic: Olivia at those accessories.

Carry on, regardless ...

Mike Mottler    LCCA 12394

Attachments

Images (3)
  • Xmas 2021, Hudson with Trains at Xmas Tree (2022_08_11 19_01_36 UTC): THOMAS trains at the base of the Christmas tree, with gt. grandson Hudson
  • Dino Pk Juveniles: The Dinosaur Park at the NE corner of the layout
  • MHM with Olivia at Layout, 5-27-23: Gt. granddaughter Olivia (4 years old) operating the Culvert accessories
Last edited by Mike H Mottler

Have you considered moving the four switches in the yard at the top left as far to the right as you can to gain longer storage tracks for more cars?

I really like your reversing loops to allow one train operation and also operate a second train on the outside loop.  Two Lionel LW 125 watt transformers would allow more space for two operators than one ZW and cost a lot less.  With conventional control, the outside loop would be a good loop to install a relayed 2 trains on 1 track system.  Three trains could be operated at the same time.

I would make all switches remotely operated.

Charlie

Last edited by Choo Choo Charlie
@Ted S posted:

I would extend that "triple track trunk" from the right side all the way around the top, such that a train could proceed from the yard to the branch line on the right without getting on the main.

Not only would this allow a local from the yard to access the branch, it will allow you to switch the yard without fouling EITHER main line.  So you could independently operate up to three trains at once.

@Ted S, your comment about the triple track in the top right corner has been haunting me, and last night I finally figured out how to do it. Great suggestion, thank you! It also makes a more direct path to proceed from the point to point around the walls to the outer loop and then the inner loop, when coming from either direction. Much better all around!

Just for kicks, I roughed in a couple of potential expansion ideas. along the left side and the bottom. The bottom would be a great location for a yard, (except that I don't have room for a runaround track) because the ceiling slopes there as it is underneath the staircase. The trains would be tucked away safely and visible but not overly so from the main layout.

Version 34

Unfortunately, my RCS order is due to be ready  any day now. For the new and improved phase 1, I'll need two more LH #6 switches and two less RH #6 switches. I wonder if Steve would be willing to adjust at this late date?

Attachments

Images (1)
  • Version 34
Files (1)

Here is the improved track plan - I added an extension on the left side with a yard and a wye. I'm pretty happy with how I was able to fit everything in. The yard has 6 classification tracks, a crossover, a caboose track, and an arrival/departure track that can pinch hit as a passing siding for the outer loop when needed.

Comments welcome.

Attachments

Last edited by chessiechick

Add Reply

Post
The Track Planning and Layout Design Forum is sponsored by

AN OGR FORUM CHARTER SPONSOR
×
×
×
×
Link copied to your clipboard.
×
×