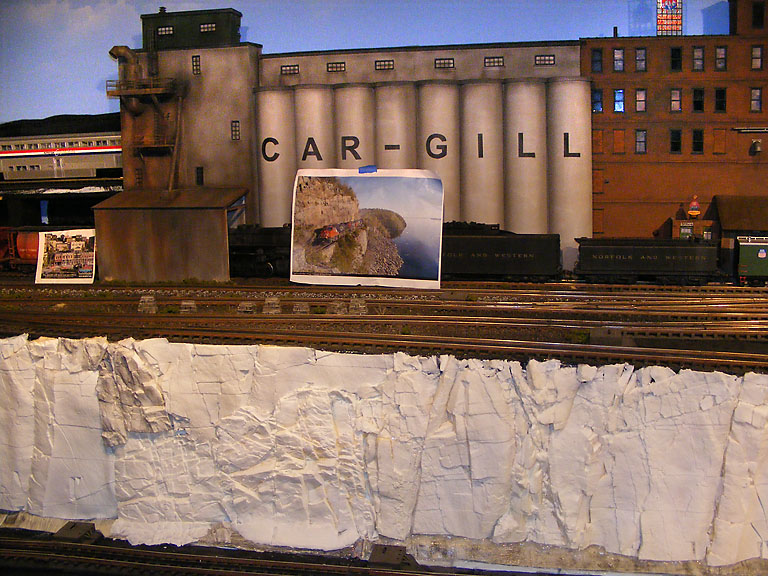
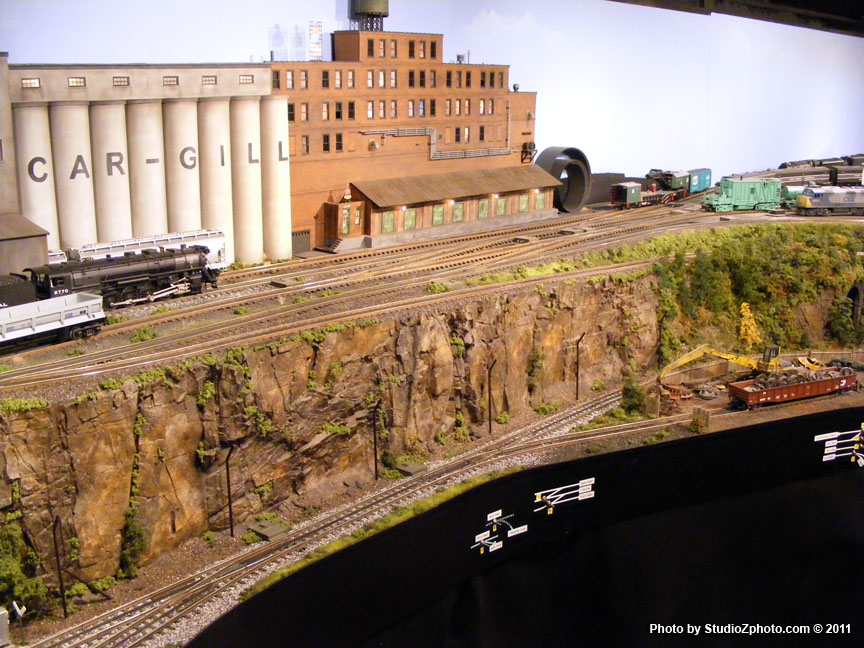
This is the first mountain for my new layout. It is made to be removed as it will be covering some plumbing but I hope I never have to move it. I used structolite thanks to Jim Policastro's advice and I am pleased with the product.


I have various rock molds but based on the shape of the mountain, I am not sure if I should use them or where I would place them. I also am not sure of the base coat color. I was thinking of a slate gray, sprinkled with green ground foam and assorted evergreen trees.


Any advice or suggestions would be appreciated. Thanks.

SAM_0016

Attachments

Images (1)
  • SAM_0016
Last edited by DMASSO
Original Post

Replies sorted oldest to newest

Looks good, Don. Glad the Structolite worked out for you.


I usually look to the more vertical cliff faces as good sites for rock castings. Areas where the land slopes less steeply would probably be covered with soil and vegetation. The steeper areas would more likely have exposed rock and just a small amount of vegetation clinging to the rocks.


You can never go wrong with gray as a base color and evergreens to model an eastern area. But don't be afraid to add touches of tan and brown to warm up the overall coloring and to add variety.


Jim

Originally Posted by Kenny Taylor:

Try heading over to You Tube, to Eric Siegel site (sp)? Or www.ericstrains.com Not sure if that is the right addy, but quick search will put it on your desktop easily. He has several tutorial videos of what you may be interesting it. Nothing else, you'll have a blast looking at his other videos. Very informative!!


Kenny


Eric is doing some amazing stuff.  Those are some great videos.  Probably when I build a permanent Layout I'll look at that system.  For now, the fast set drywall mud and shop towels are inexpensive and fast.

I don't know if it'll help or if you want help but this is what I do for mountains.

I first spray the whole thing with Val-Spar Manhattan Mist textured paint . This gives the whole thing the look of granite then hot glue on your rock formations
I use a dark gray dye for the rocks with a dab of burnt umber for that yellowish look(Most rocks aren't all gray)
Use Charcoal between the rocks for shading and in the cracks. On top of the rocks sprinkle real dirt and 50/50 glue in place with elmers.  lightly sprinkle fine burnt grass on top of the dirt and 50/50 with elmers again.
On the crest do the same as the top of the rocks using dirt and the burnt grass to get the desired affect
Remember use short trees on top of the mountain they usually don't have tall trees at the top because of the wind and lack of water.
Short ugly pine trees and hard woods are the norm in real life.
I would probably put 3 more in those open spaces you have but Hey it's up to you it's your mountain.
Hope this helps.
This my N scale layout but give you an idea of what I'm talking about

David


N scale layout

N scale layout

Attachments

Images (1)
  • N scale layout
Last edited by Former Member

Don,


Usually, I start by spraying some hairspray over the hillside, avoiding the castings. Then I sprinkle some fine turf gently from above (usually Woodland Scenics burnt grass and then yellow grass). It will tend to collect on the less steep surfaces, just as grass would. Then, one more quick spray to fix it firmly in place.


Then, I use Woodland Scenics foliage (regular type - not clump foliage) in light green and medium green colors. I tease it out so that it is very thin and apply it with full strength white glue. A few small pieces of clump foliage and some scraps of Scenic Express Super Trees material finish it off. 


Jim

Don,

To blend those rocks like Jim said I use some stuff called sculptamold it's like plaster with egg crate ground up in it you can use small amounts around the rock out croppings to fill gaps and blend in .You can also put a coat of it down and use it to fasten your rocks it blends really nice that way. most of the craft stores carry the sculptamold.

David

That is looking really good.  It could easily stand  as it is, for years to come.  But I'd keep going with the scenicking now, while it's off the layout.


Dark ground foam makes great earth-tone shadow in and around rock outcroppings.  I'd put a good dose of darks on the underside of every one of your rocks, and I'd put it in the crannies between every rockmold where they are up tight to each other.


Lighter greens can go on surfaces much more vertical than just the ledges, too.  Take another look at Jim Policastro's photo: he's got light greens on just about everything that's less than 75-degrees slope.  You can use the same method on your piece, it might fill-in a bit more of the large grey spaces.


Trees and bushes have a habit of growing out of every wet surface, including rock faces.  I'd stuff lichen & foam bushes in those vertical crannies, on top of the dark-foam base... maybe slip in a few dead-tree branches too. 

Last edited by bobdavisnpf

Oh yeah, there's that branch in the lower cut, now I see it.


I've made extensive use of the darkest fine ground foams before.  At the time, in the LHS I resested: "but it's nearly black," I thought.  It really did add a richness to the colors & shadows.  Kind of like drizzling & wiping super-thin black paint in the crevices of rock faces: once you're done, there's hardly any on there, but it really helps the 3D pop.


If you've got a new order coming from Scenic Express, that's the perfect time to "go to town" on a piece like this - a great way to try out all the new "paints on your pallete".  And a piece that's in this state - done enough, but with room to add more - can be a perfect way to try out new scenicking materials.

Post

OGR Publishing, Inc., 1310 Eastside Centre Ct, Ste 6, Mountain Home, AR 72653
800-980-OGRR (6477)
www.ogaugerr.com

×
×
×
×
Link copied to your clipboard.
×
×