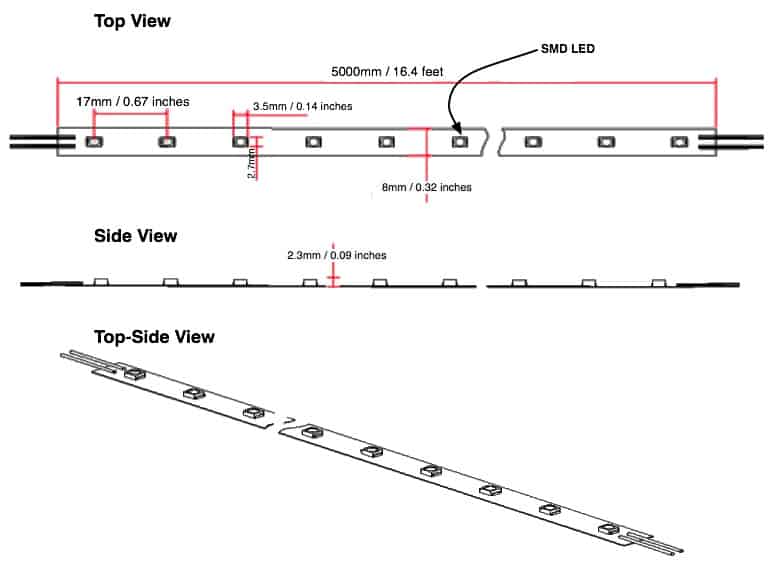
Would anyone be interested in purchasing LED self adhesive light strips (12 lights) with the stepping resistor installed and 32 GA. lead wires?

     If so then we may start carrying them on our site. We are thinking $5.00 per strip which includes shipping in CONUS.

Dave, LBR

Original Post

Replies sorted oldest to newest

hello Dave.............


if you can make the 12 LED light strips and they are 14, 17 and 20 inches long, peel and stick type tape to stick under the roof of the lionel, early MTH and K-line 15, 18 and 21 inch aluminum passenger cars.   Make it a SIMPLE 2 wire hook up (one wire to the roller pick ups and one wire to the ground (frame or trucks). The LED lights should have a life of 1000 hours.  Charge about 8 dollars per strip. Then you will sell a lot of them. I am interesting in doing that for my eight 15 inch aluminum cars.


Tiffany

John,
Yes, you are correct except we get these in 50 meter rolls. We install a
resistor on the hot side. As you already know a rectifier is really not needed
when powering the strips on AC unless you can detect the pulsing of the lights
which is usually not a factor for most hi-railers.
Dave, LBR

> On April 17, 2015 at 7:48 AM O Gauge Railroading On Line Forum
> <alerts@hoop.la> wrote:
>
Originally Posted by CUSTOM "O" DECALS:
John,
Yes, you are correct except we get these in 50 meter rolls. We install a
resistor on the hot side. As you already know a rectifier is really not needed
when powering the strips on AC unless you can detect the pulsing of the lights
which is usually not a factor for most hi-railers.
Dave, LBR

> On April 17, 2015 at 7:48 AM O Gauge Railroading On Line Forum
> <alerts@hoop.la> wrote:
>

For an added few cents +1 vote from me for the rectifier.  Sitting still they would be fine on AC... when in motion, the cars would drive me nuts. 

Last edited by andy b
Originally Posted by CUSTOM "O" DECALS:
Tiffany,
We can make them any length you want. Those lengths that you have stated
will be 7-9 dollars per strip.
If you contact us off forum we will give you a strip to test out. How does
that sound?
Dave, LBR

> On April 16, 2015 at 8:53 PM O Gauge Railroading On Line Forum
> <alerts@hoop.la> wrote:
>

hello Dave..............


I just sent a e-mail to you this morning about testing the led strip and "Santa Fe" decals. Thank you for the offer.


Tiffany

I don't really see it as something that is drop in. You still need to connect the leads some how, most likely solder. It needs to convert to DC, and should really be adjustable. Converting to LED lighting is a do it yourself project for sure, but the strip is only 1 piece of the puzzle.
Originally Posted by gunrunnerjohn:

The bridge rectifier would be a good addition to double the frequency to 120hz, that will eliminate the visible flicker that some folks sense with half-wave operation.  To kill the flicker, it also requires a decent sized capacitor.


Very helpful reply, grj.  If I understand correctly, flicker can be:  (a) the type of flicker some, but not all, folks can "see" when only 1/2 of AC current (?) is used; and (b) the type of flicker caused by dirty wheels, rails, etc. which is avoided with by use of a capacitor.

Last edited by Pingman

Hello Dave LBR and guys.....


Ijust received the package(LED strip) today from mail. It is well protected on piece of cardboard. I tested using my Z4000 setting at 12 volts then at 15(15 volts is needed to run the whole train)(Williams F-3 ABA and 8 Aluminum cars). I used my Lionel 15 inch Full Vista Dome car as a test car and mount it on the frame floor using blue tape then slided the frame back into the body. I turn on my Z4000 at 12 then at 15 but it is not as bright as it shows (brightness is less than the camera shows). The wires are red and green but needs to be gentle when handing it. The strip has the peel off tape on the back but it is wise to use the piece of plastic strip of same leigth and width to put the LED strip on the Plastic then use double side tape to mount it on the metal frame for safe measures of shorting it out. It would help if Dave can put plastic strip on bottom of the LED strip and use insulating wires instead to reduce the risk of wire touching the metal frame thus shorting it out as that would make it easier to handle it and installing in the passenger car. i think Dave is off a good start and would make small improvements to make it better and will have to charge little more, i am guessing a dollar more its not much and results is better made. i need more brightness in my cars, maybe using dual strips ? See the photos guys.

Attachments

Images (12)
  • image
  • image
  • image
  • image
  • image
  • image
  • image
  • image
  • image
  • image
  • image
  • image
Last edited by Tiffany

Nice report and photos, Tiffany.


An observation about the wire supplied.  It's magnet wire, I believe, which uses clear insulation; you can't see the insulation, hence, the belief that the wire is not insulated--it is.  I have one of Dave's strips, also, and have deliberately held both wires together while energized and there is no short.


Also, I have a car essentially identical to the one you have, as well as a standard dome, and I plan to attach the strip lighting to the ceilings of the domes.  In other words, the dome interiors will be lit directly, instead of from below to avoid the loss of light caused by the translucent "floors" of the interiors.


Thanks, again, for the report and photos.

Originally Posted by CUSTOM "O" DECALS:
We can furnish a different resistor that will brighten the lights. As far as the
wire, it is a coated 32 AWG magnet wire and should not short out if it touches
the metal frame.
Dave

> On April 20, 2015 at 10:44 PM O Gauge Railroading On Line Forum
> <alerts@hoop.la> wrote:
>

hello Dave...........


I believe this will help............


Tiffany

I got my strips today. I didn't have time to install them before I went to work but I took a piece of shrink tube and put a piece over the resistor. To make the install a little neater I took a length of 1/16 heat shrink and put both wires in it leaving an inch or two of wire to connect them. I'll put them in a couple of cars to see how they look.

Sounds like a reasonably priced item to me. I used these types of lights and they work fine in buildings. I have not tried them in passenger cars yet, but it sounds like a good idea.

I'm thinking of getting rid of the 4 watt lamps in my ceramic buildings and incorporating some of these.

I'm at work now I'll check out the link at home tonight.

I ordered a few to test, and here is my first application.  I put the strip on the ceiling of the TCA full dome. I have bulb-type leds in the sockets. Now, I admit I am very fumble fingered.  I like Chris's idea of putting a piece of shrink tubing on. I wish I had. In reinstalling I accidentally cut the two wires, about 1 in from the strip. It was a real bugger to get them re-soldered.


Now, though, I see I have to plan another project to improve the interior.


Photos with and without flash, and dome window close-up.


DSCN5168

DSCN5172

DSCN5174

Attachments

Images (3)
  • DSCN5168
  • DSCN5172
  • DSCN5174
Last edited by BANDOB

BANDOB,

     Please check it our. We are discounting our light strips by10% just for the folks here at the OGR forum. When you order for the next 24 hrs. only we will discount your light strip order by 10%. Use code"OGR10" in the special instructions portion of the pay pal invoice and we will automatically refund 10% of the light strip order.


http://www.lbrenterprisesllc.com/-O--Stuff.html


A good opportunity to save even more on lighting up your passenger cars and buildings.

Dave, LBR

Last edited by CUSTOM "O" DECALS

Add Reply

Post

OGR Publishing, Inc., 1310 Eastside Centre Ct, Ste 6, Mountain Home, AR 72653
800-980-OGRR (6477)
www.ogaugerr.com

×
×
×
×
Link copied to your clipboard.
×
×