I’m just getting started in on30 and I’m not sure what code of track to buy. My layout is 6 feet width by 14 feet length. I’m looking at Bachmann Ez track because their track is code 100. I want to go with a few turnouts. Does Bachmann track come as manual turnouts? Also, is Bachmann track reliable for everyday running trains? I have o scale buildings I want to use. Does that work with on30 trains?
The Bachmann track is HO the ties are too small too close together and the rail too heavy (Code 100) Micro Engineering makes code 83 On30 flex track, its ok. Ties are a bit far apart and of course plastic, My former layout was hand layed on wood ties some make of twigs as the prototype, I followed used small trees right from the forest. I used code 55 and code 83. and no they did not use creosote to treat them just raw wood weathered.
I used Micro Engineering 0N30 Code 83 flex track and turnouts on my 0N30 layout. Both work well.
I can't help you on B'mann EZ track/turnouts - know nothing about it. Suggest you try their web site to see if they have turnouts.
You can use O scale buildings with 0N30 trains - same scale.
HTH,
It appears Bachmann doesn't offer manual EZ Track turnouts.
Peco also makes On30 track. A Google search will turn up dealers in the US that handle it.
Rusty
While the track gauge is teh same with ON30 and HO, the ties should be bigger and wider apart. HO is close to 1/8 inch to the foot. ON30 is O Scale at 1/4 inch to the foot. Ties in O scale need to be bigger. Also a fried tried using HO switches on an ON30 layout and some of the locos his the switch stands. Narrow guage stuff has a wider overhang.
@Prairie Land Junction posted:I’m just getting started in on30 and I’m not sure what code of track to buy. My layout is 6 feet width by 14 feet length. I’m looking at Bachmann Ez track because their track is code 100. I want to go with a few turnouts. Does Bachmann track come as manual turnouts? Also, is Bachmann track reliable for everyday running trains? I have o scale buildings I want to use. Does that work with on30 trains?
I used Bachmann EZ track for my small On30 layout - works ok, but I only have shorter locos. The preceding comments about tie size, etc., are correct. AFAIK, Bachmann EZ track only offers remote control switches.
I am using code 83 Micro Engineering track and switches; I am very happy with the result.
My layout is less than 12 inches wide and is 16 feet long so far (will be around a room)
I am building a layout that is O standard and On30. Being a backwoods logging theme I am using code 100 for the standard gauge and code 70 for the narrow gauge, using Fast Tracks jigs for track and switches. My last layout was On30 and I used code 70 HO track salvaged from my previous HO layout with every other tie removed. It looked OK for an eastern narrow gauge logging outfit especially after ballasting. I lost that layout to a house fire but was able to salvage a lot of the track and turnouts.
The current layout uses code 70 ME rail for the On30 track. As I had a lot of perfectly good Lambert and Shinohara turnouts I decided to try and “convert” one to DCC with proper tie size to match the Fast Tracks turnouts and track I already had built. I was especially interested in converting all my curved turnouts as at the time FT did not offer them. I see they now do. It takes a bit longer to do the conversion than to build from scratch so buying a fixture will save time but set you back about $175. I didn’t want to waste the turnouts. Here in pictures is how I did it.
This “tutorial” presumes you have experience in building switches, cutting rail, and soldering and already have all the necessary tools.
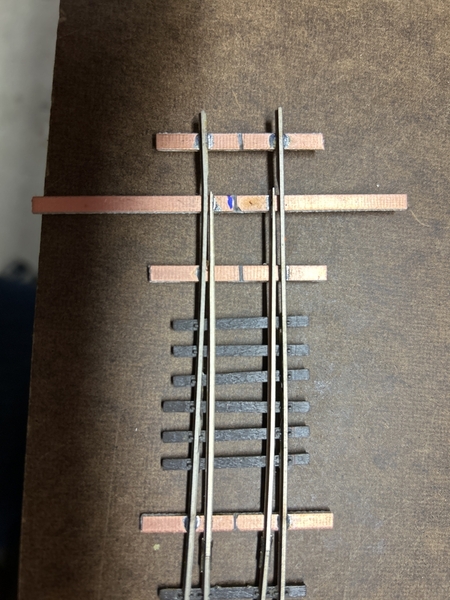
Remove the plastic ties in these areas and clean the bottom of the rail to prepare for solder. Keeping the rest of the plastic ties keeps the rail in gauge.

Now solder the PC ties to the rails. I have found it is much easier to gap the ties before you solder them. If you are not familiar with the Fast Tracks system and gaps in the PC ties go to their website and download a template for a switch which clearly shows where the gaps should be. It’s a great idea to check that there is no continuity on either side of the gap with a meter. The tiniest sliver of copper can defeat the gap and cause a short that can take forever to find once the turnout is finished and painted.

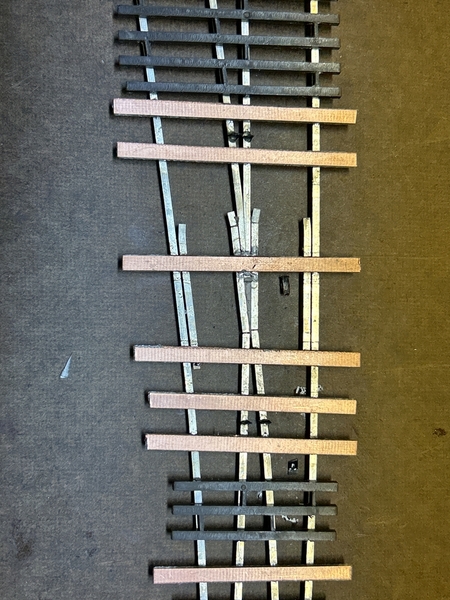
In this picture the head block ties and throw bar have been removed. You will need to unsolder the switch points from the metal tabs that hold them to the original throw bar.
The Shinohara point rails are held in place by rail jointers. Sometimes you’ll damage the thin part of the points unsoldering them but it’s easy to make new ones. I solder them to rail joiners for strength. You can see the gaps in the ties.

You will have to cut gaps in the rails to isolate the rails making up the frog. I ALWAYS fill the gaps with thin styrene and a drop of CA adhesive trimmed to rail contour after drying.
Once you have all the PC ties soldered and the gauge checked you can remove the rest of the plastic ties. Now glue the wood ties in place using the Pliobond method. I’ve found it works the best if you heat the rail where it contacts the wooden tie the day after you glued them. Now is the time to check the gauge as the rail can be moved when heating the rail and the glue is soft. Once it cools you’ll have a solid joint. You can always spike the rail to the ties as you lay your switch in place if you like this method. Here’s a picture of a finished, painted and ready to install On30 turnout and its little cousin the HO donor switch.
Attachments
Very nice Peter
thanks for sharing
impressive ![]()
Well done !
I ended up using PECO track in the end....


