This is purely theoretical.  I do not have an overheating problem, but I trying to learn how to avoid one in the future.

Suppose I have a large layout, and only one set of 18 gauge wires sending current to the track.   Let's say  the length of the wires is 8 feet.

So, now I run two trains and two lighted cabooses on the layout at full speed.

The wires start to heat up and there is a plastic smell.

Now suppose, I turn it all off.  And then I run 5 more sets of 18 gauge wires to the track for power.  All of the 18 gauge wires are fed from  a set of 12 gauge wires which are only one foot long, with one end of these heavier wires  connected to the transformer, and the other end of these wires connected to  distribution blocks, to which all of the 18 gauge wires are connected.  (In other words, the "bus wires" are only one foot long.)

Here is my question:   Does adding all of these extra 18 gauge feeds to the track "spread the load" of the power running to the track, so that there would be no overheating when the trains are run?  Or, do all of these sets of wire continue to carry the same load, so that all that would happen is that we would now have all six sets of wires overheating?


Thanks for all replies.  Again, it is purely theoretical.

Mannyrock

Original Post

Replies sorted oldest to newest

Multiple 18 gauge feeds would in fact reduce the current in each feed compared to one 18 gauge feed, thus reducing the heat produced. Actually, a silly theoretical exercise, why would you do that?

I use light gauge feeds simply because they are much easier to solder to the tracks. These leads are about 2 inches long, just to get to the power feeds below the surface. All my power feeds are much heavier gauge.

As gauge numbers go down the cross section area of the wire increases geometrically, as does current carrying capacity. Think in terms of using 12 gauge to get as close as possible to the tracks.

Jan

The above post suggests that you are careful of what the wire is made of. There is a lot of copper clad aluminum out there which is more resistive than pure copper. It’s called CCA and the 18 gauge CCA is more like a 20 or 22 gauge copper wire. It’s best to get pure copper.

@HiramO posted:

Multiple 18 gauge feeds would in fact reduce the current in each feed compared to one 18 gauge feed, thus reducing the heat produced. Actually, a silly theoretical exercise, why would you do that?


Jan

Jan,

You wouldn't in reality, that's why it's theoretical.  Scientists and Engineers call them thought experiments.

Hence I respectfully disagree.

There is no such thing as a silly theoretical exercise -- unless of course you want to convince newbies, and a few old hands who are challenged by a vexing problem at times, into visiting another forum to fulfil their curiosity.

We all learn from such a question.

@Mannyrock, thanks for posting it.  Please bring more at your convenience.

Mike

There is a difference between the run of a gauge of wire for house voltage of 120 vac and the 18 vac we use with trains. The wire tables are calculated for a percentage drop for a certain distance…like 100 feet. That’s for an acceptable voltage drop of something like 3% of  120 vac. That would be about 4 vac. A 4 volt drop with an 18 vac system would be way too much. So consider that. The best way to size the wire is to know the resistance of the run and calculate the drop for the current you are expecting. OR, take the advice of well run layouts here on the forum and the wire gauge successfully used on those layouts. You should be ok.

Why would I do this?,  some have asked.

Good reason.

If I run a single set of heavy bus wires all around under my track, and then use very short 18 gauge leads to connect the bus lines to each of my 10 electrical power blocks in the layout, then how do I cut the power in all of these blocks separately on and off?   

The only way I know to do it, would be to install an on-off switch in or about each of the leads.  To do this, I would have to tap into the lead, and run a wire all of the way back to my control panel to an on-off switch, and then run another wire all of the way from that switch back to the lead, so that I could turn the power on and off on that set of leads.

Using my system, the heavy bus lines from the transformer would run to the inside of my control panel, and hook up to distribution blocks.   From the distribution block that has the hot red line attached to it, I would run multiple (up to 12) hot 18 gauge wires to one side of the switches in my control panel, and then run those hot 18 gauge wires from the other side of the switches, out of the box, and under the table, to connect to each power block in the layout.   At the same time, I would also run a separate black 18 gauge neutral wire from the neutral distribution block in the control box, out of the box, under the table, and  out to connect to the rails in each power blocks.   

By doing this, a separate set of black and red wires, which can be loosely twisted together, and labeled for each power block, will run under the table to each power block, and be connected directly  to the track.

The 18 gauge wire is very easy to work with, and no run will be longer than 8 feet.    The tracks in each power blocks section would be no longer than 5 feet max.  And, I would not be trying to install and  "tap into" a heavy bus line 12 times under the table, to attach leads to run up to each power block.

Moreover, if there is a power problem in any given power block, I can open my control box and instantly locate the wires that run from the distribution blocks out to that section of the track, including the on-off switch through which that particular hot line runs.   Very easy to inspect.  And, from there, it would be very easy to follow the set of wires underneath the table directly to the track connection.


This all seems incredibly simple and obvious to me.

But, maybe I am missing something?

Thanks,  Mannyrock


a

Stated more simply, a hot and neutral 12 gauge bus wire runs from the transformer into the control box, to two distribution blocks.  For each power block in the track, an 18 gauge neutral wire runs from the neutral distribution block out to the track, and a hot 18 gauge wire runs from the hot distribution block out to the track.    For each power block in the track, the hot 18 gauge wire has an on-off switch inserted into it, 10 inches from the hot distribution block, inside of the control box, with the on-off switch mounted on the box.

That's it. Very simple.

No heavy bus wires running underneath the layout.   

No tapping into bus wires underneath the layout.

No trying to wire an on-off switch wire into a feed wire at the track, and then running that wire all of the way back to the box to attach to a switch, and then running it back to the track to complete the circuit, so that the power to the block can be turned on and off.

When a sequence of power blocks are turned on using their switches, the power load from the transformer to the operating track is then spread out over a series of several short runs of 18 gauge wire.  (The shortest would be about 3 feet, and the longest about 8 feet.)

Aren't 5 or 6 18 gauge wires, carrying the 16 volt load to the tracks, equal to or better than one 12 gauge bus wire carrying the load to the tracks?

Just respectfully asking.  And if not, then why not?

Mannyrock

Oh, I get it. You want to fool the transformer into thinking it is powering a smaller layout by removing part of the load (track) with your switches.

I don't think this is going to achieve what you think it will. When track is powered and no engine is running on it there is virtually no load, so you won't be conserving much by turning off the other block(s). The current draw is going to try to take a straight line path to the engine as it moves around the track. The engine is a complex load that changes as it moves along the track. Wire is sized based on the expected amperage and length of the run. Turning off a block does not change how much current is flowing to the engine.

I agree with Rich, but would go further.  18-gauge wire has to place on an O-gauge layout track feeder circuits.

Mannyrock.  For toggle-switching blocks, run the power from transformer to a control panel via 14-gauge.  On the panel place togglew switches for each block.  Run 14 gauge from toggle switches to each block.  For common, run a 12-gauge buss all around the layout, back to (and connected to) its point of origin.

Breaking up the ENTIRE layout into blocks provided a better degree of control when running conventional.  Years after I built my current layout, I plopped in DCS and made few wiring changes.

Using a voltage drop calculator from the Internet, I plugged in 16 volts over copper wire at a distance of 8 feet and 5 amps. Using 18 AWG wire gives a voltage drop of 4%. 16 AWG yields a voltage drop of 2.5%. At 10 amps, these percentages are about double.

Since you want to isolate each power block, the feeders won't supply current to your moving train until it enters another block. If they were not isolated, then current from different feeders would share the load. And since electricity will take the shortest path to the moving train, the current through different feeders will be in a constant state of change.

What you could do with your control panel is use 2 18 gauge feeders to each of your isolated blocks. But one 14 gauge feeder would be better. Once you've covered the distance, you can size it down to 18 gauge again to connect to the track.

Thanks for all of the great information.  I really appreciate it.

One thing I didn't make clear, is that as suggested by Leo, each separate power block will have several sets of 18 gauge wire feeders running to it, not just one.   So, in each block, the load is spread among multiple sets of wires. And, at an absolute minimum, there will be one power feed for each 5 feet of track in a block.

Thanks for the info that at 8 feet, there is a 4% drop in voltage using the 18 gauge wire.  But for me at least, that seems really really nominal.   I tend to look at it from the other direction.  I am getting at least 96% of the power to my tracks on the longest run of 8 feet.   Most of the runs are much a much shorter distance than that.  So,  I feel that that is good enough for me. 

Rich, I certainly respect your experience and opinions, and you have flatly stated that 18 gauge wire is not sufficient for long feeders.  But so far, the data I am hearing from others doesn't seem to bear that out for the system I have proposed.

RJR, thanks for that very clear explanation of an alternative, more traditional way to wire the system.   I really appreciate.  Additional knowledge is always a good thing.

My goal is not to trick my transformer, or to turn track blocks on an off as the train moves around the layout.   The only reason I would turn a block off is to "park a train" in that loop or straight-away, while I run another train.  In other words, to use loops and straight-aways as "sidings".  Why?  Because the very original, eclectic layout I custom designed left no room for sidings.      And, I can't park the trains in a traditional rail yard, because I just don't like using up the entire center of my layout to build a trainyard, or trying to back-up trains that may be parked there.  (I'm really bad at backing up trains, especially over multiple switches.)

Except for  a track block in which a train is parked, all of the other power blocks will be turned on all of the time.

So, my real goal here is (i) to simply run sets of really easy-to-use 18 gauge feeder wires straight from the control box out to the tracks, with several feeders for each power block, thus doing away with heavy bus lines and taps, and (ii) eliminate the need to spend lots of time under the table.   

Forgot to mention, that I have arthritis/tendonitis in my right hand so badly (carpentry and post hole digging), that it is really really painful me to try to work with heavy gauge wire, even trying to twist it with needle nose pliers.

With my proposed system, I would just drill a hole next to the tracks, drop two 18 gauge wires down the hole, reach under the table and pull the wires over to the control box on the other side of the table, , put the ends through the hole into the side of the control box, leaving two feet extra inside, hook them up in the box and then to the tracks, and then go under the table for 3 minutes and staple the wires in four or five places to the undersides of the table framework.     Very easy.  Done and done.   

I am thought-checking this in advance, to make sure that the full load gets spread out among the feeders, and isn't through some electrical principle (I'm really dumb at this), still all get pulled through one set of wires.

What all of you have helped me realize by this great discussion, is that even if all of my power blocks are on, when a locomotive is traveling over  a particular power block, the full load will only be spread out among the particular number of feeders that feed that particular power block, and not the other wires running to the powered blocks where no trains are traveling over them.   And that is really something important for me to consider


Thanks,

Mannyrock

Mannyrock, if you wish to ignore the advice given above by several experienced posters, that is certainly your privilege.

While I understand the problem of connecting and bending 14 gauge stranded wiring, I would note that running a single straight length of 14-gauge is probably less overall strain than several sets of 18 gauge

If you may someday add electronic control, such as DCS, your system may complicate matters.

If heat becomes a wiring issue on a layout, you either have a short circuit somewhere or wires are too small.  The issue is voltage drop, not heat, and it cannot really be anticipated by applying Ohm's law.

From the point of view of voltage drop, or heat dissipation, or overall resistance,  three 18 gauge wires is the equivalent of one 14 gauge wire.

The actual number is 2.5 instead of three, but I don't know how you string half a wire

This assumes all your connections are good, and all the wires are connected to the same place at each of the ends.

***************

Voltage drop is calculated using ohms law.  14 gauge wire = 2.525 ohms/1000 feet,  18 gauge wire = 6.385 ohms/1000 feet.  (oddly enough, one is 2.5 times the other)

Voltage drop = current x resistance

Example:  5 amps (typical for our sound and steam equipped locos pulling several lit passenger cars)  will drop the voltage 4 x 6.385/100 = 3.2 volts in ten feet for a a single 18 gauge wire,  but only 1.3 volts for a single 14 gauge wire.   This is why you need smaller gauge wires, or the equivalent, in longer runs.

****************

Heating also depends on the current, but is a bit more complicated. If anybody REALLY wants me to, I can reply.  Suffice it to say, as others have, heating is irrelevant for our cases, its only the voltage drop that matters

Thanks for all of the great info and advice.

I think I will proceed with my system.

The only issue I was concerned with was some type of dangerous heating.

My experience so far is that I can manipulate, strip, and attach 18 gauge wire either into a crimp or directly to a toggle switch in a matter of a few seconds.  Not so with heavy 14 gauge wire.  Since 18 gauge is very flexible, it is easy to maneuver and work with inside of the control box, and it will be easy for me to lift the lid of my box right off of the panel without the wire bending, resisting, or pulling away from the toggle connections, like heavy 14 gauge wire would tend  to do.

Moreover, since the only wires going into the box from under the layout will be 18 gauge, loosely gathered together into a "cable" by zip ties,  I can easily pick up the box and move it two or three feet in any direction if I want to with no  bending, kinking or disconnecting, as would happen with 14 gauge wire.

I understand that this is not the normal way to do it, but for me personally, I believe the benefits will outweigh the burdens.

Thanks again,

Mannyrock

I pass on one other thought:  You are going to have to be especially careful in wire management.  I only have a single feed t each block, plus 2 wires from control panel to each switch motor, plus accessory wiring.  Under my table is a hideous maze of wires, making tracing a task.   When you run your triple 18s, I recommend that you have handy a pack (or 2 or 3) of small wire ties and tie the 3 wires together every foot or so.

Design/planning a major part of the project.  General wiring rule, if there is a question about the amp-draw, up-size the wire.  #12 gauge wire, a good choice, my smaller layout,  I used #14 ga. for track feeds.  Switch/turnout wiring, was 18 ga, mostly because,  I had a lot of multi-conduction, (at least 8 conductor),  thermostat wire.  Most modelers seem to prefer stranded, I like solid wire, an easier termination.   A 500 ft. roll of single strand, or thermostat wire doesn't last long. IMO, Mike CT.

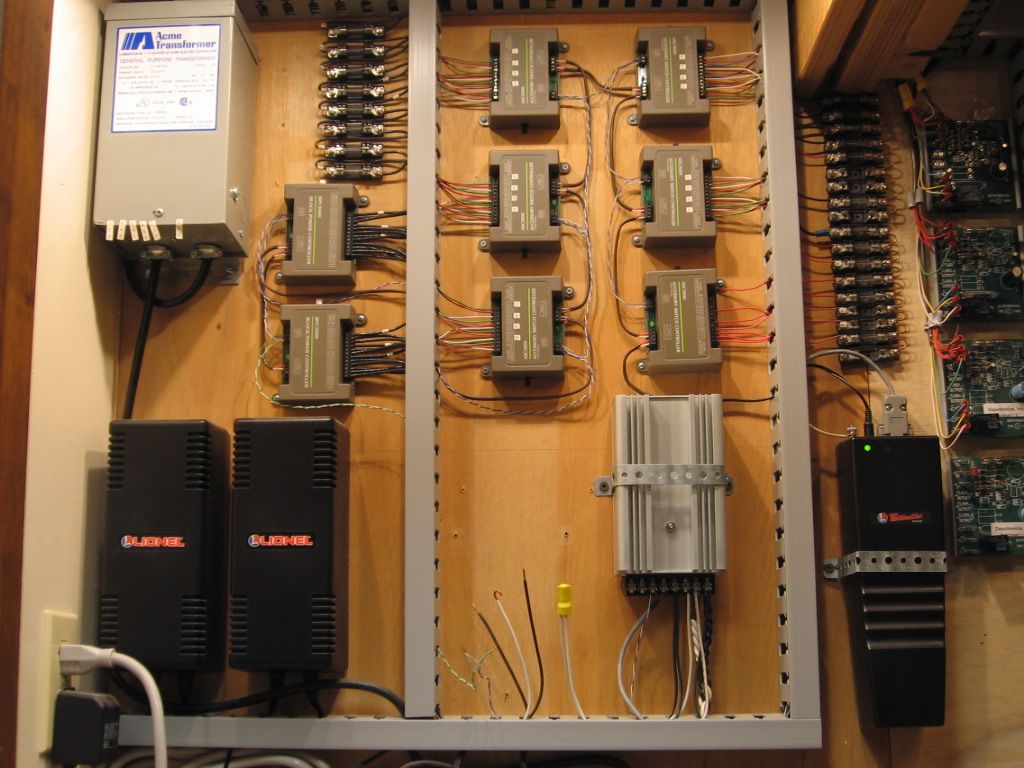
Sorry,   Answer to the questions.  There are (8) eight track circuits, fuses, (7.5 amps per track circuit), top left of picture.


Last edited by Mike CT

Interesting observation about ease of manipulating wires, with regard to their stiffness. I’ve recently thought about house type wiring and always used 12 ga. I see a lot of 14 ga now for lighting which makes sense, especially when using LED lighting. Although there are some issues coming up with switching power supplies with harmonics  heating up the wiring. I wonder about wiring outlets with 14 ga. Say circuits fused to 15 ac amps. A lot more flexible than 12 ga. Is that common?

RJR,  great suggestion about the ties.  I'll do it.

John, thanks for your comments on thought experiments.   Many people may be unaware that Einstein's General Theory of Relativity, which revolutionized physics and utterly destroyed the entire framework of Newtonian Physics, was just a thought experiment by him, published as a short article in a little known scientific magazine in Europe, while he just held a masters degree in mathematical instruction.

Based on some of the comments I have received, perhaps I have single-handedly invented "multi-line, straight run, parallel electrical current supply."     :-)        If so, I'll run out and file a patent on it today!

CJack, the standard in effect where I live, and the Romex I use, is 12 gauge solid for 20 amp, and 14 gauge solid for 15 amp.

        I have saved tons of money by buying my own Romex on sale at HD, buying and mounting my own outlet and switch boxes, pulling the Romex  through the holes, walls and conduit, leaving  long ends hanging out of the boxes and one long end hanging next to the breaker box, and then and only then calling an electrician and having him hook up one end into the breaker box with a new breaker, and the other ends in the boxes to the outlet plugs and switches, using the breakers, plugs and switches that I have already pre-bought and positioned at their ultimate points of use.    All of the prep work is simple carpentry and grunt work, that you don't have to pay an electrician $100 or more an hour to do.

       I leave all of the wires runs open for the electrician to inspect, if he so chooses,  and all of the new breakers, plugs and switches in their new packaging, with the Lowes receipts attached, in case he wants to examine those.    Using this method, I have installed hundreds of feet of wiring, with as many as 5 new outlets per run, and had it connected to the breaker box by the electrician, in only about 90 minutes of electrician time.

      If the electrician shows up and doesn't want to do it because he won't make enough money on the job, then I just send him on his way and refuse to pay him a cent.  Other than one guy from a big company, I've never had a problem.  All of the other electricians saw it as really easy work, and as always, I tell them that I pay in all cash.  They hem and haw a little, then connect the wires, get the cash, and leave.

   Other than cutting the Romex itself at the ends of the runs, I've never had to cut, strip, screw or connect a single wire!

   I just installed four new outlets in my basement, to supply convenient power to my layout and the surrounding area.

   Believe it or not, three weeks ago, 12/2 Romex was $139 per hundred feet at my local Lowes, but HD had it on sale, 10 miles away, for $99!

Mannyrock

If you can work with #12 solid romex, I'm surprised you say #18 stranded is your limit.  I've wired several house extensions/basement finishing, and hated to work with #12.

Ever worked with #10 outdoor romex?  Just finished installing a new shore power receptacle on a 50-year old boat.  Having preceded the mandate to use stranded on boats, it had #10 solid.

@Mannyrock posted:

Thanks for all of the great information.  I really appreciate it.

One thing I didn't make clear, is that as suggested by Leo, each separate power block will have several sets of 18 gauge wire feeders running to it, not just one.   So, in each block, the load is spread among multiple sets of wires. And, at an absolute minimum, there will be one power feed for each 5 feet of track in a block.

Thanks for the info that at 8 feet, there is a 4% drop in voltage using the 18 gauge wire.  But for me at least, that seems really really nominal.   I tend to look at it from the other direction.  I am getting at least 96% of the power to my tracks on the longest run of 8 feet.   Most of the runs are much a much shorter distance than that.  So,  I feel that that is good enough for me.

Rich, I certainly respect your experience and opinions, and you have flatly stated that 18 gauge wire is not sufficient for long feeders.  But so far, the data I am hearing from others doesn't seem to bear that out for the system I have proposed.

RJR, thanks for that very clear explanation of an alternative, more traditional way to wire the system.   I really appreciate.  Additional knowledge is always a good thing.

My goal is not to trick my transformer, or to turn track blocks on an off as the train moves around the layout.  The only reason I would turn a block off is to "park a train" in that loop or straight-away, while I run another train.  In other words, to use loops and straight-aways as "sidings". Why?  Because the very original, eclectic layout I custom designed left no room for sidings.      And, I can't park the trains in a traditional rail yard, because I just don't like using up the entire center of my layout to build a trainyard, or trying to back-up trains that may be parked there.  (I'm really bad at backing up trains, especially over multiple switches.)

Except for  a track block in which a train is parked, all of the other power blocks will be turned on all of the time.

So, my real goal here is (i) to simply run sets of really easy-to-use 18 gauge feeder wires straight from the control box out to the tracks, with several feeders for each power block, thus doing away with heavy bus lines and taps, and (ii) eliminate the need to spend lots of time under the table.   

Forgot to mention, that I have arthritis/tendonitis in my right hand so badly (carpentry and post hole digging), that it is really really painful me to try to work with heavy gauge wire, even trying to twist it with needle nose pliers.

With my proposed system, I would just drill a hole next to the tracks, drop two 18 gauge wires down the hole, reach under the table and pull the wires over to the control box on the other side of the table, , put the ends through the hole into the side of the control box, leaving two feet extra inside, hook them up in the box and then to the tracks, and then go under the table for 3 minutes and staple the wires in four or five places to the undersides of the table framework.     Very easy.  Done and done.   

I am thought-checking this in advance, to make sure that the full load gets spread out among the feeders, and isn't through some electrical principle (I'm really dumb at this), still all get pulled through one set of wires.

What all of you have helped me realize by this great discussion, is that even if all of my power blocks are on, when a locomotive is traveling over  a particular power block, the full load will only be spread out among the particular number of feeders that feed that particular power block, and not the other wires running to the powered blocks where no trains are traveling over them.   And that is really something important for me to consider


Thanks,

Mannyrock

I'm not sure how your loops and layout are powered, but it seems to me that the easiest way to park a train on a loop and turn off power to that loop would be to cut power from the transformer supplying power to that loop. Even if you don't have a multi-handled transformer to cut power to one loop, you could run power from a single transformer to a simple A-B switch and cut power to one loop that way.

As to cutting power to a straightaway section of a loop to park a train, I assume you are talking about running conventional trains, because command controlled engines can easily be stopped anywhere on a loop without cutting complete power to that loop and while you use the remainder of the loop to run other engines.

What you are proposing in using blocks connected to a simple on-off switch is similar to the wiring required to turn power on and off to sidings in a typical yard with a central control panel. Because I use spade crimps on my 14 gauge wire to attach to my distribution block at one end and to a two-block terminal at the track end (and then short 12" long 18 gauge feeders from that two block terminal to the track), I've never felt using 14 gauge wire was any more difficult to use than 18 gauge and would recommend 14 gauge for power to the track.   

The two block terminals also provide a nice location to mount a TVS  suppressor.

TOGGLE 2InkedTERMINAL BLOCKS_LI

Attachments

Images (2)
  • TOGGLE 2
  • InkedTERMINAL BLOCKS_LI

Ritchie, having an entire layout cut into blocks is also a benefit with command control.  You can stop a train on mainline without having to worry that it will go into ghost mode, responding to a signal sent to another loco, and is there's a derailment, you can shut off a section and not have to stop all operations.  If you have multiple trains out there and have a "hidden" derailment, finding it is simplified.

Cjack, recognizing that in talking about house wiring we're departing a skosh from the topic, but my practice when wiring my home renovation projects was to keep lightin and outlets on separate circuits, so as to have lighting when an outlet overload pops a breaker.  I used 14-gauge for lighting, and 12-gauge for outlets, on the theory that outlets might be called upon to carry heavy loads.  But, I would note that some say 14-gauge/15 amp should be used for outlets outside a kitchen because they may have lamps and small appliances plugged in, and they need the greater overload protection.

Thanks guys.

I only run conventional, not command control, and no more than two locos at a time.  Otherwise, I'm bound for a wreck.

I think what I'll do is wire it per my system, and then run it extensively.  If I see problems arise, then I will probably have to rewire the blocks, one by one, over time, using a two heavy feed wires for each block.    That's OK.  Do one a week, and its done in  six weeks.  (I'm not going anywhere.)

However, I am not recommending my system to anyone, or claiming that it is better or more efficient than the traditional system used.


Thanks,

Mannyrock

@RJR posted:

Cjack, recognizing that in talking about house wiring we're departing a skosh from the topic, but my practice when wiring my home renovation projects was to keep lightin and outlets on separate circuits, so as to have lighting when an outlet overload pops a breaker.  I used 14-gauge for lighting, and 12-gauge for outlets, on the theory that outlets might be called upon to carry heavy loads.  But, I would note that some say 14-gauge/15 amp should be used for outlets outside a kitchen because they may have lamps and small appliances plugged in, and they need the greater overload protection.

Good point. When my house was wired, they ran the circuit to the ceiling fixture and then to the outlets in the room for each breaker. Not handy when having to work with the power off in the room.

Add Reply

Post

OGR Publishing, Inc., 1310 Eastside Centre Ct, Ste 6, Mountain Home, AR 72653
800-980-OGRR (6477)
www.ogaugerr.com

×
×
×
×
Link copied to your clipboard.
×
×