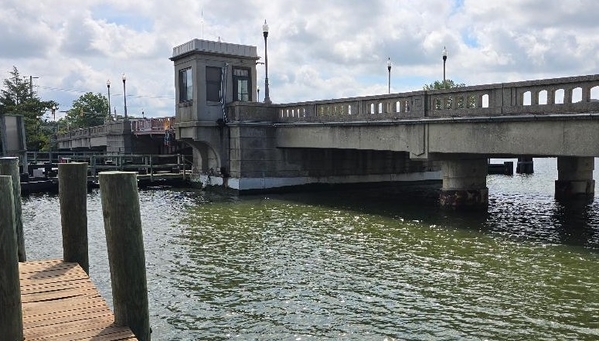
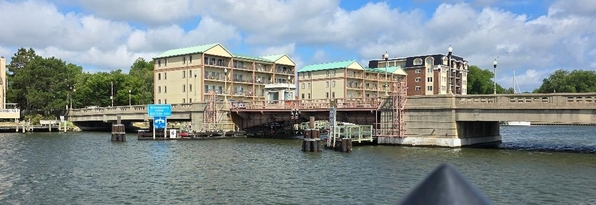
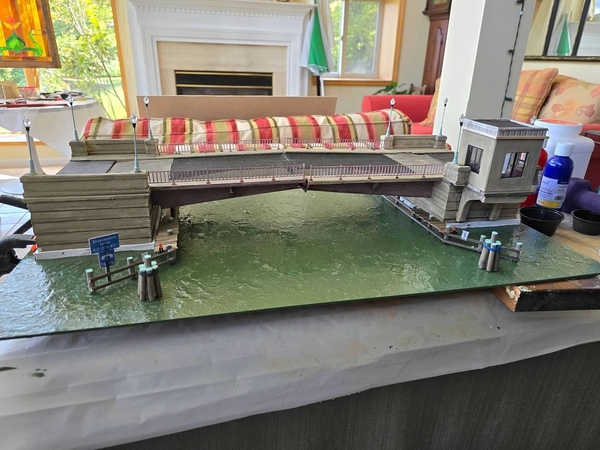
I'm doing a scratch build of the bascule bridge over Cambridge Creek for the RFC train garden, and I've reached the point of fabricating the base plate that will locate and support the spans and eventually be covered with resin or other water simulation. The body of water being simulated is a brackish-to-salty tidal estuary off the Choptank River (itself an estuary of the Chesapeake Bay). To my eye, the water appears a rather cloudy greenish-brown, with lots of organic particulates:

bridge3

bridge4   

My immediate question is, what is the best color for me to use for the base coat over the one-eighth inch thick hardboard base I'm fitting under the span sections? And for that matter, what type of water simulation media would you recommend for a project like this (possibly several square yards in total), and what colorants would work best to simulate the cloudy colors of the prototype creek?

My plan is to drop the plate in place, then pour the resin over and around the base and fill the rest of the creek representation to a depth of a quarter inch or so max -- likely requiring several gallons of media. So, something economical would be preferred, as well as something that can be done in sections, or at least able to tolerate long pour times start to finish.

Thanks in advance for any suggestions or advice you may be able to offer, and any pics would be helpful!

Attachments

Images (2)
  • bridge3
  • bridge4
Original Post

Replies sorted oldest to newest

Your situation looks very similar to that of the famous Troels Kirk on his Coast Line RR. Troels (who is a professional artist) is my hero when it comes to artistic modeling. Below is a tutorial on his technique for reproducing coastal water:

If you are not familiar with him and his work, it is well worth the time and attention. IMO his work is without peer.

P.S. -- Mod Podge works fine as the "wave" medium when using this technique.

Last edited by Avanti
@Avanti posted:

Your situation looks very similar to that of the famous Troels Kirk on his Coast Line RR. Troels (who is a professional artist) is my hero when it comes to artistic modeling. Below is a tutorial on his technique for reproducing coastal water:

Thanks, Pete! His base color (and the final result) are very close to what I am trying for, though given the sheltered location of my prototype (basically a harbor) I need much less shoreline wave action. It's interesting he seems to put all the coloring into the base coat rather than partially in the 'water' medium -- I had envisioned coloring the medium (which I also envisioned pouring over the base coat), so Troels has given me some things to think about -- his methods ISTM might be easier to add onto in sections, which might be how I have to approach the installation. I'll check out his other videos for more tips.

Last edited by Steve Tyler
@LT1Poncho posted:

I think it looks amazing! The ripples are perfect and the color is believable for sure. Great work!

Wow, that looks awesome!

Thanks! Yeah, for a first effort at a water simulation, I was satisfied with the way it turned out. Now, if I can just match the color for the adjoining modules, I'll be a happy camper!  [My current plan is to feather the color over the edges and smother everything in Mod Podge!]

A masterpiece!!!

What material and paint color did you use for the “concrete” bridge abutment?

Thanks! For the concrete, I started with white and tan acrylic, added a healthy gob of spackling compound for a bit of texture, then dabs of black to tone it down some. Then, I did a couple of applications of black washing, with some selective wiping. IMHO it's still not a perfect match to the prototype, but grimy, decades-old concrete is likely never going to yield a precise match!

BTW, I'm nearing completion of the center span modules, with lights and motors wired up to accessory power through two buck converters:

The control switch is still in breadboard form, which is the way I may leave it until I do the two traffic control modules on each bank, and figure out how to coordinate control of all three modules in one panel . . . 

Update: while reading a thread on an unrelated matter (material to repair a whistle lanyard), I realized the braided fishing line being recommended might be perfect for one of my loose ends: depicting the steel cable wraps around the piling bundles protecting the bridge bases. So, when the commenter offered to send the OP a sample, I sent a PM asking if I could get one, also. He refused my offer of payment, and lo and behold, the line worked perfectly!:

Note: the bundles are temporarily held together by rubber bands around the middle, which will be removed when the bundles are Mod Podge'ed to the 'water' -- the new line is around the top.

For comparison, here's a shot of the prototype. Other than the model pilings being a lighter color (less 'creosote'?), I think they are fairly close:

Thanks again, Millstonemike!

Attachments

Images (2)
  • mceclip0
  • mceclip1
Last edited by Steve Tyler
@Richie C. posted:

Looks great ...... any way to slow down the action of the center spans by reducing electrical current or using a gear reduction system ?

Actually, they are the slowest gear reduction motors I could find, at 5 RPM. I had been testing them using a pack with three AAA cells, producing 4.5 volts, but when I added a buck converter to use accessory voltage in the permanent installation, I initially set it at the motor's rated 6 VDC, and shot the video at that speed. I have since reduced the output to 4.5 - 5 VDC, and the action has slowed a bit, though not too close to the prototype. I'm willing to tolerate a bit faster action, though, since the rocker switch (a car window control replacement) must be held in position by the viewer in order to move the bridge span, and it's a commonplace that viewer "attention span" and patience is somewhat limited!

@SteveH posted:

Steve, Great work all the way round, mechanically, electrically and artistically!  There's a lot going on there.

Thanks, Steve! Well, even more to come: I just got word that installation of the bridge on the RFC train garden is a definite "maybe", so I'll begin work soon on the two adjoining modules linking the animated center span to the banks. Each will have slow action crossing gates to control traffic, as well as overhead traffic lights which will display red or green lights, depending on the position of the gates. If I get *real* ambitious, I'll also add a crossing guard bell sound module, like the ones I had custom fabricated for my own layout:

Stay tuned!

@Steve Tyler posted:

So, here's the final result, on the base plate for the animated center span sections:

00-k5_WS7Zx7_tfFuOPPIOajmdaStQsEsxpQuitV77CFvRJhoRHYLpb_bWVHazcepoc4xJ2Twu75QF_jizMkB1ZdA

It took two attempts to get the base water color close, but I'm happy with the way it came out in the end. Thanks for the consult! ;) 👍

Excellent job, Steve!  You got some very nice ripple effects and color looks extremely realistic.  I didn't see this thread until just now or I would have chimed in.  My Ohio River was done with a 10:1 chalky blue-gray to gold mix that turned out to accurately represent the water on that day.  And that was only applied to the base.  The water itself was Woodland Scenics Deep Pour Murky.  And as you know, the color of the sky greatly affects the color of the water.  It varies constantly and that's why photographs are essential to the process.

Anyway, it looks fantastic! 

George

@G3750 posted:

Excellent job, Steve!  You got some very nice ripple effects and color looks extremely realistic.  I didn't see this thread until just now or I would have chimed in.  My Ohio River was done with a 10:1 chalky blue-gray to gold mix that turned out to accurately represent the water on that day.  And that was only applied to the base.  The water itself was Woodland Scenics Deep Pour Murky.  And as you know, the color of the sky greatly affects the color of the water.  It varies constantly and that's why photographs are essential to the process.

Anyway, it looks fantastic! 

Thanks, George! Yean, there is so much variation from photo to photo I finally gave up trying to finesse it and just went with "that's close enough!" Besides, the eventual lighting at the RFC train garden has yet to be determined or evaluated, so even a perfect match may appear off. For now, at least, I'm pleased with the result, and time will tell . . .

Just a brief update: tonight I finished up the permanent wiring, so all input power (9-25 volts AC or DC) is now routed through three buck converters to power the LEDs (at just under 3 VDC), the two gear reduction motors driving the lift sections (at 6 VDC), and the two Tortoise switch machines activating the traffic control gates at each end (at 9 VDC). Both control switches (traffic control gates and lights, and lift sections) are now also permanently wired into the control panel. Earlier I finished the preliminary landscaping, so the three modules are ready to be taken apart and installed on the RFC train garden tomorrow:
bridge16

Attachments

Images (1)
  • bridge16
Last edited by Steve Tyler

Add Reply

Post

OGR Publishing, Inc., 1310 Eastside Centre Ct, Ste 6, Mountain Home, AR 72653
800-980-OGRR (6477)
www.ogaugerr.com

×
×
×
×
Link copied to your clipboard.
×
×