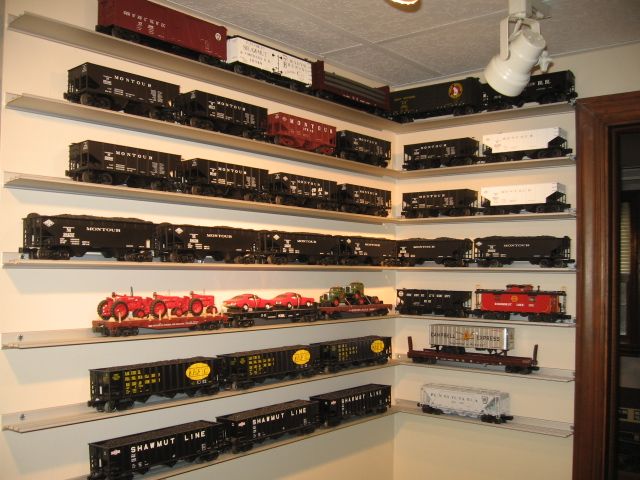
Forum advice requested. I'm installing the shelving and I am pleased with it so far. I am using a carbide tipped power mitre saw that is making nice clean easy cuts. The lowest row and desired height took me a little time to do. Also, have my spacing blocks ready. I decided on 5 3/4 inches.  I have some longer runs and had planned to use the connecting pins but haven't figure out how to open them up enough to slide or tap them onto the rails. I am pounding them with a center punch and its not working out. Maybe I wont need them but I am not the most talented or lucky when it comes to this type of stuff. I'd like to hear how others have set up their shelves before I am too far along and specifically:

Did you use these connecting pins, how did you get them open enough?

If you went to a corner, did you 45 degree mitre them or just keep them square?

Original Post

Replies sorted oldest to newest

The connector pins are a big PIA.  To solve the problem I held one end in a needle nosed vise grip and increased the opening with a dremel tool, then swapped ends.  Also bevel the edges on the opening at both ends to go on the rail easier.

The only thing I do not like about the shelving is the 3 rail.  It is display shelving, two rail is sufficient.  I have mentioned this to Glen, but to no avail.

bruce

bruce benzie posted:

The connector pins are a big PIA.  To solve the problem I held one end in a needle nosed vise grip and increased the opening with a dremel tool, then swapped ends.  Also bevel the edges on the opening at both ends to go on the rail easier.

The only thing I do not like about the shelving is the 3 rail.  It is display shelving, two rail is sufficient.  I have mentioned this to Glen, but to no avail.

bruce

I recently installed my first set of GS shelving and agree with this.  For some reason all the locomotive pick up rollers seem to have much more "springiness" on the shelves then on the layout track. Plus they keep dancing off the sides when trying to set a unit in place. Big articulated steam seems to be more so.

 Don't get me wrong, I custom made Oak shelves that are nice and since installed the GS I don't think I'll go back to anything else. 

Love my GSD shelves and have a ton of them. I only used the pins on one wall where I joined sections together over 6 feet.

I set the pin on my bench vise, add a drop of oil, and pound a punch (NOT a center punch) down into each end to spread it open. Then tap the pin onto a shelf while standing the shelf on the floor. Concrete, NOT wood or tile.

Then once you have both shelves mounted to the wall, take the same punch and drive it onto the other shelf. 

It is a bit tedious, and I did break a punch in the learning process. Like any project, once you learn the tricks of the trade, its a piece of cake.

Great shelving but the pins are impossible to use without opening them up first.

I used a hammer and old screwdriver to open up the pins.  If you are careful to line up the shelves, you won't need to use pins on most of the joints.  When I needed to use them, I only put a pin on the center rail.

I added a vertical 1X4 on each end for a finished look and to prevent runaways.  I drilled holes in the 1X4 aligned with the end pins and press fit it.  I also used a Kreig Jig to make pocket holes to mount the 1X4 to the wall with wall anchors.

Bob

I love my GS Shelves!  I mounted mine to cabinets that I made out of black walnut.  The wood is from a tree I had milled.  The shelves are mounted to the cabinet with wood screws and the cabinets are mounted to the wall with Hangman French Cleats.  The cleats are rated for the load.  I weighed the cabinets and rolling stock in order to determine which cleats to purchase. 

Here is picture of one of them.  They are identical to each other and are mounted to the wall behind my layout.

I really like the fact that I can see my collection! 

Larry

Attachments

Images (1)
  • IMG_4649

I love these shelves and have now moved them three times! Patching the walls for the many screw holes was a challenge, but these things are durable, neat and provide a somewhat simple way to display trains with minimal work. I agree that the pins are rough to install and even more difficult to remove when taking apart. Follow the really good advice above and I'm sure you will be pleased. Here are a couple of pictures of the shelves on my prior (PA) layout on a very long wall - four 6' lengths attached using the clips, and my current use of the shelves trimmed to fit on panels on the side of my current layout:

IMG_1858DSC_1519


Attachments

Images (2)
  • IMG_1858
  • DSC_1519
Last edited by stangtrain

Thanks folks for all the comments. Very Helpful especially those pictures. This confirmed I definitely wont miter the corners. Good idea with the canned food. I heard old coffee tins work well too.

This pin situation is impossible. My local HW store didn't have anything better. My punch gets stuck and then I have beat that out of the pin destroying that. Tried the chisel and the pin goes flying. Driveling wasn't working but could have been the attachment I was using. Is there specific attachment that would work easily? Gonna try a couple more tricks tomorrow and see how it looks without any pins. ARg, wish this was more fun.

Add Reply

Post
×
×
×
×
Link copied to your clipboard.
×
×