Finally arrived at the convergence of time and bench space (literally shoved a few other projects aside, ), and got into what will be the final house to install in the village of Lemasters on my layout.  Branchline Tower House kit that I had set to rest in the far back reaches of my bench gathering dust and accumulating all those "extra" details.....


Original Post

Replies sorted oldest to newest

Thanks!


This has been the easy part of building this kit; some odd parts of the supplied interior bracing make no sense and I suspect have to be cut away to install some doors and the roof sections.


I am reliably informed that the bay window will be a true nightmare; goody, goody!


Instructions for this kit are slightly clearer than mud on a rainy day.....I suspect that will get worse as I go forward as that seems to be the rule of writing instructions - they decline in detail and quality as the build proceeds forward as the write just wants to be done with it.


Still, would be annoying to scratchbuild and will complete an entire area of the layout, so maybe worth the investment.


But there's a lot of kit to complete and then there are all of the external details and scenery to add before it gets installed.

Well, as expected the roof parts don't fit very well, but no matter, not a problem, and I'll just close the gaps with cardstock and shingle over everything.


The bay window is much worse and it would have helped just a bit if the instructions would make any effort to address shaping he edges of the laser cut components to form the proper shaping - windows were pictured going in opposite of what they are now since how the instructions had them in made no sense.  


Annoying how putting together the front 1/2 of a kit just seems to totally eclipse putting together the 2nd 1/2........  


Well, now it's going together how I want to go together.

Originally Posted by scale rail:

Wholly cow. Those things don't at all. I know it will look great when your through. Can't wait to see it. Who made the kir? Don

Kit is Branchline - Tower House.


Simply amazing that a kit that's been out on the market for so long could have parts that were designed by someone that failed basic geometry,

Originally Posted by AMCDave:

Your work looks great!

I have engineered a number of laser cut structure kits. It can be difficult but I'd not go production until I had a GREAT fit on all parts. Madding at times...but a necessity unless I am running one kit for myself. 

Thanks!  Right now I'm in the midst of applying the shingles - gluing them down......defines "tedious" on even the best of days.


All that this kit needed was for someone at Branchline to actually try to assemble it and I'd bet there would be changes overnight.  This is a classic case of failure to actually test build a product and also to test the instructions.


I'm going to get to a point of "good enough" and then it's off to the next phase of all of the exterior details and scenery "stuff".

Originally Posted by Ken M:

Where did you get your shingles?


Supplied with the kit, but I also have been using the ones from Rusty Stumps for a another project and will probably use some of the bits left over on this house.

I don't know the correct nomenclature but the copper piece between the angles of the roof can be used to hide a small misalignment.

Yes, I had considered doing my usual full copper flashing exercise but will just follow more along with the suggestions in the instructions on this build if only to get it done and move it all to the next stage.

Originally Posted by Mark Boyce:

Super job!  I really like looking at your handiwork on all your structures!

Thank you!  I have 1 more building to build that goes on my layout as a "permanent" installation, and then a group of structures that go into a lift-out area if I choose to change the character of the one destination.  I need to get to that latter project if only to relocate the stack of kits off my one chair in my shop.


That bay window lived up to every warning that I was given regarding this kit.  There was a lot of sanding, filler, carving, sanding, and colorful language involved in just that aspect alone.  The roof not fitting was not that hard to traverse; just should not have been an issue.  It's stuff like this that though that sometimes gives "craftsman" kits when all of the issues with this kit could be addressed by the company...

Originally Posted by Mike CT:

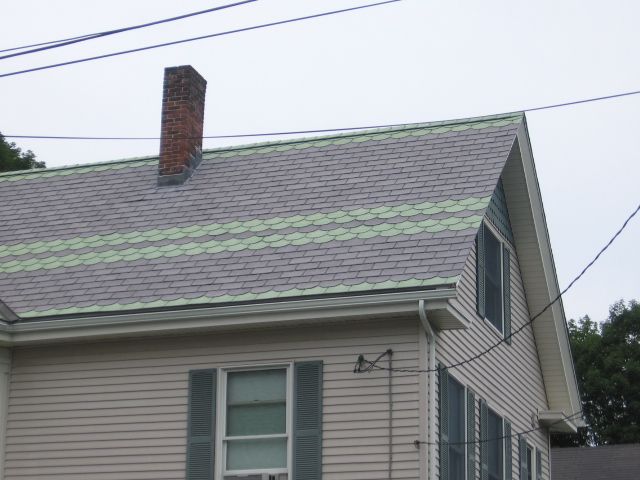
Martin:   That's an excellent build.  Thanks for posting the pictures.  I took this picture last week, trip to Boston, town of Natick, we did the 4th of July parade there.  Beautiful old town, well kept.


Thanks!!

Great shot of that roof!!!  Now I sort of wish I had used some red scalloped shingles,

Wow, great job with the build. I hear you on the poor fitting. I put together a caboose model a few months ago and found more than a few odd fitting parts. Not that bad but it made me really wonder. I even wrote the company and suggested some changes for later runs (no big deal, just stuff they could change in the writing on the instructions, which had next to no diagrams or photos anyway). I now know why so many people would rather scratchbuild than do a kit like that.

But your effort seems well worth the effort, at least from what I'm seeing as I'm sure you had some aggravation and cursing you didn't write about. I knowI sure do when I try my hand at anyone else's version of any 'easy' laser kit to build.

I'd love to see it installed among other houses, I bet it'll look great in a town. Your O scale residents are probably already dreaming of the day when they can move in!

Originally Posted by p51:
Originally Posted by Firewood:

I won't ask what might be in the steamer trunks.....

With the looks of that French Maid at the door and the woman sitting on the steps, you're probably better off not knowing!

Let's just file that under need to know combined with "specialty items",

Add Reply

Post
×
×
×
×
Link copied to your clipboard.
×
×