@CALNNC posted:

You have a  massive amount of space. I would say stop any planning or construction, find a copy of John Armstrong's, 'Track Planning for Realistic Operation', and read it cover to cover, several times.  While you may not be interested in 'realistic operation'  the wealth of information on why railroads did what they did, will help you to not make mistakes that will make operation too complicated, redundant, or too simple to become stale.  Maybe at some point you might want to do waybills and car routing like a real railroad, but the book will help in pointing out certain things a lot of modelers get wrong and end up ripping out, like where the turntable should go and why.   To have trains just  go in circles on this big of a layout, would be a crime.  Trains go from here to there and back again, and the only trains that have the same consist back and forth,  is a passenger train, loaded ore cars one way and the same empties the other as an exception.   With the space you have, in the book read up on a set up that includes loads out, empties in industries, with supplier on one side of a divider and plant on the other. can give real purpose to the whole empire.  Now if your enjoyment is just running them and circles are fine with you, great.  My layout is an around the room double track  where I  make circles and provide the rest with imagination, and I am happy to have that space to enjoy O gauge.

Hey Cal,

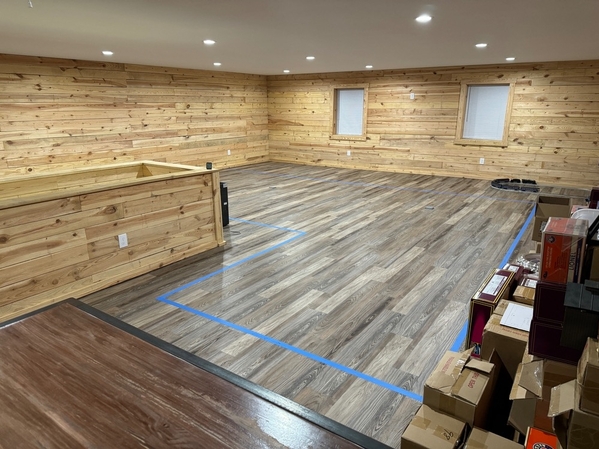
Thank you for the advice. I will check out that book. This is my one big fear... that I am years away from even being able to start a layout. Seems alot of folks have told me to stop planning and read.... great advice...and I will definitely seek out and read all I can. I guess I am feeling the pressure of 20 years of collecting engines and rolling stock only to stare at the boxes stacked up in my room. Of course I have run them... but only on temporary floor layouts that just involved track looping in an out from around the furniture in the basement. And a small around the tree layout for the holidays. Once the track was in the way, the wife demanded that I tear it up. Then it was back in the boxes for the trains. I have had this space for about a year now and have been working to finish it and get all the AC and walls up and insulated... getting it ready to house and keep safe my collection.

I guess I am having a hard time answering the "How do I want to run my trains?" question. I guess I thought I knew... but it sounds like I may have been oversimplifying my train of thought? No pun intended.... I do not just want to run my trains in a circle... but I need to understand my skillset and understand that I am not a master carpenter or engineer. So I know that my layout is not going to ever be published in a magazine or bragged about by anyone who will see it. I am just an almost 50 year old man who finally has a space to run trains and not have to put them back in the box when I am finished. I am very anxious to get started.... but I do understand that you can't run full speed head first...... I would love to have a layout that has endless fun and where trains disappear and reappear in different spots on the layout. I am a one man show though... so I have to keep that in mind too.   

@DoubleDAZ posted:

Tom, I would start with the space you’ve designated and "cheat" if necessary. For example, if you need 1"-2" to make O-81 work, I’d cheat, at least temporarily, until you get close to a final design. That said, I’d probably cut the window side to 3’, although I do see that shelving unit if you plan some storage or showcase shelves along that wall.

Since you have access on 3 sides, you can increase elevations as you lay track away from the edges, like you saw in Bill’s video. I know I said 30"-36" reach, but as I alluded to, it really depends on where the track is. If you look at Bill’s 2nd and 3rd elevations, it doesn’t look like he can reach all the track. Of course, I can’t really tell in the video. I’m really curious to see what comes up with.

As far as building goes, here’s a link outlining some techniques. You may still want to look for some of the books that have been mentioned, but this is a good starting point.
https://www.nmra.org/beginners...3-building-benchwork

I’ve also seen a lot of folks Altoona RHs and Millhouse River Studio TTs. A lot of users will recommend GarGraves with Ross switches because Ross switches are arguably the best and GG is relatively affordable. However, Atlas is solid rail and is arguably quieter than others. GG will probably require more cutting, but I’d be inclined to cut others too in order to avoid small fitter pieces and the extra joints. Also, don’t compare retail prices without checking with them and online sellers for possible bulk discounts.

The hard part is going to be coming up with a design, then trying to add accessories to justify the operation. A lot of modelers already have an idea of what they want to model, be it a city, an area, an industry (logging, mining, etc.). There’s also a tendency to fill space with tracks and not leave room for landscaping. I'm guilty. I put in as many tracks as I can fit and leave it up to the user to say what they don’t want or where they want to put a building that has X/Y footprint. It’s an evolving process.

BTW, if you need any help with SCARM, don’t hesitate to ask or shoot me an email or PM.

Hey Daz,

I am kinda like Eric Segal... I would like to model a couple of different scenes including mountains and small towns.... I don't really plan on modeling an era or specific time period... my locomotives are steam and modern diesel. I just love model trains... so my only goal is to create something that is a bit more interesting than just a big circle, but not get myself so complicated that I can't ever complete it and get frustrated and give up. This hobby is so much fun and I wish I had local folks to share in the process and the fun... just isn't in the cards I guess. The accessories I would like havent been purchased yet... ie the TT or the RH... nor has a single piece of wood been bought. Everything now is just in the digital world or on paper. The only thing I have right now is a space, a bunch of trains and rolling stock and a long time desire to have a model train layout.

Based on your last comment, I would particularly recommend reading anything you can find about John Allen and the Gorre & Daphetid RR.  He started with a small oval layout, but when he was nearing completion, that original oval was incorporated into his final, large mountain layout.  Should give much encouragement to you!!

Chuck

Tom, building can always be done in stages. Even bench work can be done in stages if it’s designed with that in mind. Bench work modules can always be bolted together. You can always include switches and just not add to them until you’re ready to add the next segment. Have you looked through the sample layouts on the SCARM site? You can filter it to show only O scale designs.

https://www.scarm.info/layouts...s.php?scale=O#filter

IMG_0213

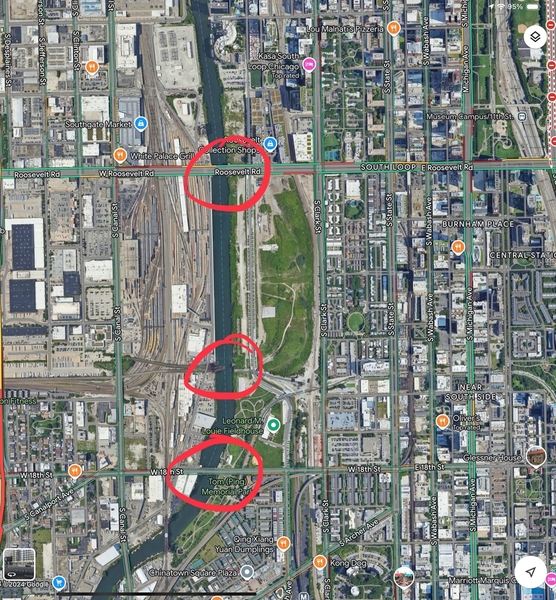
While I didn’t find any designs matching your large horseshoe, I did find some that appear to have elements, similar to what was in Bill’s video, that I think you’d like. The 1st shows a different take on turntable design with an 2-stall engine house attached to the TT and a lot of whisker tracks. Both it and the 2nd show multiple levels with tracks that crisscross. The last one will give you an idea of what an around the room design might look like, the limitations(?) of 30"-36" wide benchwork. It can give you an idea of how you might move the benchwork away from the walls by 2’ and double the width to get the same reach. There might be something to the idea of doing that, but adding a center aisle with a series of bridges similar to the bridges you see in photos of  New York  or Chicago. In fact, if you zoom in on part of Chicago, you can get different takes on yard design with a wye and engine/car maintenance buildings vs TT/RH.

https://www.scarm.info/layouts...ck_plans.php?ltp=198

https://www.scarm.info/layouts/track_plans.php?ltp=77

https://www.scarm.info/layouts/track_plans.php?ltp=53

IMG_0214

Attachments

Images (2)
  • IMG_0213
  • IMG_0214
Last edited by DoubleDAZ
@DoubleDAZ posted:

Tom, building can always be done in stages. Even bench work can be done in stages if it’s designed with that in mind. Bench work modules can always be bolted together. You can always include switches and just not add to them until you’re ready to add the next segment. Have you looked through the sample layouts on the SCARM site? You can filter it to show only O scale designs.

https://www.scarm.info/layouts...s.php?scale=O#filter

IMG_0213

While I didn’t find any designs matching your large horseshoe, I did find some that appear to have elements, similar to what was in Bill’s video, that I think you’d like. The 1st shows a different take on turntable design with an 2-stall engine house attached to the TT and a lot of whisker tracks. Both it and the 2nd show multiple levels with tracks that crisscross. The last one will give you an idea of what an around the room design might look like, the limitations(?) of 30"-36" wide benchwork. It can give you an idea of how you might move the benchwork away from the walls by 2’ and double the width to get the same reach. There might be something to the idea of doing that, but adding a center aisle with a series of bridges similar to the bridges you see in photos of  New York  or Chicago. In fact, if you zoom in on part of Chicago, you can get different takes on yard design with a wye and engine/car maintenance buildings vs TT/RH.

https://www.scarm.info/layouts...ck_plans.php?ltp=198

https://www.scarm.info/layouts/track_plans.php?ltp=77

https://www.scarm.info/layouts/track_plans.php?ltp=53

IMG_0214

Thank you for the pictures. I kinda like that idea of having the bridges potentially in the middle. Im also starting to think that maybe I am boxing myself in a little by making my table big and boxy? Maybe like has been stated earlier I can make my table narrow where it needs to be an wider where it needs to be... I just can't visualize that in my head... my entire problem. I guess i need to start scouring the web... maybe there are some good overhead shots of benchwork that fits the layout but doesn't take up so much space? Ive certainly got time to play around with this. Im also still learning SCARM... I haven't figured out how to model elevated track sections yet......

@Dave_C posted:

  Looking at your room. Have you considered running your mainline above the stairs coming up. With the layout placed high enough. It wouldn’t be considered a duckunder. Also maybe a good spot to place your mentioned bridges. It certainly would increase the length and separation of tracks on the mainline. The turntable could reside inside it.
Nothing wrong with wanting or owning a Big Boy. But if you go that route it pretty much dictates the rest of the layout as far as design. Curve size, turntable length, roundhouse stall length and the consist itself. To look somewhat correct you need a decent length train to go with it.

I’m in the Bill Park camp of the one long mainline that creates a long run with the capability of running multiple trains on it. Years ago this would never have been considered. But with the newer trains. Speed control becomes your friend.

Speaking of You Tube. I’ve watched some from  mpeterll.  Builds layout professionally. Some are based on design from the customers wants. Good watch as he shows how he tweaks the design and in the end usually comes up with a pretty good plan.

Hey Dave,


I just watched one of mpeterll's videos.... ironicly I picked one where the client gave him a drawing of what he said was the usable bench space he thought he had. It looked just like my table layout..... he said that is the worst design he would ever recommend. Now the question is how to I come up with a better use of the space... or a better benchwork design? I have already found it super hard to fit a continuous track loop in the space of which I have created based on what I thought was the only space I could have. I am beginning to understand what you guys said about thinking outside of the box.... Literally think outside the box. Anyone have any ideas on how I should start thinking outside the box?

My thoughts. . .

Consider an around the walls track plan with wall segments less than 48" deep.  36" deep benchwork is reachable.  You need 6" per track at the minimum for narrow spots, like the stairwell.

Build peninsulas in the layout space for features like engine terminals or stations.  You have enough space for a double track loop.

Build double ended sidings to store trains.  That way, you can handle locomotives less when you swap out consists.  I've got them on my layout; I can swap among my 9 car Canadian, 20 car hopper train, and 12 car freight.

Do you have equipment that's incompatible with the main layout?  Consider a second level for it.  This could go over the yard.

What accessories do you have?  Allow space for them.

As others have said, until you learn more about the kinds of operations you prefer, and until you have a sense of what is within your grasp to build, you will not be able to come up with the "best design for the space."  You need experience building and running first.

To avoid building a layout to throw away, build a section of layout that will give you practice building and operating, that can be added to and incorporated into a larger layout.

The window wall is best because you have least flexibility there. Design a town for the middle of the wall alongside a double track main. Have 3 or 4 spur tracks serving local industries, facing both directions. Have a spur at the passenger station where you can park a sleeper or express car to be picked up or dropped off. Have a pair of crossovers at each end of town over a train length apart.

For appearance, neither the edge of the benchwork nor the double track main should be straight or parallel to each other or the wall. Let the width of the layout vary from maybe 24" at the windows to the 36" max. Use extremely broad cosmetic curves except at the corners that will lead to your turnback curves. Leave room for scenic treatment on both sides of the track, although vary how much layout is in front and how much behind the track. If you want to practice with grades, you could include a very slight one using Woodland Scenics incline sets.

With this beginning you can experiment with different types of operation to learn what floats YOUR boat. The Step 1 layout described here will allow you to try local freight switching, passenger route switching, and mainline running with or without trains overtaking each other. The crossovers form a runaround for the local freight to be able to switch spurs facing either direction, and allow a train to pass another stopped at the station.

This Step 1 layout could readily be incorporated into whatever design you eventually land on.

If it were me, I would build this just below the windows, but a higher layout is much more desirable than one that low, so this could end up as a lower level branchline with another level of track over it. It's too soon to say, though.

Linn Westcott's L-Girder benchwork assembled with drywall screws would make the benchwork a piece of cake and readily allow for the varying width described above, as well as scenic features above and below the track. One or two of your bridges could find a home on this section. Using the Woodland Scenic incline sets lets you build your roadbed flat, which is easier, while still enjoying the appearance of grades.

I suggest you draw up your idea of a Step 1 layout like this, and then push the project forward from there, returning here for further feedback and discussion if you wish.

  I’m by no means am an expert in layout design. My own layout proves it. I didn’t consider myself much of a carpenter either. Invest in Wesscott’s book on benchwork and a quality made compound mitre saw. L girder doesn’t require precise cuts to go together.  Looking at your room pictures and your tape lines. I made the same mistake early on. Thought tables had to be built as rectangles. You only need the absolute table width for your 180 curves. L Girder allows the benchwork to sort of follow the track work. Your initial design seems to be done to give you adequate aisle space as far as walking around the stairway. I’d consider using the whole room with an around the walls in some sort of folded dog bone. The L Girder benchwork can be used to naturally open aisle width. The middle portion could house your engine service and turntable.

The layout design on You Tube I posted a link to uses that approach on Page 1 uses kind of what I had in mind. Longer room than yours but narrower with an 072 minimum.

If we had a plan of the entire room with windows and doors marked ( and the a/c's ) we could throw something up that will show what we mean about around the walls and thinking out of the box ( think off the tables! ). With this approach you would not need a duckunder or liftout to get inside the layout, you would already be there as soon as you came up the stairs!

Darrell, the windows (left) and mini splits (top) are the gray rectangles in the photo I posted earlier this afternoon. The bottom is against a wall, the left and top are 3’ from the wall. The right side is 2’ from his self-imposed limit. He can’t fully go around the room because the area on the right is used for something else. My design takes into account his desire for access to the windows and mini splits with a single entry point behind the stairs. It gives him access to both sides of all but the bottom right nook. That area is not wide enough for his O-81/O-72 dual mains, so it’s not a bad place for the TT/RH since that automatically has reach issues, unless it’s limited to a 3, maybe 4, stall RH. The design can be expanded to the left and top, but then he has to reach over to deal with the windows and splits, and also reduce the width of the decking to 36". The track I added is just to show the maximum while keeping center rail clearance at 6". At this stage it’s just to start discussions.

Well, I don’t know, he just ended the space there because there’s a pull-down access ladder he needs to be able to use on one side of the stairs and he made no mention of how much space there is between the stairs and the wall. Looking at the photos, it doesn’t look like there’s enough room for 36" wide bench work, but he does have some shelves and something else on that wall, so maybe there is or at least enough room for a dual main and still be able to access the stairs. This photo shows a change in flooring, so I thought that space was being used for other purposes and was off-limits. I guess we’ll have to see what Tom has to say. If we can use that space, then maybe we could go around the room and maybe even add a peninsula from either the right or left of the stairs, like the 2nd photo. Of course, it all depends on how far the wall is from the top of the stairs and what Tom wants to do.

IMG_0215

Tom 2024-09-06b daz

Attachments

Images (2)
  • IMG_0215
  • Tom 2024-09-06b daz
Files (1)
Last edited by DoubleDAZ

Dave, the tracks are not intended to be anywhere near a design, just showing a sample of the bench work and an idea of how much space there is available in 36". I’m not going to get into an actual designing until we hear from Tom to see how he wants to proceed. I know crossovers are needed, they’re in the previous version. And I know the curves can be increased, but so far we have no idea what brand track he is going to use, if he even knows. It doesn’t make sense to spend a lot of time on track at this point. I would add elevations, meandering curves, crossing tracks, bridges, tunnels, etc., but we’re not far enough along for all that yet.

BTW, the yard was just added to show there is space on the peninsula for a decent sized prototype yard. I would not do it the way the sample shows, but I didn’t spend any time on it, just threw it in there.

Lastly, I don’t think the right wall and size of the stairs has actual dimensions, so Tom needs to let us know the dimensions of the pony wall around the stairs and how long the right wall is from the stairs, assuming he wants to proceed with such a design. He never did give us the actual room dimensions, so I just added a wall with 36" bench work. The room appears to be 28’ top to bottom, but it appears to be more than 28’ left to right because originally the layout was 24’ with 4’ to the left wall and at least 2’ on the right. That seems to be at least 30’, but then the stair dimensions are wrong. I suspect there might be 4’ from the stairs to the wall. If that’s all there is, then I wouldn’t put 36" bench work there, but we could reduce it to a 12" shelf for dual mains to pass that area.

Last edited by DoubleDAZ

Hello all. I am attaching a PDF of my layout room. Complete with window locations and mini split locations. Also the included measurements. If I am missing anything just let me know and I will be happy to answer any questions. Everything in the earlier posted pictures are mostly train boxes. These will all be stored under the benchwork. The shelf is just my baseball card collection and that can be moved or even stored under the layout. The only thing that is not train related is the small whiskey bar. This is so I can entertain a bit up here and enjoy a little bourbon when running trains.   I have included a PDF and an image file. If anyone needs another format, just let me know. I am starting to figure out that my boxy benchwork design may be limiting the potential of the layout overall. Hopefully this gives everyone an idea of the space and will allow you guys to post your ideas for the space, which will help me see what you guys are advising. Thanks again for all the help!!


Tom

Attachments

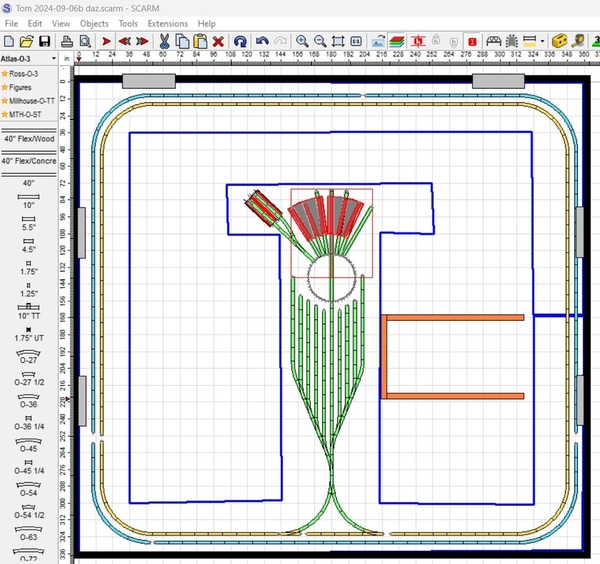
Tom, here's what I've come up with, assuming I read the dimensions you posted correctly.

For this version, as suggested by Gator, I went ahead and used used Atlas O-108 curves for the outer oval and O-99 curves for the inner oval. The crossover tracks at the bottom are O-45 just to get a bit over 6" clearance between center rails. However, other than curves, there doesn't need to be that much clearance everywhere, it was just easier. The tracks are not intended to suggest anything close to an actual design, they're just there for reference to show how tracks relate to the space.

Even though the wall around the stairs is open, I didn't know if there was enough room at the top of the stairs to safely enter the room after adding the 36" wide decking on the right, so I indented that section. I also added the wings just in case you might want to model something like an airport or shipping facility/harbor scene. The aisles are mostly 36" with the bottom right being larger. The aisle to the left of the yard could have removable bridges added if something like a Chicago river scene was landscaped on that wing.

The empty space in the bottom right could be used to add a work bench, display cabinet, mobile control panel, your bar, etc. Not all landscaping has to be ON the layout, it can be on mobile modules or lift out panels.

I know what mini splits are, but I don't know about having a layout directly under them.

I also don't know if there is enough space for the drop-down ladder, so that area might need to be adjusted.

While this design gives you great access to all parts of the layout, it doesn't let you model scenes like those in Bill's video. I know a lot of modelers who climb on their layouts to repair/change landscaping, use access hatches that you have to crawl under the layout to get to, etc. Nothing wrong with 36" benchwork, it all depends on what you want. At 77, I don't want to deal with access hatches, but that's only because I didn't build a layout when I was 50. If you plan accordingly though, you can design the framing so there are unencumbered routes to the hatch locations underneath the decking.
Tom 2024-09-07 daz

This photo shows how the actual dimensions (high-lighted) differ from what we started with. I just hope I understood the dimensions and they're close to being correct.
t1

Attachments

Images (2)
  • Tom 2024-09-07 daz
  • t1
Files (1)

Tom, I just saw your thread this evening for the first time.  First, I want to congratulate you on the wonderful train room you have there!  Simply beautiful!  And spacious too!

Second, you have done well attracting quite a few of the Forum's usual suspect in layout design!    Many of the folks who have already commented have been instrumental in helping me design and get building my layout in a very modestly sized room.  If you have insomnia, you may wish to look over the thread I started in January 2017 to see the "evolution" of getting a layout started, redesigned when I found I wasn't happy with the first and even second layout, without having to scrap and start all over.  I only say that to let you keep in mind, nothing is etched in stone even after you have gotten along with building.  Blackwater Canyon Line Yes, I know; 114 pages is a bit long even if you have insomnia.  That is a tribute to the many folks on this forum, some of whom have already jumped in to help you!!

If I had the room, I believe I would have joined in the long continuous mainline where you could run several trains.  I have seen layouts done that way in person and liked them.  Of course two or more loops works well: which is what I ended up with.

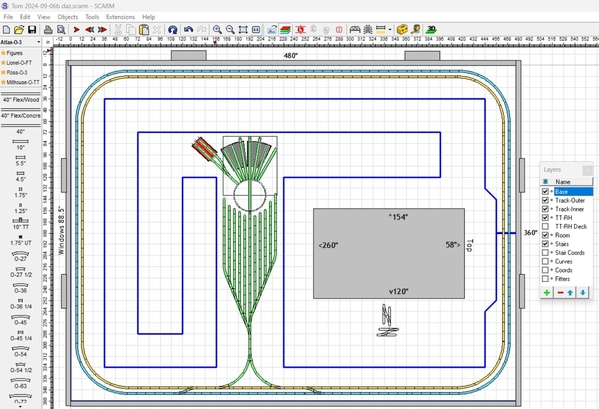
Tom, something Mark said reminded me I wanted to offer a hybrid design retaining access to windows and mini splits while reducing the large tables, no access hatches and a single lift up/out for access along the top and left walls. The bench work is 36" along the bottom, the same indent along the right and the rest are 72" wide with access on all sides. It's nothing special, but it's been a rather lazy Sunday.

Tom 2024-09-08 daz

Attachments

Images (1)
  • Tom 2024-09-08 daz
Files (1)
@DoubleDAZ posted:

Tom, something Mark said reminded me I wanted to offer a hybrid design retaining access to windows and mini splits while reducing the large tables, no access hatches and a single lift up/out for access along the top and left walls. The bench work is 36" along the bottom, the same indent along the right and the rest are 72" wide with access on all sides. It's nothing special, but it's been a rather lazy Sunday.

Tom 2024-09-08 daz

Hey Dave!

I wish I had a lazy Sunday! My wife and I grow wine grapes in our "spare" time... and yesterday was harvest time. I apologize for not communicating yesterday. Once we finished and cleaned up, I watched a little football was asleep before 9.

I really like that last 2 designs the best. I love the way you incorporated the long mainlines and also left a spot for the Atlas double track bridge. I also love the center peninsula that showcases the RH and the TT with a diesel service facility as well! There is also plenty of space for scenery and mountain making!


I want to thank you and Bill and everyone who has stepped in to offer help, support advise and encouragement! I am starting to get excited about this layout build again!

@Mark Boyce posted:

Tom, I just saw your thread this evening for the first time.  First, I want to congratulate you on the wonderful train room you have there!  Simply beautiful!  And spacious too!

Second, you have done well attracting quite a few of the Forum's usual suspect in layout design!    Many of the folks who have already commented have been instrumental in helping me design and get building my layout in a very modestly sized room.  If you have insomnia, you may wish to look over the thread I started in January 2017 to see the "evolution" of getting a layout started, redesigned when I found I wasn't happy with the first and even second layout, without having to scrap and start all over.  I only say that to let you keep in mind, nothing is etched in stone even after you have gotten along with building.  Blackwater Canyon Line Yes, I know; 114 pages is a bit long even if you have insomnia.  That is a tribute to the many folks on this forum, some of whom have already jumped in to help you!!

If I had the room, I believe I would have joined in the long continuous mainline where you could run several trains.  I have seen layouts done that way in person and liked them.  Of course two or more loops works well: which is what I ended up with.

Mike, I will check out the link you posted. I would love to see how you progressed through your layout! Your right... there are a lot of very helpful folks here and some really wonderful and sound advise. 

This hybrid design illustrates two features that are not particularly desirable in a layout, and that you can avoid given your large space with central entrance. First is the lift out, which is not as desirable as an open aisle you can simply walk into. Second is the inability to follow your train up close. If you stood in the outside aisle and took a train out of the yard and followed it along three sides of the layout, when you got to the lift out, you'd have to duck under it (because your train would be on it). Then when it got to the yard, to get up close, you'd have to either duck under the yard or hoof it all the way back to where you started. If you follow your train by limiting yourself to the inside aisle, then your train is at the back of the layout, and you still have to go around the turntable peninsula to follow your train. Not using the outer aisle means that space is largely wasted. It can be used only for construction and maintenance then.

I offer this, not to criticize @DoubleDAZ, who is not recommending this plan, but in the same spirit as he offered it--to help you learn a bit about how layout design will affect your enjoyment down the road.

@DoubleDAZ posted:

Tom, here's what I've come up with, assuming I read the dimensions you posted correctly.

For this version, as suggested by Gator, I went ahead and used used Atlas O-108 curves for the outer oval and O-99 curves for the inner oval. The crossover tracks at the bottom are O-45 just to get a bit over 6" clearance between center rails. However, other than curves, there doesn't need to be that much clearance everywhere, it was just easier. The tracks are not intended to suggest anything close to an actual design, they're just there for reference to show how tracks relate to the space.

Even though the wall around the stairs is open, I didn't know if there was enough room at the top of the stairs to safely enter the room after adding the 36" wide decking on the right, so I indented that section. I also added the wings just in case you might want to model something like an airport or shipping facility/harbor scene. The aisles are mostly 36" with the bottom right being larger. The aisle to the left of the yard could have removable bridges added if something like a Chicago river scene was landscaped on that wing.

The empty space in the bottom right could be used to add a work bench, display cabinet, mobile control panel, your bar, etc. Not all landscaping has to be ON the layout, it can be on mobile modules or lift out panels.

I know what mini splits are, but I don't know about having a layout directly under them.

I also don't know if there is enough space for the drop-down ladder, so that area might need to be adjusted.

While this design gives you great access to all parts of the layout, it doesn't let you model scenes like those in Bill's video. I know a lot of modelers who climb on their layouts to repair/change landscaping, use access hatches that you have to crawl under the layout to get to, etc. Nothing wrong with 36" benchwork, it all depends on what you want. At 77, I don't want to deal with access hatches, but that's only because I didn't build a layout when I was 50. If you plan accordingly though, you can design the framing so there are unencumbered routes to the hatch locations underneath the decking.
Tom 2024-09-07 daz

This photo shows how the actual dimensions (high-lighted) differ from what we started with. I just hope I understood the dimensions and they're close to being correct.
t1

Hey Dave,

The only measurements that I did not take, were the actual length and width of the knee wall, which I apologize for. I will get those to you this evening. The measurements I gave you are the size of the room, (30 wide x 40 long). The other measurements were accurately measured so you knew exactly the floor space that was available and the exact measurements between the windows. It looks like you understood absolutely correctly. Which is good, because a technical drawer, I am not. If there is any measurement that you need clarification or one I left out, just let me know. Thanks!!


Tom

Tom,

Ken Wing brought up an excellent point that is a problem with my layout, but not one I could fix in my existing 11' x 11' room.  That is a lift out or as is my case a lift up and not being able to follow trains all the way around.

@Ken Wing posted:

This hybrid design illustrates two features that are not particularly desirable in a layout, and that you can avoid given your large space with central entrance. First is the lift out, which is not as desirable as an open aisle you can simply walk into. Second is the inability to follow your train up close. If you stood in the outside aisle and took a train out of the yard and followed it along three sides of the layout, when you got to the lift out, you'd have to duck under it (because your train would be on it). Then when it got to the yard, to get up close, you'd have to either duck under the yard or hoof it all the way back to where you started. If you follow your train by limiting yourself to the inside aisle, then your train is at the back of the layout, and you still have to go around the turntable peninsula to follow your train. Not using the outer aisle means that space is largely wasted. It can be used only for construction and maintenance then.

I offer this, not to criticize @DoubleDAZ, who is not recommending this plan, but in the same spirit as he offered it--to help you learn a bit about how layout design will affect your enjoyment down the road.

I will show some photographs to show what I mean.  I am standing at the door entering the train room.  You can see I have two levels the lower has a steam ending sitting on a spur in front of a small freight station in the foreground.  In the middle of the photograph is a light gray homemade lift up girder bridge that is the access point to the middle of the layout.  There is also an Atlas 40" Pratt truss bridge 7-1/2" above the light gray girder bridge.  The bottom of girder bridge is at 41" above the floor.  I am no longer able to duck under it.  I have to sit on a rolling stool and duck my head to get under it.  It is not very convenient at all especially when a train is running.

20240907_193115544_iOS

Here is a view from the end of the aisle standing in front of the engine house on the upper level above the fire extinguisher in the first photograph.  You can see the access gap where the two bridges cross.

20240907_193045832_iOS

My preferred operating area is in the center beyond the truss bridge.  My point is when I am there I can't see the train running on the lower level or any scenery I might put there.  Since the length of the bridge is so long, I used plexiglass underneath the plastic truss bridge to brace is so it doesn't flex when moving up and down.  The girder bridge wouldn't have needed as much bracing, but I could have only gained an inch which wouldn't have helped.

Of course you have a much larger space than I do, so you have a lot more flexibility.  I decided I would have to live with the caveat I described above.  I'm just showing what I think Ken described to give some food for thought.  I know you will have a wonderful layout and am glad you said you want involved with the whole process including design instead of paying a professional like peterll on YouTube.  His videos are really great as others have mentioned.

Attachments

Images (2)
  • 20240907_193115544_iOS
  • 20240907_193045832_iOS
Last edited by Mark Boyce

Ken, criticism is always welcome. That said, just to offer my thoughts, a pure around the room layout limits Tom’s access to both the windows and the mini splits. I don’t know how much access he needs/wants, but reaching over 36" of landscaped decking just to open the windows, clean them, etc., might not be desirable. If he or a mechanic has to attend to the mini splits, it’s even less desirable. One thing I didn’t take into consideration is exactly where the pull-down ladder is in the upper right section of the room. I didn’t because I have no idea if this design is something Tom would want to pursue.

There’s no reason we can’t design the trackage as if the outside were against walls just as the bottom is. Yes, the outside aisles would be just for maintenance and the lift up/out for access, but I don’t see that as a deal-breaker. Yes, that may waste some space, but if you remove the wings I added in some earlier designs, there’s a lot of wasted space inside an around the room design too. That’s not to say we can’t come up with a way to fill them, but I’ve been to more than one club layout that was designed with mountain scenery all along the outside perimeter, one with a ramp along one side to view from above and an overhead control mezzanine along another side, walk-around operation was all done inside.

As far as not being able to use the lift up, there are ways to keep trains from using that section of track any time it’s open. Yes, if a train were on it and he needed immediate access, he might have to duck under, hopefully not something he’d have to do with any regularity. Mianne spent time and money designing a powered arch entryway, so there must be some demand for such access. I been to 2 layouts with that too. Also, 72" wide benchwork in some sections offers a lot more space for scenes such as the one in the video Bill posted earlier, something Tom appeared to like.

As far as not recommending the design, I was referring to the tracks because someone assumed I was suggesting simple ovals in an earlier version. Depending on Tom’s reaction, there’s no reason for me not to recommend the design if it meets his needs. The bottom line is I’d be remiss not to offer other perspectives. I’ll be more than happy to help with whatever version Tom chooses to pursue.

Tom, 2 pages in 5 days, you certainly attracted a lot of attention. Went through the posts - you are getting a lot of good thoughts.

What I did not see and perhaps missed was what you wanted on your layout besides the track?  Towns, cities, mountains, forests, trains crossing over each other, industries. bridges, tunnels, staging track, water features. All of this has an impact on the layout plan. Your possession of a BigBoy essentially means minimum 072 diameter track - a huge consideration in layout planning. The turn table is another space taker.

It would be helpful to have a list of must haves, want to have and nice to have as a guide for all your helpers.  In planning my latest version a double main, large long yard space and 072 min curves were must haves. I had lots of wants but the available space and the above musts really constrained the possibilities.

If you want to run 20 car freights or 8 car passenger trains, siding will have to be long enough to handle them. Storing engines is another matter, diesels are relatively easy to swap out, but the Big Boy and many steamers and electrics are more challenging to move on and off the track.  You may want a on-track storage area for these - the turntable is useful here. When not is use will the track section be unpowered? Same with you intermodals and other freight, where will those be stored, where will they make sense to be stored. If you have intermodals is it just train and truck or is there an opportunity for a water feature for sea shipping?  Word of experience - what you want today may not be what you want tomorrow. Don't get bent out of shape trying to get everything perfect, it will change anyway. Keep reading, watching vids and looking for ideas on this forum and others.

@ScoutingDad posted:

Tom, 2 pages in 5 days, you certainly attracted a lot of attention. Went through the posts - you are getting a lot of good thoughts.

What I did not see and perhaps missed was what you wanted on your layout besides the track?  Towns, cities, mountains, forests, trains crossing over each other, industries. bridges, tunnels, staging track, water features. All of this has an impact on the layout plan. Your possession of a BigBoy essentially means minimum 072 diameter track - a huge consideration in layout planning. The turn table is another space taker.

It would be helpful to have a list of must haves, want to have and nice to have as a guide for all your helpers.  In planning my latest version a double main, large long yard space and 072 min curves were must haves. I had lots of wants but the available space and the above musts really constrained the possibilities.

If you want to run 20 car freights or 8 car passenger trains, siding will have to be long enough to handle them. Storing engines is another matter, diesels are relatively easy to swap out, but the Big Boy and many steamers and electrics are more challenging to move on and off the track.  You may want a on-track storage area for these - the turntable is useful here. When not is use will the track section be unpowered? Same with you intermodals and other freight, where will those be stored, where will they make sense to be stored. If you have intermodals is it just train and truck or is there an opportunity for a water feature for sea shipping?  Word of experience - what you want today may not be what you want tomorrow. Don't get bent out of shape trying to get everything perfect, it will change anyway. Keep reading, watching vids and looking for ideas on this forum and others.

So far, I am processing as much of this good information as I can at the moment. There is a lot to process, think about and consider. I will do my best to answer your questions as my answers seem to be changing as I see some examples and read the advise.

I would definitely like to model a mountainous/country theme. The mountain's are where I love to be. That being said, I am trying to figure out how to incorporate elevation changes as I know that type of scene would be very conducive for such things. I would love trees etc.

I would like to have trains crossing over each other as a second upper level loop of track is a want.

I have the bigboy and other large steam. I have long coal drags and longer passenger trains already in my collection and need to think about making sure I have curves big enough to support. So far there is plenty of room for the TT and RH for storage of the bigger steam.

Dave and Bill have sent me lots of possibilities on how things could play out. We have not settled on any design at the moment, but I have been able to see what is possible in the space.

I know I will need to have different power districts... but what those are and how to implement them... I still have to learn that, and won't be able to figure that out until I have a track plan in place. I have 4 180W powerhouse power supplies, so I will hopefully have plenty of power.

Last edited by Godale03

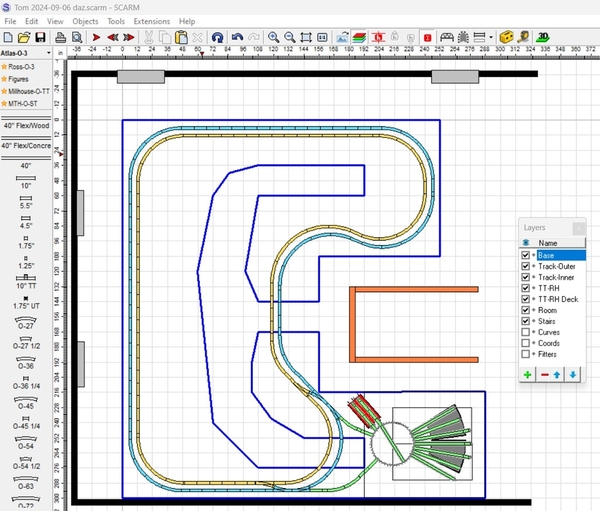
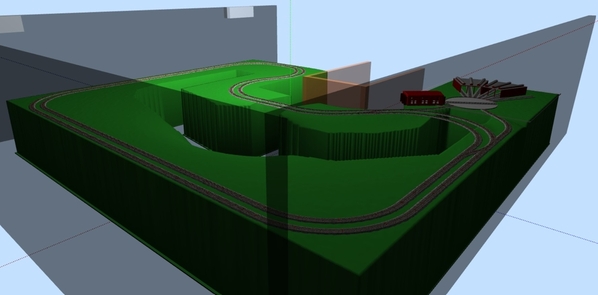
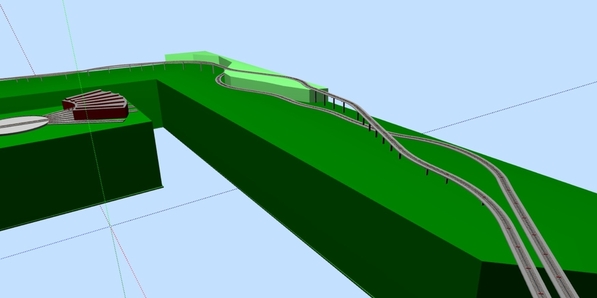
Tom, here's a rather crude attempt to show some elevations and meandering curves rather than boring ovals. The length of the section doesn't lend itself to a 3D photo, so you'll see it a bit better in SCARM. The techniques can be applied to any design, I just happened to use the last one I did.

The purple tracks are grades.

The blue line goes down 2" left to right to where the tracks cross on the right, then back up.

The gold line goes up 7" right to left, then level to the crossover on the left, then back down along the left.

At the intersection on the right, the gold line is up 5" while the blue line is down 2", so both crossovers have a clearance of 7".

Tom 2024-09-09 dazTom 2024-09-09 daz3d1

Attachments

Images (2)
  • Tom 2024-09-09 daz
  • Tom 2024-09-09 daz3d1
Files (1)
@DoubleDAZ posted:

Tom, here's a rather crude attempt to show some elevations and meandering curves rather than boring ovals. The length of the section doesn't lend itself to a 3D photo, so you'll see it a bit better in SCARM. The techniques can be applied to any design, I just happened to use the last one I did.

The purple tracks are grades.

The blue line goes down 2" left to right to where the tracks cross on the right, then back up.

The gold line goes up 7" right to left, then level to the crossover on the left, then back down along the left.

At the intersection on the right, the gold line is up 5" while the blue line is down 2", so both crossovers have a clearance of 7".

Tom 2024-09-09 dazTom 2024-09-09 daz3d1

Dave,


I love this concept! I don't know how you are able to visualize this so well. I would have never been able to come up with this on my own. I appreciate you taking the time to put this together. I love way it meanders so that you can create nice long runs. There is plenty of room to run multiple trains and give the ability to scenic in the mountains/country theme. I am not planning on modeling any particular era, which I know offends some people but I have a vast inventory of engines and rolling stock from all eras and just enjoy running trains... even though it will not be "pyrolytically" accurate. This hobby is all about fun.. and a layout like this would be fun to run. I can see tunnels and bridges and trains rolling over valleys and nice crossings where trains meet.

I also had a few ideas about the windows... since an around the room layout would only effect 2 of the 4 windows... maybe I could just have bridges in front of the windows I could either lift out or pull out? Opening the windows isn't a big deal because the room is temp controlled and I don't see myself opening windows. My only concern would be leaking windows over time and or if I ever needed to replace one. The mini splits... the only service inside that is required would be to pull out and clean the filters, so I would just need to access them. The only wrench in that theory would be if one started to leak... then that could be a potential problem. Other than that, being able to get to them if something would need to be replaced would be the only other need. All the compressors are outside. The only thing left to really contend with would be the attic stairs and the whisky bar in the upper right hand corner of the space. I can get some pictures and measurements if needed.

Another thought for the group..... would you have a dedicated upper loop... meaning I could run trains separately above, or do you like the idea of integrating the upper tracks into the mainline so trains go up and down as they meander from point A to Point B?


Tom

Last edited by Godale03

Add Reply

Post
The Track Planning and Layout Design Forum is sponsored by

AN OGR FORUM CHARTER SPONSOR

OGR Publishing, Inc., 1310 Eastside Centre Ct, Ste 6, Mountain Home, AR 72653
800-980-OGRR (6477)
www.ogaugerr.com

×
×
×
×
Link copied to your clipboard.
×
×