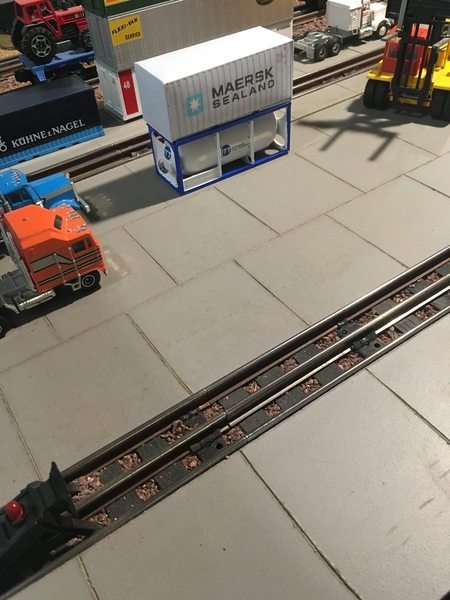
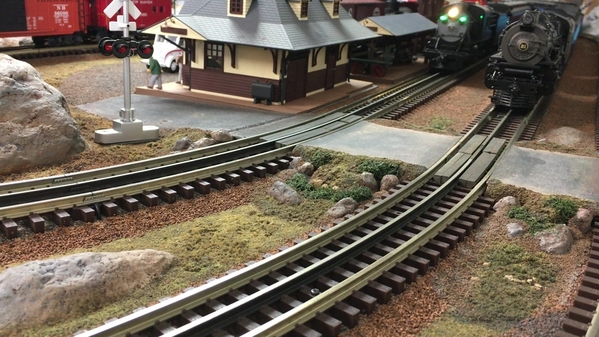
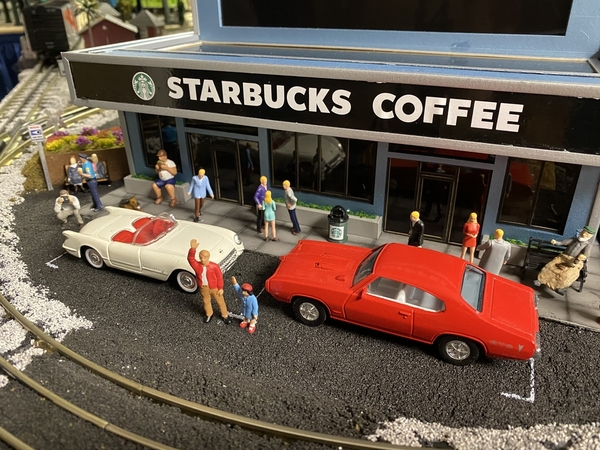
I am very open to suggestions on the best way to model street trackage in an industrial scene. The brewery complex is about 3 feet by 12 feet.

I have two questions: how have you raised the street level to match the track height and what material did you use to model the street? Okay. I fibbed. A third question is would you use that same procedure again?

I will soon start working on an urban scene that will require trackage running by and switching between numerous brewery buildings.  I have read articles in which people have used cardboard, Masonite, plastic, plaster, foam board, and thin foam insulation sheets to model streets, but - unfortunately - most of the articles are for HO track in a small area. I use Gargraves track with Ross switches. What's the best way to model street trackage in O scale, please?

Thanks in advance for any and all suggestions.

Jim

Original Post

Replies sorted oldest to newest

I used a product years ago. Savrogan Wood Putty. You could pre color it and it could be worked for hours. I used it for an engine house floor and also some roadways tinted to represent asphalt. I don’t believe it is on the market now. A lot of work leveling it at the rails using a wood block and then cutting room for the flanges. I still don’t think you could beat it for looks as it literally hugged the rails. Not sure what you would do if there’s turnouts involved though.

You might consider a product called Homabed. Similar to cork roadbed but made out of homesote. It has slots cut into it so that it bends to a corner. Comes in different thicknesses. The HO version with a bit of trimming would fit between the center and outside rails. Placed upside down as far as the bevel and it would ride up right against your center rail by going over the web. The pre  cuts could be filled in with spackle. Then just paint it your concrete color. This is all speculation as to how it could work as I have no experience with the product. I was just thinking of a way to follow a curve without doing precise cutting to follow it. Cork itself may even work as it does take paint.

I would get a piece of Gargraves. Don’t invest a lot in materials. Then maybe give your top 3 choices a go at 1 foot intervals and pick out the one you like. This is a big project being 3x12 feet. Best to have a good game plan before you proceed.

Last edited by Dave_C
@Jim Brenner posted:

I am very open to suggestions on the best way to model street trackage in an industrial scene. The brewery complex is about 3 feet by 12 feet.

I have two questions: how have you raised the street level to match the track height and what material did you use to model the street? Okay. I fibbed. A third question is would you use that same procedure again?

I will soon start working on an urban scene that will require trackage running by and switching between numerous brewery buildings.  I have read articles in which people have used cardboard, Masonite, plastic, plaster, foam board, and thin foam insulation sheets to model streets, but - unfortunately - most of the articles are for HO track in a small area. I use Gargraves track with Ross switches. What's the best way to model street trackage in O scale, please?

Thanks in advance for any and all suggestions.

Jim

Jim,

I have modeled tracks embedded in concrete for my open hearth steel mill.  They are floors, not streets, but I think the technique would work as well.

The first thing I did was determine the position of the tracks.  In the examples shown, I am using GarGraves 2-rail and GarGraves 5-rail gantry crane with the inner 3 rails removed (this is for the open hearth's charging machine).
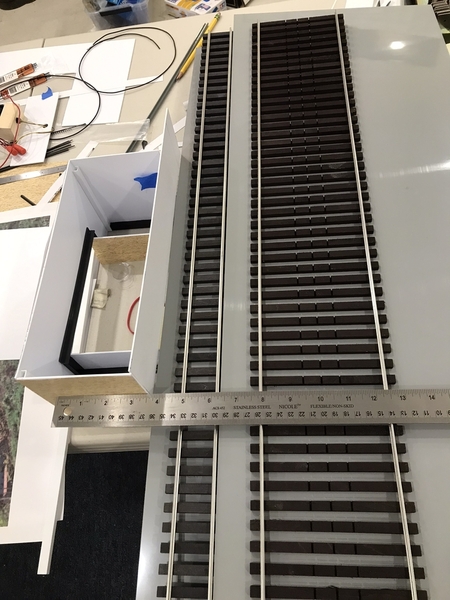
IMG_2400[1)

To simulate a raised floor, I used 1/4" square or rectangular pieces of Plastruct.  On top of them, I placed 0.060" styrene sheets that I painted and weathered to simulate concrete.  The .060 styrene is cut so that it fits right up against the track rails.
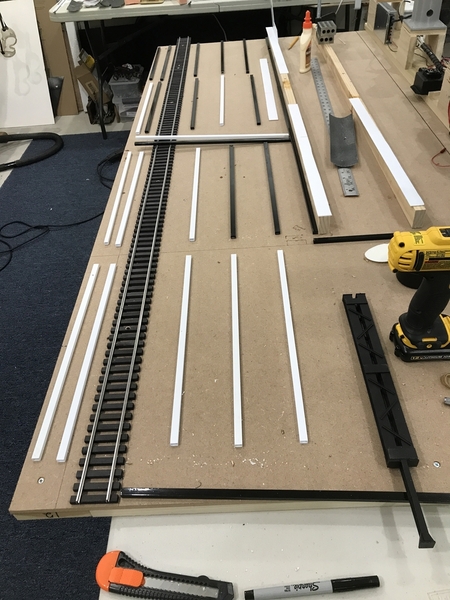
IMG_3518[1)

Here's a look at the pouring floor of the open hearth.
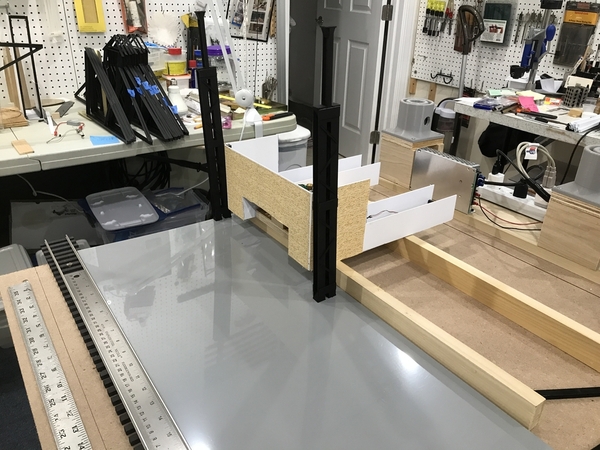
IMG_3401

This is the finished pouring floor.  Krylon #4291 Khaki Camouflage will give you a pretty good concrete color.  I enhanced the floor with some puddles of spilled steel (Testors #1180 Steel).
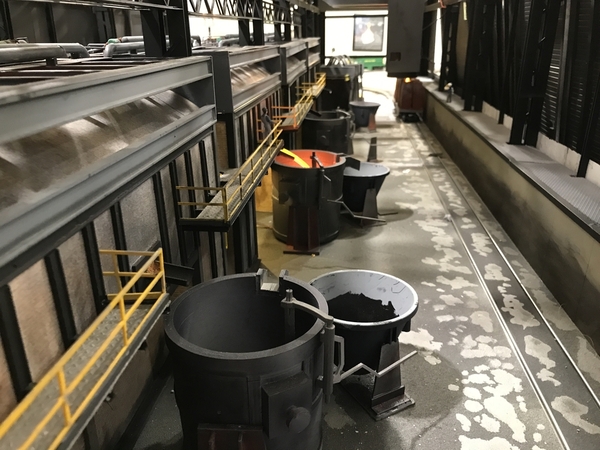
IMG_8726

This is the charging floor.  The 2 wide tracks on the left are for the charging machine.  The other 2 standard gauge tracks are for the scrap buggies (shown beyond the crane).  This floor was painted with Rustoleum texture paint (#223524) Desert Bisque.  It's a bit lighter than the pouring floor.
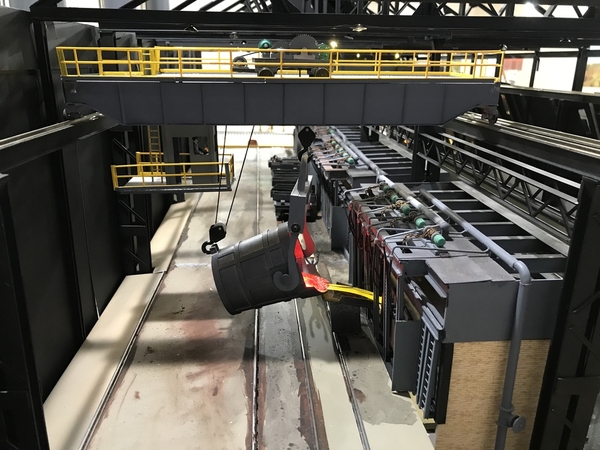
IMG_8725

Would I use this technique again?  Absolutely.  I think it turned out well.  In fact, in the photo above about 1/2 of that floor is removable, but it's almost impossible to tell.

Hope this helped.

George

Attachments

Images (5)
  • IMG_2400(1)
  • IMG_3401
  • IMG_3518(1)
  • IMG_8726
  • IMG_8725

I used the Cork Road Bed.   I had started using it for concrete curbs and sidewalks, has a texture, easy to paint, stain and weather.  What I really liked was I could cut strips on the table saw with a sharp 84 tooth blade and then the cork will follow the curve of the track.  Also easy to scribe cracks and overall easy to work with in my opinion.   

Found with Gargraves and Ross track that I had to cut or hand sand a small chamfer (45 degree edge) on the bottom side to make room for the rail profile and track spikes.  Once I figured that out, it fits snug and tight up against the center rail, and it's the perfect thickness letting the center rail protrude maybe 1/32" above the cork.

DSC00513DSC00514DSC00515DSC00516DSC00519DSC00520DSC00543

Attachments

Images (7)
  • DSC00513
  • DSC00514
  • DSC00515
  • DSC00516
  • DSC00519
  • DSC00520
  • DSC00543

Thank you everyone for your suggestions.

Norton, I had completely forgotten about MDF. Thanks. And I even have some 1/4" stuff squirreled away ... somewhere.

Ross, there are a couple of spots where I think Masonite will work very well; particularly if I skim coat it with Durham's water putty.

Dave C. I used putty as a skim coat in a long-gone layout and liked it. But as is true with the MDF, I had forgotten about it. Thanks for refreshing my memory.

G3750. Wow! The charging floor looks great. I will try using that technique near the grain elevators.

Chris a - I have used N gauge roadbed along the outside of the track to ease the slope of the embankment and save on ballast. I had not considered using cork anywhere else. What size did you use? I like the looks of how it came out.

Again, I sincerely appreciate all your recommendations. I will take Dave C's advice and try each method in different locations, so please keep the suggestions coming.

Thanks again,

Jim

An alternative to concrete is wooden planking, which is easily modeled using balsa wood. I have used this technique several times when track enters structures, but it would be OK outdoors as well. Works especially well with Super-O track:

For concrete, I would probably use the same technique followed by a skim of drywall compound or Durhams Water Putty.

Attachments

Images (4)
  • mceclip1
  • mceclip2
  • mceclip3
  • mceclip4

Embedding O gauge rails along a street is difficult. I've thought about it before but doing it convincingly would be a lot of work.

The first thing to consider is that the street surface (concrete, asphalt, cobblestones) should be just slightly below the tops of the rails - less than 1/32".

First photo shows an asphalt road with wood planking in the gauges that crosses three Atlas O tracks on my 12'-by-8' layout. In this case, the three pieces of roadway are removable – one is removed in second photo. The Atlas O track is about ½” high and is mounted on cork. Third photo shows the removed piece and fourth photo shows its internal structure. The roadway surface is a 1/16-inch piece of basswood covered with a thin layer of plaster, and then painted. You could use a similar construction technique (probably not removable) for a roadway with tracks parallel to the street.

MELGAR_2024_0915_01_3_TRACK_CROSSING_12X8MELGAR_2024_0915_02_3_TRACK_CROSSING_12X8MELGAR_2024_0915_03_3_TRACK_CROSSING_REMOVABLE_PIECE_12X8MELGAR_2024_0915_04_3_TRACK_CROSSING_REMOVABLE_PIECE_12X8

Next set of photos shows a similar track-crossing on my 10’-by-5’ layout. In this case the basswood was covered with cobblestone paper. You might consider paving your street with cobblestones as that was how track was laid in streets during the streetcar era.

MELGAR_2024_0915_05_COBBLESTONE_CROSSING_10X5MELGAR_2024_0915_07_COBBLESTONE_CROSSING_10X5MELGAR_2024_0915_08_COBBLESTONE_CROSSING_10X5MELGAR_2024_0915_09_COBBLESTONE_CROSSING_REMOVABLE_PIECE_10X5MELGAR_2024_0915_10_COBBLESTONE_CROSSING_REMOVABLE_PIECE_10X5

There is a cardboard-like material called “taskboard” which comes in 1/16” and 1/8” sheets and has a texture perfect for simulating concrete or asphalt. It also could be used between the rails, as would cobblestone paper – which I bought from Monster Modelworks.

I should also mention that the curved planking on the 10'-by-5' layout is offered by Blair Line and I made the roadway pieces removable so that I don't have to remove or redo any scenery if it becomes necessary to replace a piece of track.

Here is another view of the three-track crossing on my 12'-by-8' layout.

MELGAR_2024_0915_99_12X8_SAVED_FRAME_T=6

MELGAR

Attachments

Images (10)
  • MELGAR_2024_0915_01_3_TRACK_CROSSING_12X8
  • MELGAR_2024_0915_02_3_TRACK_CROSSING_12X8
  • MELGAR_2024_0915_03_3_TRACK_CROSSING_REMOVABLE_PIECE_12X8
  • MELGAR_2024_0915_04_3_TRACK_CROSSING_REMOVABLE_PIECE_12X8
  • MELGAR_2024_0915_05_COBBLESTONE_CROSSING_10X5
  • MELGAR_2024_0915_07_COBBLESTONE_CROSSING_10X5
  • MELGAR_2024_0915_08_COBBLESTONE_CROSSING_10X5
  • MELGAR_2024_0915_09_COBBLESTONE_CROSSING_REMOVABLE_PIECE_10X5
  • MELGAR_2024_0915_10_COBBLESTONE_CROSSING_REMOVABLE_PIECE_10X5
  • MELGAR_2024_0915_99_12X8_SAVED_FRAME_T=6
Last edited by MELGAR
@MELGAR posted:

Embedding O gauge rails along a street is difficult. I've thought about it before but doing it convincingly would be a lot of work.

The first thing to consider is that the street surface (concrete, asphalt, cobblestones) should be just slightly below the tops of the rails - less than 1/32".

First photo shows an asphalt road with wood planking in the gauges that crosses three Atlas O tracks on my 12'-by-8' layout. In this case, the three pieces of roadway are removable – one is removed in second photo. The Atlas O track is about ½” high and is mounted on cork. Third photo shows the removed piece and fourth photo shows its internal structure. The roadway surface is a 1/16-inch piece of basswood covered with a thin layer of plaster, and then painted. You could use a similar construction technique (probably not removable) for a roadway with tracks parallel to the street.


Next set of photos shows a similar track-crossing on my 10’-by-5’ layout. In this case the basswood was covered with cobblestone paper. You might consider paving your street with cobblestones as that was how track was laid in streets during the streetcar era.


There is a cardboard-like material called “taskboard” which comes in 1/16” and 1/8” sheets and has a texture perfect for simulating concrete or asphalt. It also could be used between the rails, as would cobblestone paper – which I bought from Monster Modelworks.

MELGAR

Mel, your craftsmanship is fantastic.

@Jim Brenner posted:

Thank you everyone for your suggestions.

Norton, I had completely forgotten about MDF. Thanks. And I even have some 1/4" stuff squirreled away ... somewhere.

Ross, there are a couple of spots where I think Masonite will work very well; particularly if I skim coat it with Durham's water putty.

Dave C. I used putty as a skim coat in a long-gone layout and liked it. But as is true with the MDF, I had forgotten about it. Thanks for refreshing my memory.

G3750. Wow! The charging floor looks great. I will try using that technique near the grain elevators.

Chris a - I have used N gauge roadbed along the outside of the track to ease the slope of the embankment and save on ballast. I had not considered using cork anywhere else. What size did you use? I like the looks of how it came out.

Again, I sincerely appreciate all your recommendations. I will take Dave C's advice and try each method in different locations, so please keep the suggestions coming.

Thanks again,

Jim

Jim,  All the cork I used was O Gauge/O Scale by Midwest.   I did manage to acquire some of the larger sections they made the pieces are like 5 inches wide x 24 inches long I think.   However, it's all the same thickness advertised as either 3/16" or 5 mm if my memory is correct.    If you have any significant sized pavement, the 5 inch wide stock works extremely well as 5 inches is like 20 scale feet.   

If you can't find the 5 inch wide stock, I'd still recommend you use the standard O gauge cork between the rails as once you rip it on a table saw the correct width, it maintains a perfect uniform gap for the wheel flanges to ride in.  I am pretty sure I clamped some 1/2 inch wide pine stock to my fence, put the cork and some sandpaper beneath it before I clamped it in place which did a great job of keeping the cork flat down on the table saw as I fed it through.   

To all who have responded, thank you very much. You have given me some great suggestions and, given how much space I have to work with, I can probably try out most - if not all - of them.

Pete's suggestion of wooden crossings is spot on, and I will definitely incorporate a couple. More than trains have to run on the streets, eh?

Mel gave me a Homer Simpson moment: Doh! I've looked at cobblestone and brick sheets in the Micro Mark catalog and just ignored them.

Chris a, Thank you for your response. It's unfortunate that, with the closing of E and S Trains, there aren't any hobby shops close by. However, there are some train shows next month where I will pick up some O Gauge cork.

Again, many thanks.

Jim

@chris a posted:

I used the Cork Road Bed.   I had started using it for concrete curbs and sidewalks, has a texture, easy to paint, stain and weather.  What I really liked was I could cut strips on the table saw with a sharp 84 tooth blade and then the cork will follow the curve of the track.  Also easy to scribe cracks and overall easy to work with in my opinion.   

Found with Gargraves and Ross track that I had to cut or hand sand a small chamfer (45 degree edge) on the bottom side to make room for the rail profile and track spikes.  Once I figured that out, it fits snug and tight up against the center rail, and it's the perfect thickness letting the center rail protrude maybe 1/32" above the cork.

DSC00513DSC00514DSC00515DSC00516DSC00519DSC00520DSC00543

@Chris, can you share what type and color of paint you used for your concrete base coat? Very nice work indeed! I would like to try your technique. Thanks for sharing

Mike

I know the OP wanted suggestions for embedding track in concrete. Others have made suggestions for embedding in other materials so I will throw in another example. The photo below while not very good shows track embedded in asphalt. I used a technique shown by @ericstrains.com for making asphalt. Mix white glue with woodland scenics fine cinders, then literally “pave” your asphalt roads. I used an old spatula to flatten the material down. For the crossing, I just used paving tape on the inner of the outside rails to save room for flanges. Removed it when set, and there it is. My two cents!

Mike

uuid=2B435E4E-4337-4315-B939-E2405CFB915A&library=1&type=1&mode=2&loc=true&cap=true

Attachments

Images (1)
  • uuid=2B435E4E-4337-4315-B939-E2405CFB915A&library=1&type=1&mode=2&loc=true&cap=true
Last edited by LT1Poncho

Mike, @LT1Poncho,  I know I sprayed two coats of Rustoleum Camo Khaki, which the basecoat I almost always use for the beginning of any "concrete" project.   

After that I lightly air brushed some staining, I think a mixture of dark brown and dark grays.  After that, I sprinkled some Pan Pastel Powders and spread them around with a soft brush....   Here's a photo after the base coat of Khaki, before all the weathering

I also attached another after the airbrushing....   Sorry I didn't write down the formula of craft paints I used to make the oil and dirt stains on the highway...   DSC00465DSC00478

Attachments

Images (3)
  • mceclip0
  • DSC00465
  • DSC00478
@G3750 posted:

Jim,

I have modeled tracks embedded in concrete for my open hearth steel mill.  They are floors, not streets, but I think the technique would work as well.

The first thing I did was determine the position of the tracks.  In the examples shown, I am using GarGraves 2-rail and GarGraves 5-rail gantry crane with the inner 3 rails removed (this is for the open hearth's charging machine).

IMG_2400[1)

To simulate a raised floor, I used 1/4" square or rectangular pieces of Plastruct.  On top of them, I placed 0.060" styrene sheets that I painted and weathered to simulate concrete.  The .060 styrene is cut so that it fits right up against the track rails.

IMG_3518[1)

Here's a look at the pouring floor of the open hearth.

IMG_3401

This is the finished pouring floor.  Krylon #4291 Khaki Camouflage will give you a pretty good concrete color.  I enhanced the floor with some puddles of spilled steel (Testors #1180 Steel).

IMG_8726

This is the charging floor.  The 2 wide tracks on the left are for the charging machine.  The other 2 standard gauge tracks are for the scrap buggies (shown beyond the crane).  This floor was painted with Rustoleum texture paint (#223524) Desert Bisque.  It's a bit lighter than the pouring floor.

IMG_8725

Would I use this technique again?  Absolutely.  I think it turned out well.  In fact, in the photo above about 1/2 of that floor is removable, but it's almost impossible to tell.

Hope this helped.

George

I would love to see more of your RR.

@PRRMP54 posted:

Many years ago I used spackling compound to represent concrete. The thing about it was that it (an un-rememberd brand) was a slightly tinted color like a light yellowish tan and looked remarkably like some of the older (at that time) concrete streets in Baltimore. A quick check on DuckDuckGo told me the spackling compound is still made.

You want to be sure that it is a vinyl spackle and not drywall joint compound, which is more prone to cracking.  They are not the same thing.

George

There are some really good ideas here. Thanks, again.

LT1Poncho. I made a road using Eric's method. It came out very nice. I doubt that I'll use that technique for any large sections, but to show patches and repairs, it can't be beat.

Dave, I will look for the spackling you mentioned. I had tried (unsuccessfully) using spackling on a previous project with mediocre results. Until George noted that there's a difference between joint compound and spackling, I had no idea. I guess I used joint compound.

And I agree with Harley Rider, George. I'd like to see more pictures, too.

Jim

Add Reply

Post

OGR Publishing, Inc., 1310 Eastside Centre Ct, Ste 6, Mountain Home, AR 72653
800-980-OGRR (6477)
www.ogaugerr.com

×
×
×
×
Link copied to your clipboard.
×
×