So I had my T1 opened up to figure out the lack of smoke.  The fan runs, pulses while still, constant while moving, guess this unit doesn't puff.  So on to questions:

1. I believe the GRJ's Super Chuffer will remedy this correct?

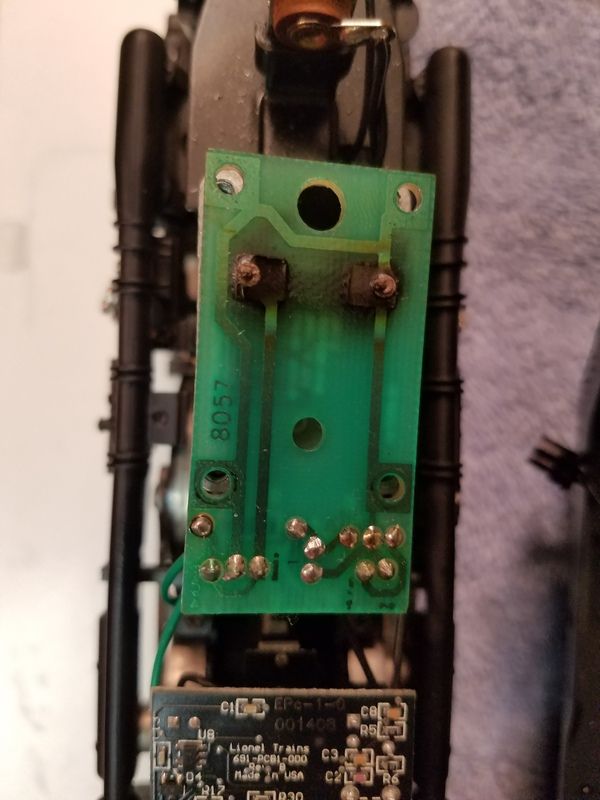
2. Pictures below depict heating element on board and top of board.  Only gets mildly warm, no smoke.  Looks a little burnt, my MTH units don't look this way.  So I assume replacement smoke unit is the way to go?

3. If I want 4 chuffs per revolution, I need the GRJ Chuff Generator correct?

4. I am also adding a ERR Cruise M, no question here, this is just plug and play correct?

5. Would like to upgrade to LED light for headlight, I thought I remember LED lights for the twist lock types that are in this loco, if so, does anyone know where to find these?
Original Post

Replies sorted oldest to newest

TexasSP posted:

So I had my T1 opened up to figure out the lack of smoke.  The fan runs, pulses while still, constant while moving, guess this unit doesn't puff.  So on to questions:

1. I believe the GRJ's Super Chuffer will remedy this correct?

2. Pictures below depict heating element on board and top of board.  Only gets mildly warm, no smoke.  Looks a little burnt, my MTH units don't look this way.  So I assume replacement smoke unit is the way to go?

3. If I want 4 chuffs per revolution, I need the GRJ Chuff Generator correct?

4. I am also adding a ERR Cruise M, no question here, this is just plug and play correct?

5. Would like to upgrade to LED light for headlight, I thought I remember LED lights for the twist lock types that are in this loco, if so, does anyone know where to find these?

1. GRJ's super chuffer will be a perfect fit for this engine

2. As for the smoke unit, you just need to replace the smoke PCB board, once you get the new board cut off the insulation off the resistor.

3. To get 4 chuffs GRJ's chuff generator is the way to go

4. With this particular engine the cruise M is pretty much plug and play, except you will have to solder the Serial data wire to pin 24

5. As for LED lights, i would simply use Evan's designs LED's with rectifier's

Alex

 The PCB is available separate, the part number is 691PCB1045 , I wouldn't just change the resistor because the traces on top of the old PCB in your picture are pretty badly burned. Once you unsolder the old resistor it will most likely rip the trace. Also the resistor in your picture is a bit to close to the PCB board itself, that's why the board is pretty burnt up. The new PCB will have the resistor soldered in the correct position.

Thanks, Alex

If you install the Super-Chuffer, you will have a direct drive for an LED headlight, and it will also offer Rule-17 lighting.  Do NOT try to use the Evan's LED's for the Super-Chuffer, they include extra components for powering from track power.  The Super-Chuffer uses a plain white, warm white, or even yellow LED, depending on your preference for headlight color.

Lionel Parts, thanks for the info and link.  Ordering parts today.

Alex, thanks for the follow up details.  I agree on getting the whole PCB as I don't trust the burnt board to just solder on the new resistor.

John, thanks for the info.  Do you know if there is an LED that is a direct fit into the twist and lock style in the loco?  Or will I have to devise my own setup to install the LED?

No direct fit that I know of for the LED, I seriously doubt it's available.  I typically put them into the headlight lens and add a connector to disconnect the light from the frame.

If the new smoke unit board comes with the sleeve on the resistor, carefully cut that off before use.  If you use the Lionel wick and the bare resistor, you'll get plenty of smoke from this smoke unit.

I reviewed the whole thread, and there is one thing to note.  The Super-Chuffer won't "fix" the smoke unit if you're not getting any power to the heater, that's the R2LC smoke triac that feeds that. If you're getting no heat, we'll need to track that down.  There isn't much in that path for that locomotive, since the fan is pulsing or running, my top suspect is actually the resistor and board that you're planning on ordering.

I've attached the latest Super-Chuffer documentation as I've changed some of the illustrations with the hope of making the wiring a bit clearer.

Super-Chuffer Documentation Rev 2 - A.pdf

Attachments

Last edited by gunrunnerjohn

John thanks again and appreciate the updated info.  

I ordered the parts already to fix the smoke unit, I want everything working first before I modify.  Too complicated to do it the other way around then determine a culprit.

I plan to do everything piece by piece, so if I have issues, I can more easily track them.  I will start with the cruise control, then super chuffer, then chuff generator.  I have learned my lessons trying to upgrade/modify everything at once mostly from my RC hobby.

From a rookies point of view.

1. Fix smoke unit 1st... make sure all runs and works as intended

2. Install Super Chuffer - test to make sure that works as intended (this gives you the 5VDC for the Chuff Generator)

3. Once you know that the engine runs and smokes as it should, then add the chuff generator. Only 3 wires but make sure it's grounded properly. I learned that the hard way and burned up a chuff generator.

I say one step at a time because if it's your first upgrade, it's easier to trouble shoot one thing at a time....not to mention you won't burn EVERYTHING up if you hook something up wrong. Once I figure out the first one, my second one was a breeze. 

Yes, make sure the power and ground are PROPERLY connected to the Chuff-Generator before powering things up.  If you inject power through the chuff input without 5V power on the chip, it does bad things as a rule.  If the ground for the Chuff-Generator is floating, that's almost certain to do bad things.  They work fine if wired properly, but somewhat unforgiving if you screw up the wiring.

The thought has occurred to me to make them more "robust" to absorb more punishment.  However, more "robust" means larger and more expensive.  Since with proper installation care they will work fine now, I stuck with the current design.

TEXASSP, I'm not sure where you are on your project, but I have been working on my T-1 smoke unit as well and found this thread.  Mine like yours was not producing any smoke at all, so I purchased and replaced the smoke unit and made modifications to it per the YouTube video and other comments referenced on this thread.  However, I was still not getting smoke.  It seemed that the brand new smoke unit was not getting the right signal to turn on (I could hear the fan pulsing in neutral, but no smoke).  I went to the owners manual to see if there was a way to reset this engine, and sure enough, on page 12, there are instructions to reprogram the R2IR circuit board.  I followed these steps and now I have smoke!  This may not cure your issue, but wanted to share this info in case it helps.

Add Reply

Post
×
×
×
×
Link copied to your clipboard.
×
×