
As usual, well done sir!
Bob, do you have the part number for the Lionchief upgrade handy? Thanks.
John
Another job well done Bob!
Gene
Bob, the RS3 looks and runs great! ![]() I need to back to where your started this project to see if what I have forgotten, since I wasn't filing everything away in my mind since my Weaver RS3 is a fairly new acquisition. Then I will formulate any questions I may have.
I need to back to where your started this project to see if what I have forgotten, since I wasn't filing everything away in my mind since my Weaver RS3 is a fairly new acquisition. Then I will formulate any questions I may have. ![]()
@Tranquil Hollow RR posted:As usual, well done sir!
Thank you Jay.
@Steam Crazy posted:Bob, do you have the part number for the Lionchief upgrade handy? Thanks.
John
John- The board was from a LC starter set which is Lionchief w/bluetooth. I think these were their second generation boards The advantage is app and universal remote control. The next gen LC + /BT boards require a feedback sensor on the motor. When GRJ said it's not worth the effort, I listened.....![]()
LIONCHIEF PCB / BLUETOOTH / RS-3 / NEW HAVEN / LCBA 4.0
<form data-action="submit-form" id="product-details-full-form" method="post">
SKU: cs-691ENGM518-p
So I found the source of the rubbing. Not my first thought which was a wire. It's the cab insert back wall. I think I can cut it down just below the flywheel to maintain the clearance.
Bob
</form>Bob, that’s a nice deal for all the features the board provides! The engine runs nice and smooth; smooth acceleration and deceleration too. Thank you for all the hints. Yes, the flywheel hitting the cab insert, just grazing it would make the sound.
Thanks, Bob!
John
I have other projects going, but since Bob @RSJB18 presented such a nice description of his Weaver RS3 upgrade, I pulled my Weaver RS3 off the Ceiling Central RR for a look inside. Let me say that I bought this engine from a Forum member a few months ago. It doesn't need the LC+ upgrade because the previous owner upgraded it with ERR. However, as I posted when I got it that it doesn't have any slow speed control. Opening it up, the upgrade looks very nicely done and I see the motors are wired in parallel. So first off, I need to wire it in series to see if it responds more to my liking. I wonder if there will be room for adding a cab insert like Bob did without having to move the circuit boards. I do dislike looking in a cab window and seeing a motor and flywheel instead of a crew member. ![]() Here is what I have.
Here is what I have.
It's a very nice looking engine and was offered at a great price.

I can see it has been run quite a lot looking at the pickup rollers.

I think the ERR upgrade was done pretty neatly.

Here is the cab end where the cab insert would go. If I have to move the circuit boards, there isn't much room on the other end before the boards would hit the other motor.

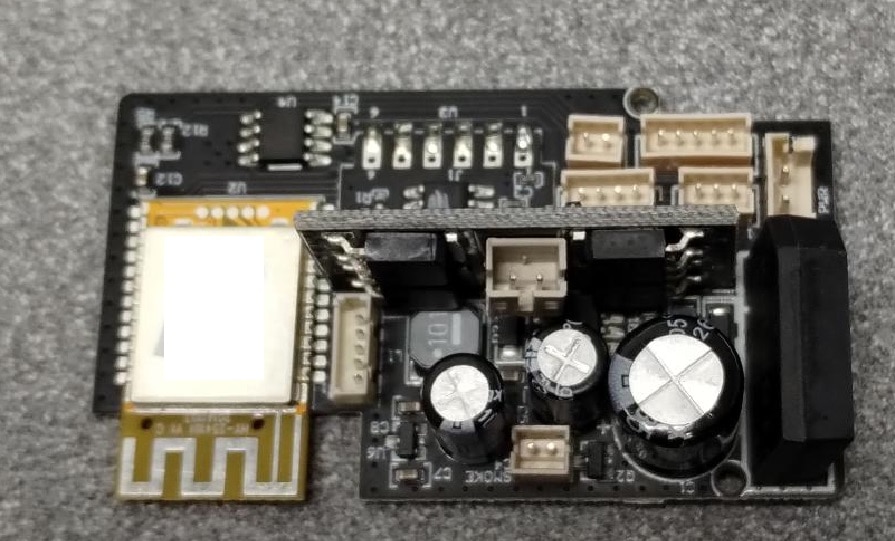
I'm not that familiar with ERR. I see it has a Cruise Commander version 4.5. I know ERR uses add on boards, but at this point I don't know what these two boards are.

Thank you for taking a look see!
Attachments
Images (5)
Whoa Mark, that looks scary. That’s a job for Dr. Bob.
@Tranquil Hollow RR posted:Whoa Mark, that looks scary. That’s a job for Dr. Bob.
😄😄 Funny, there was a Dr. Bob nearby who ran a weight loss clinic. 😄😄 The Dr. Bob you are referring to will chime in at some point here.
OK OK OK.......
I'd start with getting the cab interior and see how it fits. If the electronics are solid, I'd hate to see you mess with them.
Better to cut up a $10 piece of plastic then blown up a $200 set of boards.
I'll send you the part numbers.
😁
Thank you, Bob! I really appreciate the part numbers you sent me. That can be half the battle. I totally agree about cutting up plastic rather than risking busting up boards. 😃 Yes, it should run nicely once I rewire the motors. I’ll take all precautions against damaging the boards doing that. Not a big deal. Thank you!!
@RSJB18 posted:OK OK OK.......
I'd start with getting the cab interior and see how it fits. If the electronics are solid, I'd hate to see you mess with them.
Better to cut up a $10 piece of plastic then blown up a $200 set of boards.
I'll send you the part numbers.
😁
I knew Dr. Bob would arrive to save the patient; and, he’s sending a prescription.
@Mark Boyce posted:Thank you, Bob! I really appreciate the part numbers you sent me. That can be half the battle. I totally agree about cutting up plastic rather than risking busting up boards. 😃 Yes, it should run nicely once I rewire the motors. I’ll take all precautions against damaging the boards doing that. Not a big deal. Thank you!!
Mark- I'm far from a ERR expert but the Cruise Commander will allow for 32 or 100 speed steps. You can download the instructions from 3rd rail/ ERR and check the programming.
Gunner John would be the best resource for answers.
Bob
@RSJB18 posted:Mark- I'm far from a ERR expert but the Cruise Commander will allow for 32 or 100 speed steps. You can download the instructions from 3rd rail/ ERR and check the programming.
Gunner John would be the best resource for answers.Bob
The programming steps are all in the installation manual. Speed steps, large/small motor, cruise on/off, etc.
Pete
Bob, Pete, thank you very much!! I will download the instructions and program once I rewire the motors. Yes, John is such a great fount of knowledge on this subject! Thank you.
@Mark Boyce posted:Bob, Pete, thank you very much!! I will download the instructions and program once I rewire the motors. Yes, John is such a great fount of knowledge on this subject! Thank you.
Mark- my (our) point is that you shouldn't need to re-wire the motors. The board programming should solve the speed control issues. I would start by doing a full reset of the boards, and then program according to the instructions.
Bob
@RSJB18 posted:Mark- my (our) point is that you shouldn't need to re-wire the motors. The board programming should solve the speed control issues. I would start by doing a full reset of the boards, and then program according to the instructions.
Bob
Ohhhh! Now I see! 🤦♂️ Thank you both, Bob and Pete!! I will report back after doing the full reset and programming!
@RSJB18 posted:Mark- I'm far from a ERR expert but the Cruise Commander will allow for 32 or 100 speed steps. You can download the instructions from 3rd rail/ ERR and check the programming.
Gunner John would be the best resource for answers.Bob
Correct default is 32, need to be programmed on engine set up.
Craig
PennCentralShops
@ThatGuy posted:Correct default is 32, need to be programmed on engine set up.
Craig
PennCentralShops
Thank you too, Craig! So you can teach an old dog new tricks! It just takes a bit of clarification. 😃
@Mark Boyce posted:Thank you too, Craig! So you can teach an old dog new tricks! It just takes a bit of clarification. 😃
Attachments
Images (3)


Craig, thank you for the photographs of the instructions. They look straightforward, but offer several variations! I like it!! 👍🏻
That was certainly quick and easy. I programmed the Weaver RS3 and the video shows the results. Actually it runs even slower, but I had trouble setting the speed and holding the smartphone to get the video. Thank you Bob, Pete, Craig!!
Great job Mark! All I can say is you all are a lot braver then I am! LOL ![]()
@Mark Boyce posted:That was certainly quick and easy. I programmed the Weaver RS3 and the video shows the results. Actually it runs even slower, but I had trouble setting the speed and holding the smartphone to get the video. Thank you Bob, Pete, Craig!!
Looks great Mark. Glad it was a simple fix.
Bob
Thank you, Mike and Bob! I was half expecting it not to work the first try, and I would have to do it again. That is what happened on my two PS3 upgrade file loads.
@Mark Boyce posted:That was certainly quick and easy. I programmed the Weaver RS3 and the video shows the results. Actually it runs even slower, but I had trouble setting the speed and holding the smartphone to get the video. Thank you Bob, Pete, Craig!!
My pleasure and loooks greeeeat
@ThatGuy posted:My pleasure and loooks greeeeat
I was disappointed with it when I got it, but I should have known a reprogram would help.
@Mark Boyce posted:That was certainly quick and easy. I programmed the Weaver RS3 and the video shows the results. Actually it runs even slower, but I had trouble setting the speed and holding the smartphone to get the video. Thank you Bob, Pete, Craig!!
Looks like a really good speed Mark. Nice job. ![]()
( instead of holdoing the smart phone get a phone holder with an adapter and and mount it on a tripod maybe? ![]() )
)
@Dallas Joseph posted:Looks like a really good speed Mark. Nice job.
( instead of holdoing the smart phone get a phone holder with an adapter and and mount it on a tripod maybe?
)
Thank you, Dallas! You have a good point. I can tell some some others are using a tripod and some kind of holder because their videos are so steady. Also, if I had just done a runby with the engine already moving, I could have just left the remote sitting on the layout, hands off.
@RSJB18 Great job on your Weaver RS 3!
”I'm very pleased with the results and the install was simple compared to doing a full ERR or PS3/2 stacker. Safe to say I'll be upgrading more basic engines with this method. ![]() “
“
Funny your simple scared me off. Thinking about all those connectors that you were dealing with.
@pennsyfan posted:@RSJB18 Great job on your Weaver RS 3!
”I'm very pleased with the results and the install was simple compared to doing a full ERR or PS3/2 stacker. Safe to say I'll be upgrading more basic engines with this method.
“
Funny your simple scared me off. Thinking about all those connectors that you were dealing with.
Those little plugs do look intimidating. I bought ready made harnesses as recommended by GRJ. Much better than trying to build them from scratch. Just not worth the aggravation. ![]() In the case of the LC boards, the plugs are labeled so it's easy to know what to connect to each.
In the case of the LC boards, the plugs are labeled so it's easy to know what to connect to each.
Thanks
@RSJB18 posted: Much better than trying to build them from scratch. Just not worth the aggravation.Thanks
Well if we didn't spend sooooo much time on the FORUM getting a plethora of ideas for our layouts we would have more time and peace of mind to DIY. ![]()
God speed Bob. 
@Dallas Joseph posted:Well if we didn't spend sooooo much time on the FORUM getting a plethora of ideas for our layouts we would have more time and peace of mind to DIY.
God speed Bob.
Dallas, for folks like me between layouts its a great time to collect ideas! LOL![]()
@Dallas Joseph posted:Well if we didn't spend sooooo much time on the FORUM getting a plethora of ideas for our layouts we would have more time and peace of mind to DIY.
God speed Bob.
It’s the ideas that get me into trouble; mainly my own, e.g. I had the brain storm to create an elevated subway track. It eventually turned out ok after two years of aggravation. That’s when I coined this phrase; and someone liked it so much they made a simulated needle point. It’s now hanging at the entrance to my train room.
Attachments
Images (1)
@mike g. posted:Dallas, for folks like me between layouts its a great time to collect ideas! LOL
@pennsyfan posted:It’s the ideas that get me into trouble; mainly my own, e.g. I had the brain storm to create an elevated subway track. It eventually turned out ok after two years of aggravation. That’s when I coined this phrase; and someone liked it so much they made a simulated needle point. It’s now hanging at the entrance to my train room.
Beautiful thoughts gentelmen .![]()
@Mark Boyce posted:That was certainly quick and easy. I programmed the Weaver RS3 and the video shows the results. Actually it runs even slower, but I had trouble setting the speed and holding the smartphone to get the video.
Nice work Mark! I have absolutely no idea about the inner workings of these locomotives and I appreciate what I learn from the members. Heck, I had no clue what a BCR was until I heard it from Mr. Muffin’s latest York video.
Gene
@Genemed posted:Nice work Mark! I have absolutely no idea about the inner workings of these locomotives and I appreciate what I learn from the members. Heck, I had no clue what a BCR was until I heard it from Mr. Muffin’s latest York video.
Gene
Thank you, Gene! It's like someone who doesn't understand the inner workings of their car. You don't have to understand it to use it. You just need to know who to contact when there is a problem! ![]()
Took the RS3 apart last night to fix the rubbing of the flywheel against the cab interior.......Missed by about a 1/8" so now I have to take it apart one more time........![]()
Bob
@RSJB18 posted:Took the RS3 apart last night to fix the rubbing of the flywheel against the cab interior.......Missed by about a 1/8" so now I have to take it apart one more time........
Bob
Ugh!
@Mark Boyce posted:Ugh!
Yea........although I used more colorful language.......![]()
It's hard to measure the parts because the interior has to be installed inside the cab. It looked like a 1/4" had to come off but it's closer to 3/8" plus.
Bob
@RSJB18 posted:Took the RS3 apart last night to fix the rubbing of the flywheel against the cab interior.......Missed by about a 1/8" so now I have to take it apart one more time........
Bob
Perhaps you should consider a malted beverage prior to recommencing.
Well, I have a pair of Atlas GP60s, one powered and one non-powered, all apart and in the process of making one complete to upgrade to PS3. I had upgraded an Atlas GP60 to PS3 a month or so ago but couldn’t figure out how to install the proto couplers. I left the TMCC couplers installed in it. I ordered the short MTH couplers and had them on hand thinking that they might work better than the longer ones that came with the upgrade kit. When I received the two locomotives that are now on the bench, the powered one was not in very good condition. Several screw posts were broken, the shell was cracked and there were several broken railing stanchions among several other minor problems. I decided to used the non-powered shell, chassis/frame and pilots and transfer the motors and trucks from the damaged one. I figured out what to modify to attach the MTH proto couplers. Just took a hacksaw, a little filing, proper orientation of the modified piece, a “T” post, spring, #10 washer and an “E” clip. I had to make the holes larger in the pilots and frame to make room for the coupler wire connectors to fit through. I have headlights, number board lights and backup lights installed. Now all I need to do is install the PS3 board, decide if I want to use two TMCC 8 ohm speakers in parallel (not using smoke unit so there should be space) or use the kit speaker and install the nano LEDs, for the ditch lights, when they arrive from Evan Designs.
Larry
Sounds like a good project, Larry! I used some parts from a non powered F3 to complete my powered F3 PS3 upgrade.
Just finished replacing some 1925 vintage wiring on two Pullmans and an observation:

![]()
Mitch
Attachments
Images (1)
@Tranquil Hollow RR posted:Perhaps you should consider a malted beverage prior to recommencing.
Like Ovaltine?
@coach joe posted:Like Ovaltine?
Don't think that's exactly what Jay had in mind Coach. ![]()
Comes with the territory when dabbling in the fine art of engine bashing.......
At least it's only an RS3- 4 screws and the shell is off......not a steamer.
Bob
![]()
![]()
![]()
![]()
I've started my project, inspired by the work of @RSJB18, to update my Lionel 9510 PRR Combo Mail/Baggage/Passenger car I bought NIB from eBay. This will be pulled by new PRR doodlebug.
I've attached a picture showing it's current state of, well whatever it is. In the middle of the picture is the roof. Taking it off was no small task. I then cut off the molded plastic that doubled as windows making it super easy to put the roof on, and it stays securely. Lastly I put is some small warm white LED strips to provide lighting on both sides of the car. Except for attaching the wires, that part is done.
At the bottom of the picture is the body. I've enlarged the holes for the wires so there is no binding. I will eventually put in thin, clear plastic windows for all the openings. After that is done, that is it for that part.
The last part is at the top, a wooden base I cut that will fit into the body. The cut outs you see are for some plastic tabs molded into the body. I also put some weights under the wooden base since this car is extremely light. I am waiting for several things to come in, so this part is nowhere near completion, but I'll describe what I've done and what my plans are. I will eventually paint the wooden base black.
In the middle of the base is a section of a large molded interior piece I had left over from another project (it's actually 2 bathrooms). With a little grinding, it fit perfectly in the middle to separate the passenger compartment from the mail/baggage area. I have a hole in that part, along with the wooden base, to run the power wires up to one of @gunrunnerjohn's lighting module, which will feed my LEDs on the roof. I'll craft a door to cover the opening on the passenger side. Also on the passenger side I'll put a lighted scale wall clock on the front bulkhead. I don't know if that's prototypical for this thing, but I like clocks.
I had a few wooden bench seats left over from another project, however I need more. It took a bit to find where I bought them, but they are now on order. I bought some Bachmann Trains waist-up seated passengers from Amazon to populate it. I put one of the guys in a seat, and looking through the window the result was perfect.
I am waiting for an REA Station Agent at a desk sorting mail to put on the mail/baggage side. That piece is large enough to cover the opening in the bulkhead leading to the passenger side. I have some other people and miscellaneous stuff to fill out that area.

Attachments
Images (1)
@texgeekboy posted:I've started my project, inspired by the work of @RSJB18, to update my Lionel 9510 PRR Combo Mail/Baggage/Passenger car I bought NIB from eBay. This will be pulled by new PRR doodlebug.
looks good so far. Certainly was a fun project for me.
Happy to provide some inspiration.
Bob
Looks like a good project, texgeekboy!!
You guys sure are brave in what you all dig into to make better! I know I will do the same thing one day, but as for me that is way down the road. I know last time I did it was because I had idol hands just watching trains go round and round!
Wonderful work thought and I hope you all keep it up!
We need a sub-forum....What's OFF the Workbench........![]()
Rainy day here on LI yesterday so between moving my son home from College for the summer (and putting all his c#$p away), I finished my Weaver Lionchief upgrade. I had to open it once more to cut the cab interior down a little more. All went well and I can now declare the project done and a success.
I will definitely be doing more of these upgrades on some select engines worthy of the time and expense. Total cost for the parts was $99.00
The cab interior wall was hitting the flywheel which is visible now but from standing height, it looks fine. Also installed a new horn which was missing.


On to the next one.....maybe I can get my Morris Park Switcher done.....still needs more painting and final assembly.
Bob
Attachments
Images (2)


@RSJB18 posted:We need a sub-forum....What's OFF the Workbench........
Rainy day here on LI yesterday so between moving my son home from College for the summer (and putting all his c#$p away), I finished my Weaver Lionchief upgrade. I had to open it once more to cut the cab interior down a little more. All went well and I can now declare the project done and a success.
I will definitely be doing more of these upgrades on some select engines worthy of the time and expense. Total cost for the parts was $99.00The cab interior wall was hitting the flywheel which is visible now but from standing height, it looks fine. Also installed a new horn which was missing.
On to the next one.....maybe I can get my Morris Park Switcher done.....still needs more painting and final assembly.
Bob
Nice work Bob, looks and runs nice and smooth!
@mike g. posted:Nice work Bob, looks and runs nice and smooth!
Thanks Mike. The motors are wired in series since the LC boards only have one motor output. In the video the track is at 16vac. I used the universal remote for the video, but with the LC app it will crawl almost as well as a Legacy or PS3 engine.
Bob
Nice work, Bob! $99 👍🏻
Need to find a couple of good wheels for this Green frame 260E I picked up from a local antique shop recently.


Attachments
Images (8)
@Dennis Holler posted:Need to find a couple of good wheels for this Green frame 260E I picked up from a local antique shop recently.
Congrats on another great find. Bet she will be handsome when you’re done!
@Dennis Holler posted:Need to find a couple of good wheels for this Green frame 260E I picked up from a local antique shop recently.
Drop Train Tender a line; he can get you fixed up. ![]()
Mitch
I found my 264 forklift in a box deep in a storage bin!
It had been 20 years since I had the pleasure of buying it at YORK. Come to find the solenoid was this decade DOA! Never liked the inconsistency and noise of that solenoid, so no worries.
After doing a little research (a great thanks to OGR member “Junior”) I became brave enough to enable the DC motor conversion. The process took an entire day! There were sweaty palms, shakes hands , physically cramped area of work but no failed attempts, the lighted head visor helped. I am fortunate for the historic post and discussion that motivated me. See link below.
Working on dialing the best voltage.
It was an eye opening adventure for me. Glad I had the time to invest. It was definitely worth it!
https://ogrforum.com/...7#154307984447670917
Attachments
Videos (1)

Morning everyone, some really nice stuff here today!
@Dennis Holler Mitch is correct, give the TrainTender a call, he seems to have everything someone needs for the older stuff!
@Leroof Nice work on the forklift! looks like it runs nice and smooth! Might be a little fast, but I know you will get it tuned in to where you like it!
Everyone have a great day!
Currently on the workbench but, soon to be on the layout, is my good find at the Twin Cities May 11th train show. Found a pristine MTH DM&IRR 41' flat car for a wonderful price. Awhile back, I bought some American flyer straight track sections from which I harvested the rails for a trackside display. They now have a more prominent home and even occasional will get a ride around the layout. The Gilbert AF track rails are perfectly sized for O gauge rail loads.

Cheers, Dave
Attachments
Images (1)


@Leroof posted:I found my 264 forklift in a box deep in a storage bin!
It had been 20 years since I had the pleasure of buying it at YORK. Come to find the solenoid was this decade DOA! Never liked the inconsistency and noise of that solenoid, so no worries.
After doing a little research (a great thanks to OGR member “Junior”) I became brave enough to enable the DC motor conversion. The process took an entire day! There were sweaty palms, shakes hands , physically cramped area of work but no failed attempts, the lighted head visor helped. I am fortunate for the historic post and discussion that motivated me. See link below.
Working on dialing the best voltage.
It was an eye opening adventure for me. Glad I had the time to invest. It was definitely worth it!
https://ogrforum.com/...7#154307984447670917
Nice work Pierre! It's running real nice, smooth and quiet. You'll get the voltage dialed in in no time.
I picked this up at a garage sale. It's not one of the Chinese knockoffs. It has U.S.A. stamped outside and on several internal parts. Etched BM on the glass. NYCS also. There's even a used wooden match behind the glass. Looks like they lit it and kept tye match with the lantern as not to start a fire by dropping it on the ground.


Attachments
Images (5)


 Makeover of an MTH Santa Fe “Axy Dent” waycar. This car was radio equipped, so it lacks a ground plane antenna on the cupola, the letter “R” on its number, and R-Y-Y markers.
From experience, I know that Joe McMillan does not mind if people post his copyrighted work as long as he gets the photo credit.
I wish the conductor figure was standing…I swear he looks just like the man in the photo.
Attachments
Images (3)
Coming eventually. Rock Island red and yellow U36C and bay window caboose. To my dismay/surprise no one made these in the past, so I have to make a set myself. I sanded and prepped the U boat shell a couple of weeks ago. Caboose prep to be complete soon. Hopefully I will have time to get these done this summer.

Attachments
Images (1)
The fifth one of these I’ve done, and they’re all painted slightly different. I just need to see a real one.

One of a four car GGD coach set. Its original interior lighting was incandescent, so it will get replaced.
I have one more car from the set I could repaint, but these cars are not easy with which to deal.
Attachments
Images (2)
At April York, I picked up a Classic Model Trains Victory Diner from David Carse. It's a beautiful piece, but I decided that it needed a foundation. So, I created one from hardboard, foam insulation board, wood, and static grass.


Attachments
Images (2)


With some trucks that could be a Diner Trolley. Very nice project.
Jay
This Lionel Maxi-Stack needed some TLC. One of the cars had most of the ladders broken and the brake system was broken into four pieces so I added some K-Line Gunderson Husky Stack ladders and re-built the brake system. I couldn't re-use the plastic piping so some wire was put to use.

Attachments
Images (2)
Before I quit buying things, I got, from eBay, an MTH former PS-2 ESE J3a Hudson. Cheap. A "kit". It had no motor, boards, driveline and so forth. Don't know why I bought it, as I already had an ESE (Lionel) or two.
Anyway, now, some years later, I figured if I was going to sell it, it needed to run in order to get any sort of price at all. So I ordered all the needed parts from MTH (love the new MTH Parts on their website; gee, it's almost like somebody formerly with Lionel designed it....) and installed them.
Then I scrounged through my e-unit stash (from upgrading locos to TMCC) and found one from a Williams 4-6-0, with bell and whistle.

Afterwards below. Totally conventional with track power headlight (14V incandescent bulb). No sound, smoke or (functioning) P'coupler. It's a modern interpretation of a PW loco. It just runs. And well. FNR. I had no idea that the gear ratio was that good. Smooth. Quiet. The Wms bell/whistle are fine.
Of course, now I don't want to sell it.....trapped again.

Attachments
Images (2)
I finished my upgrades to the Lionel 9510 PRR Mail/Combo car, inspired by the work done by @RSJB18. The seated people were Bachmann waist up seated passengers. They were perfect. I made the seats from some wooden strips made to resemble bench seats. I installed LED light strips on the ceiling connected through GRJs lighting module. I do have a divider between the passenger and mail sections. I wanted to install a wall clock on that divider but it didn’t work out. The mail portion is primarily a REA Station Agent sorting mail into an old time mail desk, and some packages as well. I had to do some major amputations to get that piece to fit.
The roof isn’t as snug as I would like even after some attempts to correct it, so I’ll get back to that (hopefully). This looks great running behind my recently purchased Lionel PRR Doodlebug


Attachments
Images (3)
Nice work tex.....
Bob
Thanks Bob. I forgot to mention I added some weights to make it a bit closer to the recommended weight as well as clear plastic strips to simulate glass.
@texgeekboy posted:I finished my upgrades to the Lionel 9510 PRR Mail/Combo car, inspired by the work done by @RSJB18. The seated people were Bachmann waist up seated passengers. They were perfect. I made the seats from some wooden strips made to resemble bench seats. I installed LED light strips on the ceiling connected through GRJs lighting module. I do have a divider between the passenger and mail sections. I wanted to install a wall clock on that divider but it didn’t work out. The mail portion is primarily a REA Station Agent sorting mail into an old time mail desk, and some packages as well. I had to do some major amputations to get that piece to fit.
The roof isn’t as snug as I would like even after some attempts to correct it, so I’ll get back to that (hopefully). This looks great running behind my recently purchased Lionel PRR Doodlebug
Nicely done Tex. That’s one of the many examples of why this hobby is so much fun. We are inspired by each other’s creativity and our eyes are opened to things we may not have considered.
Jay
What a great job, texgeekboy!! You really did a great job!
@texgeekboy posted:Thanks Bob. I forgot to mention I added some weights to make it a bit closer to the recommended weight as well as clear plastic strips to simulate glass.
I like the added detail in the RPO section too. We'll done.
Hi guys I see that nothing has changed since the last time I was here!
I see that you all are still doing such amazing work that it would be hard to match the skills being shared here! But heck down the road I am going to give it a try when I can!
I hope your all doing well and having fun with your trains!
Well, actually, just off my workbench this morning, is he first run of LIRR Crew cars I custom painted for the Railroad Museum of Long Island, in Riverhead, NY. Each car is individually numbered.
Tease: Blue LIRR Tool cars will be available too in several weeks.


Attachments
Images (2)


@Lionelski posted:Well, actually, just off my workbench this morning, is he first run of LIRR Crew cars I custom painted for the Railroad Museum of Long Island, in Riverhead, NY. Each car is individually numbered.
They will be available within the next week at the Museum.
Tease: Blue LIRR Tool cars will be available too in several weeks.
Nice work John. I'll have to wander over to their website to order one.
Bob
@Mike D posted:Coming eventually. Rock Island red and yellow U36C and bay window caboose. To my dismay/surprise no one made these in the past, so I have to make a set myself. I sanded and prepped the U boat shell a couple of weeks ago. Caboose prep to be complete soon. Hopefully I will have time to get these done this summer.
Can't wait to see the results of your efforts Mike D. We are on the same wavelength here!
I also wanted a "Lionel" Rock Island caboose, one to run with my PostWar Lionel Rock Island Alcos, so, I made one:


Attachments
Images (2)


@RSJB18 posted:Nice work John. I'll have to wander over to their website to order one.
Bob
Thanks Bob - I just sent you a PM
John
I started my biggest restoration project; a prewar standard gauge #300 Lionel Hellgate bridge.
A previous owner painted it, very poorly.


Attachments
Images (2)


@Lionelski posted:I started my biggest restoration project; a prewar standard gauge #300 Lionel Hellgate bridge.
A previous owner painted it, very poorly.
Poorly is an understatement.......![]()
Good luck.
Unknown maker, I'd say around 1940. I replaced the original 80-year-old trucks, which already had hi-rail wheels (Lionel PW, actually), with some NIB "Peare" (about the same age, I'd say) trucks which have hi-rail dummy couplers which I had found on eBay years ago. They are cast "soft metal" (fancy lead), and roll about like PW Lionel trucks. I painted them with camo brown. I replaced the original trucks because they had no couplers and the couplers mounted on the frame were scale O.
The decals - except the reporting marks - are original. I left them, even including the mistakes. I used a brush and craft store acrylics to cover the peeled bare metal areas, using a flat burnt umber and a flat black. Light overspray of R-O-L camo brown, then Dullcote.
The car is all die-cast zinc and properly heavy, but not crazy-heavy. It's a tank built like a tank. 1:48. No missing steps or the like. I did replace the missing/damaged ladders to the dome from some brass ladder stock that I have. A good scale model. These oldies are often the best things around, and I get a kick out of refreshing them for 3RO.
I like the way that the big O-gauge couplers tuck under the frame unobtrusively; the short shanks help with this. Too bad that modern 3RO cars couplers' keep getting more and more extended and noticeable.

The C&O hopper and B&O brass boxcar in the background are upgraded oldies, too. I painted the boxcar.

Attachments
Images (2)


@Lionelski posted:I started my biggest restoration project; a prewar standard gauge #300 Lionel Hellgate bridge.
A previous owner painted it, very poorly.
You’re up for the challenge John. I’m sure you’ll be creating another masterpiece for Warrenville.
@Tranquil Hollow RR posted:You’re up for the challenge John. I’m sure you’ll be creating another masterpiece for Warrenville.
Much thanks!
I just finished the bridge - check out my latest blog entry on www.warrenvillerailroad.com to follow along with the restoration.
Fo some reason, if I post a direct link to this article it will not work.
Here is a tease pic of the finished project;

Attachments
Images (1)

That's just beautiful. Great job John.
@Lionelski posted:Much thanks!
I just finished the bridge - check out my latest blog entry on www.warrenvillerailroad.com to follow along with the restoration.
Fo some reason, if I post a direct link to this article it will not work.
Here is a tease pic of the finished project;
Congratulations John, that looks amazing. In fact, it looks like it’s newly minted from the Lionel Corporation in NJ. Well done!

Another Q.A.&P. Rwy. caboose made from a K-Line smoker.
Years ago I modeled Q.A.&P. #53 using the same type K-Line model, but the side windows had crossing muntins which I left in place, and this was not true to the prototype. It was decided that I should do another correctly.
Additionally: All lighting was removed and replaced with Evan Designs products. Placing a 3mm. cool white bulb inside the marker lamp made the yellow lens appear a suitable green. The red lens were unaffected. Dullcoat, weathering, and reassembly are next.


I painted the markers with a chrome felt tip pen. After some weathering with black chalk, the patina should match that of a Handlan galvanized sheetmetal marker. I once owned such a marker, but it was lost in a move in 1977…I have missed it every day since.
Attachments
Images (3)
I have an MTH GP38-2 that I bought from Trainz.com via ebay currently on my bench. In their description they stated that the short section of walkway on the left rear side was loose and the shorter piece on the left side ahead of the cab was missing. When I opened up the box I found both sections of walkway in a pocket in the styrofoam cradle. I found the right front walkway ahead of the cab loose as well as the long right side one. Yesterday I contact cemented all the completely loose ones and half of the long right side one. This afternoon I cemented the remainder of the right side long one. The engine is in very nice shape now with only 101 miles on the odometer and under 7 hours on the chronometer. I still have three Atlas GP60s to finish. One that was upgraded to PS3 that needs the MTH proto couplers installed, one that needs 2 brake chambers replaced on a couple of truck side frames and the other needs one brake chamber replaced and some right side under frame air piping replaced. Unfortunately Atlas no longer has that section of piping available. I guess I’ll have to fabricate it myself somehow.
Larry

Attachments
Images (1)
I'm currently working on this Legacy B Unit. I had an extra Santa Fe plated #22A shell and picked up one of the infamous easter egg blue NYO&W 6-85204 F3B powered with sounds/smoke. I also have tank, side frames, frame and ladders in silver. May or may not swap frame to silver.


Attachments
Images (2)
Been attempting to make a generic excursion car, open air type:


Already found a bunch of stuff to redo, this prototype may never get fully assembled or painted, but you never know....
Attachments
Images (2)
Just off of my workbench today are LIRR tool cars commissioned by the Railroad Museum of Long Island:


These are the follow-up to the Crew cars that were finished last month:


The pictures show them displayed, before boxing them up, on Warrenville.
Both of these paint schemes were based on the real prototypes.
The LIRR GP7 and LIRR caboose were earlier projects of mine.
Attachments
Images (4)


@Lionelski posted:Just off of my workbench today are LIRR tool cars commissioned by the Railroad Museum of Long Island:
These are the follow-up to the Crew cars that were finished last month:
The pictures show them displayed, before boxing them up, on Warrenville.
Both of these paint schemes were based on the real prototypes.
The LIRR GP7 and LIRR caboose were earlier projects of mine.
That's some nice work John. You say commissioned by the RRMLI, I see 6 of each, if that's the entire production run would you know the intended use for these cars, displays, extremely limited edition sale, fund raising raffle, special gifts?
Add Reply
Sign In To Reply
