

fifth one in the roster.
|
|
Hoppers in final color. Now resting for a 48+ hour cure!

Cheers, Dave
I have a couple of wheel sets that need to be re-gauged. They need to be slightly wider- flange to flange. Any suggestions? Thanks!
Dave
I got a great 356 station from Stout Auctions a while back and just got to it. I took out the old incandescent bulb (left the holder), and put a small (3) warm white LED string in the roof bracket and the same inside the station house.

@darlander posted:I have a couple of wheel sets that need to be re-gauged. They need to be slightly wider- flange to flange. Any suggestions? Thanks!
Dave
Dave- get a wheel puller from Frank at Timko. Works like a charm. The digital caliper was $40.00 at HD.
I've had issues with a few of my Menards cars.


@darlander posted:I have a couple of wheel sets that need to be re-gauged. They need to be slightly wider- flange to flange. Any suggestions? Thanks!
Dave
The Timko wheel puller works pretty well for this, just carefully crank down until you get them at the right spacing. I did a bunch of Menard's cars, and I found that I could manage to do it without taking the wheelsets out of the trucks, a major time savings for Menard's trucks.
@gunrunnerjohn posted:The Timko wheel puller works pretty well for this, just carefully crank down until you get them at the right spacing. I did a bunch of Menard's cars, and I found that I could manage to do it without taking the wheelsets out of the trucks, a major time savings for Menard's trucks.
Reguaging Menard's Boxcar Wheels The Easy Way
Found a friend with a wheel puller and he fixed them on Saturday. The wheel sets were Weaver. I also have issues with some Menard's boxcars that are currently on a display shelf because of wheel gauge issues. Will save that fix for another day. The car that needed the fix would spark on this switch. The spark would cause my resting engines to start up. Another remedy, I put a small strip of electrical tape along the side edge of the center rail.

Cheers, Dave
A new ballast load is in the mold. It's the first of 4 new ones needed for the recently completed Hart hoppers!

Cheers, Dave
Hoppers receiving decals. One side completed!

Cheers, Dave
These just finished rolling off my bench this week. Some custom painted Lionel 607/608 cars. I started with five cars (four observation cars and one coach), with a mismatch of trucks, journal covers, end platform colors, underframe pieces, roof pieces, etc. and turned them into this, with a pile of parts left over!

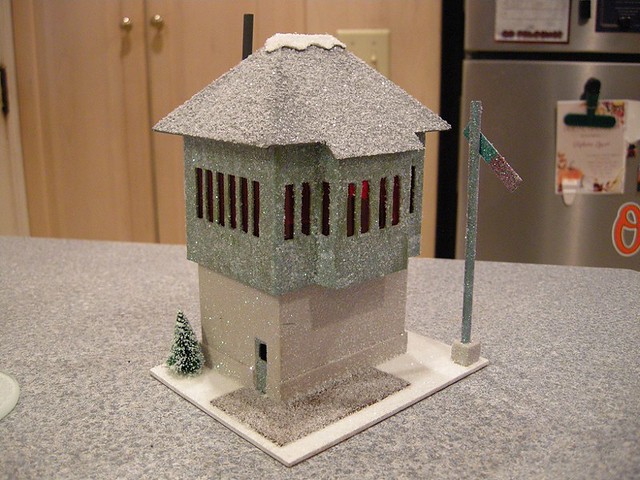
Been working on a matt board/card stock station for the wife's "glitterhouse" collection:

Loosely based on the Dorfan 425 from 1930-ish. Numerous modifications in height, length, window placement, and the addition of interior walls. Made a set of windows using MS Excel, printed on translucent vellum paper. Hoping to pair it with the signal tower made earlier:
Just finished the "preservation" of the 3461 green lumber unloading car. This was purchased in August and needed the usual coupler springs and wheel cleaning however the unloading platform was a bit rusted and the brake stand was missing. I used the Krylon flat black spray paint in a light coat to overcoat the rust on the platform. The posts looked OK and were not all repainted. The Krylon is a decent match (not perfect) for the original treated metal but once the logs are on the car, it is close enough. The 3451 brake stand was originally a press fit/rivet onto the car body. Without a press, its tough to get it really tight without damaging the integral rivet so after spreading the rivet, I added a little gorilla glue to finish the installation. The car works like new. A couple of pictures are below.


No pictures of my latest project.
I bought a beautiful S gauge Hiawatha 4-4-2 and four streamlined cars. The train is a knockout and the Milwaukee Road class A Atlantic and beaver tail has always been one of my favorite real trains.
Unfortunately the motor was burned out, so it's getting a can motor and a new tether. Hope to have it running in a few days. can't wait! ![]()
I just received my latest project....


What ISN'T on the workbench at the moment? The one commanding most of my time right now is a replacement end for a K-line 4680-30012 18" business car. Instead of the fanciful open deck it comes with (was there ever a real prototype for this? Not on the PRR), I'm replacing it with the correct end for PRR's postwar observation cars. Printed a test run today, final one tomorrow. Hope to have it painted and installed sometime this weekend...

No longer on the bench but now on the layout - four newly completed Hart hoppers have been added to the consist. Still missing ballast loads for two of them. Time for some travel so the loads will wait for my return.
Cheers, Dave

I finished up my Weaver/MTH C628 shell swap tonight. Ended up being more involved than I anticipated. MTH made changes after they acquired the tooling, so the MTH shell didn't just drop right on the Weaver chassis.
Got the ATSF Texas cosmetically completed (tender was done already). It was unpainted (like the tender) and missing some parts. I had to rummage around in my junk bin to fin the sand dome fill covers, engineer/fireman figures, and a couple of pipes under the boiler. While I was at it I also removed the factory stamped metal bell cradle and added the correct cradle with air ringer. I also added a bell bracket that had a pull arm (late ATSF large steam had an air ringer but the bell could still be rung manually by the fireman if the air ringer failed). I wanted to run cords for the whistle and bell so I drilled some holes in the boiler and added stanchions to use as cord guides. I know 5012 is a factory MTH road number but I used it because the illuminated number boards and number board under the headlight already had that number, so I decided to make my life easier and just use road number 5012. It still needs electronics and lights, but I'll get to those over the winter.


@Rob Leese posted:Not my best work:
…and, “no”, I’m not fishing for compliments. The “two foot rule” may inflate to three on this one. However, I am learning on this one in order to do a good job on the next attempt. And it will not be on a RailKing NW2.
Why won't you use an RK NW2 for your next attemt Rob.
Lou....Engine and tender look great. I have the paint and matt clear you reccommended on order for My SF 2926 project. Like your engine the firebox door on the rebuild of 2926 appears silver instead of graphite or black. Did you use the same brand of paint we discussed? Which silver did you use?
Richard
Lou and others......My SF 2926 engine is a railking and does lack some details. Runs quite and smooth so I'm sticking with it. The firebox door class lights are not suitable. If any one knows where I can source the "stalk" class lights please let me know.
Richard
So, I took my tender from the 785 Hudson and upgraded the sound board. Sadly the original sound o steam board with it's tether I couldn't stand went out. Darn. So, I found passenger car 6 wheel trucks with a roller and ground strap. Mounted those, drilled a new hole so the coupler is closer. Mounted the rail sounds board, installed the reed switch, set the volume, and Bob's your uncle! Looks much better and cleaner without the tether! Sounds nice with chuffing, bell, and whistle. At idle it sounds like it's getting maintenance done. Picture of sound board below. I don't want to take the shell back off. 


@Rppoind posted:Lou....Engine and tender look great. I have the paint and matt clear you reccommended on order for My SF 2926 project. Like your engine the firebox door on the rebuild of 2926 appears silver instead of graphite or black. Did you use the same brand of paint we discussed? Which silver did you use?
Richard
I used this spray paint for the smokebox front:
https://www.rustoleum.com/prod...metallic-spray-paint
It's a close enough match for "tarpon gray" that Santa Fe used on smokebox fronts, at least to my eye.
Lou.....Many thanks again.
Richard

Got the shell swaps done on both of my Weaver C628s. Now I am working on my Weaver E8s. Another "deal" I got from Trainz. Shells weren't mounted and were unmountable when I got them. Also had a bad truck on one of them. Working on getting the shells prepped for mounting and swapping bad truck out with a dummy until I can get the gear replaced on the bad truck. probably going to take several hours to get these usable.
My new work bench. Just got it installed. No drawer fronts or cabinets doors yet as I am still finishing those and will install later. My new work bench is 22 feet long so I will be able pile a lot of stuff on it. The only thing on it at the moment is one of my bridges that I have laser cut.
Once I get it piled high with stuff I will post additional pictures so that it will look like a real work bench.


Thanks;
idea-thinker


That’s really great!!
Idea-thinker 22' makes for a nice test track, but I see you really understand the purpose of a work bench, "My new work bench is 22 feet long so I will be able pile a lot of stuff on it.". Well at least for most of us.
@idea-thinker posted:My new work bench. Just got it installed. No drawer fronts or cabinets doors yet as I am still finishing those and will install later. My new work bench is 22 feet long so I will be able pile a lot of stuff on it. The only thing on it at the moment is one of my bridges that I have laser cut.
Once I get it piled high with stuff I will post additional pictures so that it will look like a real work bench.
Thanks;
idea-thinker
What a great work space. Please share more pix once it has settled into it's "natural state" ![]()
Bob
The first of three coaches being redone for the Texas Zephyr. These cars will be “prototype-ish”. The first (1940) TZ equipment had BURLINGTON on the letterboards. When the semi-articulated 1936 Denver Zephyr equipment was bought by C&S and FW&D to makeover the TZ, those letterboards were repainted TEXAS ZEPHYR. So, you can see from where the “-ish” comes.
This is a K-Line 21” Empire State Express coach. New letterboards had to be applied. It had disappointing diaphragms, so they were replaced. The aluminum was too glossy so it was overcoated with a matte silver paint. I printed custom decals for this project only a few days before K4 came out with their own beautiful TZ set.

A tunnel/other project for the holiday clockwork display:


Starting the scenic work shortly.
PD
PD
Did you check clearances? looks awfully close!
Are you planning on mailing that? ![]()
![]()


Yup, all the windups pass through easily. Also checked a few 6-inch prewar Flyer freights and they were fine as well. The only 3-rail loco I contemplated using here was a prewar Flyer 3192 loco/tender combination, and that made it through fine as well.
PD
LOL, nope, not mailing it GRJ. Over the years I have found USPS corrugated stock to be great for model-making...very strong while very flexible. Whenever I receive packages through USPS, I save the boxes for projects. One can also pick up a new box or two from the post office.
Got a Doodlebug pair in for a TMCC upgrade. The dummy is featured here, I used my previously designed little R2LC dummy locomotive board to add couplers, headlight control, and command control of the interior lights.
Conveniently, all the lighting is done with spring pads, so the only shell work was changing out the headlight bulb from the 1.5V bulb used for PS/1.

Here's the dummy locomotive motherboard plugged into the R2LC.

Once the board was wired, I just used Velcro to stick the assembly to the bulkhead that's hidden when the shell is on, perfect spot for it. You could, if you desired, simply add a second sound board to the dummy for better sounds, I didn't do that for this build.


Next up is my MPC gantry crane. It's going to get new metal wheels to replace the factory plastic wheels, then I am going to clean up the gantry castings and repaint in a silver color that is a little more prototypical for U.P. equipment. Probably going to add a magnet assy as well. Just a dummy for the look of a magnet since it's home will be a scrap yard. I probably won't get a chance to paint until next week depending on the weather.
Don't know if this might help someone with a similar issue.........
This MTH Premier Gp38 ps3 sat on the shelf for a year and would only start running forward with no lights or sound on my test track.
Out of frustration with no improvement running it on the track , I turned it on its back and hooked up a couple of power clips and continued to run it that way.
After quite awhile of running it this way, I must have started to wake up something inside . I placed it back on the test track and had good results and now it performes flawlessly on the DCS / TIU / REMOTE layout.
(Glad no bad board ![]() )
)

The old Carpet & Southern RR encountered a problem when some new double stack container cars arrived. Seems the old Atlas bridges didn't quite have the clearance necessary so some modifications were in order. 
So the construction crew (me) carefully removed and modified the offending bridge parts.


After cutting a small piece of styrene was added to the cut, pieces were glued back in place and success. Then end pieces were a bit more difficult but after the first bridge was completed the second one took about 1/4 the time. Still have to repaint and weather the bridges but for now this double stack is my maximum clearance car.


Of course, the follow thru on any project is very important,.. hence,


Mike, I like the Buffalo Trace option, but curious as to why you cut the crossmembers rather than raising the entire bridge above the base? In my case I sold off my MTH premier double stacks in favor of Lionel and K-Line. These latter two are optically close in size to each other, the MTH was a beast "towering" over the other two brands. Regardless I still had to do bridge surgery on my Lionel truss bridges, the MTH Truss was fine - imagine that!
https://ogrforum.com/...3#165010489493444243
Scouting Dad,
I originally thought about raising the bridge off the base but I just didn't like the look of it since it really disturbed the proportions. Next step on these particular bridges is to replace the sheet metal deck with an open grid similar to what is on those MTH Truss bridges (I have three), but that is the subject of another modification I'm still working on. On another note the Fastrack being used at the moment is just temporary and will be replaced with either Atlas or Gargraves at some point, something that looks more like bridge trackage.
-Mike in NC,
@Mike in NC posted:
Of course, the follow thru on any project is very important,.. hence,
Nice solution and good looking end result Mike.![]()
@idea-thinker posted:My new work bench. Just got it installed. No drawer fronts or cabinets doors yet as I am still finishing those and will install later. My new work bench is 22 feet long so I will be able pile a lot of stuff on it. The only thing on it at the moment is one of my bridges that I have laser cut.
Once I get it piled high with stuff I will post additional pictures so that it will look like a real work bench.
Thanks;
idea-thinker
That work bench is longer than the two longest walls in my bedroom train room. My "L" workbench is in the back room, approx 3'x5', 2' deep on both sides. Fits in corner between two doors. That workbench is great!
@idea-thinker posted:My new work bench. Just got it installed. No drawer fronts or cabinets doors yet as I am still finishing those and will install later. My new work bench is 22 feet long so I will be able pile a lot of stuff on it. The only thing on it at the moment is one of my bridges that I have laser cut.
Once I get it piled high with stuff I will post additional pictures so that it will look like a real work bench.
Thanks;
idea-thinker
That's gonna make for a long chair pad. You may need to upgrade your chair wheels to ball bearings ! ![]()
@Richie C. posted:That's gonna make for a long chair pad. You may need to upgrade your chair wheels to ball bearings !
Richie;
I was thinking about having multiple chairs that stay in place to avoid rolling them around since the room is carpeted. I suspect once I am able to do work on the work bench I will see what works best.
Thanks;
idea-thinker
@idea-thinker posted:Richie;
I was thinking about having multiple chairs that stay in place to avoid rolling them around since the room is carpeted. I suspect once I am able to do work on the work bench I will see what works best.
Thanks;
idea-thinker
Get you some of those new fang dangled glass office chair mats …..supposed to be indestructible, and lifetime warranty,…….then you can roll around to your hearts delight……I’d be tired getting up and down from the sheer number of work stations you have possibilities for ……..that’s an incredible work bench!!…..curious, …..what’s the type of projects/work we’re doing on that mammoth bench?……I don’t think Lionel’s bench in Concord is that big!!…☺️
Pat
@harmonyards posted:Get you some of those new fang dangled glass office chair mats …..supposed to be indestructible, and lifetime warranty,…….then you can roll around to your hearts delight……I’d be tired getting up and down from the sheer number of work stations you have possibilities for ……..that’s an incredible work bench!!…..curious, …..what’s the type of projects/work we’re doing on that mammoth bench?……I don’t think Lionel’s bench in Concord is that big!!…☺️
Pat
Harmonyards;
I am going to setup a bench testing area to repair engines and accessories for one. But I am also going to be testing electronic circuits that I have designed to control my trains. I have a number of different circuits that control track power, control accessories, sensor circuits, control switches and several other circuits that manage these other functions. My plan is to run 50 to 75 trains at one time so this will require automation. My new work bench will be the platform on which I test my circuits. If you notice I have a shelf at the back of the work bench to set test equipment on and or computer monitors. All of my circuits are software driven.
Thanks;
idea-thinker
Installed partitions for old-school Papier-mâché covering:

A bit of webbing next.
PD


My crane project is coming along nicely. While I have the airbrush out I figure I'll go ahead and get the base coat down on my K-Line MP15 shell. It'll be similar to the KL NYC MP15 when I get it done, but I am going to have a different road number on it.
I’ve moved a Lionel 3494 from the “to do” to the bench. The mechanism is in very good shape, trucks, wheels and metal frame are rust free. The silver paint and the side ribs are reasonable for being an 80 year old toy. My question regards the manner Lionel secured the shell to the frame. 4 1/4 in small screws through the bottom into molded plastic mounts on the inside corners of the shell. Over time the bottom portions of these mounting “studs” have broken away. The shell now simply rests in place on the metal frame, snug enough to run, but not secure. Any thoughts about rebuilding the missing plastic mounts?
thanks, Richard
Getting small bottles of hobby paints properly mixed has always been one of my problems (I'm quite lazy). Some (actually most) of my paints will sit undisturbed for months at a time then when I get around to using them my wrist/elbow gets a work out which is not good on my old body parts. The time these bottles sit in my paint box doesn't even take into consideration how long the paint was on the shelf at the local hobby shops. So a few days ago after a long and unsatisfactory shaking session I decided to invest in an automatic shaker. I started shopping, reading reviews and gave up after a few hours and went to bed. Later that night I woke up and said, "hmmmm".
Next day I opened Tinkercad and created this rough version of a bottle holder sized to fit Vallejo .57 oz AV paints. The ends were made with the idea of keeping the cap on in case it came loose, also provided a slot to hold a velcro strap.
![20221020_173225[1]](https://ogrforum.com/fileSendAction/fcType/0/fcOid/147972074967848212/filePointer/165292038969697428/fodoid/165292038969697421/imageType/MEDIUM/inlineImage/true/20221020_173225%255B1%255D.jpg "20221020_173225[1]")
I printed it, attached it to an old blade for my reciprocating saw, and gave it whirl. Yay, easily mixed paint. I did discover the metal in these saw
blades is extremely tough to drill, but with the help of a hammer and punch, I managed.
![20221020_171909[1]](https://ogrforum.com/fileSendAction/fcType/0/fcOid/147972074967848212/filePointer/165292038969697430/fodoid/165292038969697423/imageType/MEDIUM/inlineImage/true/20221020_171909%255B1%255D.jpg "20221020_171909[1]")
![20221020_171823[1]](https://ogrforum.com/fileSendAction/fcType/0/fcOid/147972074967848212/filePointer/165292038969697429/fodoid/165292038969697422/imageType/MEDIUM/inlineImage/true/20221020_171823%255B1%255D.jpg "20221020_171823[1]")
![20221020_171845[1]](https://ogrforum.com/fileSendAction/fcType/0/fcOid/147972074967848212/filePointer/165292038969697431/fodoid/165292038969697424/imageType/LARGE/inlineImage/true/20221020_171845%255B1%255D.jpg "20221020_171845[1]")
Since it worked quite well I've gone on to print another for holding my Microlux 2oz bottles. Perhaps I can rig something up for full size spray paint cans too.
-Mike in NC,
![20221020_173225[1]](https://ogrforum.com/fileSendAction/fcType/0/fcOid/147972074967848212/filePointer/165292038969697428/fodoid/165292038969697421/imageType/LARGE/inlineImage/true/20221020_173225%5B1%5D.jpg "20221020_173225[1]")
![20221020_171823[1]](https://ogrforum.com/fileSendAction/fcType/0/fcOid/147972074967848212/filePointer/165292038969697429/fodoid/165292038969697422/imageType/LARGE/inlineImage/true/20221020_171823%5B1%5D.jpg "20221020_171823[1]")
![20221020_171909[1]](https://ogrforum.com/fileSendAction/fcType/0/fcOid/147972074967848212/filePointer/165292038969697430/fodoid/165292038969697423/imageType/LARGE/inlineImage/true/20221020_171909%5B1%5D.jpg "20221020_171909[1]")
![20221020_171845[1]](https://ogrforum.com/fileSendAction/fcType/0/fcOid/147972074967848212/filePointer/165292038969697431/fodoid/165292038969697424/imageType/LARGE/inlineImage/true/20221020_171845%5B1%5D.jpg "20221020_171845[1]")
For spray cans, I know that they sell cups that you drop the can into and then chuck into a drill and spin it.
Mike in NC, that’s great creativity!
For anyone who doesn’t want to build there own paint shaker/mixer, I highly recommend this one from Micro-Mark.
It is definitely one of my favorite, most-used (and inexpensive!) small tools. Absolutely love it!
@Mike in NC posted:Getting small bottles of hobby paints properly mixed has always been one of my problems (I'm quite lazy). Some (actually most) of my paints will sit undisturbed for months at a time then when I get around to using them my wrist/elbow gets a work out which is not good on my old body parts. The time these bottles sit in my paint box doesn't even take into consideration how long the paint was on the shelf at the local hobby shops. So a few days ago after a long and unsatisfactory shaking session I decided to invest in an automatic shaker. I started shopping, reading reviews and gave up after a few hours and went to bed. Later that night I woke up and said, "hmmmm".
Next day I opened Tinkercad and created this rough version of a bottle holder sized to fit Vallejo .57 oz AV paints. The ends were made with the idea of keeping the cap on in case it came loose, also provided a slot to hold a velcro strap.
I printed it, attached it to an old blade for my reciprocating saw, and gave it whirl. Yay, easily mixed paint. I did discover the metal in these saw
blades is extremely tough to drill, but with the help of a hammer and punch, I managed.
Since it worked quite well I've gone on to print another for holding my Microlux 2oz bottles. Perhaps I can rig something up for full size spray paint cans too.
-Mike in NC,
That's pure genius right there!
Dallas, several thousand items have been created on that bench in 20 years. I plan on getting out of the closet, LOL! ![]()
Since the weathering business keeps me quite busy, I will be setting up a new commercial shop in Fl.
Great things in the plans for 2023!


 Nice jig!
@CNJ #1601 posted:Mike in NC, that’s great creativity!
For anyone who doesn’t want to build there own paint shaker/mixer, I highly recommend this one from Micro-Mark.
It is definitely one of my favorite, most-used (and inexpensive!) small tools. Absolutely love it!
Your local hardware or big-box store has paint mixing bits for your drill for a few bucks.
@gunrunnerjohn posted:Your local hardware or big-box store has paint mixing bits for your drill for a few bucks.
I did try that but found a full-size drill (or driver) to be way too much "machine" for a typical one or two-ounce bottle of hobby paint. The Micro-Mark mixer is small and operates with much more finesse (yet really gets the job done!) in a small bottle. Maybe there's a scaled-down mixing bit made for a small hobby drill?
@coach joe posted:Was that a work bench? Never mind I found the answer on this page.
These are the guys who really do all the weathering...![]()
")
")
![]()
")
")
@SIRT posted:
Never underestimate what one can do in the limited space of a closet.
Check this out: Two layouts in an unexpected space (warrenvillerailroad.com)
@Lionelski posted:Never underestimate what one can do in the limited space of a closet.
Check this out: Two layouts in an unexpected space (warrenvillerailroad.com)
![]() I'm also combining the other two work areas all in one area.
I'm also combining the other two work areas all in one area. ![]()
")
")
")
")
")
")
@SIRT posted:These are the guys who really do all the weathering...
That's awesome, Steve! ![]()
@Mike in NC posted:Getting small bottles of hobby paints properly mixed has always been one of my problems (I'm quite lazy). Some (actually most) of my paints will sit undisturbed for months at a time then when I get around to using them my wrist/elbow gets a work out which is not good on my old body parts. The time these bottles sit in my paint box doesn't even take into consideration how long the paint was on the shelf at the local hobby shops. So a few days ago after a long and unsatisfactory shaking session I decided to invest in an automatic shaker.
-Mike in NC,
Stir it first to get everything on bottom broken up then shake. Takes a minute or two. I use an old Testors paint brush and for stirring and it works great.
@SIRT posted:
I'm also combining the other two work areas all in one area.
Love the "adult beverage conveyance device" ![]()
I'm amazed by the work that came out of that little closet. Can't imagine what can be done in a proper shop. ![]()
Bob
Plans are in place. Just have to close next week and get back down to the new home. Everything's packed up for the movers. I'm kind of in limbo for awhile. Challenger is being transported this week.
My latest command upgrade project, the K-Line Speeder. The mission was to give it command and sound, that was a tight fit! All lighting is LED. I used the ERR Mini-Commander 2 and RailSounds Commander. I was surprised my 1" speaker was way louder than I expected. My only remaining task is to find some suitable seats for my engineers. Good thing it has command control since there isn't anyone driving! ![]()
I can't paint nearly this good, so I got Tom @Krieglok to actually paint the shell. My painting wouldn't look like this. ![]()
@gunrunnerjohn posted:My latest command upgrade project, the K-Line Speeder. The mission was to give it command and sound, that was a tight fit! All lighting is LED. I used the ERR Mini-Commander 2 and RailSounds Commander. I was surprised my 1" speaker was way louder than I expected. My only remaining task is to find some suitable seats for my engineers. Good thing it has command control since there isn't anyone driving!
Sounds great John. I want to add sound to the TMCC speeder I just bought. I haven't opened it up yet to see what space is available. I'll be in touch when it hits the shop. 
Bob

@RSJB18 posted:Sounds great John. I want to add sound to the TMCC speeder I just bought. I haven't opened it up yet to see what space is available. I'll be in touch when it hits the shop.
It'll be tight, but it might be possible. That one is a box, so there's actually more room than the K-Line speeder. I had to hack the rear electronics bay and enlarge it, that's why it needed to be painted. I just use Styrene sheets to build a larger cavity behind the cab.
@SIRT posted:Dallas, several thousand items have been created on that bench in 20 years. I plan on getting out of the closet, LOL!
Since the weathering business keeps me quite busy, I will be setting up a new commercial shop in Fl.
Great things in the plans for 2023!
Good to see you getting out of the closet Steve. ![]() LOL
LOL
Good to hear about great things from someone for a change Steve. 2023 soungs great. Good luck.
( It would have been too claustrophobic for me to be trying to work in that small closet ) ![]()
Congratulations on the plans for the new place in Florida, Steve!
John, that's a great job on the speeder installation!
Thanks Mark. I won't miss the long winter months anymore.
Can't wait to get started on some new projects!
@Mark Boyce posted:John, that's a great job on the speeder installation!
Thanks, I wanted one of these with sound, so I decided to take another look. ![]() I do hope I don't have to take the boards out anytime soon, they're really stuffed in there!
I do hope I don't have to take the boards out anytime soon, they're really stuffed in there! ![]()
Another eBay bargain, this one had a broken belt that drives the dispatcher back and forth. Note to self, check to see if parts are available before purchasing MTH items - this belt was not. I was able to purchase a timing belt with the same tooth pitch and count. Just had to drill a hole through one of the tiny teeth to push a pin through to drive the dispatcher. Found the worlds tinyest drill bit, said a few Hail Mary’s and bingo - it works. Tomorrow morning I am hoping to go to Lowe’s and get the plywood to start the layout.

Something different. This Howe truss bridge had its start half a world away 22 years ago. I've had the three trusses for this project since 2000. The builder who started to make them decided instead to build a steel car float set up instead.

It's a bit short, as prototypes are usually 100' or more in length. This is where the workbench project stands as of yesterday. It's 15 1/2" long, and when set up for two tracks is about 8" wide. While not as super detailed as the one SIRT Steve showed us last month, it's quite recognizable as to what it is. Besides having a lot of wooden parts, it also has a substantial amount of detailed metal work to be done on it.

More materials are needed, including myriads of nut bolt washer sets and embossed metal work. More underside transverse beams are to be installed. Then will come rails, spikes, frogs, car float alignment toggles and two tie-up winches that were hand powered with geared steel ship's wheels, which I still need to find or make. Then some decking and signage.

That dowel rod in the last photo is for the land-end rocker upon which that end of the bridge sits in trunnion bearings below, on a supporting bulkhead. This enables the bridge to rise and fall at its water end with the tide and be at a height about the same as a car float deck. The water end is supported by a pontoon still to come. The final colors and finish are still a way off in the distance.

S. Islander


Some of you will find what I'm about to say to be very amusing. That is certainly my intent.
I used to have a work bench in my basement. Before I expanded my layout, I even had a vice and a band saw on that work bench.
I no longer have a work bench.
Do you wonder what happened to it?
This is where my work bench in my basement used to be:


LOL, Arnold
@Arnold D. Cribari posted:Some of you will find what I'm about to say to be very amusing. That is certainly my intent.
I used to have a work bench in my basement. Before I expanded my layout, I even had a vice and a band saw on that work bench.
I no longer have a work bench.
Do you wonder what happened to it?
This is where my work bench in my basement used to be:
LOL, Arnold
Arnold, I never get tired of seeing your baseball park. It's great that you were able to fit it into your layout no matter it's past life. And I'm a Yankee fan.
Dave, I greatly appreciate your compliment and your love of baseball and the Yankees.
It is very easy to put a ball park on a layout. All you need is Woodland Scenics Green Blended Turf for the grass and Iron Oxide Fine Ballast for the reddish brown dirt on the field, a little chicken wire and cardboard for the fencing, Popsicle Sticks and wood glue for the bleachers and stands, and acrylic paint.
The trickiest thing is getting good O Gauge players and umpires. I got lucky and got nice metal figures from Kramer Products, which is no longer in business. I believe Scenic express has some nice plastic figures that look like old time players from the 1900 - 1910 era with mustaches, and that are less expensive than the Kraner Products figures were. Arnold
I bought this milk car in a 3 car lot on eBay a few years ago. It just had my curiosity as to how it was made. Not much info was offered. It appeared 90% done. Well it was 2 rail but based on a Lionel milk car chassis. In the prototype world. The butterdish Bordens cars were originally like the Lionel cars. The wood sheathed bodies were removed and what looks like a butterdish was formed out of metal to cover the tanks. Still not sure how the Lionel body was removed as it had I’m guessing to be cut on a bandsaw. I ended up switching out the trucks to 3 rail and re doing the coupler mount to get the coupler height correct. But I noticed the brake rigging was redone when I was in there. I remember reading somewhere the Lionel rigging wasn’t correct. The body is carved out of balsa wood. This car was really nicely done. Someone spent some time on this. So close to being finished. I’m guessing the way it was sold it was part of an estate. I have to add the hand rail that circles the body. I made a jig to drill the stanction holes. Lionel has silver boiler front ones that look to be close to what I need. I do have a brass version to go by. Seeing I have extra black decals from the brass one that’s painted white. I’ll paint this one silver. This scheme was around in the 40’s.


I have been modifying some MTH 19th Century freight cars. Mainly adding a longer brake wheel stems and period brake wheels…
I stripped and repainted this car from a MTH commemorative car to a Lehigh Valley scheme.

I added the brake stems and wheels to these two stock MTH cars. Then a light wash and some dry brush weathering…


Here is the same WM car in a black and white format…as they didn’t have color film in those days…lol.

Tom
@Arnold D. Cribari posted:Dave, I greatly appreciate your compliment and your love of baseball and the Yankees.
It is very easy to put a ballpark on a layout. All you need is Woodland Scenics Green Blended Turf for the grass and Iron Oxide Fine Ballast for the reddish-brown dirt on the field, a little chicken wire and cardboard for the fencing, Popsicle Sticks and wood glue for the bleachers and stands, and acrylic paint.
The trickiest thing is getting good O Gauge players and umpires. I got lucky and got nice metal figures from Kramer Products, which is no longer in business. I believe Scenic express has some nice plastic figures that look like old time players from the 1900 - 1910 era with mustaches, and that are less expensive than the Kraner Products figures were. Arnold
Maybe next layout Arnold. It's been on my feature list the last few but never made it.
Tom, nice job on the 19th century cars. I built a Mainline Models 36 ft. Stock Car and placed it on a Atlas 36ft. Reefer chassis with truss rods. The chassis was a board width to long and had to be sanded back for the body to sit on. I have a couple of more kits to do. Could you give me a rough measurement of the chassis length for these cars. It’s tough to find the Atlas cars and these look like they could work. I run Kadee’s. Is there a mounting setup in place ?

@Dave_C posted:Tom, nice job on the 19th century cars. I built a Mainline Models 36 ft. Stock Car and placed it on a Atlas 36ft. Reefer chassis with truss rods. The chassis was a board width to long and had to be sanded back for the body to sit on. I have a couple of more kits to do. Could you give me a rough measurement of the chassis length for these cars. It’s tough to find the Atlas cars and these look like they could work. I run Kadee’s. Is there a mounting setup in place ?
Hi Dave.
I took some measurements from the MTH 19th century car frames. The boxcar, gondolas and tank cars all have the same frame. Here are the measurements. I used metric as I could get a more precise reading…
The frame length is 210 mm ( or 21 cm)
Frame width is 53 mm
From truck enter pin to truck center pin is 155mm
Most of the cars I checked, have the pads for KD couplers. Some do not, but the space is there for mounting them. I think the older cars do not have the mounting pads, but I cannot say for sure what year they changed the design…
hope this helps…
Tom
@Dave_C posted:Tom, nice job on the 19th century cars. I built a Mainline Models 36 ft. Stock Car and placed it on a Atlas 36ft. Reefer chassis with truss rods. The chassis was a board width to long and had to be sanded back for the body to sit on. I have a couple of more kits to do. Could you give me a rough measurement of the chassis length for these cars. It’s tough to find the Atlas cars and these look like they could work. I run Kadee’s. Is there a mounting setup in place ?
😳😳😳😳😳😳😳😳😳 I’m flabbergasted, standing besides myself, jaw on the floor, covered in metal shavings, …..is that board by board built??……oh my goodness!…..that trumps anything I’ve built, ……I’m turning in my tools, …..I stand in awe of the masters, …….well done Dave!…
Pat
Thanks for the measurements Tom. I’ll have to look into these. I built the first kit pretty much by the instructions. Not a bad build. Just a lot of measuring and squaring everything up. I model the Rutland. All their cars have truss rods. Not impossible to model but I had an Atlas chassis with them. I figured I’d give it a shot on the second one and make sort of a hybrid. They always ran at the head end of the train. I figured the added heft of the Atlas chassis would be a good thing. I did have to remove one board out of the floor of the chassis at each end to get the body to fit. This pushed the trucks more towards the car ends but it looks okay. I never gave the MTH cars much of a look. The Atlas cars can be found. But you have to find the less desirable ones to make it worthwhile. I still have 2 more builds. I’ll look into the MTH cars. Thanks again.
Pat, you just have to get over the shock when you first open the box and stare at all the little pieces of wood. The sides came partially built. Otherwise. I may have never even got started. You just move along slowly and just keep everything square.


The milk car I posted previously on. Is going for a road test. I ordered some stanctions for the handrail and I need to research the silver color.
Dave, beautiful work. Very clean and precise. Like Pat said, we are not worthy! Lol
I am curious how a car will look with a MTH under frame. One detail I see on your finished stock car is the turnbuckles on the truss rods. I was considering adding those to my MTH cars. I haven’t been able to find them commercially made, so I may try scratch building some…
Tom
Access to this requires an OGR Forum Supporting Membership


