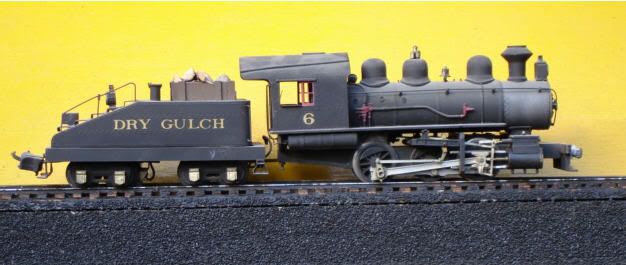
There are two Union Pacific steam engines I really want to add to my collection.  Problem is, no one has produced them in 3 RS.


Anyone actually built a steam engine from scratch?  


For those that have, please give me some details-specifically where you bought motors, running gear, etc. 


My plan is to use brass for the boiler and plastic/brass detail parts.  ERR or something for electronics (need sound/smoke). Thoughts ?


I know Bob2 has scratch built some nice engines, hope he chimes in here.  


This will be a fun project and the end result will be worth the effort.  

Last edited by 86TA355SR
Original Post

Replies sorted oldest to newest

Originally Posted by 86TA355SR:

Yes, he has.  I tried e-mailing him, no e-mail in his profile.


Hope he replies to this thread.

Well, if you are thinking of "contracting" Bob2 to scratch build a locomotive for YOU, then THAT is a whole different situation. I sure can't speak for him, but I have seen him post many, many, many times over the years that "One could NOT afford the labor rates he would have to charge!".


You might also try Forum Sponsor Harry Heike.

There have been a lot of articles, including those by Bob Turner, in magazines over

the years, but always on a specific loco, which probably are not what you have in mind.  Since this is posted under the 3 rail category, that is probably more of a problem than doing a two rail loco, which I think Turner does.  The parts are out

there for two rail....mfd. for that purpose...never heard of anybody making drivers,

gearboxes, etc., for three rail.  The ones I plan are really going to be kitbashes on

existing chasses for that reason.

I guess it depends what you mean by "scratch." I made one pretty much from scratch: I used drivers and pilot wheels, and a few other parts, plus motor and gears, from locos I took apart, etc.  I made the bodies and all scratch, out of brass/plastic - even bits of wood as bracing and such, and some of the driving rods and all.  It was not a model of a specific loco, though: I made a 2-4-4-2 mostly to see how difficult it was to make actual articulated swiveling, telescoping steam pipes to the cylinders, etc.  I mine.  


I've seriously bashed several locos, though, to get what I want: starting with a particular loco (just as I would start with a 2-8-8-2 to get a 2-8-8-0) as a basis for what I want: I did an ATSF 1800 series like that recently, and some others int he past.  LOTS of fun!!! 

Last edited by Lee Willis

Years back you could buy O gauge engine kits and customize them anyway that you wished.  I believe that Scale Craft and All Nation were in the engine kit business, Lionel offered the 5344 in kit form as well.That's ancient history as it had to be back in the 1930's. Some of the old timers had these engines on their layouts and I saw them but only once many years back. The engine kits were on the market way before my time so this info might be a bit sketchy.

Until fairly recently, there was a kitbuilder in Kentucky offering O scale loco kits, in

two or three rail.  And that was a continuance from maybe All-Nation and, I think,

one or more offered had originally come from Varney.  Those kits show up at the

Chicago O Scale show, and others, I am sure.  Seems like there were kits for 4-4-0.

4-4-2, 4-6-0, and 4-6-2, and maybe others.  The ads ran in some of the O scale

magazines unti recently, although I am not sure when I know longer saw them. I don't know whether or not they ran in OGR.

Here I am.  My first OGR articles on building steam models were designed for beginners. I did 0-6-0s, but showed how they could easily become 2-8-0s or even 2-6-6-2s.  I designed them for Harbor Freight drill presses and hand tools.  At least four modelers sent me photos of finished models using my techniques.  Wish I had the dates, but look for early 1990s OGRs.


Techniques are the same for two or three rail.  The big difference is that I do not have to insulate drivers for three rail.  Here is the one Myron Biggar tried out on his 3-rail layout:


The only UP steam I have done are Challengers and one Big Boy.  I may do an FEF some day.  My CLW Northern is as close to scratch as they come, and is a 17/64 scale FEF-1.

Oh, yeah - bashed a number of them. There's true steam scratch building like I used to see in MR and RMC from the 50's through the 70's (these articles started off with

statements like "First, find a good source of copper ore for your brass..." Yikes!),

then there's what most of us do, and that's use appropriate parts from available

sources and locos, re-purpose and re-make them to be accurate enough.


This isn't sloppy work - it's smart, convincing work, and can satisfy all but the fine-scale modeler, and those guys would turn their noses up at the center rail, anyway.


I've bought from Stevenson Preservation lines and Babbitt (not recently). 

Not to be negative or anything, but I don't consider building a loco from a kit to be "scratch" - but it can be very satisfying.   As I said above I have never built a loco completely from scratch - at the least I always get the drivers from something - usually a cannibalized older loco.  I can just imagine the old articles on that: "   After getting the copper for the brass, build a lathe to turn the wheels . . . "  I think scratch/bashed might be both the most fun (you have to innovate and be creative) and productive (you can build anything you want: Right now I am "scratch" building a model of the ATSF cab-forward steamer that never got off the drawing board, just because I want to see it running on my layout).  

"Scratch" does not usually include machining your own drivers or building your own cylinder blocks.  My first scratch used Lobaugh frames and Max Gray drivers, and a hunk of automotive exhaust pipe.  It turned out quite well.


The 3-rail 0-6-0 does have drivers machined here - they do not make cast- iron 3-rail drivers.  Cast iron on rail is a bit like your rubber tires, only more permanent.  They just grab the rails and hold on!

All mine have been a combination of "Kit-bashed" and scratchbuilt.


If an existing chassis/drivers can be used, that's the route I would take.


I've been thinking of how hard it would be to make a boiler for this:


SAL 868

Pacific_E_Stream_Draw


MTH has made a few Pacifics that were close, but not close enough to use without a lot of rework.  It would be easier to build new using brass sheet and mount it on an existing chassis.

Attachments

Images (2)
  • SAL 868
  • Pacific_E_Stream_Draw
Originally Posted by Lee Willis:

I can just imagine the old articles on that: "   After getting the copper for the brass, build a lathe to turn the wheels . . . "  .  

Actually, there was a rather nice article on making drivers up from scratch published in O Scale Trains probably in the last 5-6 years.

Originally Posted by Bob Delbridge:

All mine have been a combination of "Kit-bashed" and scratchbuilt.


If an existing chassis/drivers can be used, that's the route I would take.


I've been thinking of how hard it would be to make a boiler for this:


SAL 868

Pacific_E_Stream_Draw


MTH has made a few Pacifics that were close, but not close enough to use without a lot of rework.  It would be easier to build new using brass sheet and mount it on an existing chassis.

That is a very good looked locomotive.  It looks like it would be a nice project from any number of small Pacifics - I could even get enthusiastic about it, it really looks good.  And it appears it would have no compund curve bends, so it would be rather straightforward.  Regardless, no doubt that you are correct, best to start with sheet brass, or for me, tyrene: I prefer to work with plastic for the big stuff and it always looks the same under the primer and paint. I just finished bashing the Lionchief Plus Pacific which looks to be about the right size and definitely the right size, etc., but the issue with that is the antennas for the RC signal which I think are built into the loco body and can't be replaced or removed easily.  A plastic body shell mounted over them (possible to do I think with a streamlined body) might work, but probably brass would not - it would block the signal.

If you like that locomotive, try this:


Get a block of balsa and some cardboard.  Mock it up until you are semi- happy, then give it about six coats of sanding sealer, and try the paint scheme.  Same with the tender.  Then study it for a while before cutting brass or plastic.


I do this sort of thing routinely when I am not sure how something will look.  Occasionally the wood block is good enough to be part of the finished model.

This one has a wood block as well for tender.  The NP prototype had no rivets.  And yes, I have the proper trucks, just waiting for assembly.  The locomotive is based on Lobaugh parts, but features a twin spool drive, with two motors.  The front engine is powered by a shaft that runs through the hollow rear engine worm shaft.


Originally Posted by bob2:

Here is the Northern.  Cab, firebox, cylinders, domes, stack, and lead/trailing trucks are vastly different from the kit.  One startling feature: all drivers are equalized as the prototype, and leaf springs actually work.


Sorry about the delay in responding, I've been in South America.  I love your work and this is just one great example.


Originally Posted by bob2:

This one has a wood block as well for tender.  The NP prototype had no rivets.  And yes, I have the proper trucks, just waiting for assembly.  The locomotive is based on Lobaugh parts, but features a twin spool drive, with two motors.  The front engine is powered by a shaft that runs through the hollow rear engine worm shaft.


Where do you purchase the electric motors you use in your locomotives?  I need to find a source for pick up rollers, drivers, and stuff like that.


How did you go about making the 'rivets' ?


Thanks!

I got motors directly form Pittman, but that may not be possible now.  Good Pittmans are showing up on eBay for $25 each.  Look for 12 volt, 8x2y or 9x3y, where x and y can be any number.


Drivers are easier for 2- rail.  They are always on eBay for reasonable prices.


Rivet machine is described in OGR and OSN articles.

Originally Posted by bob2:

I got motors directly form Pittman, but that may not be possible now.  Good Pittmans are showing up on eBay for $25 each.  Look for 12 volt, 8x2y or 9x3y, where x and y can be any number.


Drivers are easier for 2- rail.  They are always on eBay for reasonable prices.


Rivet machine is described in OGR and OSN articles.

Thanks, I'll see what I can find.


Looking for the OGR articles.  See what I can find.

Originally Posted by Ron H:

If you can find the loco you want in 2 rail brass, it is just not that hard to convert it to 3 rail.

Ron, I've thought of doing that.  May give it more thought later.  If my scratch building can't keep up with my desire for other scale UP engines I'll convert a few.


Have you converted any?  I did a quick search and got a 'basic' idea of how to do it.


I really want to build something myself.  I miss model building like I used to do as a kid.  When I got back into trains last fall, I decided that I would scratch build buildings, some rolling stock and engines.  


Thanks

 After attempting some plastic diesel scratch builds, I can only admire the work on building steam engines. I wouldn't have the skills yet. I think the discussion over scratch building seems to be more of kit bashing.

 Although some may feel brass is easy to work with, I'd be amazed if some succeeded in building from brass sheets. To me that's scratch building. I would think the skills and the tools would take time to acquire.

 Bob2 those engines do look amazing!!

The motor is a new pittman purchased from Northwest Shortline. With ERR Tmcc everything will be handled by the electronics AC converted to DC, etc.. Positive and negative wires go from the motor straight to the TMCC unit. Center rail roller positive lead goes straight to the TMCC as does the ground wire on the chassis. I use the 2 rail driver wipers on the drivers joined into one ground wire. The drivers are insulated so a pick up from each is required.


I'm no expert and kind of learning as I go. The loco is still straight DC. In testing I connected hot lead from DC transformer to center rail and negative lead to outside rail just like we do with AC and she ran like a champ drawing power from the center rail roller.


Ron

Originally Posted by Ron H:

The motor is a new pittman purchased from Northwest Shortline. With ERR Tmcc everything will be handled by the electronics AC converted to DC, etc.. Positive and negative wires go from the motor straight to the TMCC unit. Center rail roller positive lead goes straight to the TMCC as does the ground wire on the chassis. I use the 2 rail driver wipers on the drivers joined into one ground wire. The drivers are insulated so a pick up from each is required.


I'm no expert and kind of learning as I go. The loco is still straight DC. In testing I connected hot lead from DC transformer to center rail and negative lead to outside rail just like we do with AC and she ran like a champ drawing power from the center rail roller.


Ron

Thanks, Ron, those are the details I need.


Originally Posted by Ron H:

Oh. I forgot to mention, brass 2 rail will not really work on tubular track and requires broad curves for the most part.

My concern would be the wheel flange depth of 2 rail engines on the 3 rail track. I'm OK with broad curves, my minimum will be 60" radius, max of 75" radius.


Any idea where to get 3 rail drivers?


My biggest problem now is finding blue prints?  Anyone know where to get them?

Last edited by 86TA355SR

Before I started having rods cast, I made very credible side rods out of K&S .064 bar stock.  Bob Stevenson has my patterns for fully reversible clevised rods in many sizes.


The "reversible" feature means you can have either smooth sided or I beam rods.  The one set that is missing is the FEF.  I would do them if there is a great demand.


Valve gear is truly trivial.  K&S .032x1/8" strip, an new file, a #62 drill, and you can quickly make almost anything.  PSC has Walschaerts links.


The loss to our hobby was the CLW castings.  Bob's H10 main rods were useful for everything.  I bought them by the dozen.

TA, If you use a track that has an actual T-rail you'll be fine. However I recommend gauging everything to NMRA standards. The problem is the switches. I've had it with scaletrax switches and will begin to convert my RR to 1/48 2 rail atlas and Micro engineering with custom switches. I'm going to lay N scale rail as the 3rd rail. I've already been slowly converting all the rolling stock to 2 rail wheels. It's near impossible to get prototype smoothness, but I want to try.

Post

OGR Publishing, Inc., 1310 Eastside Centre Ct, Ste 6, Mountain Home, AR 72653
800-980-OGRR (6477)
www.ogaugerr.com

×
×
×
×
Link copied to your clipboard.
×
×