Next week, call Lionel and get a RA # to send it in. Mike and the service dept will get to your engine as soon as they can. They have let everyone know that they are currently working through kits on several products that shipped in the November-December time frame. You may have to wait several weeks for your S3, but your patience will be rewarded with a working locomotive.

Obviously there are some issues with smoke on SOME of these engines. I have the S3 and a Texas with the cylinder effect and have not had any issues yet. I ran the Texas for 2 hours last Saturday and it performed flawlessly.

It is a real drag to have problems with our trains. We've all been there at one time or another.
There are a lot of us out here who aren't into second guessing those who are technically adventurous and allow us to learn a ton of interesting info. Nothing wrong with sending it off, but anybody can send it in. I applaud your efforts and thank you so much for your report. After all, after the "perfect engine" goes around the layout twice, what is there to learn? Not one of the company gurus would be knowledgeable without your kind of inquisitive energy. It's not all about money. Education is expensive, always was, still is.
Please don't go away, and I wish you success with this.
Last edited by cjack
quote:
Originally posted by cjack:
There are a lot of us out here who aren't into second guessing those who are technically adventurous and allow us to learn a ton of interesting info. Anybody can send it in. I applaud your efforts and thank you so much for your report. After all, after the "perfect engine" goes around the layout twice, what is there to learn? Not one of the company gurus would be knowledgeable without your kind of inquisitive energy. It's not all about money. Education is espensive, always was, still is.
Please don't go away, and I wish you success with this.


Your totally missing the point. If you read above he clearly stated he was getting frustrated with lack of success in his repair.
quote:
Originally posted by MichRR714:
quote:
Originally posted by cjack:
There are a lot of us out here who aren't into second guessing those who are technically adventurous and allow us to learn a ton of interesting info. Anybody can send it in. I applaud your efforts and thank you so much for your report. After all, after the "perfect engine" goes around the layout twice, what is there to learn? Not one of the company gurus would be knowledgeable without your kind of inquisitive energy. It's not all about money. Education is espensive, always was, still is.
Please don't go away, and I wish you success with this.


Your totally missing the point. If you read above he clearly stated he was getting frustrated with lack of success in his repair.


I got it, and amended my comments to admit that sending it in is fine, I was mostly interested in defending trying it yourself if you're willing to accept what comes with it. Which, I think, is an intense satisfaction of giving a good try and learning something.
Sure, part of the expense. But manufacturers' warrantys are highly over rated in my opinion. I see though in the case of these trains, a warranty is sometimes greatfully appreciated. I've had my share of pinched wires, intermittant sound pots, misadjusted micro switches, FasTrack gates jumping up and down by themselves, FasTrack switch hang ups, and the list goes on. If it weren't for the more adventurerous on this forum, I would have spent ten times the time solving these issues and learned nothing of others efforts. So I appreciate the inquisitors, and their expenditures of time, and money, and their warranties. We're all in this together I think.
Photos all gone from Photobucket looks like ...
quote:
Originally posted by jmik26:
Some good and bad news.

Good - I got the resistors in and everything went back together fine. I also verified that both main smoke and steam chest smoke work just as erratic as before. I used 8 ohm resistors for both.

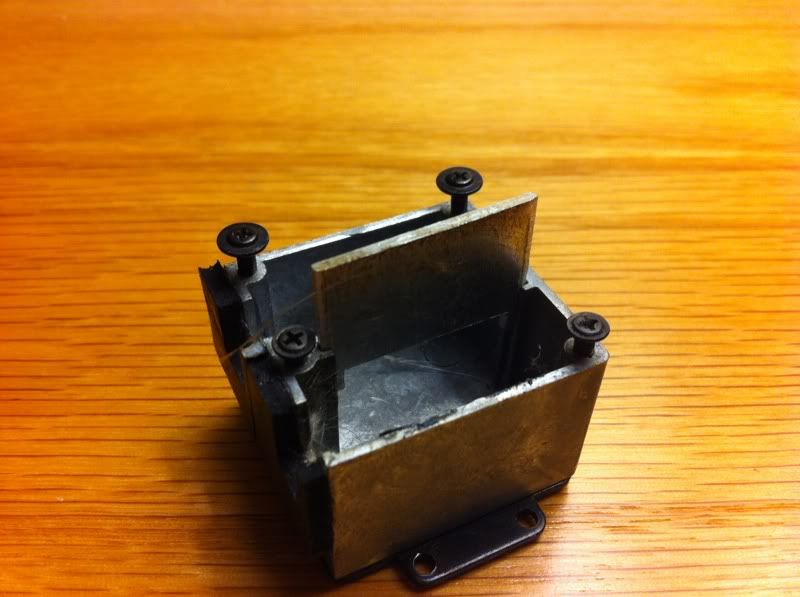
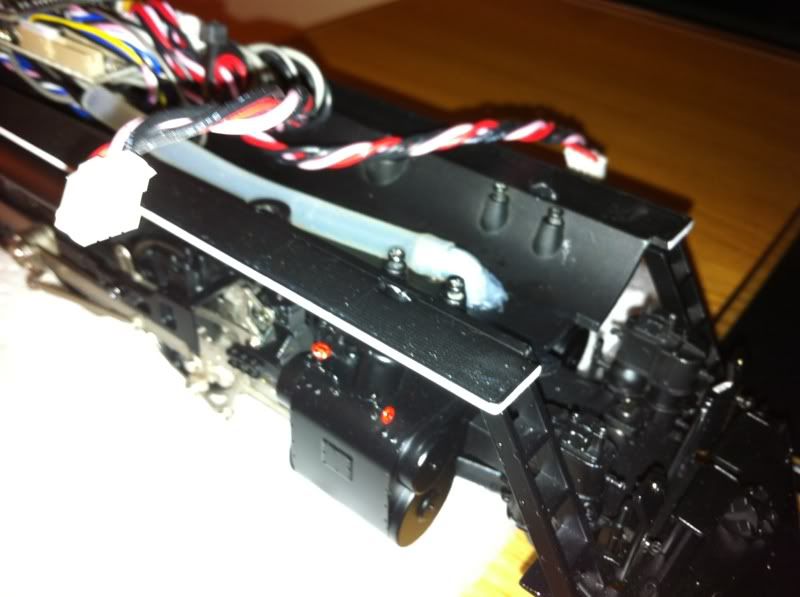
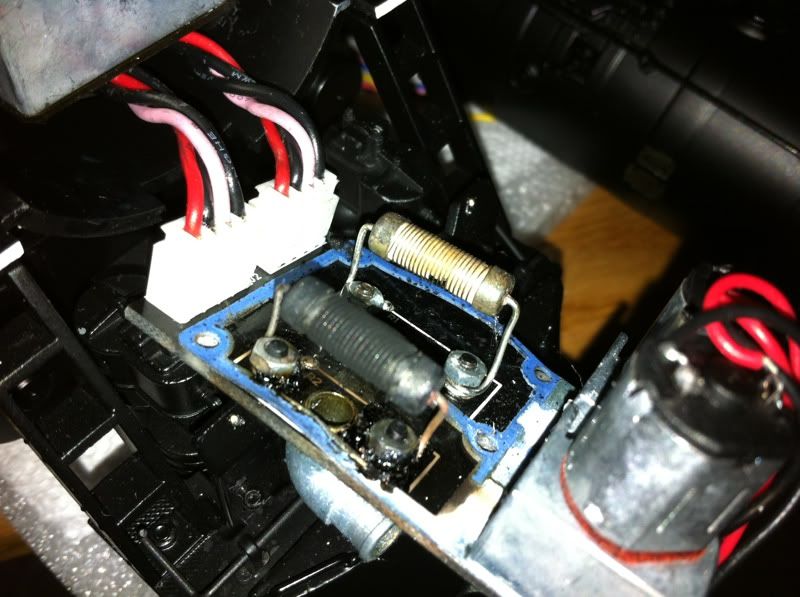
Bad - The steam chest smoke seems to still be weak and I fear its gonna burn out again if further mods are not made. Take a look in the photo below with pinched hose. I think this may be what is causing some problems for me? What do you think?


Sorry guys, I let this situation and a couple nay sayers get the best of me. I had to step away from it for a day or two.

To clear a few things up:
1. I am fully capable of troubleshooting an engine. Why that creditability was attacked by people that don't know me is baffling but it is what it is. If you can't do it thats fine, that doesn't mean everybody can't. The engine right now works exactly the way it did before it broke. Is that not repaired?

2. Right now I feel its redesigning more then fixing. Can I redesign, maybe after a lot of thought and some help from some really experienced people.

2. I don't question that Mike or Lionel can fix it. I bet they are outstanding at what they do. However, I feel Mike would be able to make it just as good as it was when it came out of the box which to me was unsatisfactory. I don't think bad of them, he is trying to help me the best he can. However I don't think shooting air up the steam chest every couple laps is the right fix.

3. I never thought Lionel wouldn't fix it. It was a question of do I pay $60 + dollars to do exactly what I just did which was replace a resistor.

4. Parts break! I have broke little rails taking a train out of the box. I heard of people getting broke parts in the box before they even run it. Does it mean the train is ruined, no. Glue the rail back on just the way the factory did and the way Mike explained. Does this warrant going on about this is why you shouldn't take anything apart? I guess to some.

5. Couple years from now there will be no warranties on these engines and people will have to make the decision on sending it in or repairing it themselves. I believe this thread will help the people that want to do the work themselves. If your a religious "I send everything into Lionel" please keep that mindset and don't offer your "see I told you so" opinion. Its counter productive!


Merry Christmas everybody... Jeff
quote:
Originally posted by jmik26:
GGG - I thought about making that gap bigger or drilling some holes in it but I think that will ruin the separation between steam chest and main stack operation. That is one of the issues I have right now. When I hit the blow off button I can see a increase in smoke out the stack. If I put my finger over the stack for a brief second the smoke pours out the steam chest. Its like its taking the path of least resistance.

cjack - I soaked mine with a full dropper before putting it together. The main stack blows smoke better then ever but the steam chest is barely working. I did read through some post loco-dan linked to and Mike did mention a eye dropper with a needle is the way to go.


The worse part is it has to be taken apart every time you need to tweak something. The more times I took it apart my patience was wearing thin and caused carelessness which led to breaking parts.


Both CHambers have fan driven smoke units, so it is interesting that it couldn't push smoke out with a properly wetted wick. Is the other fan turning properly?

I imagine if you plugged the stack it would force smoke through the other chamber, and out the chest.

I appreciate your post. G
quote:
Both CHambers have fan driven smoke units, so it is interesting that it couldn't push smoke out with a properly wetted wick. Is the other fan turning properly?

I imagine if you plugged the stack it would force smoke through the other chamber, and out the chest.

I appreciate your post. G


Thanks, GGG. You are correct, when I put my finger over the main smoke stack and hit the blow off button its pours out the smoke chest the way I would expect it. Otherwise running the train normally or at a stand still the steam chest seems to loose its strength and blows out substandard.
I think its a mixture of the kinked hose and not having enough wicking in the chamber? I did notice that Lionel put parts up for the engine online so I will have to do some ordering. Bad part is I only set up my trains around the Christmas tree then take them down so it will have to wait until next year... Jeff
Jeff,
I highly applaud your audaciousness!
I had an earlier thread that got removed after a repeated lambasting for taking apart my engine, voiding my warranty, and not reading the instructions, etc.

I would ignore the nasty spitefulness and continue in your work.

I have repaired mine for a third time last week. The fan motor for the stack side was rubbing on the gasket, thus the board was shutting down the fan motor for drawing too many amps.

I am sure you and I could compare notes... do you have a digital multimeter?
It would be interesting to see how many ohms you are getting out of the new resistor.
I had the same kink in my tube, and I had plenty of smoke, Check to see if your fan is working, opening is not blocked, and the wadding comes around the resistor.

Keep up the good work.
Try measuring the voltage on the pc board side and at the resistor, can you toggle low, med, high? What voltage reading do you get. I notice my stack side was stuck in high mode, causing my resistor to just fry. I was lucky and caught it before the PC board melted.
I did a reset and now it toggles.

The inlet gasket at the fan is over shadowed/ offset on mine. the impeller drag you can hear when the smoke is toggled on and off. I slightly oiled the fan motor, but I will have to trim the gasket bake a little better like you did.

I did notice the tube below the smoke unit came right off, the silicon seal between the tube and casting was just not working. So I took some double sided sticky gasket material. Rolled a small piece like playdoh and created my own O-ring. Now the tube stays in the casting and does not leak.

Pick up a needle applicator for the smoke bottle, and some of Jeb's Megasteam.
It seems to wick better to get to the other reservoir.

You know what would be cool is to add the whistle smoke feature to this engine.
There is plenty of room.
quote:
Originally posted by jmik26:
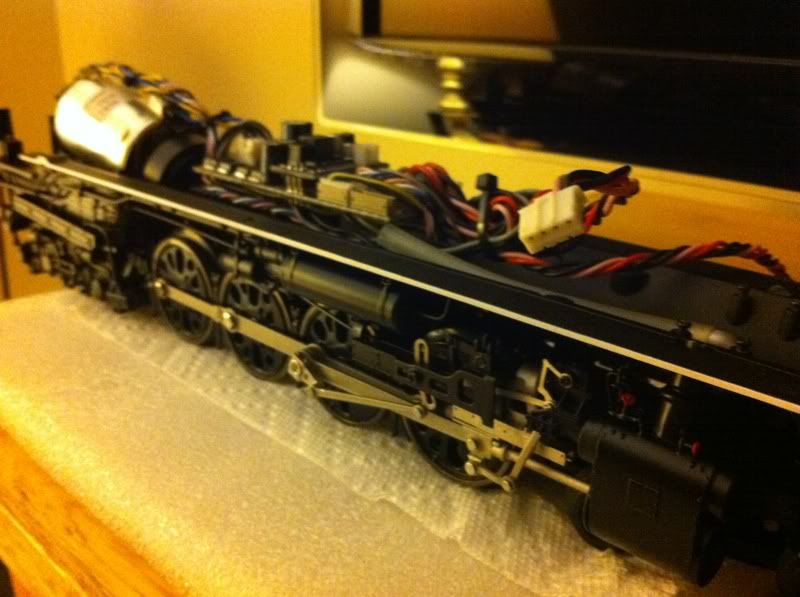
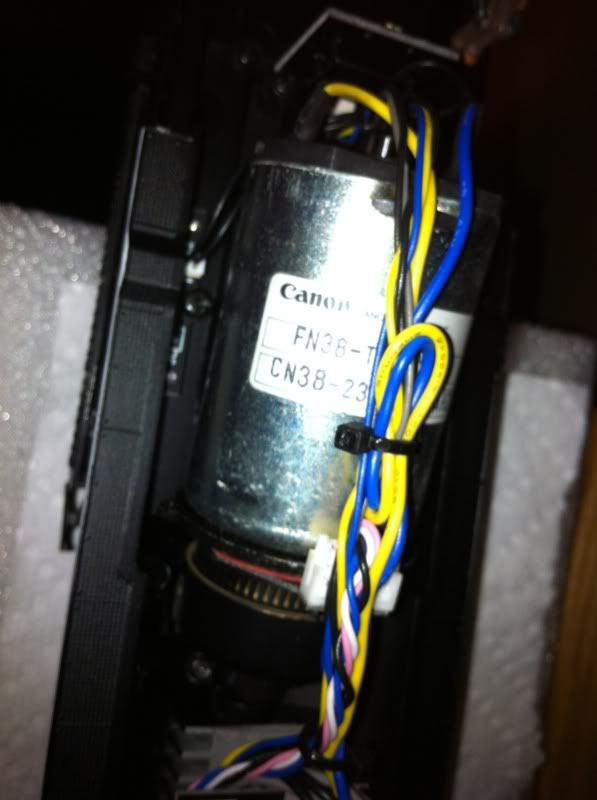
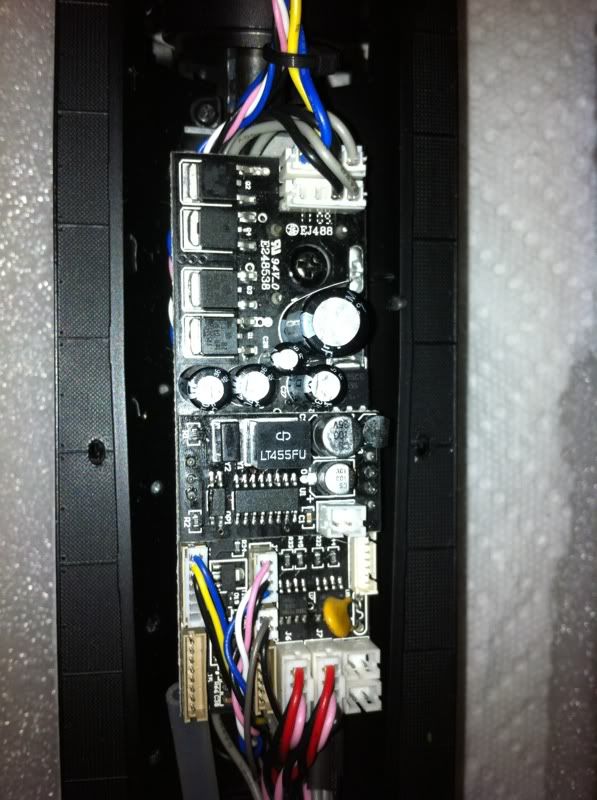
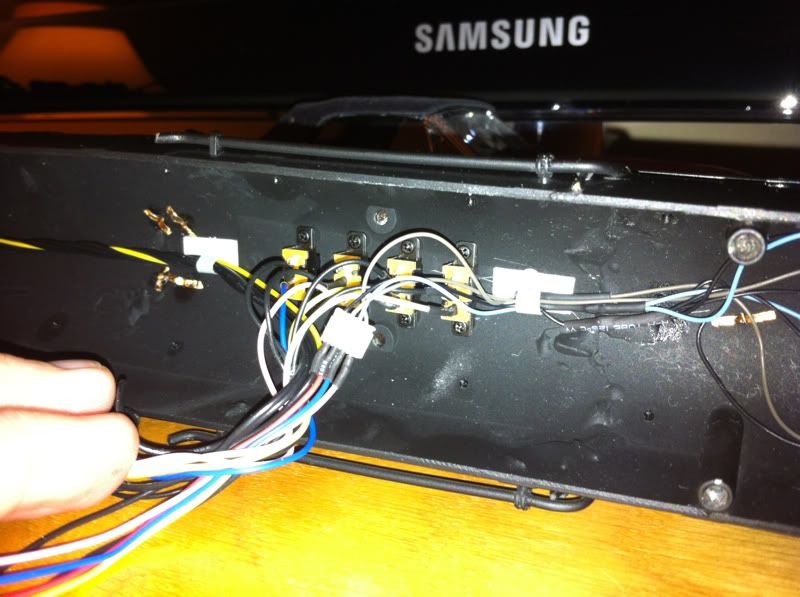
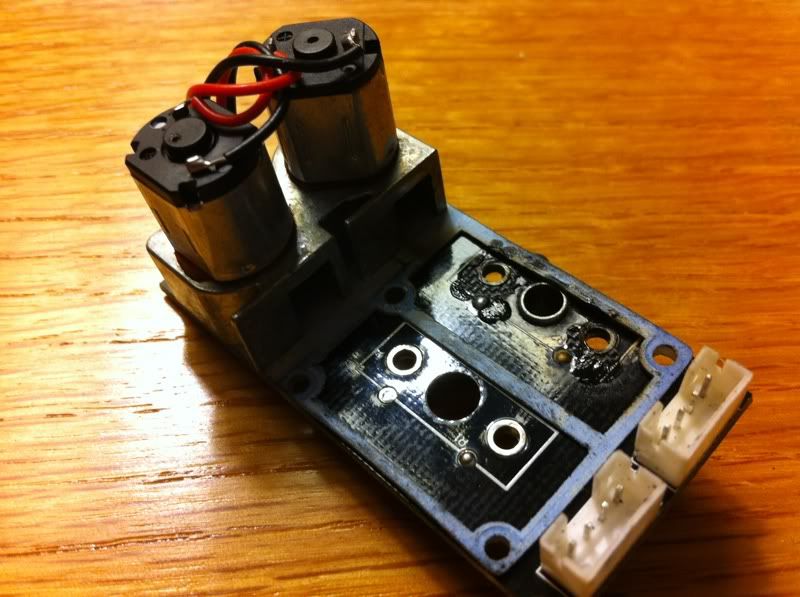
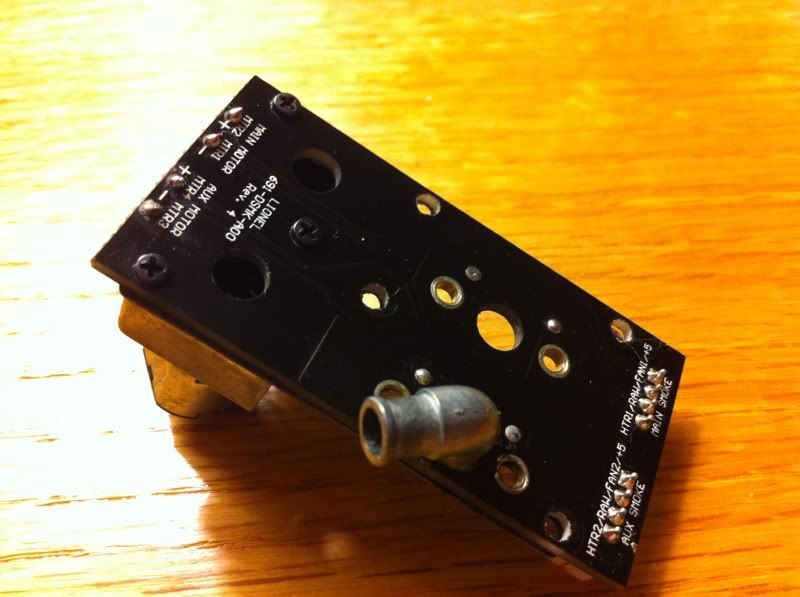
I had the pleasure of running this beauty for a short time before the steam chest smoke resistor went out. I am hoping its a fluke but others seem to be having issues and I thought I would share what the inside looks like. I would HIGHLY recommend you not taking this engine apart as it voids your warranty. I didn't know that and now I am stuck doing the repair on my own. Anyways, here is some pics... Any question feel free to ask, I will help as much as possible... Jeff


hi jeff: i have been trying to remove the shell. it is stuck on the front by the the two wire inserts ( i removed the front headlight) and still stuck. on the rear it moves 1/4" up and is stuck by the rear cab. please tell me how you removed it. thank you.
I had the same problem Jeff with my 2 engine and what I did was to fix it was to take the pcb board off and then you have the smoke chamber and divider, you want to pull the divider up flush if not a couple hairs above the chamber that way when you put the pcb board on it will push it down flush. I also took and put a little more batting in and presoaked everything and just the presoak took 4ml and an additional 2ml after it was put together. As far as the steam chest hose kinking I straightened the elbow out from the pcb board and re-glued it in. I then took the hose for the steam chest and routed it between the fans and it made the bend a little better. when all ways said and done and back together it smoked like no ones business I mean the smoke pours out so much that on low it still is thick and the steam chest comes out strong now and thick. It no longer chuffs out the steam chest or blows harder thru the stack when pressing the button for steam chest smoke. Do this what I said and you wont go wrong you'll solve all your problems well almost all your problems. I also did this to my prr texas and it resulted in the same amount of smoke and reliability. You really need to presoak the batting it will help immensely with this type of set-up. also note that I put 2ml in the smoke unit after a run so it will absorb overnight and i have about 5 hours on the engine after the repair and its still going strong. Good luck
quote:
i jeff: i have been trying to remove the shell. it is stuck on the front by the the two wire inserts ( i removed the front headlight) and still stuck. on the rear it moves 1/4" up and is stuck by the rear cab. please tell me how you removed it. thank you.

I had the same issue and I removed the engineer he gets in the way and you just have to pull up on the back its a very tight fit with the ends of the brass detailing folded over inside the cab area rubs againest each other making hard to getting it off but keep working on it you just have to pull up on the back first or vice versa pulling up on the front just make sure the lip clears the smoke unit before pulling to hard but it finally gives. It fought me for awhile but now after doing it a couple times its real easy.
quote:
Originally posted by LORDtryzAlot:
I had the same problem Jeff with my 2 engine and what I did was to fix it was to take the pcb board off and then you have the smoke chamber and divider, you want to pull the divider up flush if not a couple hairs above the chamber that way when you put the pcb board on it will push it down flush. I also took and put a little more batting in and presoaked everything and just the presoak took 4ml and an additional 2ml after it was put together. As far as the steam chest hose kinking I straightened the elbow out from the pcb board and re-glued it in. I then took the hose for the steam chest and routed it between the fans and it made the bend a little better. when all ways said and done and back together it smoked like no ones business I mean the smoke pours out so much that on low it still is thick and the steam chest comes out strong now and thick. It no longer chuffs out the steam chest or blows harder thru the stack when pressing the button for steam chest smoke. Do this what I said and you wont go wrong you'll solve all your problems well almost all your problems. I also did this to my prr texas and it resulted in the same amount of smoke and reliability. You really need to presoak the batting it will help immensely with this type of set-up. also note that I put 2ml in the smoke unit after a run so it will absorb overnight and i have about 5 hours on the engine after the repair and its still going strong. Good luck


Awesome!! Thanks for the help. Lot better then redesigning the wheel.. Jeff
quote:
Originally posted by LORDtryzAlot:
quote:
i jeff: i have been trying to remove the shell. it is stuck on the front by the the two wire inserts ( i removed the front headlight) and still stuck. on the rear it moves 1/4" up and is stuck by the rear cab. please tell me how you removed it. thank you.

I had the same issue and I removed the engineer he gets in the way and you just have to pull up on the back its a very tight fit with the ends of the brass detailing folded over inside the cab area rubs againest each other making hard to getting it off but keep working on it you just have to pull up on the back first or vice versa pulling up on the front just make sure the lip clears the smoke unit before pulling to hard but it finally gives. It fought me for awhile but now after doing it a couple times its real easy.


Same thing for me, remove the engineer. If you take your index finger through the window and thumb through the back you can wiggle him up and off. After a couple times I was able to lift the front of the shell enough to clear the smoke filler stack then shift back and up. Hope that helps... Jeff
First I'll apologize for not reading all the post's. I had a new Legacy engine with a smoke problem and at that time was not aware of the "Don't open it up policy"

I talked to the guys at Lionel, may have been Mike I can't recall . He just said "TRY" not to do it again cause it'll void the warranty and gave me an RA to send it back.

Those guys know we mess around inside these things and most of us are savy enough to not just start rippin stuff apart.

But as complex as these gizmos are .,I'd just bite the bullet on this one and send it to Lionel then you'll know it's right when you get it back.
If someone has already said this then just call me Echo Big Grin
Good Luck

David
LOL... personal! The challange

It took me 30 minutes to figure out how to open her up.
Removing the screws took seconds! it was figuring out the figures had to be removed, then there was a balancing act between the slipping the cab running boards over the boiler running boards at the rear, while slipping the stack extension out of the boiler... just go slow... you will get it...

I got a new S3, #267, today and the blow down on it never worked very well outoff the box. When I first turned on track power, I could hear the smoke fluid sounding like it was cooking inside with a bubbling sound. After about 30 minutes of running and then coming back to it later in the day, the smoke unit still wasn't great and the blow down had stopped all together.

I decided to take the engine off the track, put it in my cradle, and blow down the holes under the cylinders. The first time, it didn't help. The second time, it did!!! There must have been some fluid obstructing I the tube.

Sure wish I'd have read this thread earlier. She smokes out the top and bottom just fine now.

One other note, the cab light was flashing 5 times when the blow down fan wasn't running. The book had no code for 5 flashes.


Cant wait to take her over to Chuck's and run a doubleheader with the 261!

Post

OGR Publishing, Inc., 1310 Eastside Centre Ct, Ste 6, Mountain Home, AR 72653
800-980-OGRR (6477)
www.ogaugerr.com

×
×
×
×
Link copied to your clipboard.
×
×