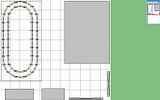
Well I'm finally doing some serious planning with the RR Track-Lite software and this is a crude mock-up, but here is my initial draft plan (in a clickable thumbnail)...


This may be a bit unorthodox as I've included the whole room in the layout, and as the title suggests...space and seatin are limited   We live in a relatively small 1950's tract home with rather small rooms.  This guest bedroom being the smallest (10'x11'), but for the time being it's the only suitable place for a permanent setup.


The gray shaded objects are a couple display cases that will be staying and the bed that must stay in place (mainly for my sister who travels up from south Texas twice a year and stays with us).  The ex'd gray spots are the doorway on the righthand wall and a closet with bi-fold doors at the bottom right of the pic.  Only things absent are the 3ft windown that would be on the backside of where I've put the table, and possibly a very small night table beside the head of the bed.  Sorry if it's a bit unusual to include the room/furniture in layout plans, but I'm want to give a feel for the constrainsts and basically solicit opinions on whether or not this just seems like a 'bad idea'.


It took me a little time to figure out the software and mock this up, and then convert it to a jpeg so I could post it, but this is basically what I've got to work with.


So please let me know what you think.


Among my ponderings are; the 8ft length (the 4'x8' rectangle outlines the layout table footprint...I thought about going down to 7ft, but really want the longest straight aways I can possibly manage); I'm also not sure about what a good height for this would be, so any thoughts on this would be a great help (I was thinking 32" to 36"); and lastly I welcome any concerns, ideas or outside the box suggestions.  The track layout is two simple ovals for illustration and a starting point, and demonstrates my limit of O42 curves.


I've obviously not left much room to get around the layout (mostly down one side) as well as not alot of aisle space so these might be additional concerns as well, but unforturnately just not a lot of room to work with there.  This will be mostly for running initially with maybe some real simplistic modelling.  Again, I'd be glad to hear any and all thoughts or opinions on this plan.

Thanks again for all y'alls help getting started.

Robert


PS the green field off to the right is just from the pic capture or conversion, and not part of "the plan".

Original Post

Replies sorted oldest to newest

I don't know if you can rearrange the furniture in the room or not, but if you could...


how about making the layout hinged onto the wall like a Murphy bed? If you made it to where the hinges were higher than the top of the bed, you could have the layout in place   when the bed is not needed, then for that two weeks a year, you clear the trains off the table, fold it up, and theres the bed for your guest.


just an idea, I don't know if it would work for you or not.


J White

Have you considered a Lift up withe cables from the 4 corners to the rafters?

You can move the bed to room center along the top wall and have a full walk around that is bigger. And when the guest shows up, crank it up near the ceiling and she has a whole room.

Only loss is any ceiling mounted lighting during guest visits, so you will need a couple decent lamps.

Designing a layout in a confined space is a challenge, but a lot of fun, too.


I would recommend staying with 8 feet if you can.  Long straights do matter. 


Once thing to consider.  I have seen layouts in small rooms made that "fold up" like a Murphy bed (see photo below - the bed folds up into what looks like a big cabinet.  You could built the thing the entire length of the wall and have it fold down.  Thus you could fold it up and use the room, but fold it down and leave very minimal space for anything else, making it perhaps half a foot longer at the bottom (looks like you have a little room more than 8 feet).  Further, if you also replaced the bed you have with a murphy bed, you could then make the fold down layout 8 x 6.  Costs more but gets you more space.


It will be a fun project, I know.  Good luck, whatever you decide. 


chesterfield_beddown

You might want to provide for a way to reverse the the travel of your trains and maybe a siding. It would add alot of operating interest. Your going to need a way to reach the back of the layout. 30" is about as far as I can comfortably reach.  There are lots of great plans for a 4x8.  Height is a personal preference. I don't like looking down on the tops of trains. I like my eye level as close to the action as possible. Kind of like the perspective you had as a kid lying on the floor. 

I have a great idea for you. Build a three-foot wide shelf all the way across one wall and make it high enough to go over the furniture. This is exactly what I have done with my current winter home project layout:

https://ogrforum.com/d...nt/10440673242762760

I've also included overhead shelves as part of the project. I have no attachments into the walls so it can all be easily removed if necessary. The framework wedges between the end walls and the floor and ceiling, so it is all solid and secure without putting any anchors into the walls.


Three feet wide is enough for O31 curves and it doesn't monopolize the room space as much as a four-foot width.


My table height is 52", good for stand-up viewing. Sometimes I use a step-stool to work on the layout further back. There is enough room under the layout to sit at a computer table.


You done good to show the entire room plan because it makes sense to multitask the entire room space as best you can. I'm not entirely sure about your window positioning and whether you might be able to reposition furniture to put a long narrow layout along the longer wall which doesn't have a window?


2012-2426-train-table-3x11


This is my current O27 track plan.

Oval-and-loops-32x138k

100_2522


I see in your previous post that you want to run passenger cars on O42 curves. With the limited space that you have available, what you might consider is ... have the passenger cars on display on the layout, but get smaller equipment to run on O31 curves. I have that sort of limit on my HO railroad because the curves aren't wide enough for long passenger cars and I don't want to use more space for a larger layout.

Attachments

Images (3)
  • 2012-2426-train-table-3x11
  • Oval-and-loops-32x138k
  • 100_2522
Last edited by Ace

Thank you J White, Russell, Lee, Mike and Ace for the responses...these ideas are great, and jus the kind of brainstorming assistance I was hoping for.


I had pondered putting a murphy bed in this room before I got bit by the train bug, but 'murphy-ing' the layout table is a horse of a different color.  I've got table saw, router, power miter, etc, etc...that could even make a large cabinet fixture look quite presentable in the long run.  Adding a little trim and molding work with some display items set high on the cabinet and maybe even a train mural on the underside of the table that's viewed when it's all closed up...sounds down right lavish.


And the idea of access around or across a 4ft width layout are duly noted as well.  I just laid out a 4ft tape from the wall and even with my apish length arms, reaching the backside would be a challenge without a step and some leaning even at a lower height.  This is a very important consideration now.  The scale of the objects in the layout above should be accurate, and I can indeed rearrange the furniture.  The only boundaries being the room and closet doors, and the 3ft wide window I forgot to add on the left hand wall behind were a fixed table might sit.  In fact the queen bed that was being used in (or ate up the room) is already leaning up against the wall, and the plan calls for a full size instead.  Don't think I could get by with half a twin in there, but it was a tempting thought.  The full size should come in right at 4.5ft x 6ft (as pictured), combined with my hopes of a 4ft table width/depth and the short wall lengths in the room led me to the above configuration...but nothing is set in stone yet, that's for sure.


The idea of a higher suspended fixed table or upward retractable table would definitely free up some real estate.  I saw a youtube video where someone even mounted a narrow shelved track not far from their garage ceiling.  I do want to consider 'average' viewing height (seated or standing) of both mine and any would be spectators in all this.  The cable idea even got me thinking about reverse telescoping legs, or I guess ceiling struts in this case.


The layout ovals are really just a jumping off point for now, and I really want to manage an O42 ciruit of track, if at all possible, to be able to run these MTH 70 cars I received that got me started here.   My other big piece, the new MTH SD70ACe, does in fact run on O31 fine with the floating axles, but would also look much better on the O42.  It's a monster.


I started the weekend searching Craigslist for a suitably sized dining or conference type table to use, but thanks to the 3 day weekend and thoughts mentioned here I just might grab a 3/8"-1/2" sheet of 4x8 plywood and frame the backside with 2x2's tomorrow.  I figure if I just set it in the room on some compact sawhorses I have I'll at least get a much better feel for all this, and the wood could be repurposed in the final plan.


So please keep the ideas, opinions and suggestions coming forum members as I spitball this as they are greatly appreciated.  I can see a melting pot of a plan starting to come together. 

Robert

You can have a lot of railroad by running trains on twin tracks on a shelf above the casing on the doors and windows--about 12" height clearance in the average home. Elevating the rear track solves the line-of-sight from the floor problem for small viewers. However, it is definitely for running and display----scenery is limited to corners and wall flats.


You certainly have the wood butchering equipment to do the work. Efficiently ripping 3/4"x4x8 plywood into 11-3/4" wide straight-away shelves can which handle the twin tracks. In the corners you can have very wide curve arcs depending on how much of the "mezzanine" overhang effect you can tolerate out from the corner. On one I helped build during the early '90s, in a 13x15 Tennessee Condo bedroom, we cut the corner sections 48"x48"[minus sawcut] and then "curve cut" the front edge 072 from the 11-3/4 wide straight ends, edge-to-edge----a corner section that enabled setback and clearance-spaced curves of 080++[using flextrack].


Definitely a lot of corner overhang but wide curves is what he wanted because he had just bought a new MTH diecast Challenger and some 8-driver Steamers. But with the cantilever strength of 3/4 ply the corner overhang is not difficult to support with brackets. Three sheets of ply built the whole thing[4+4+8=16' wall coverage].


"Step ladder" railroading is not for everyone but it works if running trains is ones preference. I did it for 15 years in the Kitchen of our mountain cottage when wife deeded me the wall space to get me up off her Den carpet.

Fuzzy photos below.

'92 Shelf Layout 001

5-Track Shelf Layout-001

Shelf Operation-Mtns. 001

Attachments

Images (2)
  • 5-Track Shelf Layout-001
  • Shelf Operation-Mtns. 001

Thanks for the reply Dewey!  That is some nicely finished out shelving and bracing.  Did you have to do any cleating or supporting between the bracing (I'm guessing the braces are located on studs), or did the 3/4" plywood handle the spans okay without too much movement?


Mounting high on a shelf in an around the room layout would certainly give the least impact to the very limited square footage, but I'm a bit concerned how much it might limit the 'hands on' and viewing.  I have been wondering how folks with the hip height around the room shelves/layouts manage the doorways (not to mention them opening the right way).  A removable section, a drawbridge length, or just duck and scoot?  If I went with an 'around the room' layout I think mine would certainly have to be at the top casing level to avoid the span of the 3' bifold closet doors (as well as their projection ouward) and the narrow corner right before the room door.


I'll certainly be up for managing with a step stool as much as necessary if that's what it takes, because right now I am definitely most interested in being able to run regularly.  Thanks for sharing your ideas and pics!

Robert

You may want to consider dividing your space into "scenes" or "neighborhoods" or "vignettes" so the viewer's eyes are diverted at times to different things.  This will make your layout look bigger by itself.  I successfully used these ideas on my 6 X 15 layout.  You could probably use a similar approach in a 4 X 8 layout.  (Heck, my high school layout was 4 X 8 during my freshman and half of my sophomore years; then it got an extra 4 X 4 extension to form an L-shape.) I'm thinking you should be able to install some switches to connect both loops and also have a stub or two somewhere else.


If you look in the diagram below, you'll see the "missile railcar base"with three stub tracks inside the blue line, but across the boulevard there's another scene of a passenger station.  To the right is the "downtown" with a refinery, a freight station and a few other scenes.  At the very front right corner is a lighthouse. 


Scenery Design - 8 Dec 09 - Lighthouse Point RR 6 x 15 - 3D View


Another way to make the most of your space is to "stack the scenes" from the front to back of the viewer.  Take a look at this photo where there are three separate scenes -- downtown, the freight station terminal area and the refinery---in about three feet of depth from where the red car is to back edge of the layout (just one track and a couple inches over from where the steam locomotive is on the inner track.)  A side benefit of this approach is your trains "disappear" for a little bit as they run behind whatever is in front of them.  (You didn't notice the steam locomotive until I pointed it out, right?  It's hiding in plain sight so to speak.)  Maybe you couldn't go three scenes deep, but you could probably get two deep on a four X eight layout.  (Take a tip from movie directors -- just pay attention to what you can see in front of you and to the left and right of in front of you.  This is called the "three walls" approach.  The "fourth wall" is the viewer himself/herself.)


Two bucks worth of Low Rider Pickup Trucks from Dollar General at Diner


Since you're space-constrained, you may also want to think about the overall arrangement of your layout.  I learned on this one that a road that runs diagonal across part of the layout, right to the edge, makes the layout look huge to the viewer. see the photo below.


0705101409


And, yes, I love long straightaways, too!  The trains look great on them!

Attachments

Images (3)
  • Scenery Design - 8 Dec 09 - Lighthouse Point RR 6 x 15 - 3D View
  • Two bucks worth of Low Rider Pickup Trucks from Dollar General at Diner
  • 0705101409

Thanks for the replies and especially the pics Dewey and Pat!  I really enjoy getting a visual on different space constrained options as I draft a plan.  That's a great attic layout Dewey and reminds me of my younger brother's that I helped him rough out a few years back.  He's already interested in trains, so maybe I can presuade him into building a similar layout in his attic for a bigger place to run....hmmm.  Your "Domestic CEO" was right though, not that you didn't already know that   ...it fit in & finished out great! 


I like the third wall and run-on design effects on those Pat.  Although I'll probably keep the modeling very simple like astro turf and such as I get started, I wouldn't mind experimenting with some modeling as I go.  In fact I had picked up some of those thick rubber, foam interlocking 2' x 2' shop mat squares to use while running on the floor at first, and was planning on using them on the test table for acoustics.  Now you've got me thinking how I may be able to use them on the 4'x8' test table (that unfortunately I didn't get built this last weekend) for some simple modeling as well.  Maybe ovelaying them with sections of astro turf later and maybe even carving and painting some textural reliefs into their surfaces in areas for further dimensional effects.  This will be my first foray into layout modeling as well, so keeping it on the cheap and testing theories before I nail down a permanent layout and track plan would be great.


I came across this page on the web with a few 4'x6' layout plans in O42 (just slightly smaller than what I have planned to start).  Adding to the ideas put forth here that further convince me I can end up with a nice little layout in this space. 

http://www.thortrains.net/marx/464201.html


Although as Lee noted above, I do have a little more than 8' of length to work with, I'm hoping that building the 4x8 temporary table top to start with, will be a good test for sizing and designing the permanent layout in this small room...really getting the feel for it.  With any luck I'm planning to get it up and 'running' by this weekend and before the bed gets sorted out so I can try it in a couple different spots.


I ordered just enough O42 curves and the few straights I need from ModelTrainStuff to setup the the two ovals and finally get to see the '70 Amtrak cars I have run.  I'm sticking with realtrax for now since the two starter sets I picked up (MTH's PRR 4-6-0 & N/S SD70) came with O31 ovals plus I have a third oval that came with the z750 I got for convential running.  I figured I was already invested in this type for the time being so I threw in a 90* cross for good measure to setup the figure 8 option on the inner loop at least.


Phase 1 would be to start with running conventional on the outer loop and the DCSRC on the inner then pick up a couple a couple switches at some point and experiment with track plans in conventional (at least until I can swing full DCS...maybe later this year), all while experimenting with plans for building the permanent small space layout, or Phase 2.  I think being able to stay 'running' will be a key incentive for me.


So you guys ideas have already got me thinking and planning alot more than I did initially, and hope you'll continue to share them as this plan evolves.

Robert

I’m limited in space too. In the past my solution has been to build from the ground up starting with a simple 8 x 4 display. I got tired of lying on the floor to work on the trains, so I’ve gone couple years without a full time display.


We enjoyed this years Christmas display so much that I’ve decided to move it back into the bedroom. I built a table on a foundation of 14 ball casters so I can roll it away from the closet doors and have a walk around setup. I also went around and measured our furniture so if I want to move the location in the future the display will be able to roll over any end tables or night stands.


When completed we’ll have a  9’ x 5’, 4 tiered display with 5 simple loops, plenty of room to accessorize and the ability to add at least two more rail lines in the future.

Thanks for the reply Matthew!  Casters are another great idea.  That could make for a fairly mobile or convertible setup.  I could see building a couple small cabinet fixtues (or heck just find a suitable pair at a builders' surplus), mount casters on them and have the table top just resting on them.  When space is needed just lift off the top, lean it against wall and roll the fixtures out of the way...drawer type fixtures would give some dust free storage space to boot.


Great Christmas Layout on your youtube vids...that's a lot of trains in not alot of space

Brainstorm idea for you: Build a 54"x 72" layout directly over the bed, with aisles on three sides. Bed mounted low or on the floor. Put the layout fairly high, about chest height, supported at the corners, and work on it from a step stool. When guests come, disguise the layout as a canopy frame over the bed. A 54"x 72" layout table would be big enough for a double-oval with O42 minimum curves. With the guest bed and layout on the same footprint, there would be enough space left in the room for a desk and work table. 


To put the mattress at a more conventional height, mount the layout higher and use viewing platforms that slide out from under the bed. Look at a bunk bed frame to figure out workable dimensions with the heights. Or perhaps the layout height could be adjustable on the corner posts.


Otherwise your room will be really crowded in there with a 4x8 table and a bed taking up much of the floor space.

Last edited by Ace

Hi Dewey,

Well sir, you've convinced me...now if I can just persuade my sister on the merits of that approach


Thanks for the tips Ace and Garfield...a collapsable or temporary extension to the permanent table would be a real nice feature, and I like Matthew's conversion of his tiered style christmas layout to a mobile version complete with tunnels.  I really hope I can get the temporary/test table top up today as the O42 and other track should be in tomorrow.

Thanks guys,

Robert

I finally settled on a very simple, quick build design/set-up to get up and running on a more permanent basis with the test table.


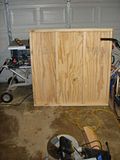
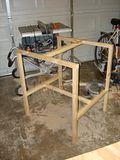
I opted to do two 4' x 4' table tops on very basic frames.  All relatively light, 2'x2' frame and 3/8" plywood, which can be quickly disassembled to gain space.  The tops sit loose on the frames for now to experiment with location in the room but will also allow me to condense down to a single 4'x4' table if the need arises and still be able to run  


Was finally able to get two of each knocked out this past weekend.  Looking forward to laying some track, running trains, and seeing how things evolve from here.

Robert

Post
×
×
×
×
Link copied to your clipboard.
×
×