Hi guys,

First post in a while, I'm slowly getting back into the train game after nearly seven years of dormancy - my how the hobby has changed in that time!  I've done a bit of searching through the forums and found some old posts circa 2014 around custom painting, but they didn't really cover specific tips or tricks, and perhaps someone can help me with decals/ideas for the specific paint scheme I'm looking to do.

I recently picked up an MTH Premier NS AC6000. While I don't dislike the NS black and white paint scheme, I don't love it either.  I was thinking of repainting the locomotive into BHP Billiton colors, both because I love the paint scheme and as an homage to the few years the missus and I spent living Down Under (full disclosure, we lived in Melbourne so I never actually saw the real live thing in-person). Here's a few photos of the paint scheme I'd like to mimic:

BHP AC6000

BHP AC6000

Certainly not a simple scheme, but I'm thinking with appropriate masking and some patience, the missus and I could pull it off.  A few questions for those who have far more skill than I:

  1. Is it required that I strip the current paint on the locomotive or can I just prime and paint over?
    1. If stripping the paint is required, what's safe to use on the plastic shell and metal trucks/fuel tank?
  2. Being a complete novice, I'm not sure whether the best approach for this would be spray or brush. I'm inclined to say spray for a clean finish, but am open to ideas
  3. I understand decals will likely be the most difficult part of the project. I'm thinking for the orange "bubbles" and cab I could make my own masks using some careful measuring, photoshop, adhesive-backed 8x11" sheets, and an Xacto knife. For the lettering, I'm thinking I could get creative, potentially with the inkjet printer decal paper and Photoshop
  4. Should I wish to leave a job like this to a professional, can anyone provide a ballpark estimate as to how much a job like this would run? Note half the appeal of the repaint to me is the project and learning opportunity rather than the finished project, but nonetheless, I figured it's worth the ask.

Thanks in advance for the constructive input, I appreciate the help!

Original Post

Replies sorted oldest to newest

The AMC man has good advice. If you could size an image to the locomotive, you can print yourself some templates to either cut the orange film or mask the orange paint and paint the green on top. Depending upon the paint you use, I've just sanded the lettering or stripes smooth as sometimes they are near impossible to strip. The factory paint job makes a nice primer coat! Keep us posted!

Another thread: https://ogrforum.com/t...iton-iron-ore?page=1

Last edited by BobbyD

"I understand decals will likely be the most difficult part of the project. I'm thinking for the orange "bubbles" and cab I could make my own masks using some careful measuring, photoshop, adhesive-backed 8x11" sheets, and an Xacto knife."

Yeah, sure (and an Xacto knife will indeed become your new best friend) - but one of your other new best friends should be model masking tape - Testors makes it, as do others such as Tamiya, but Testors works and is probably cheaper. I comes in narrow widths and may well curve adequately for many of the patterns you need. The details will be the challenge on the loco sides with any making tape.

I am in the middle of a GM&O DL-109 paint job and the Testors tape was a help on the nose - an Xacto knife can cut where you don't want it to (ask me how I know).

In any case, go for it. You'll learn to cuss well, if nothing else. But, you'll also wind up with a One of One model.

  Work with clean hands, and wait for a full cure on base coats so you don't lift it, but burnish the tape edges with a wood matchstick or even a toothpick to help keep body oils off the paint further. Clean before spraying and avoid standard Rust-Oleum as it is thick enough to wipe out details, takes forever to dry, and doesn't play well with other paints.

   You can't really go wrong following Dave's advice.

Hi all-

A quick update on my progress - with a set of digital calipers, a ruler, photoshop, and grabbing as many high resolution photos as I could find of the prototype, I've selected my paint colors and created my decals in Adobe Photoshop.  For my paint, I've chosen the following:

  1. Primer - Duplicolor DAP1699 Gray Primer (thanks for the tip @AMCDave)
  2. Clear coat / decal sealer - Testors Spray Lacquer Clear Coat
  3. Silver - Tamiya TS-88 Titanium Silver
  4. Orange - Tamiya TS-31 Bright Orange
  5. Blue/Grey - Tamiya TS-67 IJN Gray Sasebo
  6. White - Tamiya PS-1 (for metal handrails)
  7. Red - Testors Flat Red (for small details)

Order or application will be as follows:

  1. Primer
  2. White (handrails)
  3. Silver
  4. Orange
  5. Blue/Grey
  6. Red (small details)
  7. Decals
  8. Clear coat


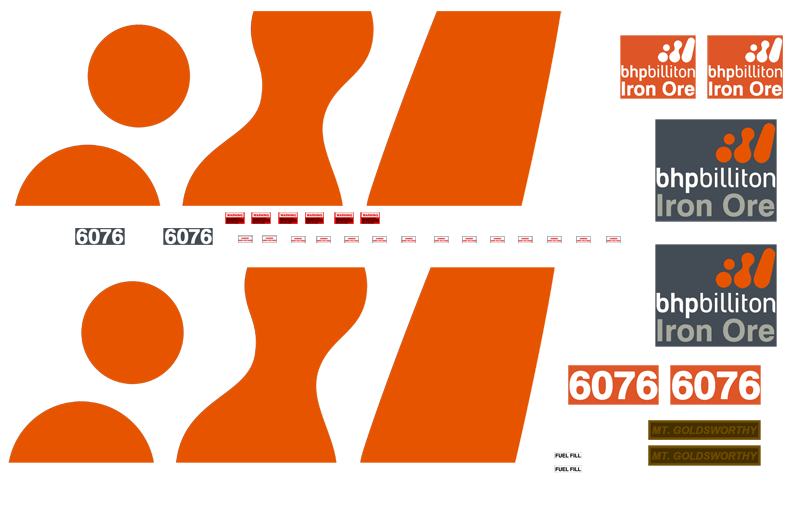
Below are my decals / masks.  The large orange "chopped" bubble logo will be used as a mask (not a decal) for the side of the locomotive.  Due to the curves of the bubble logo, I'm going to try to print the logo on adhesive 8.5" x 11" paper and use it as a mask for when I apply the blue/grey. I've also picked some Testors Model Masking Tape as per the suggestion of @D500 to help mask the silver then orange for the cab The other decals will be printed using my Epson color inkjet printer and Testors white decal paper.  I've test printed all the decals on standard 8.5" x 11" paper and "test placed" them on the side of the locomotive.  I was pretty close in all my measurements except I had to downsize the side BHPbilliton logos and the "Mt. Goldsworthy" name plates


BHP Decals

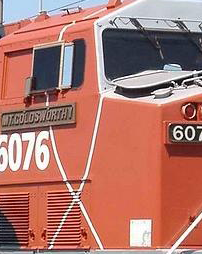
The last item I need to figure out is how to do the white stripes on the cab:

Cab Stripes

Any suggestions? I'm afraid the lines are too fine to attempt to mask it evenly, I was thinking perhaps I could attempt to free hand with a brush, but that could be risky.

Thanks everyone for the feedback and suggestions thus far! I'm enjoying the project and hoping it comes out half-decent!

Matt, I always advise someone who has never done a repaint project to start with something like a used piece of rolling stock, just to hone your skills. Better to make a mistake on a used piece of rolling stock, than a locomotive shell.

That said, I'm impressed with what I'm reading from you so far. You're obviously putting some thought and planning into your project. Still, I would advise most beginners to the world of repainting to start off simple with something that isn't going to ruin your day if you ruin the paint/decal job.

In his tutorial, AMCDave made no mention of decal setting solutions... maybe he didn't use one. I always use it, especially on cars or locos where the decals sit over molded details on the shell body.

When doing your decal application, Microscale makes a couple of different strength fluids: One in a blue lettered bottle (Micro Set) and the stronger fluid in red lettering (Micro Sol). This is one of these things you learn over time, but with most decals it is best to start with the blue bottle fluid. Then apply the stronger fluid from the red bottle to get the decals to snuggle and sit into any crevices, detailing, etc. on the locomotive shell.

I've repainted a bunch of Lionel waffle box cars and find the Walther's Solvalset decal solution to be even more helpful in getting decals to set into molded car detail.

Again this is something you learn with experience. I have found some brands of decals can take the stronger fluid sooner. Others, you will warp or dissolve the decal letter by using the strong fluid too soon. The blank stock being used now by Microscale is the thinnest I think it has ever been. It really does reduce the decal line you can get from the cut around the decal film. BUT it is also much easier to screw up the decal, being the film is so thin.

Depending on what kind of stock you are using for your decals, you may want to experiment a little before you final application. The other nice thing about the Walthers Solvaset, is the fluid is strong enough to make far less effort of removing a decal that you have screw up, or has suffered some warping in the initial application process.

As mentioned in the other thread AMCDave linked above, a good paint and decal job on even a less detailed train product can make it look more detailed than it really is. I too enjoy the process of making lesser expensive items look better than they did before... it makes the hobby more enjoyable for me and as an added benefit, also more affordable.

Thanks @brianel_k-lineguy and @AMCDave! I'm going to head to my local train store this weekend and pick up some microscale setting solution (both blue and red solutions). From reading online, it looks like my order of operations for the decals and setting solutions are:

1) Apply Micro SET with a Q-Tip or brush to the area where the decal is destined
2) Soak the water slide decal for 15 seconds in lukewarm water
3) Slide the decal into place
4) Using a separate brush apply Micro SOL on top of the decal
5) Don't touch and allow to dry thoroughly
6) Reapply Micro SOL on imperfect spots and let dry again

Regarding the "dry run," that's not a bad idea, I'll see if I can source a cheap hopper or tank car to test it out on first to ensure the primer/paint/and decals all work together and to work on my technique.

I'll post pictures/updates with my progress. Thanks again!

Nothing wrong with your method there.....I always say find what works for you!!!

I wrote this a number of years ago when I worked for a decal maker.....

Start with a clean and glossy surface. Use whatever method you like to get there. I like a clear spray like Testors gloss coat or Tamiya.

Regardless of decal type here is how I apply decals.

I cut the decal from the sheet as close to the image as possible. I have a small pair of scissors that are sharp and easy to cut around small images.

Using tweezers I dip the decal in warm water for about 10 seconds.

I place decal on a damp paper towel and allow the decal to ‘cook’ as its called. This can vary by decal paper maker. It can be anywhere from 30 seconds to a minute or two. When decal moves easily on paper backing it is ready to apply.

On surface of model put two or three drops of water. With tweezers place decal on model body where you want to apply. With your finger move the decal image off the paper just enough to use your tweezers to pull the decal paper from under the decal image. This will keep as much air out from under the decal.

Position the decal image in the exact spot you want it. With the slightly damp paper towel blot the water from the decal.

Making sure the decal is positioned in the correct spot, make a squeegee from the damp paper towel and from the center of the decal out to the edge squeegee out all the water and some of the glue. This will keep the decal from turning yellow as it ages.

IF needed I will use Walthers Solvaset decal solution. Go light as it is a strong solvent but works
Well for me.

After the decals dry for a day or two I apply a coat of Future Floor Shine with a 1 in wide soft sable brush that is only used for Future. Allow to dry overnight and all should be good!!!

Last edited by AMCDave

Hi all,

Here's a long overdue update on my progress.  As per the suggestion of some folks in this thread, I picked up an inexpensive scale Lionel Hopper at a recent train show here in Atlanta (no box) as well as an MTH premier boxcar for my test subjects. I've gone from start to finish on the hopper and plan on starting on the boxcar this weekend, time permitting.

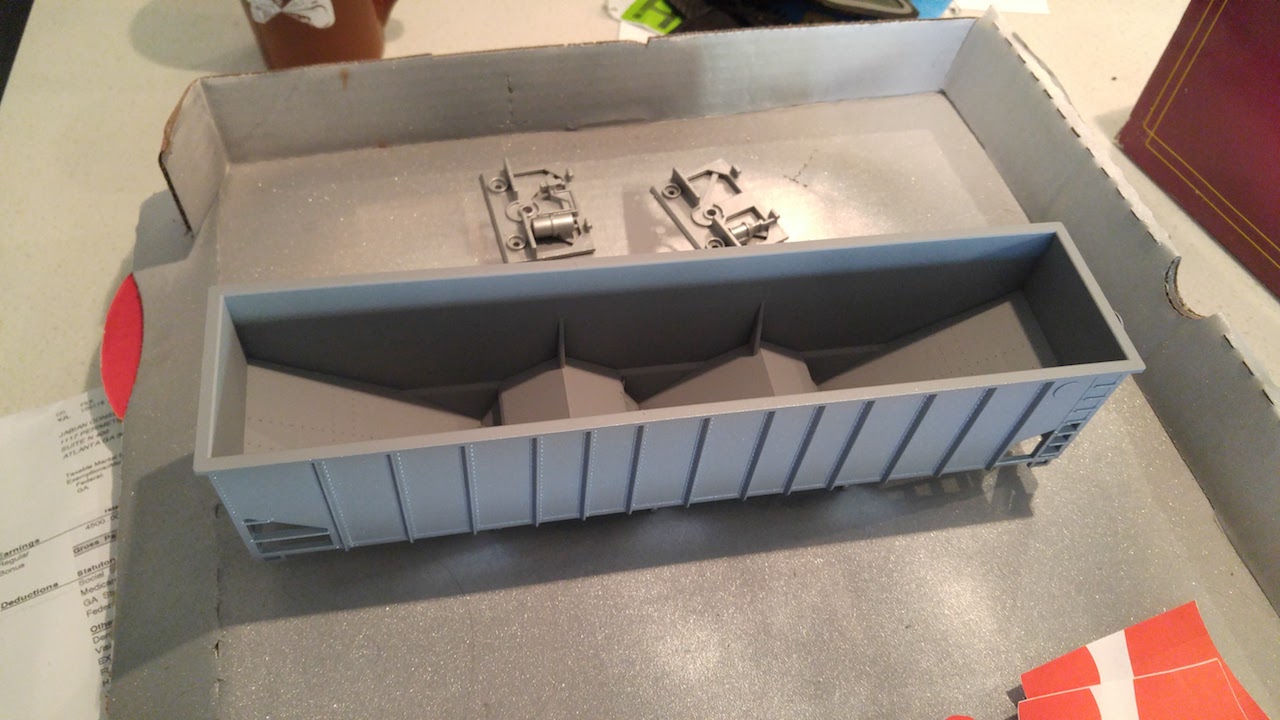
Here's the hopper, disassembled and ready for sanding:
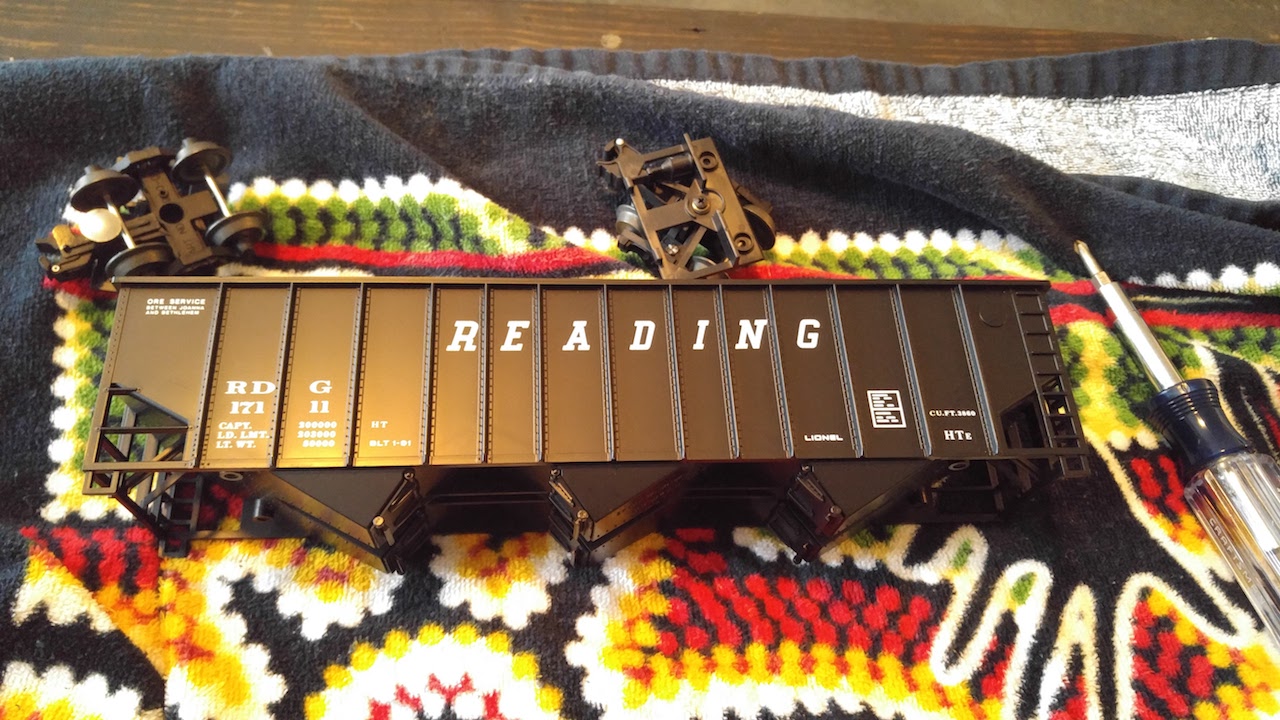
I used 1000-grit sandpaper to smooth down the lettering and decals, then hit it with about 5 coats of Duplicolor DAP1699 as primer

After priming, I applied a base coat of the silver with 4 coats, progressing from lighter to heavier coats, focusing on the bottom of the car:
I taped off the sides and bottom using a combination of Tamiya model tape, masking tape, and paper.  I hit each half of the car with a few coats of the Tamiya bright orange paint, which will serve as the orange for the BHP bubble logo.  I then printed off my BHP bubble logo mask using adhesive-backed 8.5x11 label paper.  I carefully cut out the shapes using an Xacto knife and did my best to apply the mask over the ridges of the plastic body:
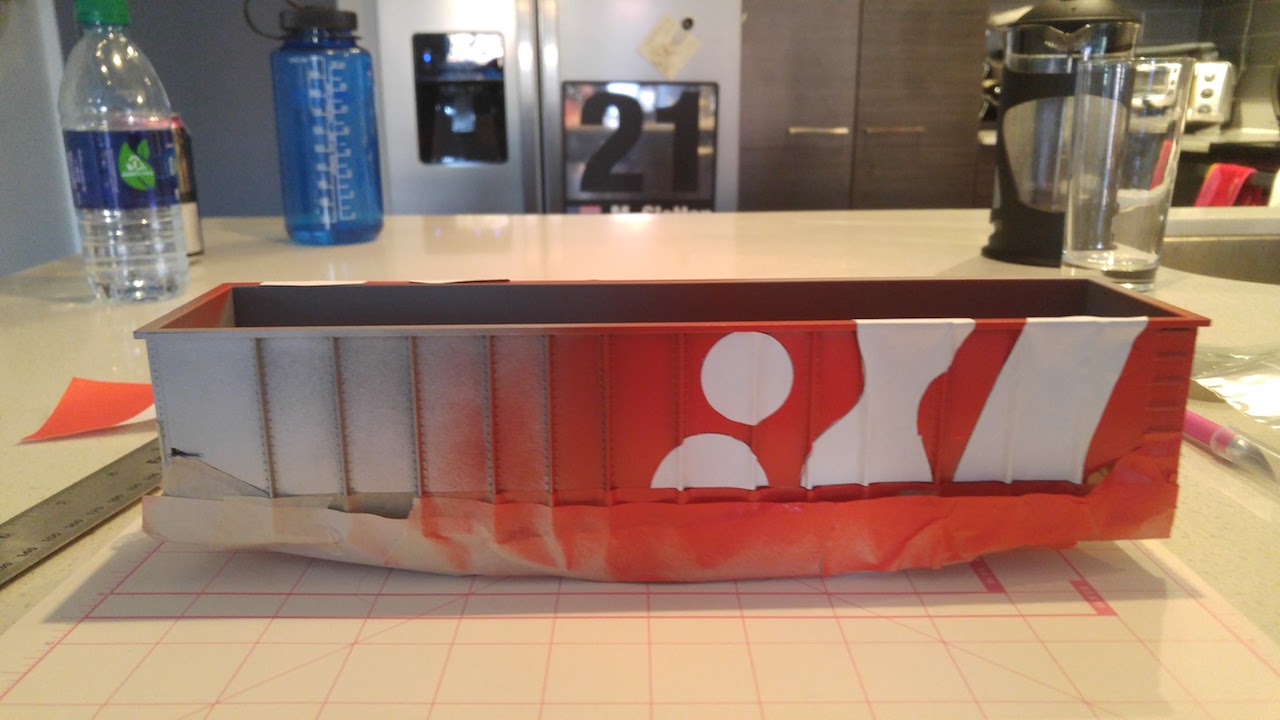
I then hit the whole car body with Tamiya TS-67 IJN Gray Sasebo Arsenal, then removed all my masks to check on my taping:

As you can see in the photo above, my model taping abilities demands more care around the ridges along with my bubble logo mask. I ended up going back and masking to hit the car again with the silver to clean up the bleeding along the ridges. I then cracked open my photo editor and put together my decals for the hopper.  I really struggled getting the color match for the background of the decals - I tried multiple approaches, including using the Tamiya color chart to sample (which was way off), taking photos of the paint on the car and setting my white balance on my camera (which somewhat worked, but no matter how evenly I tried to light the car, there was a lot of variance in the color depending on where I sampled within the photo).  Ultimately I ended up using a combination of sampling a photo of the paint on the car and eyeing the color in the color selector tool. I ended up with an acceptable result, but if this were my locomotive shell, I probably would have gone through more iterations to really tune the color right. For the boxcar up next, I plan on spending more time tuning in my colors.

I also noticed that printing on the Testors decal paper, my decals came out with a bit of orange peel texture.  This was even after aligning the printer heads and using the printer head cleaning. Moving forward, I may try purchasing newer ink cartridges and playing with my document format (e.g. printing from PDF) to see if I can reduce or eliminate this texture.

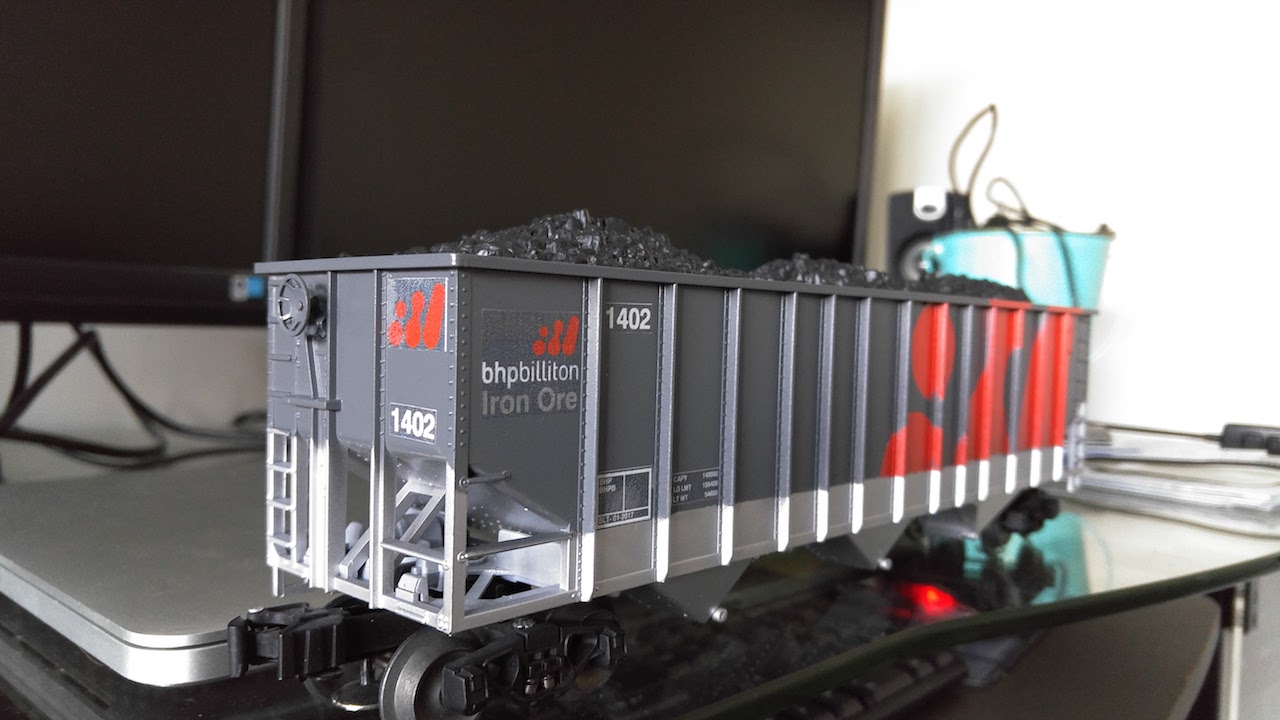
Here's the end result:
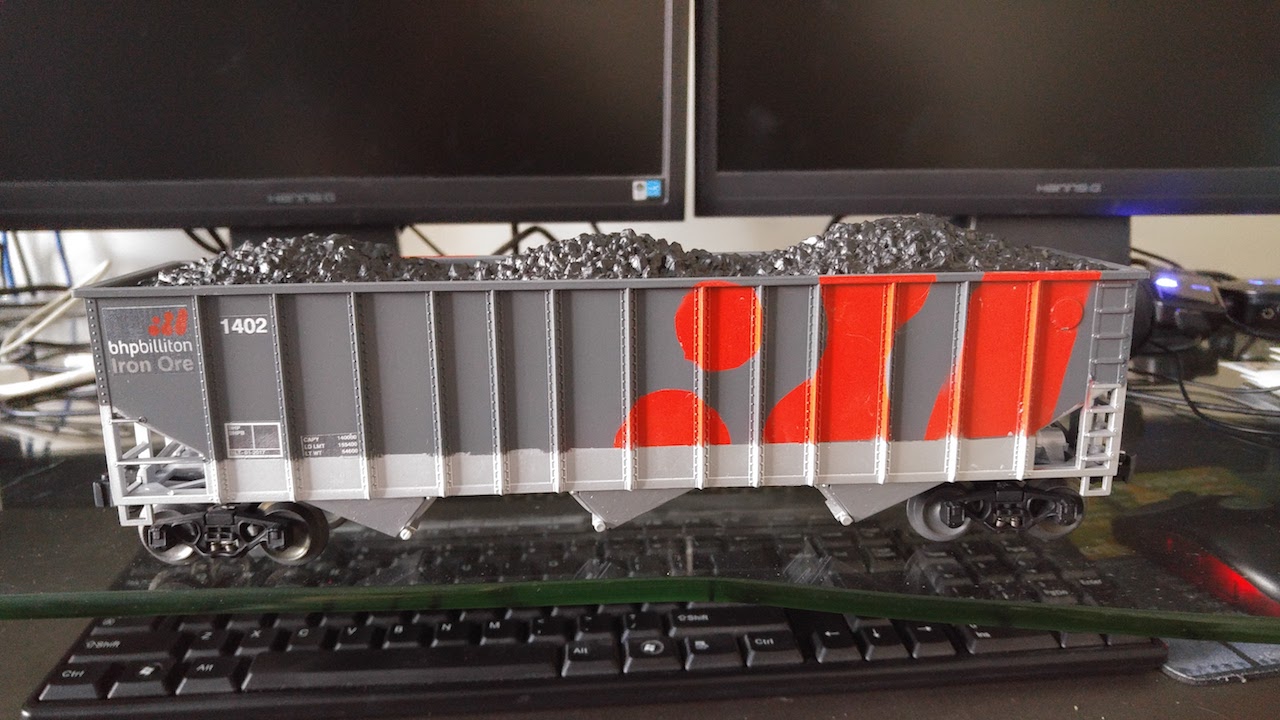
Overall I did enjoy the project and am looking forward to applying lessons learned for the boxcar up next. Depending on how the boxcar turns out will determine whether I decide to do the locomotive.  Here's a summary of my lessons learned:

  1. Don't trust the tamiya paint color chart!  From photos and the color chart, Tamiya TS-88 Titanium Silver looked to be a correct match but when the paint can arrived in the mail, I could tell it was far too yellow. To avoid this, I did go to my local train store (Legacy Station) to look for Tamiya spray paints, but unfortunately they don't carry them in stock. As it turns out, TS-30 is the correct color silver
  2. Spend some time setting up a "paint booth." As I live in an apartment, I had to do my painting outside on my concrete stoop, using a pizza box and another cardboard box to form half of a paint booth. While it worked relatively well, it proved difficult to paint with any wind or breeze, and by the end, my paint booth had collected a lot of dust and dog hair (we have a dog who loves to sit out on the stoop). Next time I may try using one big box, with the hope that the additional "walls" will better shield from wind, dirt, and debris but still allow me enough room to fully spray the car.
  3. Tamiya PS paints (for polycarbonate) does NOT play nice with the Duplicolor primer.  I had a can of the PS-41 Bright Silver paint from an RC car project last year laying around.  I figured I'd give it a try on the car and see how it turned out - it looked like it applied well, but when I went to remove my masks, the PS paint peeled right off and appeared to have softened the underlying primer. I ended up having to re-prime the car and use the correct TS paint.
  4. Masking is important and tedious - I didn't take enough care initially with the Testors model masking tape or with my BHP bubble adhesive masks and got either paint bleed or soft lines. I purposefully chose to do the hopper before the boxcar as I figured it'd be the more difficult of the two to mask, and I think I was right.
  5. Using package label adhesive 8.5x11 sheets for masking mostly works - but it leaves sticky residue. I ended up having to whip out the Goo Gone to get the BHP bubble mask off the orange base.  Fortunately it didn't hurt the paint, but it would've been nice if the masks had just peeled off cleanly.
  6. Decal background matching color is tough and requires lots of samples - see point 1 above.  Also, play with document formatting to see if the orange peel effect can be reduced. Next time, I'm going to take more care and run through more trials on standard 8.5x11 paper to ensure that the background color matches the paint on the car better.
  7. Trim decals carefully, ensuring to cut along the edge or slightly below the edge of the background color. I thought I had done this correctly until I went to actually apply the waterslide decals on the car and I could see for some of them I didn't cut quite close enough, so some of the decals have a fine white line around the edge.
  8. Print twice the number of copies of the decals that are anticipated to be required. I was one number decal short after two of my water-slide decals didn't slide so nicely off of the backing paper. I did not want to waste a whole additional decal paper for one decal

Thanks everyone for all the helpful advice and tips! I'll update the thread later with my progress on the boxcar in the next few weeks.

Add Reply

Post
×
×
×
×
Link copied to your clipboard.
×
×