I’m stuck on how to move forward on a trestle system. I’d like to build a two tiered arched trestle to bridge the gap on the lower levels. Our Friend Alan (LeavingTracks)  used an arched bridge from the Bridge Boss. While I love the design and craftsmanship, it can not be my modified for my display…

One of the complications on my display as you can see from the pictures below; each run enters the gap from a curve on both ends.
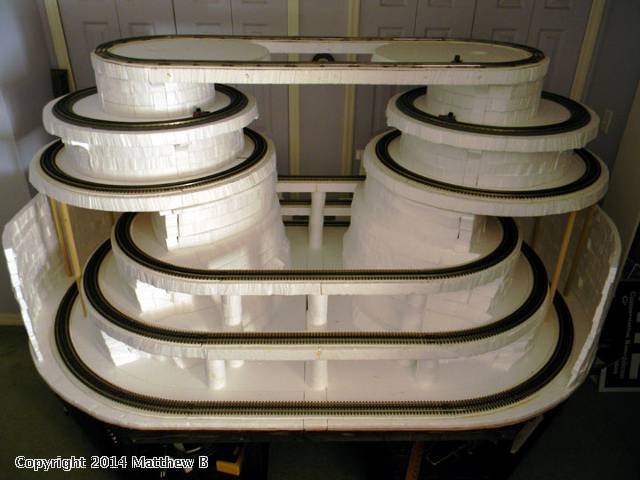
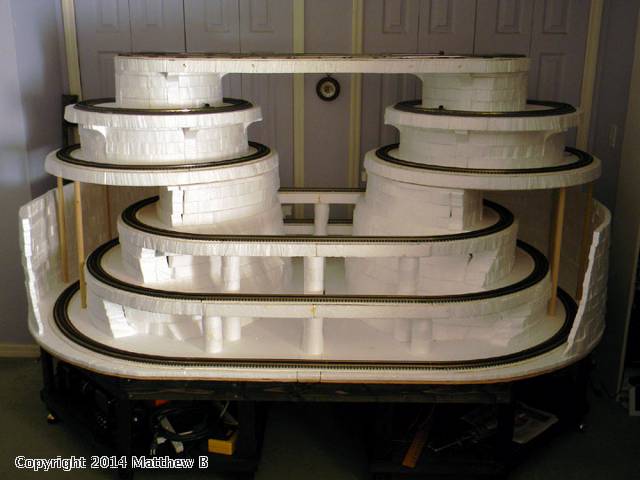


Long ago I built a 4’ double wall vertical steamer which could be used to make the wood pliable. But it was made for other purposes and I’ve no experience bending wood.  


Questions I have…

What would be the best materials to use for an arched trestle with multiple curves? Type of wood and fasteners?


I assume the best method is using a steamer and jig to bend the wood: is there an approximation of how much smaller the form would have to be to compensate for spring back?


Any help would be appreciated, thank you

Last edited by Matthew B.
Original Post

Replies sorted oldest to newest

Thanks for your input Don. I have thought about using MDF. My concern in using it is how well it would hold it's form. The inside curve on the second tier above the main level is O36 the outside curve on the first tier is O46.
 
I've never used MDF can it be stained or painted to create a creosote appearance?
 
Originally Posted by DMASSO:

How about cabinet grade plywood or use 3/4" MDF. Jodt cut your entire shape out of sheet material.


I would make the bridges for the straight sections rather than build curved ones. I'd also construct multiple bridges given the track configuration on the various levels.


I like the "frame and skins" method for building a bridge. Use 3/4" plywood for the deck and quality lumber for the supports. Make arches from 1/4" plywood. Trim up and paint it like aged concrete and you're good to go. You can make any number of arches you want. In the example below, I chose a single parabolic arch.


I'm currently working on the design for a replica of the Pacific Electric Torrance Bridge.


The basic core of this bridge is composite decking material, which is very heavy. The longer bridge at the other end of the viaduct was done using select pine, but if you can't get good straight lumber, plywood is the best bet. The sides here were done using 1/4" MDF, but the subsequent bridge was done using 1/4" plywood sides. 

Bridge 007

Bridge 015


Seal it up with sandable primer from your local home improvement center. Kills any trace of wood grain.

Bridge 023


The surface was spray painted with stone textured paint, then that was sprayed with a coat of "Straw Flower" to give it a yellowed look.

Bridge 026


The railings were cut from the plastic screen used to keep leaves out of rain gutters. One of our members had some lying around and it worked out well.

Bridge 036


Here's what the skeleton and skins look like. The deck was cut short so that the adjacent road bed would rest on the core of the piers. The Art Deco styled columns were made from moulding (doubled up) with the ends cut and rounded off.

Bridge_Framework


Here's the rest of the viaduct with the second bridge. Though this bridge is longer, it weighs less than the first one because it was done using lighter materials. 

20120909_165247

Attachments

Images (7)
  • Bridge 007
  • Bridge 015
  • Bridge 023
  • Bridge 026
  • Bridge 036
  • Bridge_Framework
  • 20120909_165247
Last edited by AGHRMatt

Thanks for the replies everyone. I may be getting back to you Tim.


Matt that’s a great looking bridge and the process is what I will consider if my current experiments don’t work out. In the end I may have to give up on bridging the curved sections.


I spent most of the afternoon yesterday digging my vertical steamer out of the garage attic. It’s been about 15 years since I’ve used it and I forgot how big the darn thing is. It’s shaped like a rocket and can accommodate 65” lengths of material.


 Since I went through all the trouble to pull the thing out, I decided to run a few experiments. I ripped a scrap pine 1’ X 4’ down to 3/8” x 3/8”  and ¼” x ¼” .

Set up the steamer and it’s been running since about 7:00 last night. I’m going to try using a empty gallon paint can as the jig to get the curve I want. As soon as things warm up a bit here I’ll try setting the material in the jig.


The reason  I want to use more of a skeletal frame trestle is to keep the weight down, the display has to be moved quite often and also keep the view from front to back as unobstructed as possible. This is only a 5’ X 8’ display which is generally controlled while lying in bed. When it comes to train operations I’m one lazy SOB.

Thank you and best regards everyone. I’ll continue to post my progress or failures which ever the case.

Originally Posted by AGHRMatt:
 

The basic core of this bridge is composite decking material, which is very heavy. The longer bridge at the other end of the viaduct was done using select pine, but if you can't get good straight lumber, plywood is the best bet. The sides here were done using 1/4" MDF, but the subsequent bridge was done using 1/4" plywood sides. 

Bridge 007


Great work on that bridge!!! Thanks for sharing!

Is there a reason you will use plywood over MDF in the future??? I just bought some MDF for a project and really like it over ply......is there a down side to MDF?? THX

Major failure in my experiments. But I did discover soft woods such as pine are not good for bending. Hardwood is easier to bend but you want it to be air dried and not kilned dried which I believe pretty much eliminates big box stores as a source for material. Air dried oak may be the best wood for creating tight radiuses. Vertical steamers aren't preferred steam chambers for this application, horizontal steam boxes are easier to work with because of the short steam periods and working times involved. Surprisingly I discovered wood can be over cooked and brittle if left in the steamer to long. Anyway I have a nice pile of kindling available. 


Originally Posted by AMCDave:
Originally Posted by AGHRMatt:
 

The basic core of this bridge is composite decking material, which is very heavy. The longer bridge at the other end of the viaduct was done using select pine, but if you can't get good straight lumber, plywood is the best bet. The sides here were done using 1/4" MDF, but the subsequent bridge was done using 1/4" plywood sides. 

Bridge 007


Great work on that bridge!!! Thanks for sharing!

Is there a reason you will use plywood over MDF in the future??? I just bought some MDF for a project and really like it over ply......is there a down side to MDF?? THX

Weight and structural considerations. MDF doesn't take carpenter's glue as well as plywood -- the parts can be peeled off because MDF is made from presses paper and the glued layer just peels off. It's also not as structurally strong in the 1/4" panels. I built a warehouse shell (background full building 48"w x 20"h x 9"d) as a view block with it and had some problems with breakage on a couple of columns, plus the thing got pretty heavy.

Post
×
×
×
×
Link copied to your clipboard.
×
×