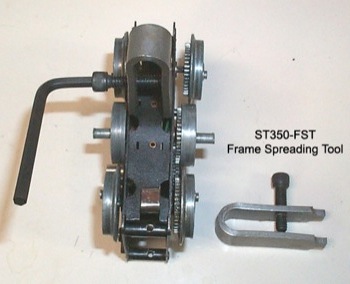
I've got a great deal on 2056 from 1952 that suffered some damage in shipment where the collector plate became damaged. I priced out parts, refunded that amount by the seller, and obtained the parts. Now that I have the new collector in hand, I then did some research on how to replace the collector. That research lead me to purchase Craftsman 4735 snap-ring pliers. Unfortunately, even with those pliers, I was unable to liberate the busted collector plate, let alone feel confident I could open up enough space to wedge in the new collector plate.

Any tips on going about this repair?

Last edited by bmoran4
Original Post

Replies sorted oldest to newest

I did replace the complete pickup on a Marx by spreading side frame with needle nose pliers and an extra pair of hands it was difficult but side plate sprung back together like as original.

Anyways on TT parts site click on the picture next to the ST350 tool and notice the back geared wheel is almost off its axle while all others are in place and the tool is at that particular wheelset to give the side plate wiggle room at that point to get the roller assembly plate out .

Hope this helps.

imagePlus 1 what Roger said about the spreader tool. You can slightly trim off one side off the tabs on the collector then fight to get the collector seated then secure with CA adhesive. This works but I don't like doing the repair this way.

When I have to replace the collector I pull the drivers then grind or file down the stakes on the bottom of the frame. You can then slightly open the frame to pop in the collector. Then reseat the frame back on to the stakes and use CA adhesive to secure.  The 2046 has three stakes that need to be filed down. It also has an aluminum frame so you must be careful just prying or spreading this frame apart to insert the collector.

Attachments

Images (1)
  • image

I bought the spreader tool and tried to remove a plate. It didn't end well. The spreader tool bent and was useless

Same here.
Once I tried releasing the staking at the bottom of the engine, as Stew1957 described. My plan was to drill and tap the posts to hold the motor together with screws. Unfortunately, I broke the tap in the hole and could not remove the broken piece. The mechanism sits in my junk drawer to this day.

Replacement posts for prewar engines are available. I don't know whether they could be used for postwar.

I have a number of mechanisms missing their collector plates in my junk drawer. They are just that.....junk.

I guess I could try again, gluing the mechanism together, as Stew1957 did.

One time I did use a modern era replacement, with the tabs on one side only. Worked fine, but not correct for Postwar Lionel.

Last edited by C W Burfle

I've used Train Tender's frame spreader multiple times successfully and it is a little tricky. I think it's a bit easier to use when the wheels/axles are removed (allows more spread) but still works with wheels in place. You'll want to place the spreader jaws as close to one of the fiber plate tabs as possible (usually near the axle locations) and carefully begin spreading until you start to feel resistance. If you attempt further spreading you can bend the motor frame, especially with the aluminum "magnetraction" type frames. At this point you probably won't be able to spread the frame quite wide enough so use a flat blade screwdriver to gently pry the tab on one side out of and away from the slot. Loosen the spreader tool and repeat the procedure on the next tab. To install the new plate, locate the tabs into the slots on one side of the frame and reverse the procedure.

Removing some of the tab material may also help and, as Stew noted, make sure the offset is oriented correctly when installing the new collector. 

rickoshay posted:

I've used Train Tender's frame spreader multiple times successfully and it is a little tricky. I think it's a bit easier to use when the wheels/axles are removed (allows more spread) but still works with wheels in place. You'll want to place the spreader jaws as close to one of the fiber plate tabs as possible (usually near the axle locations) and carefully begin spreading until you start to feel resistance. If you attempt further spreading you can bend the motor frame, especially with the aluminum "magnetraction" type frames. At this point you probably won't be able to spread the frame quite wide enough so use a flat blade screwdriver to gently pry the tab on one side out of and away from the slot. Loosen the spreader tool and repeat the procedure on the next tab. To install the new plate, locate the tabs into the slots on one side of the frame and reverse the procedure.

Removing some of the tab material may also help and, as Stew noted, make sure the offset is oriented correctly when installing the new collector. 

Can that frame spreader be used without removing the wheels? Or even slightly moving a wheel outward as shown in the website picture? 

rickoshay posted:

Yes, there's usually enough side play in the axles to allow the spreader tool to do it's job. The method described in the Lionel manual is to use a flat blade screwdriver to pry the fiber plate tabs from the frame. The frame spreader probably won't get the tab(s) totally clear of the slot but will get you close and make it easier to pry out the collector plate.

Ok, is inserting the plate back into the motor the same but In reverse?

You position the "jaws" of the tool at the openings (for bearing lubrication?) in the fiber plate. Let me stress the point that you will not be able to spread the frame enough with the tool to get the plate tabs totally clear of the slots. It just provides some clearance to make it easier to pry out the plate using the flat blade screwdriver. Same goes for the install and it will go a bit easier if you shorten the tabs a little beforehand.

rickoshay posted:

You position the "jaws" of the tool at the openings (for bearing lubrication?) in the fiber plate. Let me stress the point that you will not be able to spread the frame enough with the tool to get the plate tabs totally clear of the slots. It just provides some clearance to make it easier to pry out the plate using the flat blade screwdriver. Same goes for the install and it will go a bit easier if you shorten the tabs a little beforehand.

Oh ok. Will have to experiment. But in the meantime. It's time to hit the sack. Maybe one day I'll be able to bid a daylight job

I just wanted to follow up on this and bring some closure to this thread.

SUCCESS!

With help of the ST350-FST frame spreading tool and the Craftsman 4735 snap-ring pliers, I was able to remove the broken collector plate and install a replacement. The ST350-FST dosen't make it gravy, but very instrumental to operation. It took a few careful tries and some finagling, but the operation was a success! I didn't have to modify the plate at all (no shortening or removing any of the tabs). Engine runs well! Very happy with the outcome!

Glad to hear it. I have the Hobby horse equivalent and I was not so successful. The tool bent at the set screw. I want to straighten it, but afraid that I might have to heat it. 

I was able to straighten mine without heat.
I had a thick piece of steel that just fit between the legs.
I also have a VERY LARGE (6.5 pound) Rawhide hammer.

After removing the screw, I was able to put the steel piece across two supports, place the bent leg on it, and WHACK it with the hammer. It was nice and straight after a few blows.  (Had to reset after each blow).

I happened to have picked up the hammer at a garage sale. Here is what they look like : Garland Hammer

Haven't had a chance to try using it again.
I guess the bending and straightening might have weakened it a bit.
We'll see.

Glad to read that BMORAN4 had success using the tool.


Last edited by C W Burfle
C W Burfle posted:

Glad to hear it. I have the Hobby horse equivalent and I was not so successful. The tool bent at the set screw. I want to straighten it, but afraid that I might have to heat it. 

I was able to straighten mine without heat.
I had a thick piece of steel that just fit between the legs.
I also have a VERY LARGE (6.5 pound) Rawhide hammer.

After removing the screw, I was able to put the steel piece across two supports, place the bent leg on it, and WHACK it with the hammer. It was nice and straight after a few blows.  (Had to reset after each blow).

I happened to have picked up the hammer at a garage sale. Here is what they look like : Garland Hammer

Haven't had a chance to try using it again.
I guess the bending and straightening might have weakened it a bit.
We'll see.

Glad to read that BMORAN4 had success using the tool.


I was thinking the same thing as far as a weak spot goes. But as you said we'll see. I'll get it straight and try again. 

Add Reply

Post
×
×
×
×
Link copied to your clipboard.
×
×