
I just finished building and staining my first display case and I am pretty satisfied.  This case was needed, as I had no place to store my "Crescent Limited" set when not in use.  But, the only problem is that it is heavy as lead and I am nervous about hanging it on the wall...lol.

IMG_2903

IMG_2904

IMG_2905

IMG_2906

IMG_2911

Attachments

Images (5)
  • IMG_2903
  • IMG_2904
  • IMG_2905
  • IMG_2906
  • IMG_2911
Last edited by lionel89
Original Post

Replies sorted oldest to newest

Thank y’all for the compliments.  Mike, the Crescent Limited is one of my favorites also.  I was thinking about buying a display case, but what is the fun in that?  It means much more that I actually made it.  Dennis, I have not yet thought about mounting hardware.  Do y’all have any suggestions?


Pete, the plexiglass is built into the “door”, but the door is not hinged and does not slide.  I used magnets, which are hidden and barely seen (see pics).


I was thinking about using nicer track for display purposes (like Atlas 2 rail, or something to that effect), but I am a Lionel guy and decided to keep it authentic. 


IMG_2912

IMG_2913

IMG_2914

Attachments

Images (3)
  • IMG_2912
  • IMG_2913
  • IMG_2914
Last edited by lionel89
Originally Posted by lionel89:

Thank y’all for the compliments.  Mike, the Crescent Limited is one of my favorites also.  I was thinking about buying a display case, but what is the fun in that?  It means much more that I actually made it.  Dennis, I have not yet thought about mounting hardware.  Do y’all have any suggestions?


As far as mounting, Dennis is correct, find studs (at least two but I'd shoot for three or four if possible depending on the length).  With all that Oak, that thing is bound to be heavy!  What does the back look like, is it completely flat?  If so, I have one thing in mind for mounting, BUT... it would involve drilling through the back of the case and the screws/bolts would be visible from the front.  Also, if the magnetic door frame is larger (is that 1x3?) than what it mounts to, you have some space to hide some hardware... let me see if I put something together to show you what I mean


I was thinking about using nicer track for display purposes (like Atlas 2 rail, or something to that effect), but I am a Lionel guy and decided to keep it authentic. 


I like the tubular in your display case (just my 2 cents).

I've attached some photos of what I did in my shop to mount some heavy wall cabinets. I took them out of the science classrooms when they remodeled the high school where I teach. They were quite heavy but this method seems to work. Granted, it's a shop and you'll want something nicer in your train room or house, but the basic principle will work.  A guy with your talent can certainly dress up the braces and make it look sharp! You might even make them from oak and have it look like part of the cabinet.


The advantage of "setting the cabinet on a shelf" is being able to adjust the brackets to ensure that you hit the studs. It might aid in centering the cabinet on a wall where the studs are not "cooperating" with you. I have the cabinets sitting on two 2X6's.


Just a thought.


DSCN0259


DSCN0260

DSCN0261

DSCN0262

DSCN0263

DSCN0264


Attachments

Images (6)
  • DSCN0259
  • DSCN0260
  • DSCN0261
  • DSCN0262
  • DSCN0263
  • DSCN0264

I just finished putting this together.  I like Dennis' idea too, they are actually pretty similar to one another.


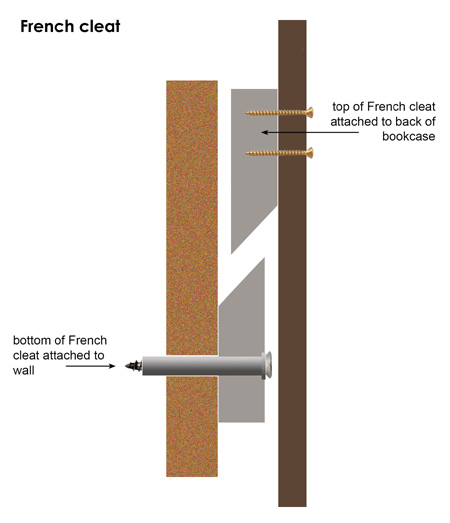
The three screws in the top would mount directly into the wall studs.  If your wood dimensions are similar to that shown below, at eye level the hardware should not be visible.  


The additional piece would be mounted the exact same way (in the studs).  In my example I used the representation of a 1x3.  You could use whatever you want, but I'd stick to something that has some strength.  Judging by some of your woodwork, I think you may have a router.  If you do, you can do whatever you want with the three unused edges of this piece. 


I would drill into the top of it and glue in four pieces or so of dowel rod, leaving at least 3/4 of an inch sticking up.  Drill into the bottom of your case in those same locations to at least an 1/8" deeper than what you left the dowel rod stick up.


Mount that bottom piece on your wall, place your case on the studs (dowel rods), then screw in the top three screws.


This is just a suggestion of mine, no offense if not used.


Lionel89 Ex1


- Mike

Attachments

Images (1)
  • Lionel89 Ex1

Wonderful ideas guys.  I am going to split the baby and use both Dennis’ bracket idea and Mike’s dowel rod/wall mount idea.  You are right, Mike, at eye level, the hardware should not be visible.  Also, the added bracketed support underneath will give me peace of mind.


Dennis, by the way, those are some nice shop cabinets.  You were lucky to get them.


Thank y’all and I will post pics of the finished product.

great job, beautiful work.

use cabinet makers/carpenters trick to mount

it on the wall. Just make sure you go into studs.

and use twice as many screws as you think youll need.


My aunt had a carpenter mount cabinets on kitchen wall.

she loaded it up with dishes. That night when they were in

Bed the whole thing came crashing down. made a hugh racket and she

lost most of her dishes.

I think what you're looking to do is a "french cleat" system.  It is a very simple way to hang heavy stuff like your project.  And, it's very easy to make if you have a table saw, radial arm saw, or even a power circular saw.  It can be made from 1 1x4 the length of your cabinet.


If you are not familiar with a "french cleat" go to Youtube and do a Youtube search for "french cleat".  There are many videos to teach you.  If you made that cabinet you definitely can make a french cleat.


Good luck and post some pics when you get it hung.


Rick

Last edited by RICKC
Originally Posted by RICKC:

I think what you're looking to do is a "french cleat" system.  

Rick has it exactly right. This system is one of the strongest you can make but to do it correctly you have to plan for it's incorporation into the cabinet while you are constructing it.

I have used this method many times and it is incredibly strong and supports a lot of weight. An added bonus is that you can simply "lift" the cabinet off of the wall mounted mating cleat without any tools should you need to. Securing the wall mounted cleat into studs with strong screws is the recommended method.

Here's a pic of what it looks like:


Good luck!

Mark

Last edited by banjoflyer
Originally Posted by lionel89:

But, the only problem is that it is heavy as lead and I am nervous about hanging it on the wall...lol.


I would recommend using (2) sets of cleats on the back of your case one top one bottom.

If you are not familiar with this heavy mounting:

Two of your oak planks, the length of you cabinet are screwed or bolted through the back of the cabinet and mount to the back. One at the top and one 2/3 of the way down.  Make sure these cleats span (2) studs.

Using two more of equal length, mount these to the wall studs (best if you counter-sink lag bolts) into the wall-mount cleats.

The case is then hung cleat-to-cleat on the wall keeping it level, securely mounted and can then only be removed by lifting the case up off the cleats.


Case Cleats

Attachments

Images (1)
  • Case Cleats

The French Cleat method is a really good suggestion.  However....I must add, with the great finishing on his display case, using either of the methods above could take away from the finished look.   *ONLY* if there is no gap on the back and its all flush mounted.  If it is flush mounted, using one of the two methods recently suggested may require (depending on how finished he wants his case to look) additional trim to hide the 3/4" gap from the cleat.

Post
×
×
×
×
Link copied to your clipboard.
×
×