Hey Gang,


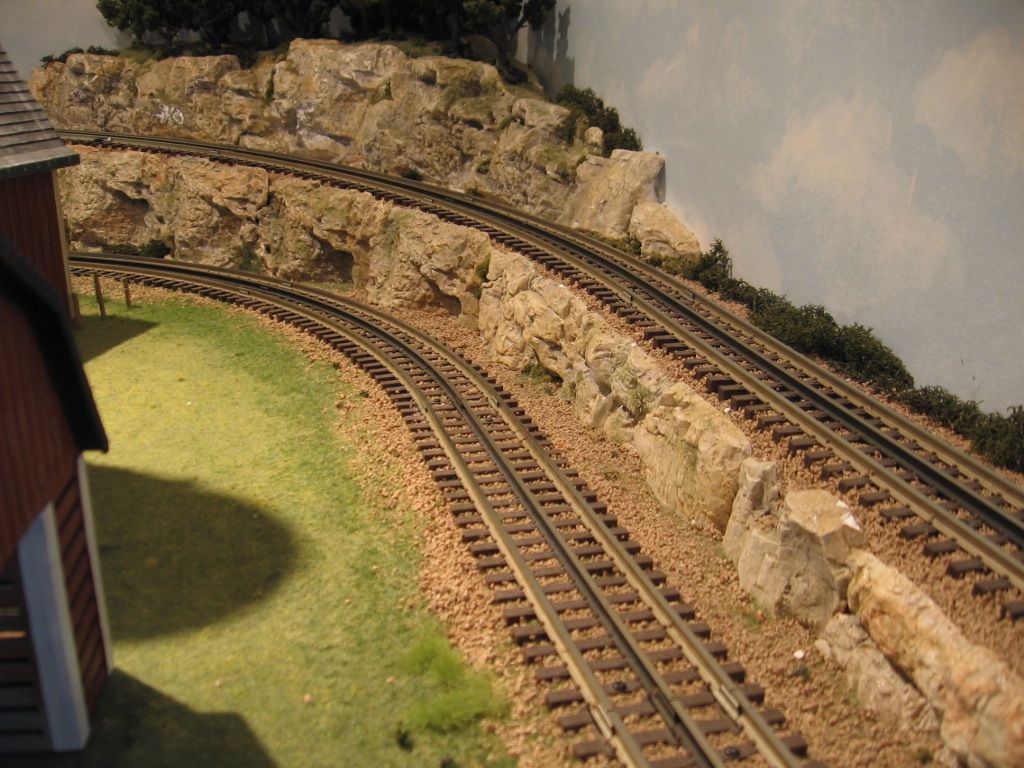
I had some fun today painting some rock faces and would appreciate some feedback.


I used hydrocal and a Woodland Scenics rock mold to create the rocks. I'm trying to adjust the formula so I get a little more than enough hydrocal for the mold. For the washes, I used DecoArt Americana: Lamp (Ebony) Black, Neutral Grey, and Slate Grey. I played around with different ratios of paint to water. Each rock was painted differently, either by the order of washes or washes with different ratios. I used the method from Woodland Scenics video of using foam applicators to apply the washes.


The Slate Grey looks a little too light for what I am going for, so I may stop using it. I've got a mold drying and used the leftover to make extra castings to continue practicing on.


One final note before getting to the pictures, if you have ever wanted to try this, go for it! It was a lot easier than I thought it would be with the hardest part playing with the different mixtures.


IMG_0148

IMG_0150

IMG_0151

IMG_0152

IMG_0153

IMG_0154

Attachments

Images (6)
  • IMG_0148
  • IMG_0150
  • IMG_0151
  • IMG_0152
  • IMG_0153
  • IMG_0154
Original Post

Replies sorted oldest to newest

Thank you everyone for your input!
 
Originally Posted by Avanti:

You will want to add at least some hints of vegetation, I think.

I agree. Although I will be going for a less damp, I still plan to add some ferns and small trees growing from the rocks.


Originally Posted by NJCJOE:

If you want to go an additional step for some added depth, brush on an Indian ink wash.

I was staring some India ink right in the face before leaving the crafts store, lol. I think I need to add a coat of sealant before giving the rocks a final wash in black again. When the wash of black was wet, it had that added depth. When the wash dried, the depth went away. I'm not sure if the Hydrocal was absorbing the top wash or if I need to adjust the ratio of the wash.


Now that I have a pretty good idea of what I'm doing, I need to get out to the area that I am modeling and snap some pictures. So far, I've colored the rocks according to memory. I also need to go buy another jug of Hydrocal, lol.

Your rocks look great.  You can come over and paint mine anyday.  I went to a building supply(not Home Depot or Lowe's) and asked for some Hydrocal Plaster.  They sold me a 50 lbs bag for about &11.00.  The stuff dries rock hard in about five minutes.  I found that if I mix it a little wet it pours into the molds easy and dries hard.  The wet stuff is a little more fragile and lighter.  You can take the mold and press it against a wall and hold it there for a couple minutes, then peal off the rubber mold and the casting will stick and form to the surface.

I picked up a Woodland Scenics Shelf Rock Mold C1247, Hydrocal and a few more paint colors. I'll be busy tonight!
 
I haven't been able to get out to the area I want to model, so I did a Google image search. This was the best picture I could find of the area I want to model.
 

ioryspringfield(1)


The following pictures are from the same area to study the coloration of the rocks.


108269705_large_54f9d7(2)


476021-largest_Short_Wide_Boulder_-_Copy(3)


 For comparison, here is a picture from above of a casting I colored from memory. I can see I need to add some tan.


IMG_0154


(1) Screen capture from video: http://article.wn.com/view/201...drone_testing_hub_g/

(2)(3)http://www.mountainproject.com...ngfield-oh/107522447


Attachments

Images (3)
  • 476021-largest_Short_Wide_Boulder_-_Copy
  • 108269705_large_54f9d7
  • ioryspringfield

Making progress on a huge canyon I'm building. This section goes from six feet to about a foot from the floor and is five feet long. Attached to that will be a canyon from six feet to about 3 inches from the floor and is about twelve feet long. Many of my molds are 3 x 2 feet. I'm making hundreds of pounds of them. This section has a lot of detailing to come. I just spayed most of it with auto primer gray. It will set all night, then the detail will begin. After that a very high trestle will be built across this area. This is by far my biggest mountain project I'v ever tried. It will be the Milwaukee mainline and a electric short line below. It's hard to tell the scale of this but the shot is about four feet wide and three feet high. 

Don

DSC_0529

Attachments

Images (1)
  • DSC_0529
Last edited by scale rail
DSC_1356 [800x530)
 
scale rail posted:

Making progress on a huge canyon I'm building. This section goes from six feet to about a foot from the floor and is five feet long. Attached to that will be a canyon from six feet to about 3 inches from the floor and is about twelve feet long. Many of my molds are 3 x 2 feet. I'm making hundreds of pounds of them. This section has a lot of detailing to come. I just spayed most of it with auto primer gray. It will set all night, then the detail will begin. After that a very high trestle will be built across this area. This is by far my biggest mountain project I'v ever tried. It will be the Milwaukee mainline and a electric short line below. It's hard to tell the scale of this but the shot is about four feet wide and three feet high. 

Don

DSC_0529

I have a big canyon to build that goes from the floor to the ceiling in the basement.

Any chance you'd share how you made this?? ( Bragdon's molds?)

Attachments

Images (1)
  • DSC_1356 (800x530)
Last edited by Engineer-Joe

I bought mold making liquid at Michale's.  I used a cheap paint brush to paint on about five coats.  After each coat I just put the brush in a zip lock bag.  No need to clean it between coatings.I did one a day, but if you use a hair dryer it can go much faster.  After the fifth coating I used mosquito netting which I found at Joe Ann Fabric's.  1/4 of a yard gives you a lot.  I put on the sixth coat and painted the netting and let set.  I added another coat and let it dry over night.  Once the mold was ready I used plaster of Paris I purchased from Home Depot in a 50 lb bag.  I also found a type of hydrocal plaster at a building supply center.  Not a big box store.  The stuff I used dried rock hard in about five minutes.  It cost about the same as one of those milk cartons you get at the hobby shop and goes a lot further.  The best thing to do is make several different molds and pour them all at the same time.  I sprayed my molds with soapy water which help release the plaster.  You can apply your rocks to your wall as soon as it is about set up.  Just hold it in place for a couple minutes until it sets up and peal off the mold.

ChessieFan72 posted:
aubv posted:

Real.

real or plaster cast image

How are you going to apply the rocks?

Plaster...I think. The moss looks too new for the rock.

Engineer-Joe posted:

AUBV, you're layout and work is fantastic. 

Engineer -Joe,

Thank You. You have remarkable powers of observation, making that statement based on a picture of a fake rock. 


image

Attachments

Images (1)
  • image
Last edited by aubv

I pulled the mold off tonight and trimmed the edges. I can't remember if I put on six or seven layers, but the mold feels very durable. Despite washing the rock in the kitchen sink with detergent and warm water before I started, you can see dirt that attached to the mold. The mold separated from the rock easily and looks like it caught all of the detail of the rock.

20160110_222538

I made a double batch of hydrocal, only to realize I hadn't added enough of the hydrocal powder to the water as I poured it into the mold. I added in another cup of the powder and mixed it in inside the mold. To add to the excitement, my hydrocal powder was opened almost a year ago and was kept in a plastic bucket with a lid on it. We'll have to wait until tomorrow night to see how disastrous the results will be, lol.

Attachments

Images (1)
  • 20160110_222538

Looks nice.  If you have a flat surface to apply the rock, you can stick it on the surface while it is setting up.  Once the hydrocal starts to harden up, but is still pliable.  Hold it on the surface for a few minutes and peal the mold off the casting.  It should stick to the surface and once dry you can paint it.

Add Reply

Post

OGR Publishing, Inc., 1310 Eastside Centre Ct, Ste 6, Mountain Home, AR 72653
800-980-OGRR (6477)
www.ogaugerr.com

×
×
×
×
Link copied to your clipboard.
×
×