Photographic evidence suggests that the tuscan single stripe GG1s retained that scheme through the mid 1960s. Here is a picture of tuscan 4907 taken in June 1965.
http://www.railpictures.net/viewphoto.php?id=62275
The owner of this photo states that this image of 4916 was made in February 1966.
http://ABPR.Railfan.net/abprph...nColl.jpg&redirect=1
What a late repaint! That picture was taken two months after the February 1, 1968, PC merger and the paint on 4907 looks very fresh. I'm surprised that PRR repainted any locos with such an elaborate paint scheme so close to the merger date.
And the new 3rd Rail GG-1 "OLD RIVITS" Sample Arrives.
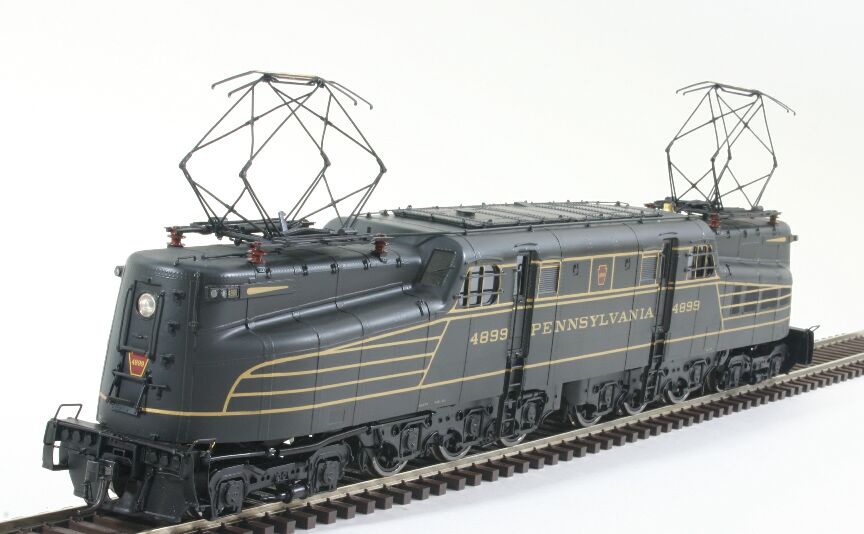

While no authority on the GG1,it looks like the 3rd Rail model stands at the top of the list. Happy New Year to all.
Norm Rish
Norm Rish
Jonathan,
Thanks for the advice on the pulling power and adding weight to the Williams. Is there much of an overhang on O72 track?
Thanks for the advice on the pulling power and adding weight to the Williams. Is there much of an overhang on O72 track?
A LOT of time went into the 3rd Rail model. It is a beaut!
Ted - If you are looking at any scale GG1 from track level you will notice overhand on even large track radii based on the articulation of the prototype.
Ted - If you are looking at any scale GG1 from track level you will notice overhand on even large track radii based on the articulation of the prototype.
3rd rail model: It does not have those lights on the top of the roof near the front as it came out of the erection shop.
The thing looks like something from a si-fi movie from that time period.
The thing looks like something from a si-fi movie from that time period.
quote:Originally posted by Ted Tully:
...snip... Is there much of an overhang on O72 track?
I would have to say yes; from my post on page 9 of this thread:
My Williams scale GG1 heading into an Atlas O-72 curve:

The 3rd rail model of old rivets looks great! But I was wishing for the number domes too on each roof end of the locomotive.
The 3rd Rail model of "Rivets" is based on the "Post Loewy" modifications and is prototypicaly correct for the three other paint schemes is being released in - wide 5 stripe DGLE with Futura Lettering, 5 stripe DGLE to match the rest of the GG1's, and the Conrail 1976 paint scheme.
From what I understand, the cost of tooling to make the details exact for the first version was beyond the budget to pull the project off. However a second run with the Baldwin delivered appliances? Could be a possibility and would be correct in both 4899 and 4800.
From what I understand, the cost of tooling to make the details exact for the first version was beyond the budget to pull the project off. However a second run with the Baldwin delivered appliances? Could be a possibility and would be correct in both 4899 and 4800.
Nice to finally see small railings on the front & rear pilot.
Never could understand why Lionel left those off of the JLC's.
Joe
Never could understand why Lionel left those off of the JLC's.
Joe
It looks very likely the 3rd Rail GG1's should be shipping in February. Another comparison is at hand 
Scott,
4899 looks very good. It appears the detail questions have been addressed as discussed. I look forward to seeing the paint job in person and can't wait to see the welded version.
4899 looks very good. It appears the detail questions have been addressed as discussed. I look forward to seeing the paint job in person and can't wait to see the welded version.
Why did G's have pilot steps which have a slight curve to them instead of being straight?
I have seen images of all the 4800 paint schemes. Trust me on this one - you NEED one if you haven't purchased one. These will go down in the books as the best G's ever at this price point.
In comparing the Weaver and Lionel JLC versions of this model, the Weaver version seems the more pleasing to the eye in terms of form. I understand that the Weaver model may be a bit short of scale but is the Weaver version perhaps more correct in terms of the other dimensions? By comparison, the Lionel JLC version appears a bit "blocky". Perhaps that is the difference between brass and die cast?
Also, are we comparing apples with oranges on the lengths (body v. body/frame/couplers)? I ask this question because of the slightly different dimensions and body/frame arrangements between the Lionel JLC and the Weaver.
Also, are we comparing apples with oranges on the lengths (body v. body/frame/couplers)? I ask this question because of the slightly different dimensions and body/frame arrangements between the Lionel JLC and the Weaver.

I see you have the fully modified 3rd rail pick up version sans Pantos
quote:Originally posted by BillP:
I see you have the fully modified 3rd rail pick up version sans Pantos

It was sent to Morrison-Knudson (sp?) for a rebuild and they accidentally did their standard EMD re-power.
Anyway, at some point in its history, someone installed QSI diesel sound in it.
quote:Originally posted by J. S. Bach:
They should have used a large Cat!
If they used a Cat, would the prime mover purr like a kitten?
It has been a long time in the works, but with much excitement please enjoy these pre-production versions of the three remaining paint schemes not yet unveiled for the 4800 GG1. Please note that these are one-off pre-production versions. Each scheme has another round of corrections to go through prior to the final product being done in February!
With Scott's permission, I am pleased to present the following:
GG1 1935 Paint Scheme (Strasburg version as noted on 3rd Rail Web Site):
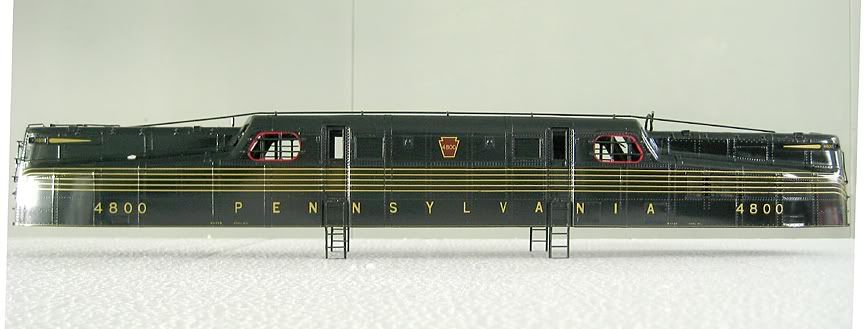
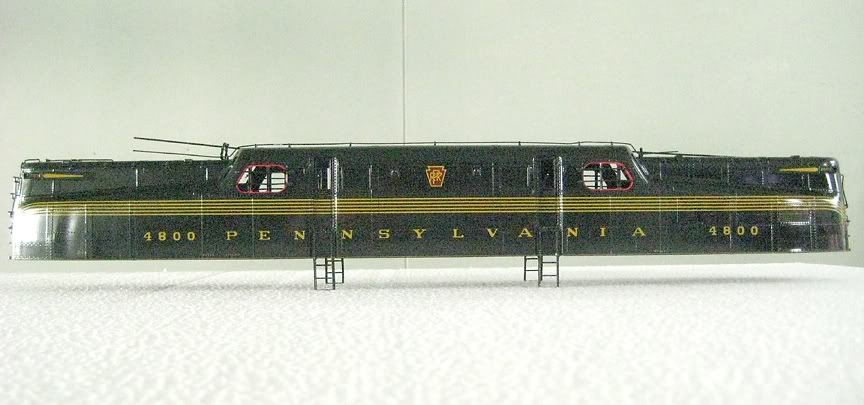
GG1 1952 Paint Scheme (Loewy version as noted on 3rd Rail Web Site):
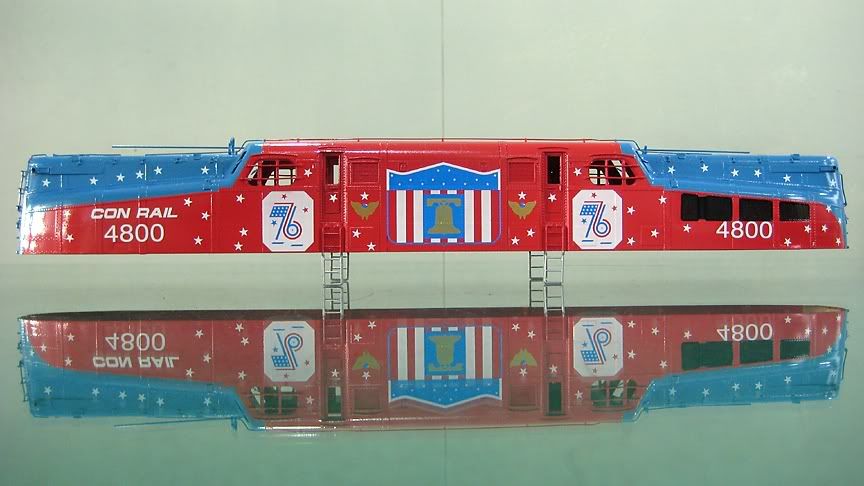
Bicentennial Scheme (as made available through the Big Little RR Shop in NJ):
I can state at this time that I had an opportunity to assist 3rd Rail in a wonderful team effort to get these to fruition. Coming on to the project in February of 2009 there was a lot of effort on everyone's part to pull this complex model together. What started out as nearly 12 sheets of drawings from the PRRT&HS of the prototype as documented by the PRR in 1934 has now led to the most accurate version of this locomotive produced to date. For anyone interested in how complex putting together a quality model here is the process that was involved. It is utterly amazing how much work goes into this and Scott must not sleep at all for all the time he put into this project.
1. Sorting out the piles of prototype data found in drawings and cross referencing it with prototype photos to check for accuracy. As many know, the prototype locomotive was modified over the years. Technically it had three separate visual modifications over it's lifetime. This version accurately models the G as modified in 1935. The compiled information was reduced to a small enough package to send to the manufacturer to produce scale model drawings
2. Review of scale drawings provided by the Korean manufacturer. This literally involved lots and lots of rivet counting . It also involved taking a 1/4" scale model dimensioned in metric and checking dimensions against the prototype drawings. Dimension / 25.4 * 48 / 12 was the formula to check every dimension!
  Two reviews and about 150 comments later the drawings were in decent shape.
3. Prepare painting diagrams for each version. This was done using PRR original painting diagrams dimensioned to the nearest 1/32" of an inch at FULL scale. In order to get the accuracy required for the various versions, this was done using AutoCad for precise layout.
4. The 1976 version is special as there was no diagram and this needed to be produced from prototype photos. An interesting set of discoveries came out of this exercise. Mainly the paint scheme is not the same on each side! The star pattern is different on each side and there are various other variations from side to side. Nearly all the photos of the locomotive are taken from the same side of the loco, so finding the other side was just plain luck. This has never been done on a model of this paint scheme ever.
5. Review the sample models as they came along. Numerous corrections over several reviews.
6. Review the paint schemes once applied to the model. Still further corrections to be achieved and they will be prior to release.
This represented 250-300 hours of my time alone and that is just the small role I played. Scott Mann made who knows how many trips to Korea personally, lots of calls and emails to the manufacturer, and acting as a translator from my overly lengthy technical writing into plain language no doubt! The PRRT&HS researcher, Joe Acri, was a wonderful resource for the prototype drawings. The Railroad Museum of Pennsylvania's curators were very helpful in obtaining historic images of the loco as delivered and in the poorly documented early paint schemes. OGR forum member Rheil put in countless hours doing his own reviews with input from PRR Man who posts here too.
I have new appreciation for the model building process. It is not easy and Scott needs to be commended for the effort he put into this model and putting up with the emails noting all the corrections. The model makers did a great job with this one and for a group who doesn't know much about US railroads, this particular loco is an accomplishment.
Finally, I hope that everyone who purchases one of these gets full enjoyment out of it. Every minute of time put into this was worth the effort. When they start shipping, look for additional production run photos to follow!
With Scott's permission, I am pleased to present the following:
GG1 1935 Paint Scheme (Strasburg version as noted on 3rd Rail Web Site):

GG1 1952 Paint Scheme (Loewy version as noted on 3rd Rail Web Site):

Bicentennial Scheme (as made available through the Big Little RR Shop in NJ):

I can state at this time that I had an opportunity to assist 3rd Rail in a wonderful team effort to get these to fruition. Coming on to the project in February of 2009 there was a lot of effort on everyone's part to pull this complex model together. What started out as nearly 12 sheets of drawings from the PRRT&HS of the prototype as documented by the PRR in 1934 has now led to the most accurate version of this locomotive produced to date. For anyone interested in how complex putting together a quality model here is the process that was involved. It is utterly amazing how much work goes into this and Scott must not sleep at all for all the time he put into this project.
1. Sorting out the piles of prototype data found in drawings and cross referencing it with prototype photos to check for accuracy. As many know, the prototype locomotive was modified over the years. Technically it had three separate visual modifications over it's lifetime. This version accurately models the G as modified in 1935. The compiled information was reduced to a small enough package to send to the manufacturer to produce scale model drawings
2. Review of scale drawings provided by the Korean manufacturer. This literally involved lots and lots of rivet counting
3. Prepare painting diagrams for each version. This was done using PRR original painting diagrams dimensioned to the nearest 1/32" of an inch at FULL scale. In order to get the accuracy required for the various versions, this was done using AutoCad for precise layout.
4. The 1976 version is special as there was no diagram and this needed to be produced from prototype photos. An interesting set of discoveries came out of this exercise. Mainly the paint scheme is not the same on each side! The star pattern is different on each side and there are various other variations from side to side. Nearly all the photos of the locomotive are taken from the same side of the loco, so finding the other side was just plain luck. This has never been done on a model of this paint scheme ever.
5. Review the sample models as they came along. Numerous corrections over several reviews.
6. Review the paint schemes once applied to the model. Still further corrections to be achieved and they will be prior to release.
This represented 250-300 hours of my time alone and that is just the small role I played. Scott Mann made who knows how many trips to Korea personally, lots of calls and emails to the manufacturer, and acting as a translator from my overly lengthy technical writing into plain language no doubt! The PRRT&HS researcher, Joe Acri, was a wonderful resource for the prototype drawings. The Railroad Museum of Pennsylvania's curators were very helpful in obtaining historic images of the loco as delivered and in the poorly documented early paint schemes. OGR forum member Rheil put in countless hours doing his own reviews with input from PRR Man who posts here too.
I have new appreciation for the model building process. It is not easy and Scott needs to be commended for the effort he put into this model and putting up with the emails noting all the corrections. The model makers did a great job with this one and for a group who doesn't know much about US railroads, this particular loco is an accomplishment.
Finally, I hope that everyone who purchases one of these gets full enjoyment out of it. Every minute of time put into this was worth the effort. When they start shipping, look for additional production run photos to follow!
Jonathan,
Simply stated - you have done a superb job to have this model turn out that well. Magnificent. Scott should give you one of each version for your efforts.
Thank you.
Simply stated - you have done a superb job to have this model turn out that well. Magnificent. Scott should give you one of each version for your efforts.
Thank you.
Hello Jonathan:
Great information on this model and interesting write up on the work involved.
A couple of questions:
In your posted images of the three paint patterns, there seems to be a roof railing/radio tube that runs the length of the body.
What are these?
The shape seems to have been changed and how come they don't appear in any of the previous photos?
If the answer is because of camera angle, that’s fine, but even in the museum pieces (IRM, Green Bay and the PRR museum) I don't recall seeing this detail.
To my eye, this is much more obvious than the truck and pilot railing, which is nice, but not as notable as the top detail structure.
Thank for your help.
Charlie
Thank you, Jonathan, for rebutting all of the uninformed comments posted on this forum over the years about how, "getting it right doesn't cost any more than getting it wrong." Accuracy is neither cheap nor easy, but it is worth it.quote:Originally posted by GG1 4877:
For anyone interested in how complex putting together a quality model here is the process that was involved. It is utterly amazing how much work goes into this and Scott must not sleep at all for all the time he put into this project.
This model represents the 4800 version. It had conduits on the roof connecting the two sets of pantographs. One is a bit larger than the other. The production model GG1, which is what the original thread compared had these eliminated due to the work that Raymond Loewy's company was hired to complete.
There was only one of this engine built like this, and it had more paint schemes than any other single GG1 in the fleet. The actual locomotive sits outside at the Pennsylvania Railroad Museum. It is in need of some serious restoration at this time.
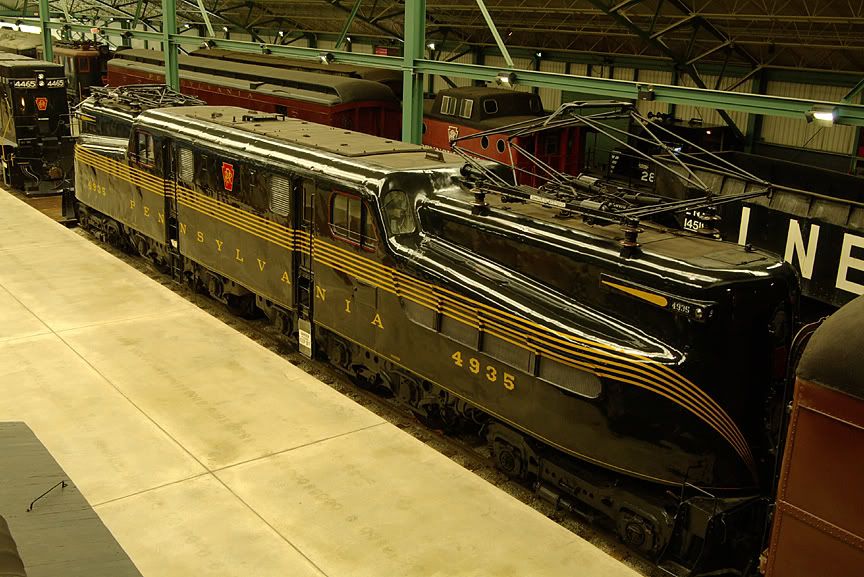
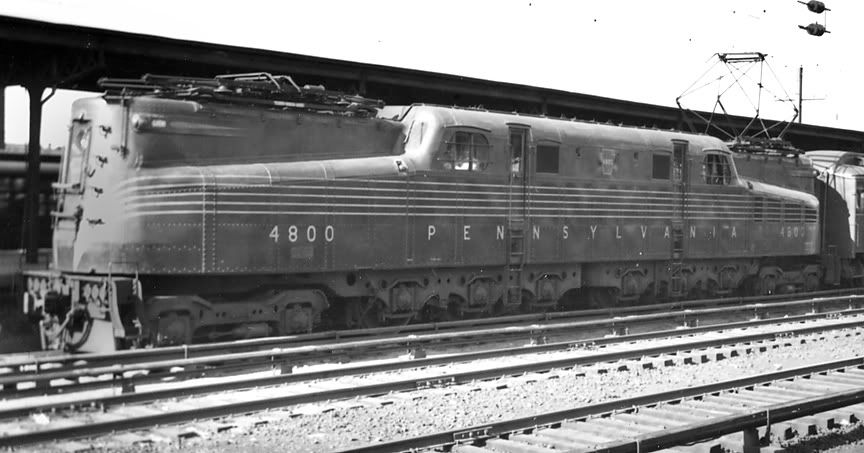
I think these two images best describe the difference between the prototype "4800" GG1 and the production versions numbered 4801-4938.
Production and Smooth Sided GG1:
A 1936 Image of GG1 4800 at Manhattan Transfer:
There was only one of this engine built like this, and it had more paint schemes than any other single GG1 in the fleet. The actual locomotive sits outside at the Pennsylvania Railroad Museum. It is in need of some serious restoration at this time.
I think these two images best describe the difference between the prototype "4800" GG1 and the production versions numbered 4801-4938.
Production and Smooth Sided GG1:

A 1936 Image of GG1 4800 at Manhattan Transfer:

Jonathan,
I too have been providing input to Bob about these paint schemes, and have informed him of a needed correction to the striping on the '52 scheme which deals with the curvature of the stripes at the ends, which is different from the '35 scheme. The pre-production model has the '52 curvature as the same as the '35 and is not correct. Your posted pix of 4935 vs. 4800 shows this clearly.
I too have been providing input to Bob about these paint schemes, and have informed him of a needed correction to the striping on the '52 scheme which deals with the curvature of the stripes at the ends, which is different from the '35 scheme. The pre-production model has the '52 curvature as the same as the '35 and is not correct. Your posted pix of 4935 vs. 4800 shows this clearly.
Jonathan ... Wasn't the Bicentennial shelved due to lack of orders??
Chris,
Thanks for the catch. The original paint diagram produced is correct in showing the different curvatures, but yes the model is not.
The 1952 version also has an interesting miss in the photo on the number placement on the left side. That just jumped out today after posting them here.
I was wondering if you were in on this too and Bob's post on 2R confirmed this.
Best,
quote:Originally posted by Joe G:
Jonathan ... Wasn't the Bicentennial shelved due to lack of orders??
Joe,
The entire run of 1976's was bought out by the Big Little RR Shop in NJ. They are selling them directly to interested persons and 3rd rail is not involved with these sales.
4935 is the prototype for the Wlliams former "shiny" engines!
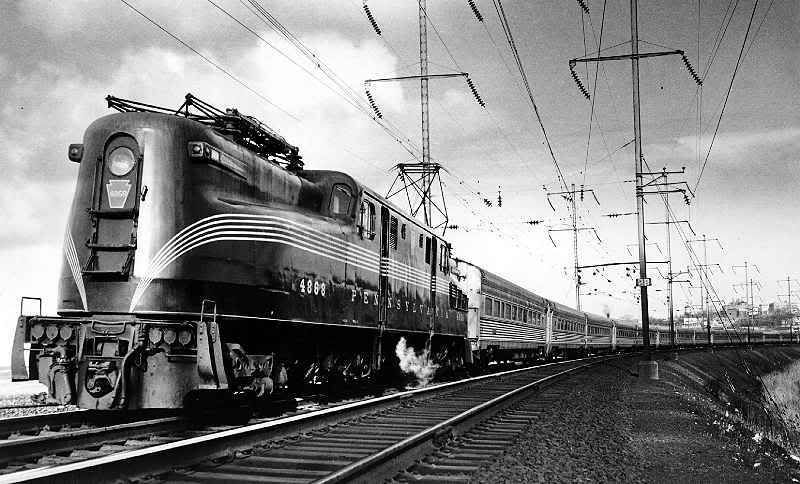
Did real G's look that shiny when they were younger, or does the '35 have wax/varnish coating?
Did real G's look that shiny when they were younger, or does the '35 have wax/varnish coating?
quote:Wasn't the Bicentennial shelved due to lack of orders??
quote:Joe,
The entire run of 1976's was bought out by the Big Little RR Shop in NJ. They are selling them directly to interested persons and 3rd rail is not involved with these sales.
Joe,
Here is a link to the Big Little Railroad Shop in Somerville NJ where you can find ordering information on the Bicentennial unit.
Just click on the GG1 for more information.
http://www.biglittle.com/
This is going to be a beautiful model. I remember seeing this unit many times in 1976 on the northeast corridor in Metuchen NJ, where I would go train watching as a boy
Enjoy
Frank
quote:Joe,
Here is a link to the Big Little Railroad Shop in Somerville NJ where you can find ordering information on the Bicentennial unit.
Thanks Jonathan and Frank. I'd go for this in a big way but I have MTH's Premiere issue... One's enough this day and age but ya never know ..
I can certainly understand the purist position regarding the FARR intakes. However, I have a JLC Penn Central GG1 and I think it is quite funky looking with the intakes. Certainly prototypical at least.
quote:Originally posted by DominicMazoch:
4935 is the prototype for the Wlliams former "shiny" engines!
Did real G's look that shiny when they were younger, or does the '35 have wax/varnish coating?
quote:Thanks Jonathan and Frank. I'd go for this in a big way but I have MTH's Premiere issue... One's enough this day and age but ya never know .. Wink
Joe,
Keep in mind that this is GG1 4800 "old rivets" it was the first GG1 and is different from all the other GG1's. It has never been done in O scale 3 rail before. It is a limited edition with only 25 being produced.
Enjoy
Frank
PRR, known for their dirty locomotives did break out the polish every now and then on a GG1 for a special occasion. Even PC polished one or two during their brief time in the railroad business 
If anyone likes the Bicentennial scheme, use your MTH version for the PS2 electronics in the 3rd Rail one and sell it!
If anyone likes the Bicentennial scheme, use your MTH version for the PS2 electronics in the 3rd Rail one and sell it!
The PRR paint specs called for 2 coats of varnish, thinned with Japan thinner, to be applied over the dried paint. The DGLE paint already was fairly shiny to start with. Up until the late '60's most of the passenger G's I saw had been put through the washers at Sunnyside, which did a great job of washing the sides, but not the tops or the upper noses. Noses had to be done by workman and long brushes.
The freight unit G's saw much less, if any washing, and it showed.
The freight unit G's saw much less, if any washing, and it showed.
Here is some video of New Jersey Transit's "Big Red."
http://www.youtube.com/watch?v=tC6W0XEqOLw
http://www.youtube.com/watch?v...npm0&feature=channel
http://www.youtube.com/watch?v...qmbU&feature=channel
http://www.youtube.com/watch?v...rRyY&feature=channel
http://www.youtube.com/watch?v=tC6W0XEqOLw
http://www.youtube.com/watch?v...npm0&feature=channel
http://www.youtube.com/watch?v...qmbU&feature=channel
http://www.youtube.com/watch?v...rRyY&feature=channel
The Kennedy funeral train had two freshly painted PC G's, if i remember correctly!
Add Reply
Sign In To Reply


