I completed adding rock molds behind where a trestle will be built. The appearance looks really good. I am concerned that I will ruin it with a bad paint job. I have been taking some pictures locally of hillsides and rock faces to choose the colors.


My question for those who have painted plaster molds before is what type of paint or other form of coloring do you use? I was thinking of using flat latex paints.


Thanks

Matt


Original Post

Replies sorted oldest to newest

Matt

Please don't paint them. If you use straight paint the detail of your rocks will be eaten away by the paint. You should make washes, a blend of paint and water. The detail of your rock castings will come to life using washes. Search washes on this forum and you will find many options. Good luck. 

It is usually a diluted wash of latex paints.  Carefully looking for the high-lighted detail you want.   I would practice on some of the scrap generated for the very nice wall that you built.  Lighter is usually better, you can always darken it down with an india ink wash. 

Rocks    Click on the underlined phrase to view a slideshow.


Noted on a previous thread was a How to: book  Realistic Model Railroad Scenery By Dave Frary.  Kalmbach.  Great reference source. 


Here are somes choices from the 2nd edition of the How to listed above.

Copied from page 24.

Latex Mud and earth colors.


Earth: 

(1.) Tru Value Hardware Tru-Test No. C220 Dusty Sage or No. C216 Antelope.  

(2.) Pittsburgh Paints: No. 3491 Franciscan Gold, No. 3610 Poplar, or No. 4489 Tulip Wood

(3.) Sears Easy Living No. 600 Autum Wheat Dark, No. 589 Sage, No 574 Parisiene Beige, (satin finsh only- this is OK because after thinning the paint loses its shine), or No. 068 Sand (a good light earth color).

(4.) California Paints: No. 35C-3D Boca Raton or No. 35B-3D Cameron, (a little on the red side but good for rich farmland).

(5.) (Sherwin Williams Fringed Jacket is an earth color that I haven't tried.)  Noted penciled in add in my book was SW1118.

Mud:

(6.) Tru Value Hardware: Tru-Test No. C214 Sugarloaf.

(7.) Pittsburgh Paints: No 4491 Leather Vest, No. 7483 Earthenware, or No. 4606 Yorktown Brown (reddish).

(8.) Sears: Easy Living No. 585 Guernsey Beige

(9.) California Paints: No 35C-4A Oakheart or No. 36C-3D Cassel Brown.


Color names and numbers change with home decoratiing styles.  Most stores have a cross-reference book to match old names and numbers to their replacements.  Ask the store clerk.  If you still cannot fine the exact colors mentioned above, use your color chip to select something else.


These colors are only starting points.  Your own taste or the prototype you're modeling may differ, so feel free to substitute colors you like!

Also buy a quart of flat white for lightening and use with tinting colors. If the earth or mud seems too dark, add flat white before diluting the paint. 
 

Best wishes on your project.  

Mike CT 


Last edited by Mike CT

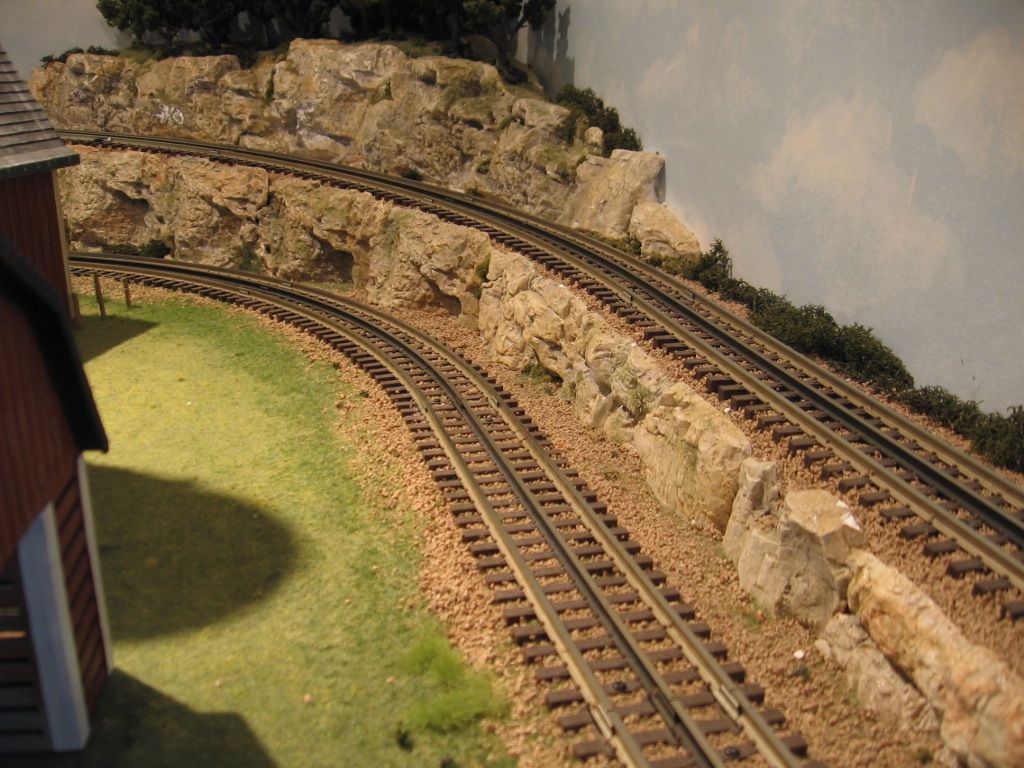
Matt, I have a slight variation in the techniques described above.  My first step is to coat the casting with artist's Gesso.  This is a primer coat used by artists which is a nice flat white that also is thick enough to cover blemishes such as bubbles or small cracks in the casting.  Then I put on a coat of the diluted white latex paint colored with acrylics for the base or theme color of the rocks in the area I am doing.  You will note that different types of rocks are very different, from dark grey to almost red.  


Next, I dry brush highlight acrylic colors, onto all areas of that rock.  Finally, I cover it with a very diluted wash of black.  That settles into the crevasses and highlights the shadows, making the colors pop out more.


IMG_1522

Attachments

Images (1)
  • IMG_1522

BTW...  Woodland Scenics makes a nice plaster rock coloring kit #C1215.  Additional quantities of the various colors are available individually, too...C1216-1222.


Their colorants are different that thinned acrylic paints in that they have no binders.  That means that continued washing will further 'move' the colorant deeper into the porous plaster.  That's useful and important in blending colors  when applied to plaster rock moldings.  Their basic technique is affectionately called 'leopard spotting'...dabs of different colors applied to the rock per their suggestions, videos, book, package instructions, etc..  Then the 'spots' are blended together by spraying the overall rock structure with a water mist...or you can simply continue to apply a standard black/brown wash with a foam brush, etc., which also accentuates the cracks/crevices of the rock, increasing its 3-dimensional appearance.  All of this comes from trial and more trial.  Not hard.  Rather fun.


But the key for their technique is using colorants that have no binders, as does regular or craft acrylic paints.


FWIW, always...


KD

I painted this with Galeria brand tube acrylics mixed on a pallet. The base color was tan with highlights of raw sienna and cerulean blue added and blended in place. Get your base colors and pick a few highlight colors for shadows and lighter areas and start painting, when you think it looks bad just keep painting and it will look better and better as you go. If in the end you don't like it you can always repaint it correcting your past mistakes. Good luck.


Painting rock castings has been one of my favorite parts of doing scenery. I agree with light washes and no binder. Light applications of very dilute India ink at the end does make it pop. The biggest thing I learned while experimenting is it is very forgiving. you almost can't screw it up...but if you do use a light coloredvcover coat and start over. 

Post

OGR Publishing, Inc., 1310 Eastside Centre Ct, Ste 6, Mountain Home, AR 72653
800-980-OGRR (6477)
www.ogaugerr.com

×
×
×
×
Link copied to your clipboard.
×
×