
got the midtown hotel. all 8 bldg sides are slightly bowed. i can flex them flat, but they don't hold. is there a method to flatten them? how else do i deal with this. i am not an experienced kit builder.
|
|
got the midtown hotel. all 8 bldg sides are slightly bowed. i can flex them flat, but they don't hold. is there a method to flatten them? how else do i deal with this. i am not an experienced kit builder.
Replies sorted oldest to newest
If you will clamp them while gluing, that should take care of the problem...
Alan
have never understood how to clamp something joined at right angles.
Iv'e had to do this with several kits that I have bought. I have two blocks of wood that you put walls against them while they are gluing. Takes a little longer but it works, just make sure you use a square to keep them that way.
ok, i think i can see a way with the stuff i have. thanks for the visual.
Are these kits usually warped like this?
You can use 1/4" X 1/4" basswood in the corners clamped with normal hobby clamps. Sears hobby clamp set pictured. Click on the underlined phrase to link.
Forrest....no, they are not usually warped as I am assuming you mean. How about taking a couple of pictures to show us...? To be honest, I have built a lot of these kits and have not experienced any bad warping...yes, some walls are slightly bowed but not to the point that they could not be glued together and held by corner clamps or even tape. A TIP: I have glued the corner of two walls together first starting with the very top or bottom corners. Don't worry about any bow or slight warp at this point. Then, once the corner is dry, go to the other end/corner and glue it. This usually solves any warp or bow at this point. Then, tape the rest of the two sides together and run a bead of glue the length of the joint. Repeat these steps for each corner joint. Another method that some folks use is to dry fit all of the walls together at one end and hold together with a rubber band. Do the same to the opposite end. From that point you can glue the corners.
The explanation(s) above are basics...you will likely have some special circumstances depending on the kit. Since you mentioned you are not an experienced kit builder, you may want to consider trying a smaller and simpler kit to "practice" on. If you think the walls are a problem, wait till you start putting together the fire escapes!!..
Alan
First, you flatten the sides with a weight on the inside, and then you, as described
above, glue 1/4" strips (Lowes has) cut to the right size, maybe toward the ends or
in the middle, too, if a wide wall. Leave room for joining at the corners, at the corners. Lowes also has right angle clamps that will hold two walls at right angle while glue dries, with the usual hobby clamps. Lowes ones will work with most O scale building walls, but, would not with HO. MicroMart will have smaller ones, for narrow
buildings.
I experienced a similar situation with those walls and it is easily fixed by 1/2" - 3/4" strip wood on the inside of the walls. Usually two to a wall will work fine. Clamp them and/or weight them down and when dry they will be totally straight. Just make sure that where you put the bracing will not interfere with putting the walls together. Also, leave at least 1/2" or more at the top so that when you put the roof material inside, the bracing doesn't block the roof. As others have suggested, you should consider 1/4" bracing in the corners as well. You'll not only have a very straight building but one that will be very sturdy and can withstand constant handling.
Jerrman
OK, here is a quick shot. each end is about 1/4" off the flat surface. All 8 side pieces are like this. of course this shot also tells me i am doing a very poor job of painting. i knew it wasn't good, but i didn't realize it was this bad.
i am not looking forward to the fire escapes.
i may quit soon.

Forrest...DON'T GIVE UP my friend!! You are doing fine on the painting. When you weather the building, everything will "blend"!!
That "warp" is fairly typical but it is not a problem...just follow the guidelines folks are sharing with you and it will be fine. I would suggest that you use sandpaper to rough up the edges where you are going to glue as this will make a better bond.
As far as the fire escapes, just put them together right on the building...don't try to build them first and then glue them to the side of the building.
One more tip....you will have to either cut or file down the top edge of the first 3-story section so that the second 3-story section will fit tightly on top of it.
Keep posting pictures as you go along and I am sure folks will chime in to help you...this can be a good learning experience for all of us...!!![]()
Alan
Foolish me. I thought "easy to assemble" meant they would, you know, snap together.
A method for straightening warped walls with which I have had some success is to soak the panels in hot (~100 deg F) water for about 10 minutes then laying them on a flat surface and place weights atop them while the panels cool.
Hello fellow member Forest. This is part II of a YT series I did on Ameri-Towne Building Kits form OGR Magazine, A hair dry, wax paper and a brick may help.
Cheers from Michigan
Hello fellow member Forest. This is part II of a YT series I did on Ameri-Towne Building Kits form OGR Magazine, A hair dry, wax paper and a brick may help.
Cheers from Michigan
yeah, but no details about the hair dryer, wax paper, and brick. ![]()
"One more tip....you will have to either cut or file down the top edge of the first 3-story section so that the second 3-story section will fit tightly on top of it."
well, that is just dumb. this isn't even mentioned in the instructions.
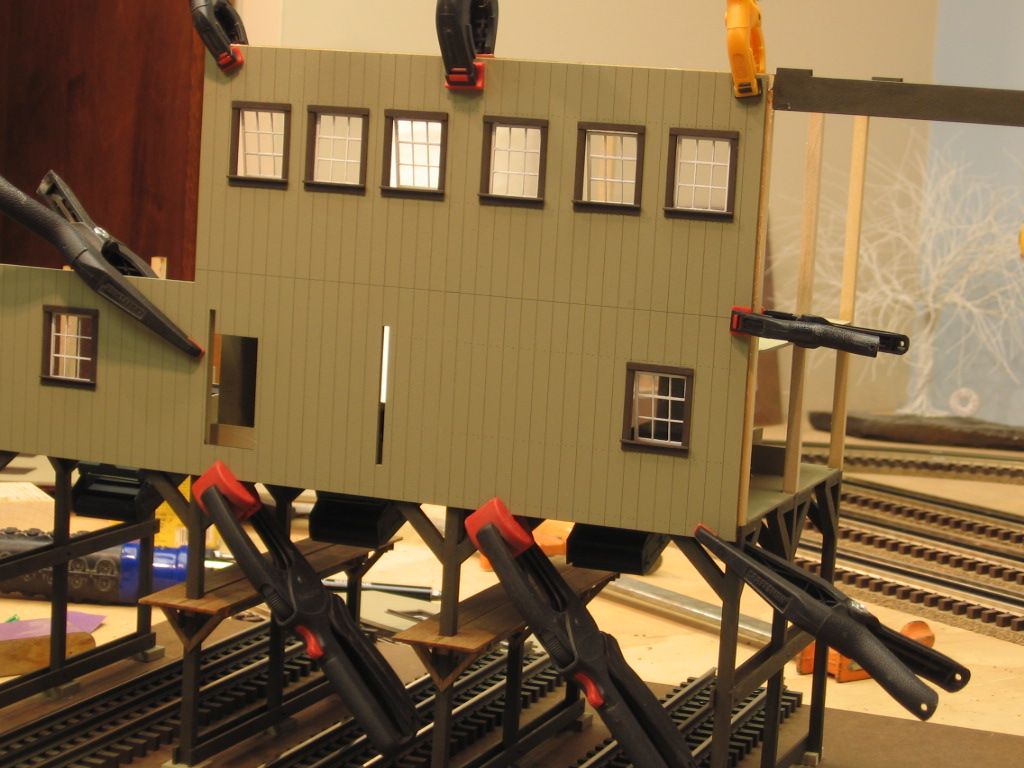
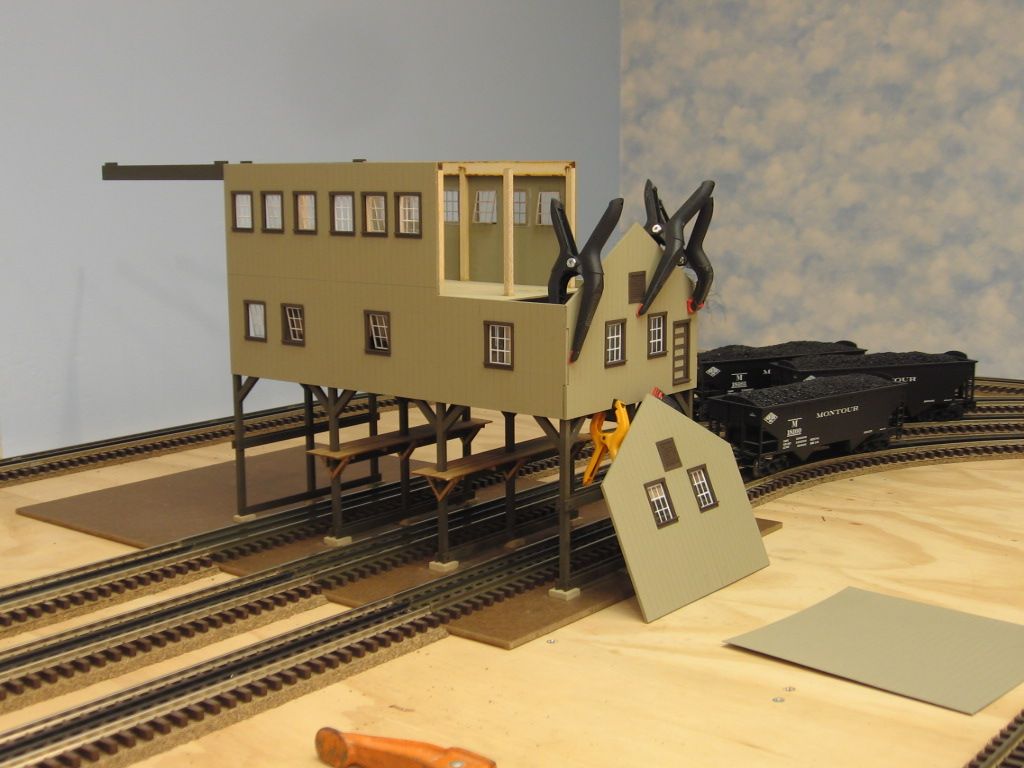
The OGR Ameritown set is an interesting modular build set with pieces that are mixed and matched for the different kits. You can purchase the pieces separately. I purchased a couple of extra windowless walls for this project. Cut the panels carefully with my band saw/finished the cut with a file and assembled this bump-out wall detail under the storage track. Base is 1/4" Masonite.


The corner piece, one store, is a really bad cut from an OGR Ameritown Barrettsburg factory. I had a couple of matching fronts that I traded to Steve, so that he could complete the factory. I used the pieces along with cut side and roof panels to complete the wall detail.
Painting:
(1.) Parts are washed with detergent and scrubbed with a soft brush to remove all mold release agent from the pieces.
(2.) I used a diluted latex paint (grey or tan) to add the mortar lines. Dilute to the point that it may take (3 or 4) applications to get the effect you want.
(3.) I lightly sanded the surface with 400 grit paper to remove brick face wash paint that I didn't want.
(4.) With the pieces laying flat on the work bench, I worked/painted most the trim paint.
(4a.) I worked/painted the edges of the stone trim detail first, holding the piece vertical with one hand and carefully working the brush to the brick.
(4b.) I turned the piece upside down and did the other perpendicular surface to the brick. This technique also applies to all the window trim, with two more position-ings. Piece vertical on the left side. Piece vertical on the right side. A lot of time and patience.
(4c.) With the edges of trim or windows painted, the piece is placed flat on the work bench to complete the remaining surface of all trim. OGR material does not one coat well, I had to two coat all the trim, with Polyscale acrylic paint, brushed direct from the bottle. Continually stir the Polyscale paint.


"One more tip....you will have to either cut or file down the top edge of the first 3-story section so that the second 3-story section will fit tightly on top of it."
well, that is just dumb. this isn't even mentioned in the instructions.
I am a big fan of Ameritown kits for bashing/custom work but I agree there is quite a lot of little details that are not mentioned in instructions, just "left as an exercise for the modeler."
I use a bandsaw to cut the third-story facade off.
One trick that is useful: Particularly if using a handsaw, etc., to make these and similar cuts in the panels, the edge you cut and then glue will be a bit a bit rough and the 'crack' between pieces will show. You can use the point of a sharp knife (I use a #11 X-Acto blade) to work drops of white or yellow glue into the crack where capillary action will pull it into the crack. It hardens and sticks enough to fill the gap. When you then paint the building the crack pretty much complete disappears. I do this a lot. the building below has cuts in all sorts of places made before it was put together again.


For all who shared their experience here, THANK YOU!!!! It will be a big help to me, and I expect others, as well.
Mike CT, that's a nice set of hobby clamps; mine will be to me Thursday; $10.79 (there was a modest discount; and, free shipping). I already have similar clamps that are somewhat larger, but these look like what I need for these types of projects.
So, thanks Mike, and to all who shared.
You can buy these clamps individually also at Sears. I've added a few of the long needle nose clamps in addition to the set. Many modelers use clothes pins. Also useful are bar clamps.
well, i have just about given up.
tried hair dryer to flatten them out without any success at all.
am looking at lee's example of trimming the facade off and know in my heart i would manage to mess that up. i don't have a band saw.
i don't know what i was thinking when i bought these kits. should have done more research. if i had gotten this input before purchase, i never would have.
Forrest....what you have shown as "warping" is fairly typical of any kit no matter who's it is. Why do the walls have to be absolutely flat for you to glue them together? Have you tried to use some of the suggestions above...like gluing one corner at a time or even using good ole tape to put two sides together and then applying glue along the interior joint?
Alan
. . . . even using good ole tape to put two sides together and then applying glue along the interior joint?
Alan
This works for me. If they are mildly bent I just tape them together as I glue them. I then cut some plastic - I prefer 1/4 inch square styrene, and glue it into the inside of the corner as reinforcement.
It the warp is more severe, I take two boards, place them on wither side of the panel, put a monster C-clamp on them, and turn it to flatten them out, and then glue them.
Lee....this is what I am trying to tell Forrest. Using tape as you go along the joint usually works. I can tape one corner, glue it from the inside of the joint and then go to the other end and do the same. This will take the bend out and then one can glue the rest of the joint from the inside.
Alan
Forrest...I went into our system and tried to give you a call using the number you provided but it is not your number. I had hoped to give you a personal call to help you.
Alan
well, that is because the daytime phone was incorrectly entered. should have been the same as the evening phone. would not have worked anyway, as we were out seeing MockingJay part 1.
these sides are relatively thick. i can't see how taping them would work. it takes a bit of force for me to even flex them a little bit. i can't imagine how to flex them and tape them at the same time. if i tack one end, the difference at the other is accentuated.
i also lack an array of clamps and am loathe to purchase same just for these stinking kits.
to top it off, i got a bad container of glue, too.
on the other hand, my 765 is great.
Forrest...we have tried to help you. If you are not willing to try some of the techniques, that is certainly up to you. By the way, the phone number you registered with us is the same for both day and night time and when I called, several times talking to 2 different folks, both said no one by your name works there!![]()
There is nothing wrong with these "stinking kits".
Alan
OK...I tried to call again after looking up your wife's cell number. Got a message so I left a message if you want to return my call...I am trying to help.
Alan
Alan. Sent email.
Got it and replied...
Alan
Access to this requires an OGR Forum Supporting Membership

