Hi -

I've gotten great response from the group - thanks. It seems one can buy lots of AF stuff before you're knowledgeable about what you're buying and can ask the right questions.  I bought this 761 from a reputable dealer, but there are some things I don't understand. I just got the semaphore and it's box but nothing else - what else should there be, a two button push button red/green?  A track trip maybe?  Or is this from some cow or logging camp thingie and "this is it"?

Also, I have the K-line book and show the hookup for this - why do I only have 4 wires and no black wire?


Thanks!oldseph2oldseph1


Tom 

Attachments

Images (2)
  • oldseph2
  • oldseph1
Original Post

Replies sorted oldest to newest

Thank you - I have a couple of 670 trips I can use, can anyone find the instructions and kindly post a jpeg here?  Then it seems I need to solder on a black wire, can anyone confirm the "metal tab" in the picture above is the right place to connect the black wire?  The white wire seems to "dive under" that metal tab, I'm always reluctant to take these things apart because of stripping the screws ...

I seem to have to fix everything I buy!   I guess that's the fun, right?

Tom

Ah, I wondered about that - the missing black wire seems to attach to a lug and the lug just gets attached via a screw to the frame.  To just get the bulb to light, are there 2 wires that could get attached to base and 16V?  The semaphore action seems to work, so that's a start, I loosed the screws, it won't open fully but the linkages seem good - man, I only seem to buy junk!  Does the 23761 hook up differently?  I didn't get a red/green control button, should I have?


Tom

milwaukeeroadtrackman posted:

Ah, I wondered about that - the missing black wire seems to attach to a lug and the lug just gets attached via a screw to the frame.  To just get the bulb to light, are there 2 wires that could get attached to base and 16V?  The semaphore action seems to work, so that's a start, I loosed the screws, it won't open fully but the linkages seem good - man, I only seem to buy junk!  Does the 23761 hook up differently?  I didn't get a red/green control button, should I have?

Tom

The link I provided explains what wire does what Tom.

Seems like the yellow wire is what you are looking for?


BobbyD posted:

From the Portlines link:

WIRING:

Red wire controls the STOP aspect using a momentary contact (button or track trip).
Green wire controls the GO aspect (button or track trip).
Yellow wire connects the LIGHT to the 15VAC post and completes the electrical circuit to throw the solenoid when the button is pushed or the track trip is activated.
Black wire is the BASE.
The White wire controls the Isolated section for automatic control by making or breaking the electrical circuit in a short isolated section of track.

Actually, the dark green version is the 23761.

The 761 came in the normal light green associated with most semaphores. The dark green is a variation, usually in poor condition due to paint chipping as the chips are more visible on the darker paint. The 23761 is always in the lighter green. All boxed versions I have seen in 40 yrs are the lighter green. The black wire is the ground or base. It simply connects to the lug which is screwed directly into the base.


Rich

Hi - I have a dark green 761 in very good condition - the bulb lights when I take it out of the socket - but not when I apply 15V to the yellow and base to the black - why doesn't it light like a switch? I have a couple of old push buttons I can use (not a red / green single-housing button) so I'll look at the wiring diagrams and try that ... always learning, here's my test circuits for the 670 and the 26671 - I use old AF bulbs and sockets as test lights

Tom20180515_19395020180515_185907

Partial success - I used 2 push buttons and got the thing to light - the "red" works if I put the semaphore up to green (vertical) and then push the red button it drops and shows the red light, but the green won't go back up.  Now I'm used to cleaning the solenoids on the reverse loop relay, there's maybe one in this semaphore, you have to polish the moving parts (plunger) with a ribbon of typing paper (NOT anything abrasive) but I've tried to disassemble this previously, when you get all 4 screws out the guts don't drop, I didn't monkey around much so as not to disturb the linkage - anybody know how to take this apart?

Thanks                Tom

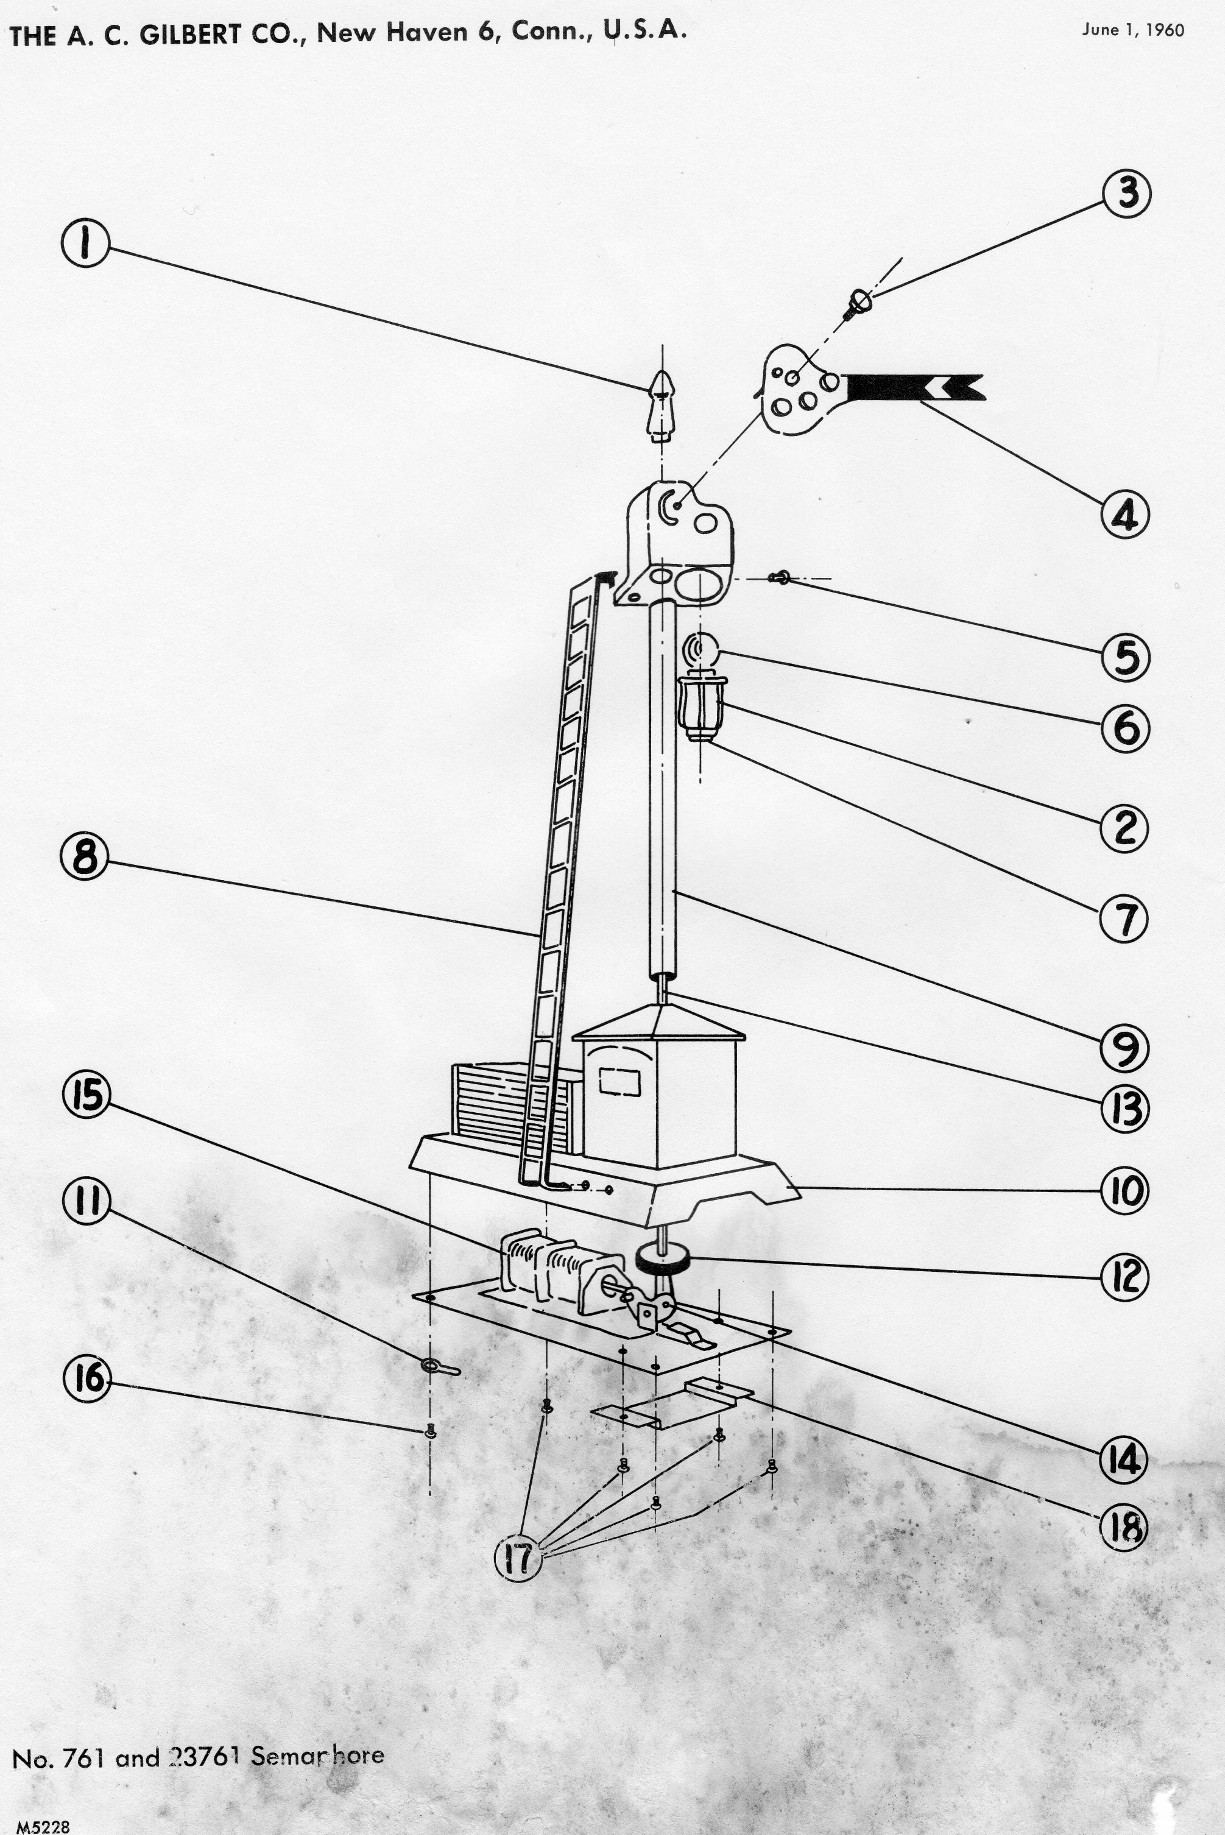
Well, I have chemical and electrical engineering degrees, have been a full-stack computer developer, and write novels for fun .... "Life without learning is death, and the funeral of a living man" - I don't have a mechanical engineering degree because I'm dyslexic - so how do you take this dependable accessory apart?  Like I said, removing the four screws at the bottom don't allow the guts to drop because of (as far as I can see) the linkages, and ya, people throw up the exploded view, but that hardly says for certain what may safely removed, and this thing is old and I have one and breaking it while taking it apart seems dumb.  That's what I have you guys and gals for - I imagine the top comes off somehow and the long rod comes out the bottom ...  Numquam anima per ignorantiam offenderent populos

The very top cap doesn't seem to unscrew.

So I tried taking the big screw out of the flag at top, and the pin there fits into the long position rod, this action allows the rod to slip out from the main shaft and now the guts drop out.  I cleaned the solenoid plunger and put a drop of special hobby oil on the linkage, put it back together and again the "red" button easily pulls the flag down, but it only fires back up again if first I gently nudge the flag.  I don't think this is how the semaphore actually worked on railroads in the old days. I'll revisit the linkage, plunger cleaning, and there is a small bent copper piece that limits or allows more linkage movement, maybe that's the key.

The bad news is now one of the little screws in the bottom is stripped.  That's why I hate working on this stuff.

Okay, took it apart a second time, the long rod running up to the flag has a round weight on it that slips on and sits inside the housing.  There's a copper contact that that linkage 1) gets attracted to when the rod is down (red), in the other condition the coil pulls the linkage "over" and away from the copper tab.  Playing with the tab and slightly bending the plunger ALMOST fixed it, note in the picture a curious trianglular strip of missing paint? It would go nicely into green "up" mode most of the time, BUT if you place your fingernail flush against the edge where the sephemore rides to limit it, it fires reliably. I surmise someone taped something along this edge to act like my fingernail and that's how this baby worked in the old days.  I'll have to figure something out and paint it black.  I love how the colored lenses look -

This is pretty much how I operated as an engineer - if someone knows about the problem already I want to know how they fixed it.  If I'm on my own, then I'll figure it out and share the answer.    Finis.20180521_221930[1]20180521_221958[1]20180521_222005[1]

Attachments

Images (3)
  • 20180521_221930[1]
  • 20180521_221958[1]
  • 20180521_222005[1]

Add Reply

Post
×
×
×
×
Link copied to your clipboard.
×
×