Many times when the subject of NYC Hudsons come up, many feel the unstreamlined J3a was the best detailed one Lionel has done. The first one , cab #5444, was introduced in 2001. The catalog showed correct Boxpok drivers but when released it came with Scullin disks. After many complained Lionel offered the correct Boxpoks for those who wanted them. Also it came with class lights which the J3s never sported when running on parent companies tracks. There are photos though of J3s with class lights, possibly on a subsidiary. Lionel's later J3a, 5433 came with Boxpoks and sans class lights.

Other criticisms included an overly long drawbar and incorrect headlight. I decided to address these issues. The drawbar was shortened many years ago after acquiring this previously owned engine. Also the smokebox front was swapped out with one from 5433. Here is a builder's photo of 5444, the last J3a built.
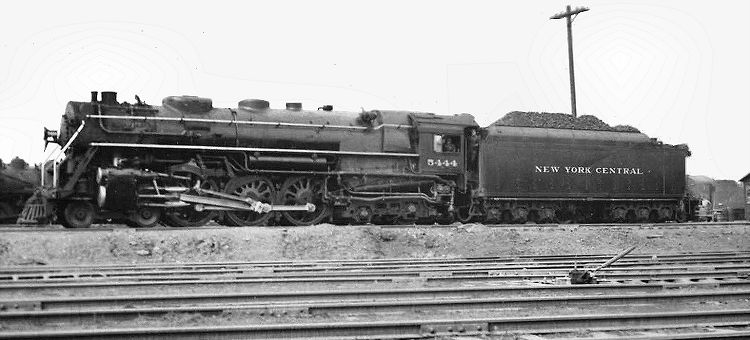
Here is mine as it stands today.

J3_Side

After shortening the drawbar, a cab apron was added along with cab curtains.

J3_side_close

Dual airhoses were added along with lift bar chains and a new headlight closer to the prototype. Both items are from Precision Scale.

J3_Front1

The replacement headlight was a bit of a surprise as it came uncored. It had to be drilled and milled out to accept the bulb and number boards. Here is a before and after including polishing the lens area prior to tin plating seen above.

J3_Headlight

Here is the headlight showing the lighted number boards.

J3_Front2

A fan smoke unit has been installed waiting drive electronics. The Lionel J3 now stands along side its 3rd Rail and Williams stablemates.

J3a's_front

Pete


Attachments

Images (6)
  • J3_Side
  • J3_side_close
  • J3_Front1
  • J3_Headlight
  • J3_Front2
  • J3a's_front
Last edited by Norton
Original Post

Replies sorted oldest to newest

I always watch these on eBay but have yet to snag one. I always liked the box artwork for this engine. Are the Scullins really incorrect for this cab number? I always thought the complaint from buyers was more of an aesthetic issue.

Proto question - what is the small stack ahead of the exhaust stack? 

In any case, good job - I was not aware the headlight was incorrect.

Norm, the J3s came with both Scullins and Boxpoks. Slightly more with Boxpoks. All of the engines I have seen with roller bearing rods had Scullins. But NYC had a habit of swapping drivers on their engines, some even having more than one type at a time. Its possible 5444 had its drivers changed at some time but the only picture I have is of the as built version above. In any event Lionel made swapping them out possible if not easy. Anyone trying this should know the screws are loctited in and not easy to remove even with heat. I had to drill two screws out. Fortunately new screws were included with the driver set.

As for the small stack I believe its the exhaust for the Elesco feedwater heater half buried in the smokebox. Its not present on the ones with Worthington heaters.

Pete

Last edited by Norton

Pete,  great job on the detail project.  Looks fantastic.  Did you also paint the model, or simply paint the detail parts to match?  What type of paint do you use.  I really like the cab curtains, where did you get those?

I always assumed the small stack was the exhaust for the trailing truck booster engine.  Can someone clarify it's purpose?


Thanks Scott. I only painted the parts I added. I use a paint from my local motorcycle shop called PJ1. In particular their "Special Satin Black". On small parts I just brush on Tru Color. Large parts I just spray the PJ1 right from the can. Small parts like the headlight I sprayed the PJ1 into my airbrush cup. That gives smaller droplets and a finer pattern. You can find PJ1 online and also many MC shops stock it.

As for the cab curtains they were cast from molds made using MTH cab curtains. For that reason I can't sell them but they are easy to make if you own a newer MTH steam engine. 

Check out this thread.


Pete

Last edited by Norton

Great work once again, Pete.

I see this version of the J3A on the market far more than the 5433 and at much more reasonable prices, so I might be tempted to do something like this than pay top dollar for the latter set loco. Unfortunately, it looks like the replacement boiler front for the 5433 is out of stock at Lionel...

I've read a few books, including a Lionel catalog, with the latter stating the small stack up ahead is the booster exhaust stack. Apparently though, it's both an auxiliary feed water heater and booster exhaust stack. There was some extra piping going to it for other appliances on the locomotive as well.

Last edited by Mikado 4501

Norton -

Looks really good. I have done some of this to mine, though that headlight looks really sharp - I filed my existing headlight on the top of the "barrel" to approximate the correct shape, but your real thing looks better. Great - another thing to buy...

I substituted a Lionel articulated drawbar which was shorter on my J3a's, and on this one I removed the class lights, pushed the LED's into the smokebox, filled the holes with Bondo, sanded and touched up with some incredibly coincidentally matching paint that I happened to have - acrylic, no brush marks. a couple of bolt heads/nuts are missing (Lionel didn't cast them in) where the lights used to be, but I accept that. Very small.

I kept the Scullin Disks - I like them better than Boxpok (which I like too) anyway. Did the 5444 ever have them? Don't know. I should find out.

Great work that Lionel should have done to begin with.

Next - the later J3a, as modified by the NYC, should come from Lionel. Without the errors.

Corrected smokebox front; some will mind the bolt omissions, some will not. I may try some of my "decal rivets" - or is it "rivet decals"? 

DSCN2260

Attachments

Images (1)
  • DSCN2260

D, thanks. I agree Lionel needs to up its game in the detail department. If it has a coupler it should have at least one air hose. MTH and 3rd Rail includes them. The one I used is PSC #40315. Dual air hoses, NYC type. The number for the headlight is in the photo above. If you get these air hoses know they are cast and require heat to bend. They break with little effort. I used my resistance soldering tool but a mini torch would work. A soldering iron is not hot enough. 

The rivets could be added using brass wire and a few holes in the smokebox. 

Do you have a description of the paint you used?  Matching paint can be the hardest part.

Pete

image

Tonight I converted the engine from 2 chuffs to 4 chuffs. I was hoping to do it electronically using either GRJ's Super chuffer and chuff generator on the motor or my own optical sensor and circuit but neither would fit.  So I opted to make another 4 lobe cam. This turned out a bit easier than the one I made for my Mogul as I was able to use a piece of 1/2" square stock and simply, or not so simply as it turned out, bore a hole to fit the axle. The axle turned out to be a size which was not very close to any drill bits I had either metric or letter. Brute force was the solution to make the slightly oversize hole a tight fit by using my 4 jaw lathe chuck and overclamping. Voila, press fit.

I still have to build a little circuit to shorten the on time and drive the fan motor. Should be able to make it small enough to fit in the space left.

Pete


Attachments

Images (1)
  • image
Mikado 4501 posted:

I’m a little surprised John’s Super Chuffer and generator didn’t fit in a locomotive this large. But the more you know and learn, amirite?

Here is the problem. The boards are mounted on a long metal plate that stretches from the motor to the smoke unit. The only place with close to enough room is below the plate behind the smoke unit. Anything you put there has to fit between the wheels. John's board is too wide. Mine is to tall. Hopefully the next version of John's board will be rectangular which would allow more flexibility. 

Now using the mechanical switch I only need a few small components for the fan motor.

image

Pete

Attachments

Images (1)
  • image

Nearly finished. I still need to fine tune the smoke unit some but am close. Lots of trial and error but am learning more like the fact that Lionel wired the smoke units I am using here backwards. Where red usually goes to the positive terminal on these it goes to the negative. Maybe due to how the fan blades are oriented. It puffs the same with either polarity.

Also my first attempt at a video. I either need an engineer or a camera man. Not good at doing both.


Attachments

Videos (1)
trim.4F9D3577-1A7C-46BB-AF1F-FB57FCAFF1B1

Norton - 

Just looked at this thread again; the "matching" paint that I used on the smokebox patch was apparently Badger brand Weathered Black acrylic; it came airbrush thin, but I used a "non-air" brush. I looked at the loco a few minutes ago and if you shine a bright flashlight directly on the front you can see a paint difference, but not much, and obviously from my photo above, in the real layout world it's negligible, even without the weathering that I should do... (note - I am not sure this old bottle of paint - still good, BTW - is pure, but this Badger paint, #16-05, is a place to start; there may have been a Badger "Graphite" involved - usually I write this stuff down).

Enjoyed you video; the locos in it make me think of my layout....I even see my 3rd Rail "Super J3a" with the improper lettering style on the tender...one day I'll fix that...Hudsons and Mohawks and Niagaras, oh my!  

What brand is that Niagara #6008? I have the Williams, Lionel and MTH - is this 3rd Rail? 

Last edited by D500

D, the super hudson was one of my basket cases that I rebuilt. The 3rd Rail 6008 Niagara in the background was the other. Came numbered as 6024 which is like the 5344 Hudsons. Everyone has made at least one. Both came with many missing and broken parts.

I started focusing on NYC about 7 years ago. Only way I can control spending.

Pete

Last edited by Norton

Add Reply

Post
×
×
×
×
Link copied to your clipboard.
×
×