Replies sorted oldest to newest

Matt

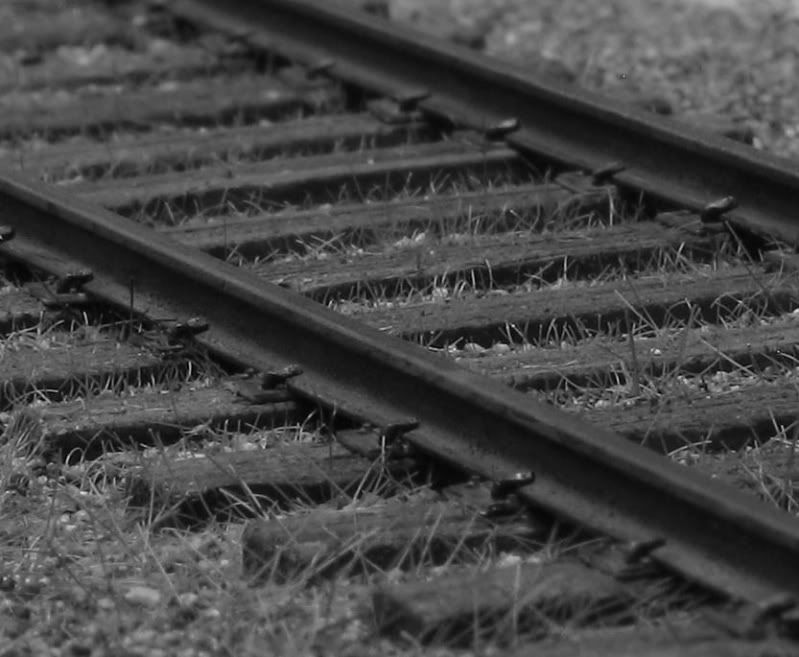
I'll second Ed's comment. That is spectacularly good work. It is nice track work simply as hand laid track with tie plates. The weathering puts it in an entirely other realm. The ties are just spot on for old weathered ties nearing the last of their service life. The rail weathering is very nicely done. Your choice of ballast nicely compliments the ties and the static grass enhances the overall effect. If you use Lou's joint bars you might even want to drill out a bolt here and there to make it look like a few are missing.

I hope you model the Milwaukee in the 1970s, with some low joints your track will be a perfect model of theirs!
Thanks all for the nice comments. Smile

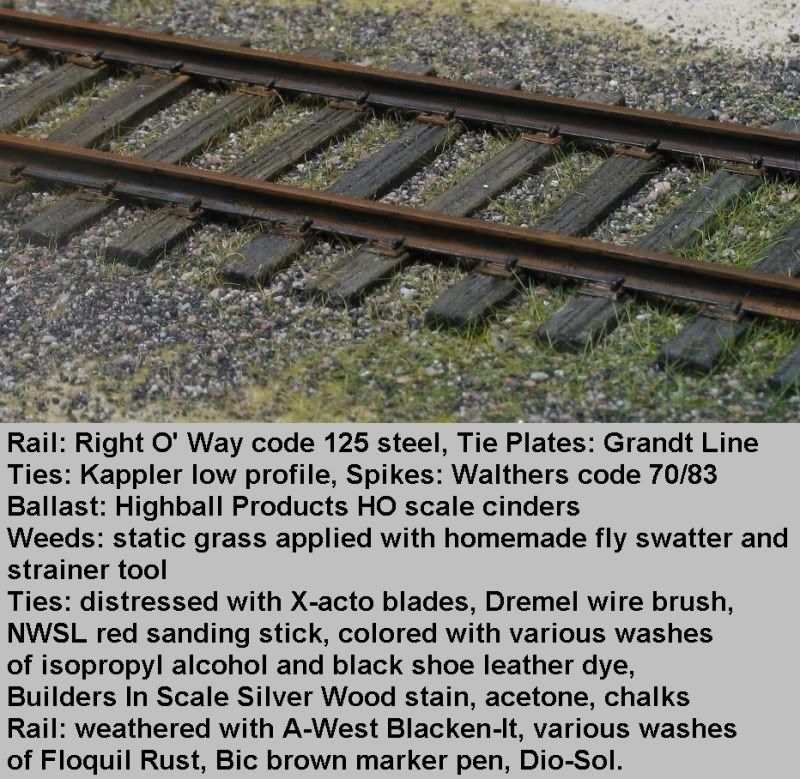
I didn't have any code 125 rail but Ed Reutling was kind enough to donate two short sections. I have never modeled with steel rail but after this experiment I plan to use it on my shelf micro layout. It's much easier to file, takes weathering great and best of all...looks like the prototype. Smile

This test section is only 6" in length and did not involve an excessive amount of time. Waiting for the glue to dry when applying the static grass is probably the most time consuming part but working in sections would minimize wasted time. Per the article in the Modelers' Annual, using a hair dryer on the ties after the washes are applied speeds things up and adds to the weathering effect.

According to the Blacken-It instructions, it conducts electricity, as on wheels and rails. The color on the rail tops is mostly Floquil rust. I'll take some super fine sandpaper and see if it polishes up to the original condition.

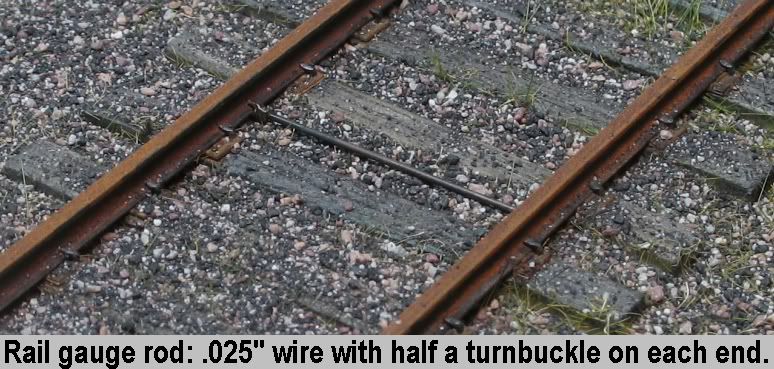
Adding joint bars, rail braces, loose spikes...etc. are great detail ideas that can be added as time permits. I cannibalized a turnbuckle from a Ye-Olde-Huff-N-Puff reefer kit, cut it in half and mounted each piece on scrap wire to simulate a rail gauge bar...the photo is in my first post. It's a bit large compared to the prototype. An S scale turnbuckle from Tichy Train Group and .015" wire might be closer to scale.

Thanks again for the compliments.

Matt
Thanks guys.

Ray,
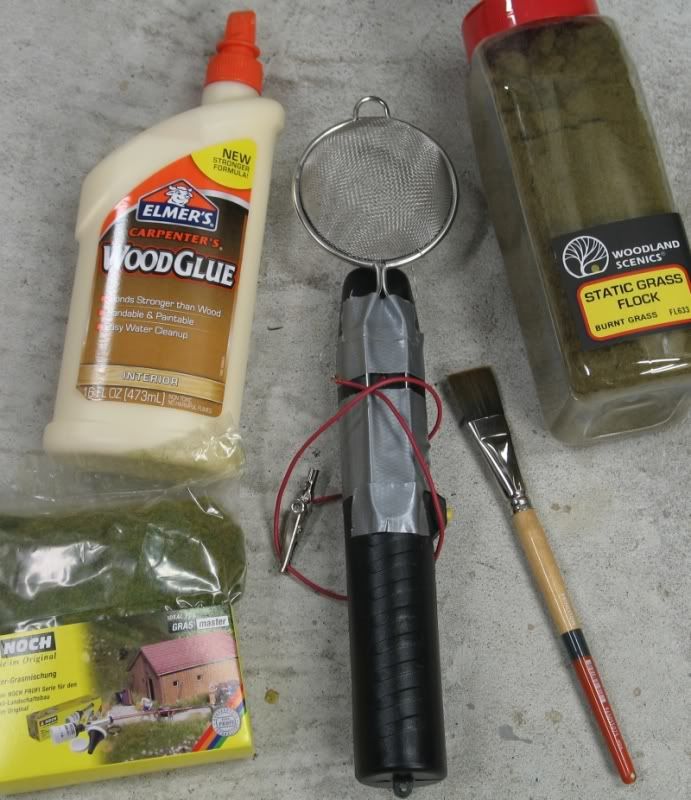
Here are the items I used for the static grass:


There's a three part video on YouTube describing construction of the applicator:
Make a static grass applicator with an electric fly swatter

This site describes construction and a modification to the circuit board:
DIY Static Grass Applicator

I did not make the modication to the circuit board because mine seems to work fine w/o it.

Harbor Freight has the fly swatter on sale for $2.99.

I applied the static grass after the ties were colored. Using a flat brush spread the glue between the ties making sure that there is a continuous path of glue. Use a damp paper towel to remove any stray glue from the top of the ties. Stick a nail in the glue, attach the alligator clip from the static grass applicator to the nail, press the button on the applicator then lower the strainer filled with a small amount of static grass within 1"-2" of the glue and bingo...the grass will stick into the glue. It won't be perfect but you don't want perfection or it will look like fur. Wink

Give it a try and practice, practice, practice!

Matt
That really is amazingly realistic looking track.

There's really only one thing I see that gives away that it's a model - the spike heads are too big and the wrong shape. I think you can get better looking spikes from the proto87 store - they have listed "Precision Milled, Stainless Steel Spikes" for O and S scale.

You have certainly raised the bar for realistic model track!

Ken.
Ken,
Yup, the spikes are a bit of an issue but I think the Walthers spikes look better than the ME small spikes, especially with the code 125 rail. I'm still waiting on my order of ME micro spikes but the head size might just be identical to their small spikes.

Initially I tried the Walthers spikes with code 100 rail but was not pleased with the results. I do have the P:87 Stores stainless steel spikes but installing them pushes my patience to the brink. This test with steel rail (vs NS rail) was an eye opener and now I'm trying to decide to build my layout with code 100 steel rail and P:87 spikes or code 125 and Walthers spikes.

...I did space the rails to 56.5" so I can sleep at night. Big Grin

Thanks everyone for the nice feedback. Smile

Matt
Post

OGR Publishing, Inc., 1310 Eastside Centre Ct, Ste 6, Mountain Home, AR 72653
800-980-OGRR (6477)
www.ogaugerr.com

×
×
×
×
Link copied to your clipboard.
×
×