All of my Premier PS3.0 steamers come with a long drawbar. Has anyone replaced them with a shorter one? I have found two shorter ones on the internet - 25 mm and 30 mm. I am guessing I just have to order them and they'll be a one to one replacement (drawbars have female plugs at both ends)?

Thanks.


Last edited by Paul Kallus
Original Post

Replies sorted oldest to newest

I have replaced all of mine. Make sure you get the one for PS3 (6 pin). You have to buy a set of three assuming you buy new. There are two sets of three. The sizes overlap so check what you have and how much shorter will work. They come in 5mm increments. Sometimes one 5mm shorter will work, other times 10mm will depends on your curve diameters. 

It would be nice if they just sold single lengths as the sets almost always come with one the same size you want to replace.

Some smart guy is going to figure out a use for all the unused over length drawbars, make a fortune and maybe buy a train company.


Pete

Last edited by Norton

I have shortened the drawbars on virtually every one of my steam locomotive models, whether Sunset/3rd Rail, MTH or Lionel. Although I have no MTH PS3 models, yet, I have installed shorter drawbars on virtually all my PS2 models. Be aware that MTH offers sets of three different drawbars for BOTH PS2 AND PS3 models (my hobby shop stocks both sets). Check a recent MTH Catalog, and you will find the appropriate part numbers for each PS2 and PS3 3-drawbar sets.

I was going to do it on a USRA Mikado.  But the gap isn't too bad (oddly enough the draw bar that comes with it is not one of the lengths that come in the set).  Anyway, I found the that clearance of the cab roof and the top of the front of the tender is pretty close as is, so I figured that when hitting an upgrade, the roof and tender might collide.  Adding to that the fact that I would have had to cut the grounding spring thing to try it, I felt like the potential benefit was not worth the risk of then not having a long enough ground spring part if I had to go back.  My point is to look at all factors regarding the gap, not just what it looks like sitting on a straight.  Seems like nothing is simple!

Good evening, my latest MTH Imperial Pennsy K4 came with a 40mm drawbar.

Inside the box was also a shorter 25mm drawbar also.

Not realizing this I purchased another set of draw bars to switch out the new K4 so I have plenty draw bars.

I have one curved turnout that is a 0 36 heading into the passenger station siding. With the shorter drawbar the engine roof is close to the tender but still clear. 

Even in reverse and backing out thru this 0 36 turnout with four passenger cars and two milk cars and backing thru to more turnouts the engine and tender never made contact with one another.

The shorter drawbar really helps with the appearance closing up the gap between the engine cab and tender.

Changing the drawbar is about a five minute change. Just be careful on the engine end not to lose track of the spring and retainer.

KJSTRAINS:

Yes sir, I have ordered additional, single drawbars from the MTH parts department. A while back I bought two 45mm and one 40mm (which is a size you will not find in either of the three-packs they offer). Each one was $10.00. They charged me somewhere around $11.00 for shipping, but in my opinion that was better than buying a three-pack and ending up with two useless lengths. MTH sent them via FedEx and I had them within two days. Each one came in a miniature Ziploc-type bag, all of which were well-packed in a small, rugged box.

Hope this helps.

-RUSS

Last edited by TRAINMAN0703
MarkStrittmatter posted:

Good evening, my latest MTH Imperial Pennsy K4 came with a 40mm drawbar.

Inside the box was also a shorter 25mm drawbar also.

Not realizing this I purchased another set of draw bars to switch out the new K4 so I have plenty draw bars.

I have one curved turnout that is a 0 36 heading into the passenger station siding. With the shorter drawbar the engine roof is close to the tender but still clear. 

Even in reverse and backing out thru this 0 36 turnout with four passenger cars and two milk cars and backing thru to more turnouts the engine and tender never made contact with one another.

The shorter drawbar really helps with the appearance closing up the gap between the engine cab and tender.

Changing the drawbar is about a five minute change. Just be careful on the engine end not to lose track of the spring and retainer.
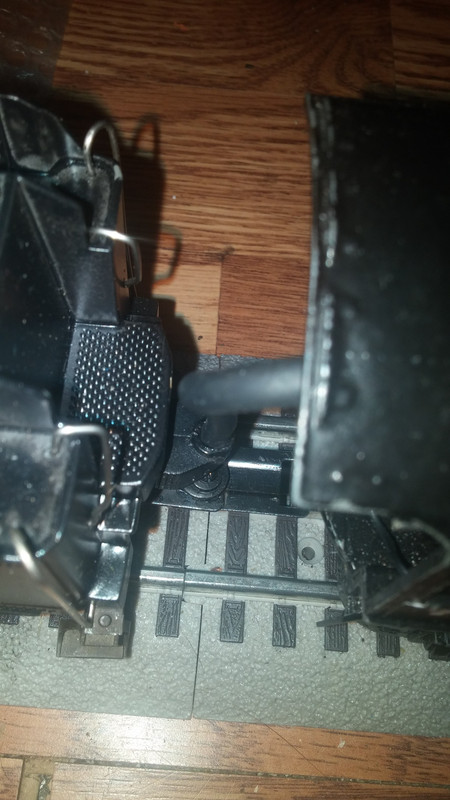
My Western Maryland H9 came with a shorter drawbar as well.  I replaced the 40mm one and had the same good results as Mark did with his PRR K4.  I haven't run the H9 for a while, as I have been switching things around getting started with the new layout. 

So all I have left is the original.  It is interesting that both Mark's and my locomotives came with the replacement shorter drawbar, but none of yours did, Paul.

kjstrains posted:

Has anyone tried ordering the same size drawbar from MTH parts?  I need two 45 mm drawbars but I don't really want to buy the packs with the rest of the drawbars when I only need 1 size for a replacement of a broken one.  

I have (2) 45mm drawbars that I will sell you. These drawbars have 6 pins on each end for MTH PS 3.0 engines.

Contact me off the forum.

 My Email is in my profile.

Only 25 mm drawbars. Clem is sending me one (thanks again!). Need 3 more at this point.

The 4 Premier PS3.0 steamers I have only came with the longer drawbar ~ am guessing they're 45 mm in size. Way too large of a gap for a supposed scale model. I am not a rivet counter per se but it detracts from the steam locomotive "look."  Even on O-72 curves the gap between rear of engine and tender frame is huge.

If I am understanding right - a couple of people received 25 mm bars with Railking engines? If so, doesn't make sense to me why they wouldn't include them on the Premier line too.


Last edited by Paul Kallus

I will be surprised if a 25mm will work on all your engines. At the very least you will have trim the apron. Let me suggest you remove the apron and then run the engine around your layout to make sure nothing binds. I tried going three sizes shorter on one engine (15mm) and it wouldn't work, not even close. Going 20 mm shorter will require a lot more trimming of other parts like cab roofs.

As for including a shorter drawbar with each engine, I recall the Barry said MTH was starting to do that but I have not yet received a PS3 Premier steam engine with one and my last purchase was two months ago.

Pete

Last edited by Norton

I did surgery on the the drawbar of my 2426w tender after adding electronics to the tender and 726 Berkshire engine.  I had to do that to customize the distance between the tender and engine, to properly accommodate the MTH tether I added, which handles wiring feeds going both ways.

As the photo below shows, I did that by cutting off the flat section of a draw bar I had on an old scrap 027 tender I no longer use and bolting it onto the flat section of the stock 2426w drawbar.  That gave me about an extra 1/8 inch of distance between the engine and tender, which is just enough to allow the tether to flex smoothly without binding or putting lateral pressure on the tender.   

modified Lionel drawbar     

Last edited by Dan Fender
Paul Kallus posted:

If I am understanding right - a couple of people received 25 mm bars with Railking engines? If so, doesn't make sense to me why they wouldn't include them on the Premier line too.


I am no expert, but I think you will find there is a lot more to it than merely the space between cab and tender, e.g., how far out does the connection point of the drawbar kick on curves, distance between top of cab roof and tender, and other issues I suspect   But I am curious to see how it goes. 

You guys are right - while measuring at the right locations I measured on a tangent. What I ended up doing was placing the engines on my tightest mainline curve - O72 - and allowing for small clearing between cab roof and tender - that's the limiting factor.

The Camelback can get away with the 25 mm - and perhaps the Consolidation - have to mess with that one.


Walt,

is replacing the bar a "plug and play" type thing or it there knowledge and/or soldering skills involved????

It's a matter of unscrewing the drawbar at the engine side (one screw) while taking care to keep track of a spring and a couple of washers. There's no soldering or special skill required.

The only "issue" is if it's difficult to reach the plug in the engine onto which the drawbar's socket connects, it might be necessary to remove the boiler to access the socket.

As an aside, you might want to contact Paul (above) and see if you can negotiate a deal for one of his too-long drawbars.

Last edited by Barry Broskowitz

Thanks for the feedback Paul.

Looks like I won't be switching it out after all.  I bit the bullet Sunday and dug the engine out of storage so I could measure the bar that's currently on it.  I measured it at 60mm from very tip to very tip.  Funny, the longest that I've been reading about on this forum is 48mm so maybe that not from end to end.  Anyways, it would seem that the engine already has the longest one.

- walt

Yes, the size is printed on the bars - although you may have to remove the plastic covering to see it.

fyi, MTH sells them from 25 to 50 mm in size - and the plastic covers separately. PS3.0 are 6 pin variety.

One thing: how is the metal ground bar supposed to connect to the tender - is it supposed to make contact with the tender's metal plug that inserts into the drawbar?

I noted the ground bar is insulated in the engine side by a plastic washer (washer between spring and bar - how is it thus even making ground between engine and tender if its insulated on the engine side?


Last edited by Paul Kallus

Paul,

One thing: how is the metal ground bar supposed to connect to the tender - is it supposed to make contact with the tender's metal plug that inserts into the drawbar?

Yes, the drawbar's spring should be tight against the tenders metal post.

I noted the ground bar is insulated in the engine side by a plastic washer (washer between spring and bar - how is it thus even making ground between engine and tender if its insulated on the engine side?

I expect that contact is made through the drawbar's screw into the engine's body.

Ye.s. CNW E4 from the set released several years ago. The only down side of using the shorter draw bar is that the deck plate MAY not have clearance and would either need to be removed or cut down. I took mine off. For some locomotives, though, you will be restricted to 36" radius (O-72) or broader due to reduced clearance. In my case, since I only run that locomotive at the club it's no problem. Will probably get shorter draw bars at some point for my other steam locomotives.

Add Reply

Post
The DCS Forum is sponsored by
×
×
×
×
Link copied to your clipboard.
×
×