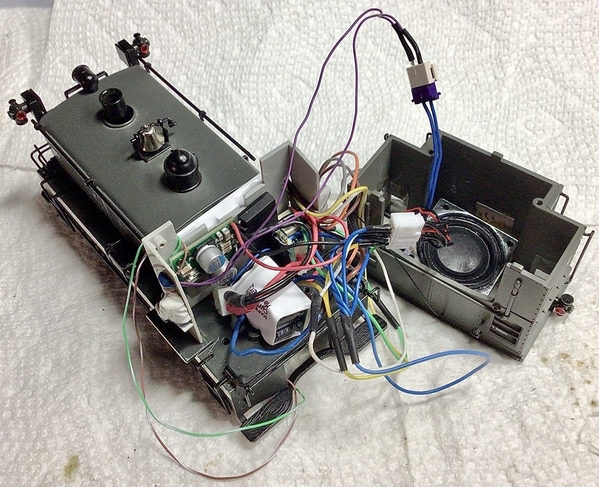
Took a while but I managed to fit a 2200 in this Plymouth. Stock smoke unit is controlled with F3 through a relay. Also was able to fit a current keeper in there.
I prefer the Kadee knockoffs but electro couplers with smoke control would require smaller relays. No room for a second save a third for individual coupler control. F4-F6 still available.

I included two videos. First is startup sounds when track is powered. It takes about 20 seconds for the app to connect with the engine after power up then after the app is in control.


Pete

Attachments

Videos (2)
IMG_3646
IMG_3654
Original Post

Replies sorted oldest to newest

Bob, K-Line did the paint. It was a set engine. They also did a separate sale NYC in black. Sounds are for a Galloping Goose. The only gasoline engine sounds I could find. They are part of the Baldwin Blunami sounds.

Horn is also from the Goose but I suspect that would be selected by the company that used them.

Pete

Last edited by Norton

Allan, I know its not pretty but here is what it looked like for testing before I cleaned it up. I spent a few days just putting components in different locations until I was able to get all to fit in the space space available.

Only the light gray plastic “firewall” had to have to material removed to make room for the speaker.

Speaker, rear light, and markers in cab shell.

Blunami is the thin white object in front of the firewall. DC DC convertor at the top of the firewall with a bridge rectifier, below it is the current keeper in the white cube and a small relay for smoke unit power to the right of the current keeper mostly hidden by the wires.

Speaker is from Lionel, 12v 2.4 amp DC convertor from Pololu. Many sources for Sountraxx Blunamis.

IMG_3643

Pete

Attachments

Images (1)
  • IMG_3643

John, I kept the bulbs in the markers but used LED chips in the headlight and rear light. Rear markers tied to the front headlight and vice versa so total amp draw from each circuit is about 60 ma well under the 100 ma max.

I know the mini Commanders/trackmobile boards would have saved some room but not sure there are any Railsounds boards that would fit even if you replaced or removed the smoke unit. Too bad the smaller TMCC boards are NLA.

As for electro couplers I think by eliminating the current keeper relays or circuitry could fit to drive them.

Anyone thinking of adding Command to these has to make a list of preferences as its difficult to have sound, smoke, and working couplers.

I knew a Current Keeper was important as these engines easily stall on larger switches.

Pete

@Norton posted:

I know the mini Commanders/trackmobile boards would have saved some room but not sure there are any Railsounds boards that would fit even if you replaced or removed the smoke unit. Too bad the smaller TMCC boards are NLA.

Removing the smoke unit allows you to pretty easily fit the standard RS-Lite board and speaker in the cab.  I like the fact that you got all of it in there, including smoke, I couldn't figure how to get the smoke in there too.   However, I do have operation using my preferred command setup, using the Lionel remotes.  That was kinda' important to me.

BTW, how is the range with the Blunami board stuck in the middle?

Last edited by gunrunnerjohn

I used a little salvaged laptop speaker I had in my speaker collection.  I've found that the DB rating of speakers varies widely, and sometimes you get surprising volume from small speakers.  This one has a baffle, which also helps a bunch.  It just fit in the cab with the ERR RS-Lite board  I put Mini Commander II under the hood.   With the MC-II under the hood, I couldn't fit the HO smoke unit, it's quite a big bulkier than the tiny Blunami 2200.

Laptop speakers are a good choice for small speakers, they usually have a well engineered baffle and have amazing volume for their size.

@Norton posted:

Bob, K-Line did the paint. It was a set engine. They also did a separate sale NYC in black. Sounds are for a Galloping Goose. The only gasoline engine sounds I could find. They are part of the Baldwin Blunami sounds.

Horn is also from the Goose but I suspect that would be selected by the company that used them.

Pete

I have the black one # 80. Never saw the gray before.....let the hunt begin! Release the hounds!!!!!!

Bob

@Trainmstr posted:

Gunrunner do you think your SMT version of the electrocoupler board would fit in the Plymouth with smoke and the Blunami.

I'm sticking an electrocoupler into a Blunami 4408 equiped steamer, and I wonder if you'd explain how you map a coupler to one of the available function outputs  Most of the external function outputs are unused, I just don't know how to map them to function buttons and get the momentary operation working.  I tinkered around a bit, but I know next to nothing about CV's or DCC, so I'm not making a lot of progress.

The function outputs can be set for touch on, touch off, or momentary, touch and release. That is done on the same page as the Function button is shown.

FX4 in this video.

You will need a relay or intermediate circuit to drive the coupler.

I was able the map the coupler CV to the Function output the coupler was wired to so you heard the clank when the coupler opened but will have to check the map to see what CV number that was.


Pete

Attachments

Videos (1)
trim.786865CD-07BE-4594-8223-62B7EA4F8B11
Last edited by Norton
@Norton posted:

The function outputs can be set for touch on, touch off, or momentary, touch and release. That is done on the same page as the Function button is shown.

FX4 in this video.

You will need a relay or intermediate circuit to drive the coupler.

I was able the map the coupler CV to the Function output the coupler was wired to so you heard the clank when the coupler opened but will have to check the map to see what CV number that was.

I know "what" I want to do, but when I look at the configuration, I can't figure out how to make the connection between the coupler function button and one of the FX outputs.

There is a coupler button by default at F13, and it emits the clank.  What I can't figure out is how to also have that output a pulse on one of the free FX outputs.  I have F3 thru F8 all free on the 4408 board, any one will do.

I also have the coupler driver board already made and ready.

Last edited by gunrunnerjohn

I know "what" I want to do, but when I look at the configuration, I can't figure out how to make the connection between the coupler function button and one of the FX outputs.

There is a coupler button by default at F13, and it emits the clank.  What I can't figure out is how to also have that output a pulse on one of the free FX outputs.  I have F3 thru F8 all free on the 4408 board, any one will do.

I also have the coupler driver board already made and ready.

I will have to dig out the engine I did this with. One downside of Blunami is you can’t get to the configuration menu without an engine on the track. At least I don’t know how to do that.

Pete

@Norton posted:

I will have to dig out the engine I did this with. One downside of Blunami is you can’t get to the configuration menu without an engine on the track. At least I don’t know how to do that.

Yep, since all the stuff is actually stored in the decoder, you have to fire it up to access it.  I laugh when people tell me how simple DCC is, but then I ask them why there are more than 400 CV registers if it's so simple!

Yep, since all the stuff is actually stored in the decoder, you have to fire it up to access it.  I laugh when people tell me how simple DCC is, but then I ask them why there are more than 400 CV registers if it's so simple!

Here you go John. Since I used Fx4 for the coupler I changed the value in CV 1.260 (CVs Page1) from default 25 to 13. F13 is coupler.

IMG_3897

Also if you haven’t already change the switch action of the Fx you use for coupler to momentary by swiping right on the FCN 15-28 page.

Pressing coupler on the FCN 0-14 should now also open the coupler.

IMG_3896

Easy, right?

Pete

Attachments

Images (2)
  • IMG_3897
  • IMG_3896
Last edited by Norton

Add Reply

Post
×
×
×
×
Link copied to your clipboard.
×
×