I first discovered this forum as a result of my love for Lionel factory displays and layouts. While I'm a Standard Gauge collector I enjoy seeing the old factory displays in all scales. The post war O Guage layouts were really interesting with all their remote control accessories and Lionel packed a lot of action into a small space. I've spent hours on here looking at and studying them and I would love to find one someday .

The Pre-War Scenic Displays and Plots are my favorite though. Something about the old sawdust grass, the "mud trees" and hedgerows, the tin bunglaows and villas that I find fascinating. The people that created them had to be both artist and  artisan, machinist and mechanic. I've often wished I could go back in time and watch them hand hammering a 130 or 140 tunnel or a sheet metal elevation piece.

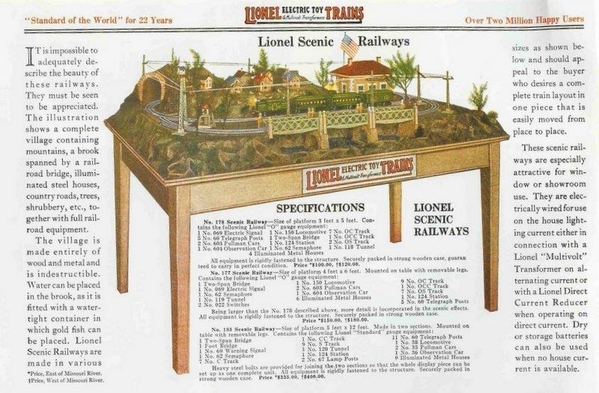
Examples of  Pre-War layouts are quite scarce as is the information pertaining to them. I am fortunate to own one of the No. 199 Scenic Railways as shown on the inside cover of the 1925 catalog. It's mostly complete and has virtually all of it's original accessories except  for the metal corner grass plot and a 3 piece metal grass plot.

199

The 199 Scenic Railway as described inside the back cover of Lionel's 1925 catalog

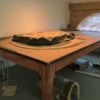
Due to space limitations in my current home, my layout will be confined to the loft area. Not a lot of headroom up there so the plan is to build a coffee table height stand for the original layout to rest upon. That will allow me to operate the trains comfortably from a chair while allowing me to slide underneath to address the wiring.

As a way of giving back to the forum I thought I would document the project here and describe in detail some of the construction techniques, materials, dimensions , etc that the factory used to build them. Would be great if I find others out there who can add info or history to the thread, make suggestions,  or simply enjoy reading about it. Maybe it will serve as a guide for future hobbyists and collectors. I will do my best.

Here's a few photos of some of the parts and pieces to get things started. The layout requires almost 50 accessory pieces including bungalows, villas,  switching tower, station, street lamps, telegraph poles,  tunnel, crossing gate, semaphor , trees, etc.


IMG_0448IMG_0452IMG_0453

IMG_0449IMG_0063

3 mountains

Gerry C.

Normandy Beach, NJ

Attachments

Images (7)
  • 199
  • IMG_0448
  • IMG_0452
  • IMG_0453
  • IMG_0449
  • IMG_0063
  • 3 mountains
Last edited by G-Man24
Original Post

Replies sorted oldest to newest

Thank you all for the compliments and encouragement. I'm a known procrastinator so  I'm hoping this thread will provide the necessary impetus to see it through to completion. 

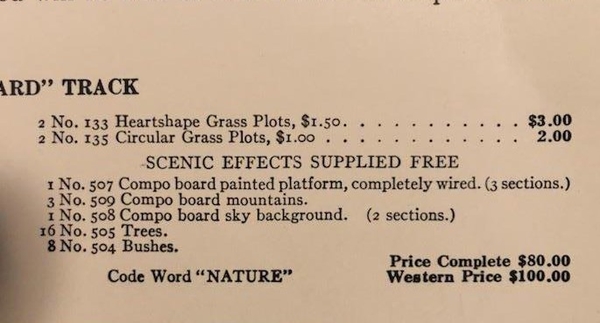
A few interesting notes about the display. In 1925 the retail price was $80-$100 depending on delivery point. That's roughly $1200-$1500 in today's money and it came with no trains, track or transformer. Minimum wage laws at that time were set at 16 cents per hour so that was a pretty hefty sum for the average Joe. I think it would be safe to say that the displays were primarily targeted to retail stores and dealers unless you were a kid whose parents were well-to-do. 

TCW [14)

In another example of Joshua Cowen's brilliant marketing skills , the catalog points out that the Price Complete of the display is equal to the sum total of all the accessories included. That is, you are essentially getting the scenic layout for "free" ... provided you purchase all the accessories at one time. This must have been irresistible to the dealer who realized that when he was done with the display he could put the all the accessories back into their boxes and sell them to recoup his money.

IMG_0573

IMG_0575

This is only a guess on my part, but I would say that in most cases that is exactly what happened. At some point the dealer would sell off all of the accessories to recover his investment, and the large cumbersome displays were broken up and discarded . If in fact a lot of these were sold as the catalog indicates "The demand is already tremendous"..this would account for the small number of displays which have survived. The Great Depression and WWII lie just ahead, where the preservation of a toy train board would seem rather unimportant. 


Attachments

Images (3)
  • IMG_0573
  • IMG_0575
  • TCW (14)
Last edited by G-Man24

I will state up front I am a bit of a purist and I will attempt to keep things as original as possible. I don’t mind seeing a battle scar or age-worn spot here and there as long as it does not significantly detract from the overall appearance.  The patina for me is a glimpse into its past, the places it’s been and the people who cared for it and operated it. I want to see it exactly as the kid standing in front of the hardware store window in 1925 saw it.  It is my intent to restore the layout to running condition without any re-paint, touch-ups, or component replacement except where it may be absolutely necessary.  

Starting from the bottom up. The scenic layout is made up of three individual layout boards and their accompanying frame sections, laid side by side. Each frame section measures approximately 49” x 30” for an overall size of 49” x 90”.

IMG_0347

The frames are made of wooden rails approx. 1-1/4” wide with both a step and groove milled into them. The corners are mitered lap joints. 

lapjoint

groove

The cross braces are attached using corrugated nails which allows them to lay flush with the base of the side rails while supporting the panels from underneath. The panels then slide down inside the groove in the frame creating three separate units which are sturdy and rigid.

corrugated

IMG_0585

The display is almost 100 years old now and the wood frames were loose so I disassembled all the corner joints and rebuilt them using fresh glue & wire brads as original. I experimented first with Gorilla Glue but settled on regular Titebond wood glue. Once the glue is set, a wire nail is driven into the corner from both directions. The result is a surprisingly strong joint. 

glued

Attachments

Images (6)
  • IMG_0347
  • groove
  • lapjoint
  • corrugated
  • IMG_0585
  • glued
Last edited by G-Man24

With the frames tightened up I turned my focus to the layout panels. Hard to tell from this picture but a couple of them had slightly bowed or warped over time.

Boards

The weight of the track and accessories would probably help straighten them out but I wanted to try and get them as flat a possible before sliding them into the frames for the last time. Honestly I don't know why they were ever removed  since the frames would have helped to keep them straight and there's really no good reason I can think of for doing it .  It doesn't make it any easier to store them.  Bending the bow out of them "dry" is both futile and dodgy as they spring right back and there's a chance of cracking the board. I decided to try applying some steam to the backside and then pressing them flat while they dry using some heavy panels of tempered glass I had. 

IMG_0613

I'd say they're 90% flat now with just a little more tweaking to go. Maybe one more steam and press session.

IMG_0354


Attachments

Images (3)
  • Boards
  • IMG_0613
  • IMG_0354
Last edited by G-Man24

Thanks again guys. MATTR the story behind how I found the layout is not as exciting as you might imagine. I got it from a longtime collector and friend who had it stored away for years. He had not gotten around to putting it all together and trusted me to give it a good home. I wish I knew more of it's history it would be really interesting to know where it originated.


OK a little more about the train layout panels themselves...Lionel describes them as "Compo" board.

This Composition board is sort of an early version of Masonite. The panels are approx 1/4" thick. The grass and foliage looks like it was painted by dipping a sponge into various colors of oil paint and dabbing it on. There are holes punched or drilled in for wiring.

IMG_0691

Interestingly, the location of each accessory is factory labeled with the corresponding catalog number. Seems Lionel was intent on having all the displays set up in a consistent configuration rather than having people use their own imagination. You can be sure the marketing wizards at Lionel helped designed the layout in a way that would best show off their line of accessories and thus maximize sales. As an example there are three different styles of street lights along with a variety of villas and bungalows.

IMG_0067

77

IMG_0696IMG_0064IMG_0066

Attachments

Images (6)
  • IMG_0691
  • IMG_0696
  • IMG_0064
  • IMG_0066
  • IMG_0067
  • 77
Last edited by G-Man24

Got to work on the table last week. Being a retired machinist I’m way more comfortable working with metal than wood so I enlisted the help of my friend and neighbor Roger who is experienced in cabinet making.  As stated earlier I wanted a “coffee table height” display stand since it’s going up in my loft and headroom is a consideration. These layouts were designed to sit on a floor or large table or on a store window platform so I’m not attempting to replicate or reproduce an original Lionel piece per se but rather create a unique display stand that will show the layout well while providing a comfortable height from which to operate it from a chair (I’m getting too old to play with trains on the floor). In designing it however, I did try to borrow some of the styling cues (fully skirted perimeter, tapered legs, moldings, etc.)  that Lionel used on their Pre-War standing displays. In other words, I tried to style in a way that I think Lionel would have had they produced such a table.

SCAN0087.0 [1)

The table is constructed entirely of Hard Maple and spans almost 8 feet without the need for a center support leg. The interlocking cross bracing prevents it from racking while the open grid design allows easy access to all the wiring. The new framework follows the factory framework, supporting it just the same as if it were placed on a floor. Wooden cleats will be added to the inside of the frame which will register against the inside of the 3 factory frames keeping them centered and preventing them from shifting. 

IMG_0733


Table [8)Table [3)Table [9)Table [12)Table [13)

Table [11)

The best part of all is the entire table can be knocked down into a stack of wood and re-assembled again using a single tool, a 1/8” square drive screwdriver. This is a huge benefit for getting it up into the loft or in the event it ever needs to be stored away (heaven forbid!) 

Hard to get a good picture of it right now since I'm essentially building a 32 sq/ft frame within 50 sq/ft of shop space.  A few more hours of work and I can disassemble for stain and varnish.

More to come…

Gerry C.

Attachments

Images (9)
  • Table (16)
  • Table (8)
  • Table (3)
  • Table (9)
  • Table (12)
  • Table (13)
  • Table (11)
  • SCAN0087.0 (1)
  • IMG_0733
Last edited by G-Man24

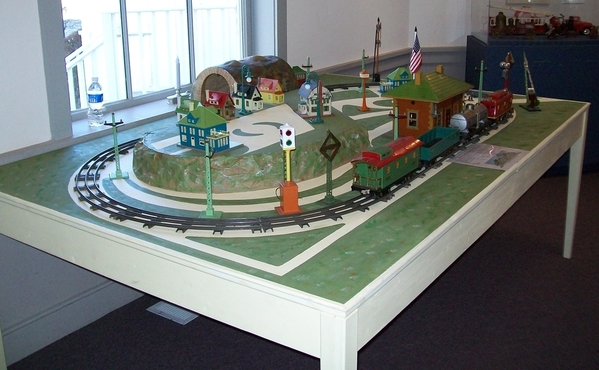
I built a clone based photos I had of an original display, sans the backdrop, about 10 years ago for a local museum display.  Ran a #8 outfitted with a Williams Std gauge motor for 8 hours a day for a week.  I had most of the accessories, but took some liberties on others to fill the spaces.  I set it up for about 3 years every holiday season.  No longer used, if anyone is interested.100_0387

Attachments

Images (1)
  • 100_0387

Got some stain on the finished frame this weekend. After letting it dry for a day I partially disassembled it to carry it up into the loft:

IMG_0774

IMG_E0775

Yes that's water outside the window. Our home is perched right on the edge of the Barnegat Bay and the loft overlooks a cove that runs behind the house. I was going to lay claim to the "model railroad built closest to the water" but there's probably some rich guy out there that has a layout on his yacht. Anyway it makes for a cozy little clubhouse with a nice view. 

Before disassembly I stamped some witness marks into the frame so it always goes back together the same way . My neighbor Roger said it's starting to look like it came from Ikea so I stopped.

IMG_0778

A handful of screws and it was back together... 

IMG_0782

My objective was to make a stand that looks like it belongs with it ..something that would enhance the way it is displayed but not be so fancy and "furniture-like" that it detracted from it or looked fake.  I wrestled for days over which color to use staining small samples of maple but it's very hard to get the full picture off a 4" piece of scrap. I finally decided on a color called "Gunstock" and I'm really happy with the results. I think it plays well against the original dark green on the frame which overhangs it all the way around like a crown. It also looks good against the muted colors found on the board and the old accessories like the tunnel, station,  and bungalows. 

IMG_0787

I was thinking of adding a coat of poly over it but I think I'll leave it as-is. 

Here's one of the mountain backdrops propped up against it for color contrast,  just to get an idea of how it will all tie together...

IMG_E0807

Gerry C.


Attachments

Images (6)
  • IMG_0774
  • IMG_E0775
  • IMG_0778
  • IMG_0782
  • IMG_0787
  • IMG_E0807

It looks very nice- you and your friend did a great job on the construction. I'm an old Manhattan cabinetmaker myself. I am slightly concerned about that 8' span with no center leg, but if it starts to sag, you can always add one. I do have to admit being a little sorry you didn't just clear coat that beautiful maple which would have more closely matched the cream color Lionel used. But your finish looks sharp, I have to say.

I an making a Christmas table layout loosely based on these prewar table layouts which I have always loved.

By the way, where are you on the bay? My grandparents had a house on the Bay in Mantoloking.

Will I hear exactly what you are saying because I started out down that road. I considered either clear poly or tung oil or even painting the wood a cream color to match the stand in the photo but it just didn't look good at all when I sampled it. I think it's because these particular frames were painted a dark , flat green as opposed to a natural color frame like is shown in that ad . Also the table models did not have the flat layout boards like this display but rising hammered sheet metal. When I put the natural color wood up against the green frames and tan panels it looked awful in my opinion. Too stark a difference it looked like they didn't belong together. I think the stain works nicely with the green frames, the panels  and  the mojave, peacock green, maroon , terracotta , etc. (colors) of the accessories. It just has a nice warm "old" vibe to it that feels right. 

IMG_0863

IMG_0869

At the end of the day there won't be many people besides myself and family members climbing the ladder up to the loft to view the layout so I need it to be something I enjoy looking at vs. "correct" and since Lionel never offered a table for this particular display I guess there really is no "correct".  Usually I know when I've made a mistake I start to second guess myself but its been a few days now and I still look at it and like it.  Once it's all together and up and running and I step back  I will know if I made the right call or I goofed. 

As for the bay , we live on a cove just South of the Mantoloking Bridge. 

Thanks for your interest in the project , I appreciate it.

Attachments

Images (2)
  • IMG_0863
  • IMG_0869
Last edited by G-Man24
Will posted:

Yes,  I see your point. It looks right with the display on it. My grandparents house was  916 Barnegat Lane, on the lagoon between Bergen and the Bayhead line. I spent the summer of '69 there.  It was sold decades ago, though, although I still drive by now and then.

What a great location your grandparents had. I almost always jump off Rt 35 over to Barnegat Lane just to admire the homes back in there.  I drive my wife crazy wishing I could live there. When you drive over that little bridge on Bergen and look down the lagoons to the North and South you see the beautifully manicured yards and the old wooden skiffs and cruisers tied up to the docks. Very serene. Over the bridge to the left,  out to the point of Lagoon Rd South is my dream location (if only I were a multi-millionaire). Some day I'd like to get a part time job at the Bay Head Yacht Club working in the boat house . Some great looking historical buildings there. 

Must have really been something back in '69,  I'm sure you have great memories.

BTW I checked out your website, very cool. Your work has a great Mid Century Modern vibe to it. Before buying our bay home we lived up by the beach in a 1950's bungalow with a lot of MCM decor ..old knotty pine paneling, Heywood Wakefield furniture, Majestic lamps, Masketeer wall art , gravel and sand mosaics, Lava Lamps, you name it. Fun stuff.


Last edited by G-Man24

Fantastic to read about what you wanted to do and where you have gotten with your display layout .  And that goes for the comments as well .   I will be following this thread for sure , being that I was bitten by the Standard Gauge Bug a few years back . Plus being a carpenter myself , I really enjoy seeing the frame work,  something that most people will never see .    I do agree with Will about putting a clear coat on it . Even if it is a matte finish , it's amazing what dust will stick to .  Keep the wonderful posts coming , you have an interested audience !!

Thanks for the compliments . This project has been helping me keep my sanity.

Today I made some small wooden cleats out of scrap 1/4" hardwood. After positioning the three layout frames into their proper positions I fixed the cleats inside the corners. This locks them (the frames) securely into place without adding any unwanted holes to the original framework. Once I locate them I drill the through holes with a larger clearance drill which allows me to shift them around slightly for fine tuning. The built-in washer on the screw heads works nicely for this purpose. 

Cleats [1)Cleats [2)Cleats [3)Cleats [4)Cleats [5)

The panels can still be removed simply by lifting them up but once dropped over the cleats they all lock together nice and solid with no shifting. 

Here's the right hand panel set in place along with the corner elevation and switching tower 

IMG_0931

Gerry C


Attachments

Images (6)
  • Cleats (1)
  • Cleats (2)
  • Cleats (3)
  • Cleats (4)
  • IMG_0931
  • Cleats (5)
Last edited by G-Man24
JohnnieWalker posted:

....  I was wondering , are you going to use traditional old track or are you going to use new production track , USA or another maker ?

JW I figure I came this far so I plan on trying to use the original track. Some will probably second guess that decision but it wouldn't feel right to use modern track for this particular application. The track I have looks to be early to mid 1920's  and it's very clean and straight so I'll remove all the pins for cleaning, brush out the tubes and see how it goes. 

pins [1)

On the same subject can anyone tell me if Lionel offered an insulated block signal curved track or only straight? If not I may need to make my own to operate the crossing gate and bell. 

Attachments

Images (1)
  • pins (1)
Last edited by G-Man24

I finally have all three panels in their frames and in place. I was pleasantly surprised at how well the steam iron/ plate glass trick worked to press the warping out of the center panel. It’s darn near perfect and way better than I had anticipated. Also notice how the painted “grass” areas line up well. I don’t believe the panels were laid side by side and painted as a unit way back when. I believe each was likely done individually using different templates at different stations in the factory, perhaps even by different people so uniformity or conformity is not always the case. On the few other examples of this layout that exist, I have noticed the artwork does not always align and the boards even vary in color like they came from a different “run”. Fortunately, these seem like a nice “matched” set that have always been together.

IMG_0987IMG_0994IMG_0996

 The most noticeable discoloration follows the path of the oval track layout and appears to have been left by the well lubricated gears and wheels and motors of the engines and rolling stock that once ran on it. With the track back in it’s place it will hardly be visible and with any luck my grandpa's old 390E and passenger cars will soon be laying down a few oil drips of their own.

 IMG_0585

There is also what looks like an old water stain streaking on the edge of the center panel but again, fortunately, this is completely covered by the large center elevation. It looks like once all the track and accessories are in place only the best-looking areas will show and so it should display very nicely.

 IMG_1007

 Gerry C


Attachments

Images (6)
  • IMG_0987
  • IMG_0994
  • IMG_0996
  • IMG_0585
  • IMG_0585
  • IMG_1007
Last edited by G-Man24

Speaking of the center elevation, this is my favorite piece of the entire display and the piece that really makes it special and unique. It gives it another dimension.

IMG_0063

The center elevation is nearly 4 feet long and 30" wide and is a combination of sheet steel, hard board panel and wood framework . It holds an assortment of illuminated villas and bungalows as well as street lights, trees, bushes, and a circular grass plot. The majority of the town’s “residents” live here, and there’s a walking path at the front to get them down to the rest of the village and the train station.

IMG_0069IMG_0071IMG_0072IMG_0074

I love how the sheet metal is cut, folded, and hammered into shape. There must have been a wooden buck that allowed them all to be formed into a similar size and shape, yet like the 130 and 140 pre war tunnels, no two are exactly alike. The hundreds of hammer marks and folds assures that each one has a unique personality. To the uninitiated it may just look like  some wrinkled up sheet metal. Over the course of my career as a machinist I was fortunate to work with some great old school craftsmen including some very talented tin knockers and I dare say some of those guys would’ve been hard pressed to duplicate one of these pieces. It takes both mechanical ability and an artistic flair and I have a lot of admiration for those early Lionel employees and their work .

IMG_0117

IMG_1028

From the time I acquired the set I have looked forward to the day when I would set the elevation into place and yesterday was that day.

IMG_1003a

Thanks for following along. More to come..

Gerry C

Attachments

Images (10)
  • IMG_0063
  • IMG_0063
  • IMG_0069
  • IMG_0071
  • IMG_0072
  • IMG_0074
  • IMG_0114
  • IMG_0117
  • IMG_1003a
  • IMG_1028
Last edited by G-Man24

Brief update. I wanted a small control console , again something that looked like it "belonged". Used some leftover maple to form the framework. Top panel will be a piece of Masonite.

IMG_1044IMG_1045

Very rudimentary in design it will hold a period correct Type "T" transformer on the left, No. 90  rheostat, main power switch, and a bank of 6 Lionel knife switches . The knife switches will control among other things the track power, bungalow and villa lighting, street lamps, station lighting and crossing gate/ warning bell. I'm thinking with this short loop that ringing warning bell might get to be too much after an hour or so :-)

IMG_1062

IMG_1060

IMG_1063IMG_1064

Gerry C.

Attachments

Images (6)
  • IMG_1044
  • IMG_1045
  • IMG_1062
  • IMG_1060
  • IMG_1063
  • IMG_1064
Last edited by G-Man24

G-Man24, Your work and craftsmanship is Top Notch in every way!

This is one of the most rewarding things about a restoration job of this nature. You have put it back together as it belongs.  You are doing a first class job and this layout will be brought back to life as it deserves to be on display again in all its glory!  It is amazing that it has survived after all these years and you are now the one helping it survive a longer life, great job in every way!

Enjoy it, thank you for taking the time to share this with all of us, Best wishes and Health to you and your family.  

Thanks guys for the comments and "likes". 

Rick you might be interested to know my maternal grandfather worked virtually his entire life with the CNJRR as a brakeman or yardman. Kind of ironic since it was actually my paternal grandfather,  a policeman (who I never got to know) , that handed down his Pre-War Lionel trains. 

My maternal grandfather lived upstairs from us in a two family house. After he retired in the early 60's he would often take me along as he drove back down to the yard on Trumbull Street in Elizabeth to visit his old friends. That was a huge yard I'm sure you know that tied into the passenger and freight rails that served the massive Singer complex. I also distinctly recall driving with him to visit the site of the 1972 boxcar derailment that demolished the station by the Broad Street overpass. 

cnjelizabethwreck7

Someday maybe I'll dedicate a thread to my grandfather with more of my memories and some old photos of him at the yard. I still have one of his lanterns and I'm planning to hang it near the Lionel display. 

Gerry C

Attachments

Images (1)
  • cnjelizabethwreck7

Add Reply

Post
×
×
×
×
Link copied to your clipboard.
×
×