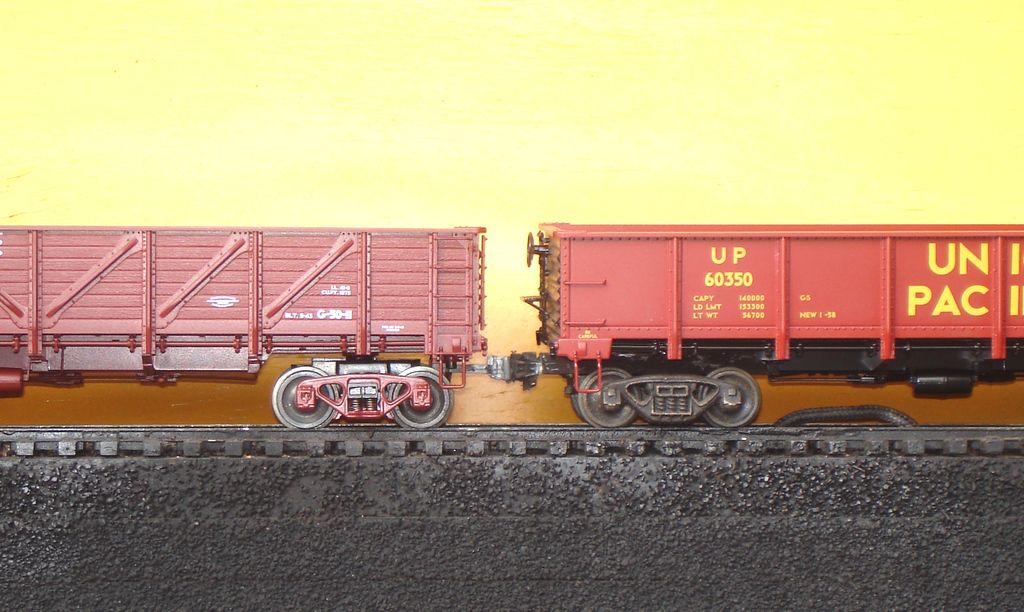
I have several recent production MTH Premier gondolas that seem to sit too high compared to their Atlas O and Lionel counterparts.  Has anyone lowered these cars?  It looks like I will have to construct new bolsters to get the proper height.  Any advice would be welcome.


Thanks,


Tom

Original Post

Replies sorted oldest to newest

Originally Posted by Tom Densel:

I have several recent production MTH Premier gondolas that seem to sit too high compared to their Atlas O and Lionel counterparts.  Has anyone lowered these cars?  It looks like I will have to construct new bolsters to get the proper height.  Any advice would be welcome.


Thanks,


Tom

Lowering the car over the Hi-Rail trucks, with the pizza-cutter flanges is not easy. The tastes and simplest method is to just change the trucks to the 2-Rail SCALE type (I prefer the Weaver 2-Rail trucks). All the changing of car body bolsters and such, could still cause the big flanges to contact the underside of the car.

Originally Posted by breezinup:

I've also looked at trying to lower MTH's tank cars, which ride so high it's ridiculous (if those were 1:1, you could walk under them standing up). I couldn't figure out a way to do that, either, without some kind of complete redesign.

Another reason why that tank car is so high, is to clear the swing of the claw coupler, in addition to the big wheel flanges. When the claw coupler is removed, and the car is up-graded to Kadee coupler, then the body can be lowered on the truck, even with the larger flanges.

Swapping the stock MTH trucks with Atlas O trucks will also lower them down a bit as the truck bolsters are lower.  Atlas O separate-sale truck pair kits also come with screw mounting adapters that work fairly well.  I've done this to a number of MTH freight cars before eventually deciding to 2-rail them altogether using the same method, except of course with 2-rail versions of the Atlas O and MTH trucks, which others have already mentioned lower them to an even more prototypical height.

I've never found that the large flanges have been a problem when lowering cars. I'm sure that in some situations they have been, but when I lowered some old K-line (Intermountain) plastic reefers riding on old-desiign, PW-proportioned die-cast sprung trucks, I just Moto-Tooled the Intermountain plastic frame bolsters off the car and the reefers now sit quite realistically, with the original trucks, and no flange scraping.

The area where the bolsters were was not visible, anyway. 


This is one example and situation; some are more problematic. But, often, just grind away in the hidden spots.


Tank cars and their nudity are a problem - but have you noticed that, because of this, even the real tankers in a freight yard sometimes look like they're riding around on MPC trucks? Weird.


Switching to 2-rail if one has nice things is not a good idea. One usually needs a bigger house and has to live with poor equipment selection. By comparison. If I wanted 2-rail with poor selection, I'd go to S-scale tomorrow. 

Originally Posted by David Minarik:

Tom,


I just did a whole fleet of gons.  


I was some major surgery but once I had the first one done, it was pretty easy.


Here is a photo.  The stock is on the right, lowered on the left.


IMG_2978

Dave,


That is exactly what I'm looking for.  That gondola looks great lowered.  I probably won't be able to get mine that low due to using the original "Claw", but I should be able to make a little improvement. 


What kind of surgery did you have to perform?  I could probably figure something out myself, but why re-invent the wheel!


Thanks for your input.


Tom

Tom,


Sorry for the late reply.  I had to disassemble one and take some photos.  I will try my best to explain:


1. I use a flexible saw to cut off the mounting boss from the frame.


2. Enlarge the hole with a Uni Bit


3. Invert the mounting boss and insert into the enlarged hole.  I used bars in the depressed cross pattern as a stop gauge.


4. Trim the excess material on the underside.


I hope this helps!


Pics:


IMG_3117

IMG_3118

IMG_3116

Attachments

Images (3)
  • IMG_3116
  • IMG_3117
  • IMG_3118
Originally Posted by Engineer-Joe:
Originally Posted by D500:


 If I wanted 2-rail with poor selection, ... 

Wow. I see this is posted in Hi rail so ......I should let it go?


Probably......some folks still believe in the tooth fairy and Easter bunny.  Stripping away their closely held myths can be risky, yet entertaining.

No - switching to 2-rail is a poor idea if you like the center rail.  It is easier to switch to 2-rail than it is to convert a whole bunch of 3-rail cars to 3-rail scale wheels and Kadee couplers.  If you are laying track, it is probably a break-even if you are laying "T"shaped flex track, although switches may be a problem.  Doesn't Ross make 3-rail "T" rail switches to custom specs?


If you convert MTH to 2-rail it remains capable of its original radius unless you add underframe details - and unless the Kadees constrain the radius.  And as I understand it, most MTH new production comes in either 2-rail or three.  You can keep tinplate radii if you want.


I see nothing wrong with 3-rail scale, if having a center rail is important to you.

Here are my MTH gons, re-done with insulated wheelsets.  The one on the left will probably do O-27.  The one on the right has metal frame extensions, and probably needs 36" radius.  The choice of how big the layout has to do with how accurate you want your equipment, not how many rails you like.


These are nice models, and do not need lowering.  The prototypes sat quite high, so the doors over the trucks would work.  Now if only somebody would do the earlier version . . .

Last edited by bob2
Originally Posted by bob2:

The choice of how big the layout has to do with how accurate you want your equipment, not how many rails you like.


In part true, but you can have a rather small layout with very accurate models if one chooses carefully.  In my case, that's generally prior to 1920 which limits the size of equipment permitting tighter radii, etc.


These are nice models, and do not need lowering.  The prototypes sat quite high, so the doors over the trucks would work.  Now if only somebody would do the earlier version . . .

Nice gons again, Bob.  Wonder if the Glacier Park gon kit might serve as a starting point for the earlier version???

I have about eight MTH gondolas and all are modified for 2 rail and sit nice and low.

When I modified mine I used Weaver trucks, Intermountain wheels and Kadees.

To mount the trucks I turned down some round solid nylon in the lathe and made sleeves to mount the trucks on.

Works for me of course the stumbling block is you need a lathe for my method.

Roo.

DSC08284

Attachments

Images (1)
  • DSC08284

Roo,


Those trucks make the modification totally different.  Certainly less complicated.  I have issues with 2 rail flanges on Ross/Gargraves track and switches.  They work OK with just a few cars but derail as the train gets heavier.


Matt,


I keep the stock trucks.  I do hack off the claw mount for Kadee clearance.  


They negotiate 72 curves.  I have one section with 2 72" switches in an 's' pattern that I use to test cars.  They make it through just fine. 


Dave


Thanks for the reply Dave.

The good side of the modification is you could use Weaver 3-Rail wheel sets if your layout is 3-rail.

The downside as I mentioned you need a lathe to make the sleeves and when your making one at a time it can get laborious.

If you were going to do many cars a computerised lathe would be the shot.

I did these a long time ago when the Cement container gondolas first were released from MTH. Of course the containers (to me) sat to high so I milled the containers till the height looked good that's another story.

Nowadays I try to use as much original items as possible for 2-Rail conversions.

I have just done six Lionel EL centre flow 3-bay Hoppers using the original trucks and I have six MTH EL 2-bay hoppers coming any day now.

Apologies this posting is on the 3-rail site but my mods can be used for 3-rail as well.

Roo.

Well, it only took 4 1/2 years to tackle this project, but I finally got it done.  

I based my modifications on Dave's work, but had to make some adjustments due to the fact that I am still using the original couplers.

DSC04239

The car on the right is original.  The one on the left has been lowered.  While not as low as Dave's, it is a huge improvement over the factory height.

DSC04240

Like Dave, I cut the mounting base off of the underframe.  I used a bandsaw for this operation.  I then sanded the area smooth with the cross braces.

DSC04243DSC04244

I made new mounting plates using 1/16" thick material.  I drilled a 1/4" hole for the truck stud to fit into.

DSC04245DSC04246

The mounting plate was centered on the bottom side of the underframe and secured with CA glue.

DSC04247DSC04248

A shot of flat black paint hid the modification.

DSC04249

There is a very small gap between the coupler shank and the car body, maybe 1/64".  The body will hit the shank with the springs depressed, but for normal operations it works well.

DSC04252

One of the lowered cars.  Not quite as nice as Dave's, but I'm happy with the results.

Tom

Attachments

Images (10)
  • DSC04239
  • DSC04240
  • DSC04243
  • DSC04244
  • DSC04245
  • DSC04246
  • DSC04247
  • DSC04248
  • DSC04249
  • DSC04252

Add Reply

Post
×
×
×
×
Link copied to your clipboard.
×
×