Good Afternoon everyone,

I have started a little project that I think is very needed for those of us that are Union Pacific (UP) fans. For me, it started with the preservation of the UP #4014. I have been a huge rail steam fan for decades. Lots of decades. Since I was a kid decades. But the icing on the cake was when President H.W. Bush pasted away and the Union Pacific used their dedicated UP #4141 to pull his Funeral Train to College Station Texas. Behind it, was the Passenger Cars from the UP’s Heritage Fleet. I purchased the complete train for my one year anniversary of my open heart surgery. I was afraid that I wouldn’t be able to purchase the complete train, but I was able to after an extensive search of the internet.  Lionel has produced at one time or another, all but 2 of the UP cars that were in the Funeral Train. These 2 cars are the Power Generator Car UPP #2066 and the Sleeper Car “Portola”.  My intention is to model both of these cars utilizing a Lionel 21” passenger car. I tried to use the Rio Grande Ski Train Power Car but this car measured in at 18” vice the required 21”. So, using a Baggage Car as the basis for the power car wasn’t going to work. I needed 21” to replicate the necessary length of the UPP #2066.
Any photos in this thread will be my own. If you want to see what the UPP #2066 looks like, there's lots of photos on the net.

History

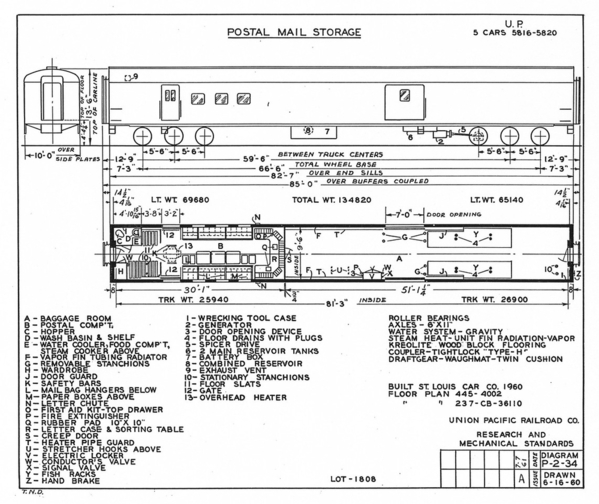
The UP #2066 was built by St. Louis Car Company in Lot #1808 and started life in 1960 as a Postal Storage Car #5816. It was 1 of 5 cars in the order from the Union Pacific. Then in 1972 #5816 was renumbered to UP #903677 and turned into a Roadway Tool Car. In 2004 it was redesignated as Power Car UPP #2066 after receiving the upgrades and modifications.

Description

Length, Over Buffers (coupled) 85’ 0”
Length, Over End Sills: 82’ 7”
Length, Inside 81’ 3”
Truck Centers: 59’ 6”
Truck Style: 6 wheel, with disc brakes (11’ 0” wheel base)

i-82TtsJJ-X2

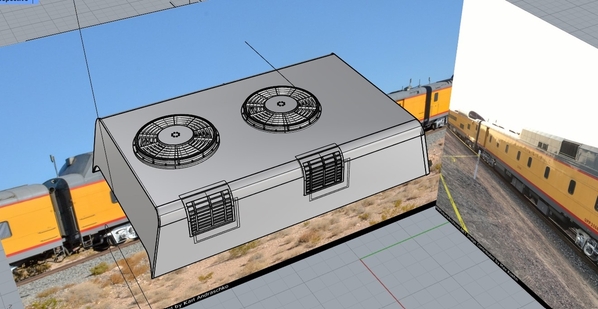
Union Pacific’s UPP #2066 Power Car has roughly twice the power capability of the other existing power cars in the fleet. It is able to handle a 17 to 18-car passenger train by itself. UP is able to keep this Power Car at the head-end of the train instead of having 2 of the smaller Power Cars, one at the head-end and a second at the mid-train. The #2066 heightened roof houses locomotive cooling fans to dissipate the enormous amount to heat generated. The car is 16’ 1” high, slightly higher than that of a domed car. The UPP #2066 also houses a Control Room directly behind the power plant compartment, an operators Bunk Room with private bath, a Walk-in Cooler, Commissary Storage, and a Walk in Freezer.

This is going to be a long-drawn-out process. My first order was to purchase a pair of 6-wheel trucks from Lionel. Along with a speaker and housing, a 10K ohm pot for volume adjustment, a pair of switches for On/Off and Min/Max. I had a RailSounds Lite mount from another project. I still need to acquire the RailSounds Lite Generator Car board and some other miscellaneous parts.

DSCN0043

Min/Max and On/Off switches mounted. Hole drilled for the volume control. The PRG switch will become the on/off switch.

DSCN0044DSCN0045
The donor car is a used 21” New York Central Coach Car. I have removed the interiors and built a wood floor that runs the length of the frame.

DSCN0046

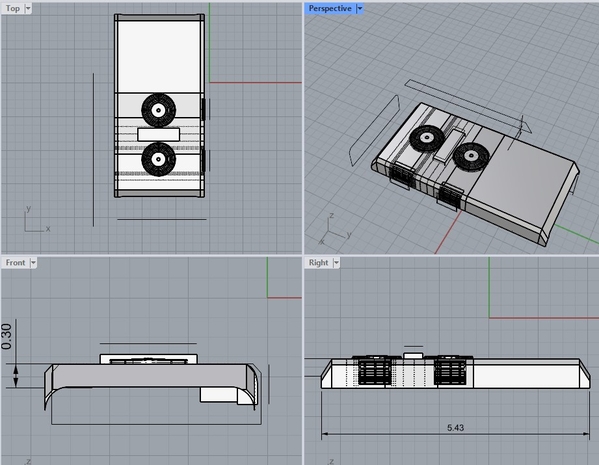
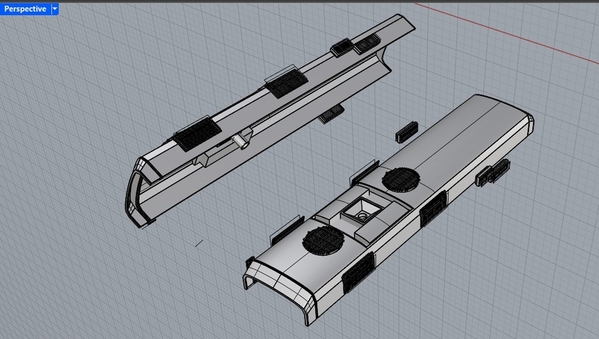
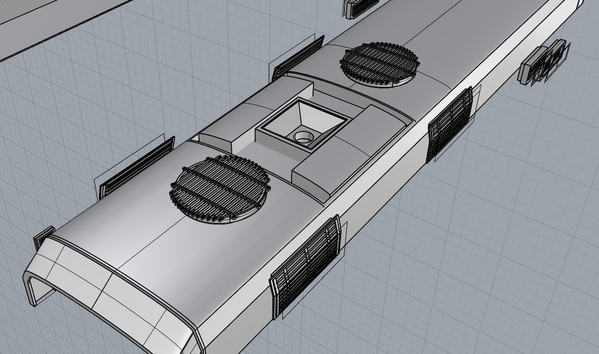
The plan is to replace the sides of the coach car with sides for the #311 UP ACF Smooth Side Business Fleet Power Car from Union Station Products which is a direct match for the sides of the #2066. I will then need to get the hump of the #2066 made using 3D printing.  I am currently in the process to trying to obtain information from Union Pacific on the #2066 car. I have an email out to UP’s Historical Society requesting drawings, photos and any info they may be able to provide. Contacting UP's Public Affairs person sent me to the Historical Society.

Until the next time...

Attachments

Images (6)
  • i-82TtsJJ-X2
  • mceclip0
  • DSCN0043
  • DSCN0046
  • DSCN0044
  • DSCN0045
Last edited by Jayhawk500
Original Post

Replies sorted oldest to newest

Just a little update...I have ordered the sides of the car fom Union Station Products. The order was confirmed and an estimated ship date is very soon. I also ordered the sides for building the "Portola" Sleeper car at the same time.
The only draw back is Union Station only produces sides up to .040 thickness. Factory sides from Lionel are .100 thick. So I now have to build up the sides to get the correct thickness to match the Lionel sides. No biggie really, just a couple of extra steps. Union Station is providing the necessary material for the build ups. They have great customer service and have been awesome dealing with!

I sent Mark at Union Station an email about the sides for the Portola car and within about a half an hour, he emailed me back saying it was done and on the website. Now that's service!

I'll post up some pictures when I get the sides.

Last edited by Jayhawk500

Good Morning Fellow O Gaugers,

Here's a progress update on the 2066 power car. I've had alot of this done for quite sometime and honestly forgot I had these pictures.
First up is the speaker mount  simply made out of HVAC duct sheet metal.

DSCN0047

Trying to decide where I want to place these 2 items.

DSCN0049

I stained the wood decking in a dark color to simulate the Kreolite wood flooring. I let that dry and then started assembling the chassis. The Railsounds Lite board is only a place holder for the Generator board. I used this to get the correct plug and wire lengths.
The trucks are 6-wheeled with one having the Hall Effect sensor.  The 2 wires running on top of the speaker enclousre is for the Fan Driven Smoke unit. Which I just realized, these 2 wires are way over kill, They'll be replaced.

DSCN0055

DSCN0057

Once I get the hump for the car, I'll have to decide which smoke unit to use, both are MTH units. The smaller one (I believe) is from a smoking oil tank car. The larger one is a PS1 unit. Consequently, the fluid capicities are different, both smoke equally well. It's just how often do I want to refill the smoke unit.

DSCN0058

The car sides should be arrivng any day. Then alot of measurements will be sent to Alan so he can work his magic.

Until next time...

Attachments

Images (5)
  • DSCN0047
  • DSCN0049
  • DSCN0055
  • DSCN0057
  • DSCN0058
Last edited by Jayhawk500

As promised, here are the sides from Union Station Products. The sides are made out of .030 Styrene, both white and clear. I ordered both the Power car and Portola sleeper car sides.

DSCN0061

I have already added the battens, glued the clear inner spacer in place, and added the doors to all four of the sides . This brings the total thickness to .060. I need another .040 to bring the sides to the standard thickness of .100 as manufactured by Lionel. Everything is in white, so it's hard to see some of the detail. You can just barely see the battens on the sides.

DSCN0062

A NYC coach car is used as a donor car. Yes, I know sacrilege by some of the NYC fans. But, it's what I have to work with.
Taped up and ready to start surgically removing the side. I'm cutting just a cats hair below the rivet line.

DSCN0063

And so it begins, I started off using a Dremel tool, but I didn't like the way it cut. I settled on using a fine tooth hacksaw blade. Easier to control.

DSCN0064

The side removed, Now I have to clean up the edges, and add the .040 to the side. Then it'll be ready to install.

DSCN0065

Until next time...

Attachments

Images (5)
  • DSCN0061
  • DSCN0062
  • DSCN0063
  • DSCN0064
  • DSCN0065
Last edited by Jayhawk500

Here is some of the detailing of the sides. The batten strips are glued into place with superglue. In fact everything is glued with superglue. I started off with the gel type glue, but quickly ran out since there is next to nothing in the bottle to start with. Now I'm using commerical grade glue. Which is like normal superglue.

DSCN0069

After measuring the inside and getting a dimension of 2.2", I cut 5 pieces of 1/4" plywood to that measurement. Then glued them to the inside of the existing car side. This not only gets me the correct spacing, but it also helps support the side while it's glued into place.

DSCN0071

The side is taller than what is needed so I ended up cutting about 3/16"-1/4" off of the top of the side. After looking at a bunch of photos, the door tops are a cats hair below the rivet line. So that is where I did the cutting. The bottom needs to be flush with the diaphram end piece.

DSCN0070

All glued on to the donor body, wiped down with paint thinner and wiped clean.

DSCN0072

This is a very time consuming process. It has taken me approximately 5 hours from start to finish. With all the cutting and fitting that's needed.

Here's the final product of side number 1. After looking at a lot of pictures on the internet, U.P. always runs this car with the head end of the car where the big slider door is to the front of the consist. The passenger door to the rear of the car. There are some small detail issues I need to fix, but all in all, this looks pretty good sitting on the chassis. I've already started to cut the other side free. More pictures coming in the next few days.

DSCN0073

Until Next time...Stay frosty my friends.

Attachments

Images (5)
  • DSCN0071
  • DSCN0069
  • DSCN0070
  • DSCN0072
  • DSCN0073

Small update, The second side is on. I now have to fill in the holes between the sides and the roof. I removed a section of the cat walk on the roof for the future hump. Then I sprayed Adhesion Promoter so the primer would stick and then the automotive primer to bring out the imperfections in one uniform color. Now its a matter of cleaning up those imperfections. Then the car will get lightly sanded again and then painted, when the hump is on and finished.

DSCN0077DSCN0078

Until next time...

Attachments

Images (2)
  • DSCN0077
  • DSCN0078
Last edited by Jayhawk500

I spent part of the day building the second largest item that's on the UPP2066, it's fuel tank. Using pictures I had gotten online and the details in the sides of the car, I was able to determine the approximate size of the tank. The tank is made out of .030" styrene with a few pieces of .040" thrown in for stability. I have the tank high enough that it should clear any turnouts. I don't expect the tank to be hitting any structures going around a curve since it's sitting inside the body, only time will tell. I need to purchase the O scale fuel tank fittings now.

DSCN0003

Finalized all the filling in of the body to roof seams, Re-glued the end pieces back onto the body, then sanded everything back down w/ 400 grit sandpaper. It's ready for paint! I didn't care for the primer I used so I'm not doing that again. It was way too soft of a primer.

DSCN0005

Now that I have the body 85% complete, I'll see if I can try my hand at building an interior for the one end of the car. That should be fun!

Until next time...

Attachments

Images (2)
  • DSCN0003
  • DSCN0005
Last edited by Jayhawk500

I have started to assemble the interior of the car. Starting on the far left is the generator room, next to the right is the Control Room, then it's the Bunk Room for the generator car crewman, and lastly is a Commissary Stores room. There will be a walk in fridge and freezer, and multiple shelving units for the dry sundries. All the walls are .030 Styrene. I cut in doors which I felt would be easier to see from the outside. Rather than just an open hole like Lionel does on their interiors. I still have to put in a monitoring window in the wall between the Control Room and the Gen Room. I know, I should have done that before I glued the wall in. I cut the floor in half so I can remove the right section, so at least it will be easier than having to do it with everything in place.
I originally had the crewman bunk room opposite of what it is now. When I put the body on, the walls came to fall in the middle of the windows. So I flipped them, and now they fall where they should.
I'll have to touch up the floor with a little stain. Or, maybe I'll just paint the floor, Undecided at this point.

Does anyone know what color the Union Pacific's utility cars interior color is? An inquiring mind would like to know.

DSCN0001
DSCN0002

Until next time...

Attachments

Images (2)
  • DSCN0001
  • DSCN0002
Last edited by Jayhawk500

Weekend update...I have all but completed the interior of the car. The walk-in freezer and cooler are scratch built. I got a 1:48 scale desk and man w/ chair off ebay and they look way too big for my application. Any suggestions on a size? The wall color is a light tan as per Hot Water's retired UP friend. I just wagged at the couch and still have to paint the floor in the restroom. I was able to cut in a observation window between the control room and the generator room. For this, I used one of the small windows from the coach car sides.
Sadly, once the body is on, you won't see any of this.

DSCN0003

Until next time...

Attachments

Images (1)
  • DSCN0003

Good Morning Fellow "O" Gaugers, While I'm waiting on my hump, I figured I'd modify my LED lighting strip. In my other post asking about the UP's interior colors, A retired friend of Hot Water's from the UP stated that the windows on the generator cars were heavily blacked out so no one could see in. So I opted to cut power to the 3 LED's over the generator compartment (this can be reversed) and I also put in an internal block on top of the generator/Control Room wall to prevent any light from the rest of the car from bleeding through. I then proceeded to operationaly check my lights to ensure they worked and didn't bleed through anywhere. When I powered up the track the car was sitting on, the 2101 CSS Railsounds lite sound card turned on, sounding like an idling steam engine. What a pleasent suprise to me.
I also completed the fuel tank by adding the fueling fittings and painting the tank in UP's Harbor Mist Gray. It's now permanently attached to the chassis.

DSCN0004

DSCN0005

With the interior lights bleeding through the sides, The sides will get a coat of Scalecoat Black to hide the light.

Until next time...

Attachments

Images (2)
  • DSCN0004
  • DSCN0005
Videos (1)
DSCN0006
Last edited by Jayhawk500

UPP 2066 Detailing Update

As with all things in this hobby, the beauty is in the details and the eye of the beholder, and this isn't any different. I wanted this car to stand out from any other O scale Union Pacific car. I purchased a set of AFC vents from Union Products for the car. When they arrived they were way too big for the car. So those got sent back and I asked Mark if he could scale them down to my specific dimensions. No problem, he said. Then he sent me what you now see on the car. Using the rivet lines on the roof, I was able to determine the size of the vent. Once they arrived I had to sand them down to get the vents to lay flat on the roof, and I took off some of the hump on the top of the vent also.  The vents still look big, but they are to scale. To sand the bottoms of the vents to the roof, I took automotive adheisive backed 400 grit sandpaper and stuck it to the roof of the car. Then it was simply sand the vent bottom until I had full contact with the roof, and sand away any 3D printer lines

DSCN0007

Next I moved on to the ends of the car. On the HE, I built a small box to house the hand brake gearbox and hand wheel. All of the measurements are to scale using photos off the 'net. Preicision Scale provided the Ajax box and 5 spoke handwheel. I also added the lifting eyes to both ends of the car.

DSCN0008

The last thing I have completed is hand forming the hand rails for the ends. These are made out of .250 music wire.
I have a set of door knobs coming Berkshire Valley Models for the doors.

Next, I need to get some scale I-beams and bumpers for the ends. I didn't realize there were I-beams there until I downloaded my last photo.


Until next time....

Attachments

Images (2)
  • DSCN0007
  • DSCN0008

Good Day Fellow O-Gaugers, It's been a minute or two since I last posted anything about my project car. I've done some tinkering and rethinking about this project. I have found a fellow o-gauger on another site doing the very same thing I am attempting to do here. But, he has completely scratch built his hump. He has afforded me some ideas and I him. One of which he found some N20 Gearmotors that would be awesome to use for the cooling fans mounted in the roof. As you can see, these gearmotors basically use the same type of motor for a fan driven smoke unit but it's wired for 12 volts. The current rating on these gearmotors is 30ma no load and 85ma max load. With a fan blade attached to the top of the shaft and not touching anything these should run in the no load arena. These motors will be powered by a buck converter with a varible output so the fan speed can be set to the correct looking speed.

DSCN0038

Following the photos I got off the 'net, I started detailing the non-generator (tail) end of the car. The ACF vents I had orginially purchased were too large. Even after having them resized they were still too large. I found a guy in Oregon that makes resin castings and he had ACF vents that are the correct size. He also had the vestibule vents. Lastly, I built from scratch the items that make up the antenna systems that where on the car at one time or the other. What you currently see is what was abandoned in place and is still on the car. I have yet to mount the large flat GPS antenna plates. I'm still trying to determine the correct sizes for those.

DSCN0039

The Lionel Parts sale is coming up and I'll be ordering the generator sound card to complete the internals.

Until next time.....

Attachments

Images (2)
  • DSCN0038
  • DSCN0039

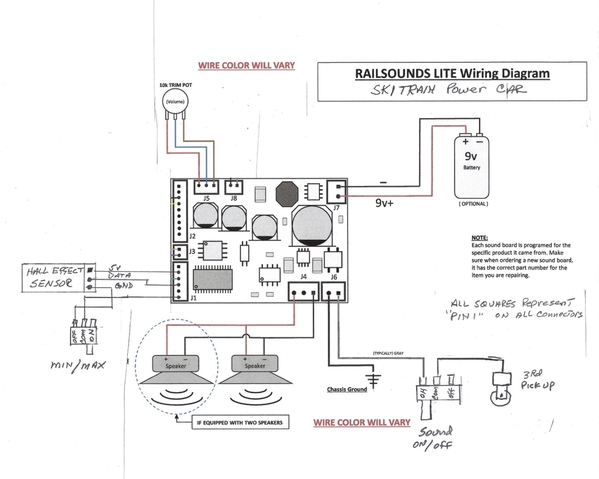
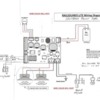
I wanted to through this out there. I was able to get the wiring diahram from Lionel for the Rio Grade Ski Train Power Car.
I used one of Bruk's RailSounds Lite drawings and hand drew the wiring diagram. It's crude, but it works.

Ski Train Power Car

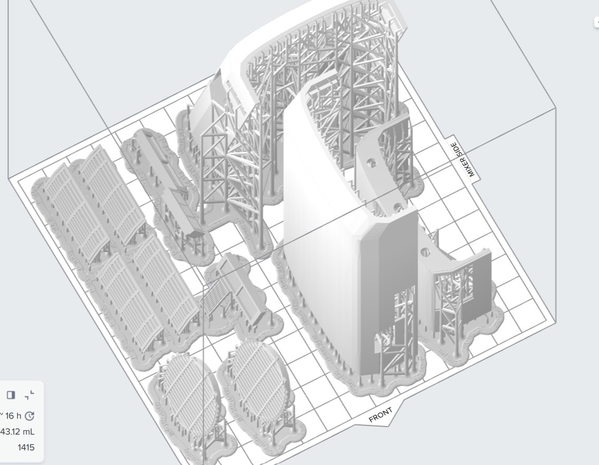
I also received word, that the hump should fit in the 3D printer in 3 sections. So this will be like putting a model kit together.

hump print [002)

Attachments

Images (2)
  • Ski Train Power Car
  • hump print (002)
Last edited by Jayhawk500

Add Reply

Post

OGR Publishing, Inc., 1310 Eastside Centre Ct, Ste 6, Mountain Home, AR 72653
800-980-OGRR (6477)
CONTACT US
www.ogaugerr.com

×
×
×
×
Link copied to your clipboard.
×
×