
Nice, Mark. I like that plan.
It's been a while since I first saw your thread Mark. You are patiently planning a nice layout. I like the planning stage but it really is enjoyable to start building bench work. Have fun.
prrjim posted:You could avoid the duckunders (save arthritic knees) and get broader curves if you them, by going around the walls instead of an island layout with acess hatches. build the whole thing 30 inches wide (or however far you can reach) around the outside of the room and maybe a peninsula up the middle if you have enough room. 24 inch aisles are wide enough for one guy operation. 30 or more if multiple operators.
Jim,
Your idea would have been my preference except for some problems with my room. The entry from the rest of the basement is a door at one corner, which is good, but the adjacent wall has a sliding glass door with the opening at the far end only 2 feet from the far corner. I needed to keep that open for traffic, so in effect my 11' 6" x 11' 4" room has about two feet chopped off the one side. At the beginning of this topic we discussed an idea I had of having a loop go the whole way around with a lift-out bridge in front of the glass door, but I finally decided against it. The duck-unders came as a concession I didn't want to make at first. I talked about the problem with my wife, and she even suggested I take the glass door out and put a wall in it's place, which wouldn't be that hard to do, but the way the rest of the basement is constructed, I decided against it.
Nothing is etched in stone yet, so I won't rule out that once I get building benchwork I may change my mind on this. Time will tell. Thank you very much for your suggestion!!!
Chris D posted:your getting there mark! I am almost done with my garage to start my layout.
Chris,
Thank you! I am glad you are getting done with your garage. We may find ourselves at similar points of construction somewhere down the line. Someday you can come take a look at mine in person.
mjrodg3n88 posted:Nice, Mark. I like that plan.
Mike,
Thank you! I'm glad to see your layout is coming along nicely, and someday you can come up to see mine in person as well.
Mark
Nice work so far. I was looking at the track plan and looks good as laid out. I was thinking that you could actually connect everything to see how things would run. Then decide if you would have to modify. Easier said then done, but then you wouldn't have to modify the bench work. As for the suggestion of around the room option. This would be perfect timing to mock that one up then you could decide which way you want to go. The one thing you will have to do with that option is to build a either a lift away at the door or something similar to what paul2 is doing that flips up . Another advantage will be storage. You could build shelves into it and then the room might not look so cluttered. with shelving on the walls.. I think it was mike who asked about the celling central. Something to think about, but from the looks of it you could possibly do the same thing in that room and then run a spur connecting both rooms. Another option with the around the wall plan. Might need to knock a hole in the wall, but you could run a spur into the other room and along the wall have a hidden yard with four or five sidings with trains ready to go. Then you could decide what you want to run before you enter the room to operate. The work on the room itself is looking good. The lighter blue actually make it look bigger. Question the window leads to the out side or into the garage?
I use a mechanic's stool to get under my layout. It's the only way I can do it and be able to get back out and stand up afterward. Harbor Freight has a couple of different ones and I use the shortest one they have. It's the rectangular one, the round one is a little higher. Unless they have gotten some new ones in the last 3-4 years. If you can get something like that and make your benchwork high enough so you can fit fairly comfortably while on the stool I think you will be able to get under there and work fairly well and certainly be able to get to the access hatches without much trouble.
I'm 5'-9" and my benchwork is 40" to the top. The cross pieces are about 3-1/2"-4" or so and that leaves me roughly 36" of clearance. That's a little low, I would go about 3"-4" higher if I had it to do over, but as long as I remember to duck a little for the cross braces it isn't too bad. If you haven't been under there for a while the first encounter with a cross brace usually provides incentive to duck from then on. ![]()
Also, I was worried about the 40" height as my grandson was only about 6 or 7 when I got going on my layout. He could reach the items on the outer parts of the layout, but anything a little ways in on the layout was hard for him to get to. I got him a couple of step stools, also at Harbor Freight, and he used those when he wanted to get to something a little further in on the layout. He just moves them around where he wants them and has never complained. He's taller now and doesn't use the stools so much any more, only once in a while now.
Just some more things to consider or think about here.
suzukovich posted:Mark
Nice work so far. I was looking at the track plan and looks good as laid out. I was thinking that you could actually connect everything to see how things would run. Then decide if you would have to modify. Easier said then done, but then you wouldn't have to modify the bench work. As for the suggestion of around the room option. This would be perfect timing to mock that one up then you could decide which way you want to go. The one thing you will have to do with that option is to build a either a lift away at the door or something similar to what paul2 is doing that flips up . Another advantage will be storage. You could build shelves into it and then the room might not look so cluttered. with shelving on the walls.. I think it was mike who asked about the celling central. Something to think about, but from the looks of it you could possibly do the same thing in that room and then run a spur connecting both rooms. Another option with the around the wall plan. Might need to knock a hole in the wall, but you could run a spur into the other room and along the wall have a hidden yard with four or five sidings with trains ready to go. Then you could decide what you want to run before you enter the room to operate. The work on the room itself is looking good. The lighter blue actually make it look bigger. Question the window leads to the out side or into the garage?
Doug,
Thank you for your observations and suggestions. I started mocking up an idea from earlier on in this process, but with some suggestions since I opened this topic. Yes, it would have a flip up shelf/bridge. I want to do a little more before I post any photos of it.
As to the hole in the wall to the Ceiling Central RR room, here is why I won't do that. Eleven inches of concrete block and brick. Then you can see the CCRR shelves above the clock in the other room.


This room is an addition my in-laws put on the house a few years before we bought it from Mum after Pop Pop passed. The train room was intended to be the supporting structure for the sun room above it. LOL My father-in-law loved that sun room, as his health kept him indoors a lot. So yes, this was the exterior and the big window has the laundry on the other side.
Now, that said, the CCRR is right above the top of the door opening, It would be possible to have a shelf 4" lower and it could go through the corner of the door opening, and I wouldn't hit my head. I am 6' 0". I'll ponder that some more over the summer I think.
Thank you very much, and I will post some ideas as I develop them. It is just as good I won't have time to build benchwork until fall anyway.
Attachments
Images (2)


rtr12 posted:I use a mechanic's stool to get under my layout. It's the only way I can do it and be able to get back out and stand up afterward. Harbor Freight has a couple of different ones and I use the shortest one they have. It's the rectangular one, the round one is a little higher. Unless they have gotten some new ones in the last 3-4 years. If you can get something like that and make your benchwork high enough so you can fit fairly comfortably while on the stool I think you will be able to get under there and work fairly well and certainly be able to get to the access hatches without much trouble.
I'm 5'-9" and my benchwork is 40" to the top. The cross pieces are about 3-1/2"-4" or so and that leaves me roughly 36" of clearance. That's a little low, I would go about 3"-4" higher if I had it to do over, but as long as I remember to duck a little for the cross braces it isn't too bad. If you haven't been under there for a while the first encounter with a cross brace usually provides incentive to duck from then on.
Also, I was worried about the 40" height as my grandson was only about 6 or 7 when I got going on my layout. He could reach the items on the outer parts of the layout, but anything a little ways in on the layout was hard for him to get to. I got him a couple of step stools, also at Harbor Freight, and he used those when he wanted to get to something a little further in on the layout. He just moves them around where he wants them and has never complained. He's taller now and doesn't use the stools so much any more, only once in a while now.
Just some more things to consider or think about here.
I have thought I would like benchwork high, not as high as the 50" I had on my last HO layout, but higher than 40" We don't have any grandchildren yet, but I think I will find a good height for me and provide step stools if we have grandchildren or any other kids see it. Thank you very much for your experience.
Mark Boyce posted:suzukovich posted:Mark
Nice work so far. I was looking at the track plan and looks good as laid out. I was thinking that you could actually connect everything to see how things would run. Then decide if you would have to modify. Easier said then done, but then you wouldn't have to modify the bench work. As for the suggestion of around the room option. This would be perfect timing to mock that one up then you could decide which way you want to go. The one thing you will have to do with that option is to build a either a lift away at the door or something similar to what paul2 is doing that flips up . Another advantage will be storage. You could build shelves into it and then the room might not look so cluttered. with shelving on the walls.. I think it was mike who asked about the celling central. Something to think about, but from the looks of it you could possibly do the same thing in that room and then run a spur connecting both rooms. Another option with the around the wall plan. Might need to knock a hole in the wall, but you could run a spur into the other room and along the wall have a hidden yard with four or five sidings with trains ready to go. Then you could decide what you want to run before you enter the room to operate. The work on the room itself is looking good. The lighter blue actually make it look bigger. Question the window leads to the out side or into the garage?
Doug,
Thank you for your observations and suggestions. I started mocking up an idea from earlier on in this process, but with some suggestions since I opened this topic. Yes, it would have a flip up shelf/bridge. I want to do a little more before I post any photos of it.
As to the hole in the wall to the Ceiling Central RR room, here is why I won't do that. Eleven inches of concrete block and brick. Then you can see the CCRR shelves above the clock in the other room.
This room is an addition my in-laws put on the house a few years before we bought it from Mum after Pop Pop passed. The train room was intended to be the supporting structure for the sun room above it. LOL My father-in-law loved that sun room, as his health kept him indoors a lot. So yes, this was the exterior and the big window has the laundry on the other side.
Now, that said, the CCRR is right above the top of the door opening, It would be possible to have a shelf 4" lower and it could go through the corner of the door opening, and I wouldn't hit my head. I am 6' 0". I'll ponder that some more over the summer I think.
Thank you very much, and I will post some ideas as I develop them. It is just as good I won't have time to build benchwork until fall anyway.
Brick and mortar wall Definitely a challenge. I don't think you would have to lower the entire Ceiling central to make the door way now looking at it. Just the sections leading to it with a down ward and upward grade to and from the door. In the train room Ceiling Central would be more like shelf central with it at the height to make the doorway. That would be easy to blend in with the layout. Hidden yard run through the window and then into the other room?
It is good thinking. I will look it over and do some measuring.
Thank you for the ideas
So in the last week, I tried looked at this idea, and put some track on the floor for that idea, and measured for another idea, and finally think I will stick with the plan as shown ")
I decided I don't want to just go around and around the room. I don't want curves any tighter than 042, because I want to run my MTH Western Maryland Consolidation. I don't want to bother with extending the Ceiling Central into staging tracks, because I don't want a quarter of the room taken up by a helix, and I had trouble building the shelves at that height anyway. It's as painful as trying to run tracks on the floor.
The only possible idea is to take a track off the curve by the big window at the bottom of the drawing and run it through the window over the washer, dryer and stationary tub. Unfortunately the tracks would have to stop adjacent to the edge of the benchwork at the bottom of this drawing, because I need to keep another doorway open. If I did put tracks there the track height would be 45" above the floor, which is workable. I think I would want a Plexiglas barrier in front of the trains to protect against water splashes, which would not be common. Still I don't know that it is worth it and have cars near the water source.
Thank you for all the comments and ideas!!
Attachments
Images (1)
")
Looking great Mark. I have been following the progress and looking great. The layout design looks great.
Marki, sounds like you have your plan and it's a good one. Time to stop discussing the plan, draw a line in the sand and build it. ![]()
Looks good Mark. I think you have deliberated and discussed on this forum long enough. Looks like a solid plan that should bring you lots of enjoyment to build and operate.
I was almost going to chime in when someone suggested blasting through the brick above the door to extend the CC but you quickly put that idea to bed. Cutting through 12+" of brick and block is no fun. There's probably a lintel above the door too.
Hope to see some benchwork up soon!
Bob
Thank you Harry, Pat, Bob, And Dave!! I think all of you are correct! I think it is a good plan for someone who wants to tun trains somewhat simulating a prototypical manner, in limited space and leave room for interesting scenery. This was my thought a couple weeks ago, but I wanted to give reasonable suggestions some consideration. Dave gave me a suggestion offline that may aid in having cars ready to swap out quickly when making up new trains, that I will give some thought.
I am glad the discussion came up on the window to the laundry. Since we bought the house, we have kept the window open to let some heat from the vent right above the washer into our daughter's art room. I never thought about moisture getting in there, and daughter certainly would have raised the issue if it had affected her variety of artworks and materials. My wife and I both thought I may want to take the window out altogether. We have never used that baseboard heater on the far wall. I don't think I should have a problem with moisture especially if I have the dehumidifier running. Does anyone have any thoughts on that.
Other than that, I am ready to get some wood and have been looking at miter saws at Lowes and Home Depot. I recall a suggestion for a compound one. Progress may be slow for now, but I should be able to make progress over the summer.
Thank you everyone!!
I don't think you'll have a moisture problem in the train room, but could have had some with a spur going into the laundry room, more heat than moisture. I don't know how that room is configured, but ours gets warm when the dryer is running. Probably not enough to do any damage unless you have an accident and get water on the spur. Even without that, I think it would have made doing laundry a little more of a hassle having to watch out for the spur, etc.
Mark Boyce posted:Thank you Harry, Pat, Bob, And Dave!! I think all of you are correct! I think it is a good plan for someone who wants to tun trains somewhat simulating a prototypical manner, in limited space and leave room for interesting scenery. This was my thought a couple weeks ago, but I wanted to give reasonable suggestions some consideration. Dave gave me a suggestion offline that may aid in having cars ready to swap out quickly when making up new trains, that I will give some thought.
I am glad the discussion came up on the window to the laundry. Since we bought the house, we have kept the window open to let some heat from the vent right above the washer into our daughter's art room. I never thought about moisture getting in there, and daughter certainly would have raised the issue if it had affected her variety of artworks and materials. My wife and I both thought I may want to take the window out altogether. We have never used that baseboard heater on the far wall. I don't think I should have a problem with moisture especially if I have the dehumidifier running. Does anyone have any thoughts on that.
Other than that, I am ready to get some wood and have been looking at miter saws at Lowes and Home Depot. I recall a suggestion for a compound one. Progress may be slow for now, but I should be able to make progress over the summer.
Thank you everyone!!
Yes Mark- look for a compound saw. You will not be sorry.
Bob
Dave,
I think you are right about not having a moisture problem in the train room. I agree, shelves over the laundry would be in the way. And I do as much wash as my wife does.
Bob,
Thank you on the compound saw. I was looking on the phone for the earlier remark, and it is a pain to find on a little screen.
I just want to thank everyone who has given suggestions, input, and just a positive note 'like'. Since my first layout back in 1969-70, I never had anyone to discuss ideas with before! It is so much better this go round with all of you with me here! I appreciate everyone who has read this topic! Thank you!
You don't need a compound saw. Why don't you just build it?
William,
Thank you for your reply. I am with you on that; Just do it! ![]() The main reason I haven't started on it is we have been faced with increasing responsibilities for caring for older relatives. Dad had been taking care of Mom since she got out of an extended stay in the hospital in the winter. This past week Dad was in the hospital briefly, and realized he isn't up to doing as much as he had been. My mother-in-law lives down the road, and I have an aunt in assisted living, but I am her power of attorney, etc.
The main reason I haven't started on it is we have been faced with increasing responsibilities for caring for older relatives. Dad had been taking care of Mom since she got out of an extended stay in the hospital in the winter. This past week Dad was in the hospital briefly, and realized he isn't up to doing as much as he had been. My mother-in-law lives down the road, and I have an aunt in assisted living, but I am her power of attorney, etc.
On to the saw. I thought maybe the saw would make it quicker, easier, and more accurate in making cuts. Maybe I should just rent one for a day, just to see if that is really true. I think with outdoor work too, it will be fall until I get at it. I do have some more track lighting I want to install while I still have an open floor below.
So I see it has been a month since I replied. Well due to obligations to my elderly parents, aunt, and mother-in-law, I haven't touched this in a month. Today I got a chance to try to draw some kind of plan for L-girder benchwork. I have used it before, and I think it would be best here, due to the curved perimeter of the layout. I do not know how to do it differently, so I added a layer to the last SCARM drawing and put in the gray lines showing the long L-girders, the cross joists, and the almost square looking legs. Remember, with L-girder, the joists do not have to be even. There would be cross members joining the L-girder sections. I have not figured out how to put the L-girder layer under the other layers, but I'm sure it is easy, I just need to look it up but don't feel like it now. It was a busy morning at church, and after this exercise, I'm going to take a nap. I mainly want to post this photo to see if there is any discussion on the merits or how I could do it differently. Actually, the L-girders and joists show up better on top for this discussion.
Thank you for looking.

Attachments
Images (1)

Mark, it gets very complicated because of the way SCARM displays tracks and objects. However, for your purposes, check the property values for the L-Girder rails. You didn't attach the SCARM file, so I can't check myself, but I suspect the vertical position and height fields are not correct. The lowest track (blue) is "0" elevation and the decking is 1/2", so if you want to portray a 1x4 L-Girder rail and have it display beneath the bottom level, try changing the vertical position to "-4.0" and the height to "3.5" (or post the SCARM file and I'll take a look).
The 1st photo shows where I added two beams, both 3.5" tall. The one on the left has values of "0" and "3.5", the one on the right "-4.0" and "3.5". As you can see, the one on the right is properly displayed beneath the track whereas the one on the left is displayed above the track. The 2nd photo shows the 3D view. Once properties are changed for all the rails, your L-Girder should be displayed below the track. Let me know if that works.
Now, please note that the beam on the left is not beneath the Yellow track even though the elevation of that track is 8" and the beam is only 3.5" tall. I first noticed this when I tried to add an object below the tracks in a design I was working on and I had the tracks set to their actual height of 40". I could add a shelf at the 8" point and get it to display correctly in 3D, but they always covered the tracks in 2D. My simple understanding is that tracks are displayed as a singe "object" without regard to elevation of individual tracks and are displayed on top at elevation "0". Therefore any object with either property value set to something greater than 0 will always cover the tracks regardless of track elevation. As you might have figured out, a vertical position less than 0 will display beneath the track and that's why the "-4.0" fixes the display.


Attachments
Images (2)
I got my beauty nap too Mark...during the first half of the radio broadcast of the race. L girder is absolutely the best way to go! The most flexibility by far--easier to revise, etc. I'm very happy and excited for you. NOT being negative, my concern for you is that you will get bored with the looping--as my original version had turntables at both "ends" which made an operator: stop, uncouple, get on the turntable, take the caboose off, and place it on the other end of the train. That would keep a single person busy for hours...
The looping is nice in that you can control one train and let another run freely to challenge you as you go back and forth. With this set-up, you will have to be disciplined enough to NOT just let this become a loop of track missing its tree.
On smaller ,shorter, layouts, it is imperative to give an operator something to do that provides purpose and participation because it will only take a minute or two to complete the entire main run. With your spurs at opposite ends, you can use those to switch out trains...in other words when you run a train upward--park it in a spur and return with another train. Switch trains every time you go either from bottom to top or vice versa...
With sharp curves in yours and the real area--use restricted speed to your advantage. Regardless, this is a really neat layout--and the theme is good. Be sure to take pictures every time you do something! I have 1000s of ours and it is amazing to look back to the beginning. One day you may discover that the realistic operation that turntables would have provided on each end would have been the way to go...everyone is different in their opinions and preferences...
Even if you do...the loops on the ends would leave an area for turntables should you ever feel you want a change.
Dave,
I think I got it on how to show the benchwork underneath. I wasn't even thinking of elevations. I was just looking to bring the track on top. That thinking came from limited experience with an ancient version of DesignCAD and Visio. I am not concerned with the benchwork showing on a 3D view so your instructions will get the results I'm looking for.
John,
Thank you for the comments. If I had a larger room, I would make my layout in a fashion more like yours and run trains one way then break them up and run other consists. Considering my short run, I want to be able to do an out and back for a longer run, simulating the Blackwater canyon then back down the mountain again for a longer run. Yes, passing over the same scenery in the opposite direction takes some imagination, but the looping takes some imagination as the Blackwater doesn't do that in real life either. Believe me, I do not run my trains now for as long as I would like because I do get bored with the short ovals. As you said, the real estate will be there if I get tired of this and want to put a turntable in the future. The L-girder will give me ample room to put shelves or roll out drawers of some sort in for all my cars I want to switch out by hand while running trains.
Thank you both for your comments.
Oh, one more thing John touched on. During the last few months, I have been converting some of my roster from longer to shorter cars and locomotives. I sold and traded two large steam locomotives and picked up a 0-6-0, SW-9, and RS-1. On the passenger car side I got rid of two large sets of 18" passenger cars and bought a 3-car set of baby Madison cars that should look good on the mountain curves.
I've just got around to taking a look through your thread, Mark. Very good.
I'll watch with interest from now on. ![]()
Max,
Thank you very much! I'm glad you took a look. Things are a little slow now with spring chores and care for elderly parents. I'll be posting when I can.
Today in response to one of my posts elsewhere, John Coy asked me how the Blackwater Canyon Line is coming along. I thought I should post my reply to John here for all of you who have been so good to reply and follow my topic. ![]()
Thank you for asking. The new layout is temporarily on hold. My 86-year old parents had a rough winter and spring. Both have had extensive hospital stays; in fact I just got off the phone, and Dad will be discharged Monday and I will be taking him to a personal care home while my sister brings Mom from her house. It has been trying on us all, but we have seen God work out some amazing things. Hopefully, things will start to settle down in July and we can just visit them, though we will have to watch the house and mow the grass until we decide what to do there. As to the new layout, I am still picking up material when I can. I also have my 91 year old aunt, who I serve as power of attorney, in another facility; and my mother-in-law who now lives across the road from us. No one helps us with those two. We have been blessed, but are usually very tired. ![]()
![]()
(After receiving another Ross turnout from a Forum member, I will only need 4 more turnouts and that should complete the track purchases. I have the lumber I can get from my mother-in-law's house, and I can go through Dad's stash of nice lumber since he won't be using any of it. That is sad for me to say, but who would have thought he could have kept up with everything to past his 86th birthday)
Sorry to hear about all the issues you and your family are facing, Mark. Building a model railroad is the last thing you need to worry about, so take care of those you love, the railroad will always be there.
Thank you, Dave!! Yes, the railroad will be here waiting.
Mark, you and your family are in our prayers.
George
G3750 posted:Mark, you and your family are in our prayers.
George
George,
Thank you so much!!
Thanks for taking the time to let us all know what you have been dealing with. I know this is a very emotional time for you. As I have said several times, in the forum, we are a brother/sisterhood in this hobby. Just pop your head in when you can and we will give you your train fix for the day. In the meantime, take care of mom and dad as I know they have done for you. Keep your head up and know we are here for you.
Dave
Mark I agree with everything that has been said! Family comes first, as the old saying goes they took care of us when we were young and now it's our turn to return the favor! Our thoughts and prayers are with you and your family!
Dave and Mike,
You are both so right! Mum has been in decline for a few years, needing a cane, walker, or wheelchair depending on the circumstances. Also her short-term memory is now not very good. Dad still insisted on being the caregiver after Mum was out of the hospital in January, but it took a major toll on him and became evident he wasn't up to it. He was the last of us to figure it out. Now he has turned all responsibility over to us "kids", and I told him yesterday that it was our turn to take care of him and Mum, just as they did for us. I say the same thing about our aunt, who was the one who lived closest and was most involved with us growing up!
I have looked up to Dad, a godly man, as an example for what kind of man to become. The last few years I have looked to him as an example of how to make the most of the aging process. Now I am witnessing his example of how to live as an elderly person. He is to be commended, as he used other men as an example for this since my grandfather passed on at age 56.
Everyone on OGR Forum,
I do use this Forum as a therapeutic agent. All of you give me that "train fix" as Dave put it, when I don't have time to run trains or work on a layout or other project! I thank all of you very much for your prayers, thoughts, and comradery! I hope to meet more of you face to face as the years go by! Thank you!!
Mark, many of us have walked in your shoes, and we are here for you.
It's very difficult to watch the decline of our parents. Take comfort in their love, which is always there for us "kids", and transcends all obstacles (even death), and in the fact that you are truly honoring your mother and father as the Commandment says.
May God hold you and your family in the palm of His hand.
George
Mark sorry to here about the family issues. Like all of use here at one time or another life issues get in the way and take priorities over other things were trying to accomplish. Forum as a train fix now that's funny. Sometime reading the issues that have come up would seem more of a discouragement. But that's OK too sometimes reading about others issue can make yours seem trivial by comparison. So I know in the end things will work out for you and eventually the layout will get built. In the meantime you still have the other one up and running so you can run trains, come here and do a mind dump, after all everybody needs some sort of escape from reality otherwise we would all go crazy.
George and Doug, thank you for the very kind words! I appreciate it very much!!
I had a very nice diversion from life. I have been planning to model the Big Run Culvert and the Tubs Run Viaduct on the Blackwater grade, with some areas from Thomas and Davis at the top, and some of Hendricks at the bottom. There is a river crossing at Hendricks which I had in the back of my mind to model. There is a ho hum girder bridge there. When Menards released their through truss bridge this week, I thought that would be nice, but if I stay to the prototype, I can't use one. When I saw Cabinet Bob's photos of one on his topic, it suddenly dawned on me that I thought I had seen a through truss bridge at Parsons, just a bit upstream towards Elkins. Yes, I was right.

Hmmm...Looks a lot like the Menards release. Here is one of Bob's photos.

Yes, it will do nicely!! I will have items from Hendricks/Parsons at the bottom end of the layout. Sometime, I will work the scenic items up on a plan to show their general location better. For right now, it is fun to think about and visualize when I walk into the mostly empty room!!
Attachments
Images (2)
Mark- All of the life stuff that gets in our way is out there for a reason. You and the family will get through this and be better for it.
This gives you more time to plan everything so you don't make all the dumb mistakes we do because we are so eager to get trains running that we rush through the building.
Bob
Well here is something related to the layout planning. As those who have read, I was looking for one or two appropriate engines for the fairly sharp curves. I bought this ProtoSound Western Maryland BL-2 and non-powered BL-2 from a Forum member a week ago. The powered one runs very smoothly, but the sound isn't too great. I bought them with the plan to upgrade, since I have a couple PS-3 upgrade kits.


Since I'm not starting to build the layout until fall, I thought I could setup to start the a PS3 upgrade. I recalled I loaned my static mat and wrist bands to one of my sons-in-law, who told me today it is at his dad's house. He forgot about it. Well, this is as far as it goes on the project until I get the static mat. ![]()

Attachments
Images (3)


You are right to wait, Mark. One little zap, and game over!
George
Best of luck, Mark. You are in my thoughts.
Thank you, Pat!!
Mark Boyce posted:Here are photos of the room. Yes the pink wall will be the first thing to go.


Mark, your requirements for your layout are exactly the same as mine, ie; small town, mountains, coal hauling, logging, some operating accessories etc. I was even able to squeeze in a small yard and engine facility! If I can be of any assistance with ideas please don't hesitate to ask. Have fun!


Attachments
Images (4)

Videos (1)

Good smoke! ![]()
Howard,
Thank you! I have seen so many photos of your layout! How much space does your layout take?
Mark Boyce posted:Howard,
Thank you! I have seen so many photos of your layout! How much space does your layout take?
It's basically a 15'x20' L shaped shelf layout, but only 5' wide or less in most places. It extends through a wall into my laundry room, around my furnace, about 1 scale mile to give it the effect of going somewhere far or coming from somewhere. The 1 scale mile mainline was done so that I can easily compute scale miles per hour.
Attachments
Videos (1)
")
Howard,
The scale mile is great! Your layout always looks good! As We discussed earlier on this topic, our laundry room is adjacent to the open window in the brick wall of my train room. I will attach another photo.

There is a door just to the right of the stationary tub, and the furnace is to the left of the cabinets. That is a portable heater on the shelf I put on the window sill. I put it there to blow heat into the train room, because our daughter had the that room jammed with art tables, projects and materials. I plan to take the heater down and put it in the train room when needed. My wife is happy with the shelf, so I could run some sidings in over the stationary tub and just under the cabinets. Once we get to the water heater and furnace, there is another problem, because there is a narrow passage past the furnace to the other door. I couldn't do a loop, but I could put some sidings in. The window sill would dictate the lowest track in the train room, which would be about 46 inches. That makes the highest track 54 inches high, which is about the height I had my last HO layout at. That is a little higher than I was thinking this time, but not unrealistic for me.
Thank you for getting me thinking on this again!!
Attachments
Images (1)

Mark Boyce posted:Howard,
The scale mile is great! Your layout always looks good! As We discussed earlier on this topic, our laundry room is adjacent to the open window in the brick wall of my train room. I will attach another photo.
There is a door just to the right of the stationary tub, and the furnace is to the left of the cabinets. That is a portable heater on the shelf I put on the window sill. I put it there to blow heat into the train room, because our daughter had the that room jammed with art tables, projects and materials. I plan to take the heater down and put it in the train room when needed. My wife is happy with the shelf, so I could run some sidings in over the stationary tub and just under the cabinets. Once we get to the water heater and furnace, there is another problem, because there is a narrow passage past the furnace to the other door. I couldn't do a loop, but I could put some sidings in. The window sill would dictate the lowest track in the train room, which would be about 46 inches. That makes the highest track 54 inches high, which is about the height I had my last HO layout at. That is a little higher than I was thinking this time, but not unrealistic for me.
Thank you for getting me thinking on this again!!
In my opinion, one can never have enough hidden sidings
I think you are right about that. I was reluctant to go into the laundry room because of moisture concerns, but enough good folks commented here they haven't had an issue. That's good enough for me. My wife is in favor, so I just have to get back to planning! ![]()
Mark Boyce posted:I think you are right about that. I was reluctant to go into the laundry room because of moisture concerns, but enough good folks commented here they haven't had an issue. That's good enough for me. My wife is in favor, so I just have to get back to planning!
no moisture concern for me. As a side note, my layout is in my basement and I keep a fan circulating the air at all times.
Attachments
Images (1)
Mark Boyce posted:I think you are right about that. I was reluctant to go into the laundry room because of moisture concerns, but enough good folks commented here they haven't had an issue. That's good enough for me. My wife is in favor, so I just have to get back to planning!
Mark, before you go too far with planning, here's a little something for you. I didn't take time to check where there access to the laundry room is, but since the elevation is higher on one end, I used SCARM's "flip" tool to flip all the track vertically. For some reason it wouldn't flip the RH switches even though it flipped the LH switches just fine, so I had to manually replace those.
Anyway, depending on where the window to the laundry room is, you might not have to do too much planning. And since all the yellow track is at the higher elevation, the yard can be flipped if the windows in where the thin rectangle is.
Just food for thought to get you started. ![]()

Attachments
Images (1)
Files (1)
Dave,
I see. This version has the highest area near the window in question. Yes, that could be done. You are right, the skinny rectangle is the window. As this stands, the yard lead goes through the block and brick wall over the tub. I was thinking of coming off the left side of the curve through the window and the tracks would end up over the tub.
Well tomorrow is another day. Thank you for the input!!!
You got it Mark, should be easy enough to rework the yard from the left. What is the height of the window opening?
Mark, I changed the earlier rendition to the other side and replaced the SCARM file.
DoubleDAZ posted:You got it Mark, should be easy enough to rework the yard from the left. What is the height of the window opening?
Dave,
Yes, the rework would be the practical one. The window sill is 45 inches above the floor. So allowing for roadbed, the track height would be 46 inches. I don't think it would be necessary to have bench framing through the window, as long as it is solid in each room. The section passing through the window would be like a bridge so to speak connecting two separate 'tables'
If this was the high side of the layout, then the other town would be 38 inches above the floor. If we flipped back to the original design, and this was the low side, then the town at the other end would be 54 inches above the floor. The tiny window at that side of the room is 52 inches above the floor. While I like my benchwork fairly higher than most folks I see posting, I don't think I want track 54 inches high. My reach would be hampered, unless I stand on a stool or platform. Since I'm not getting any younger, that may not be the best idea. 38 inches does allow for a better reach, and is still fairly high to roll under on a seat, if I get to not feel like stooping under. Sitting on this folding chair and my head dropped down, I can duck to about 40 inches. A seat 6 to 8 inches lower would work fine.
All that said, if I am to build the staging track through the window, flipping the layout heights as you have shown would probably be best. Thank you for your consideration on this, and I know you wouldn't fiddle with these if you didn't like doing it. I still appreciate it very much!! ![]()
![]()
Writing about the possibilities of running tracks through the window between the train and laundry rooms, got me thinking of pulling the sliding window and storm window out. I hadn't done it before, because our daughter filled the train room with art stuff before I had a chance. I never entered that room after, except when she invited, and then just stood near the door, because I was afraid of bumping something. That is also why I built the shelf in the laundry room to hold the space heater; no room in the old art room.
Well here it is wide open except for the two brackets for the shelf that I anchored into the block wall. The first photo shows the space over the appliances and tub. 6' 8" from the left hand end of the window to the wall on the right of the tub. There is a soil pipe in the corner, then hot and cold water and electric conduit with a ground fault outlet to the right of the window.

This one shows the other side from the wall to the right end of the door. I chopped the left side a bit, but the corner is just about at the right hand edge of the photo. My Masonite backdrops cover about 2 inches of the bottom of the window as they are leaning against the brick wall.

This one shows better what is beyond the laundry area and why I can't very well run any tracks out into the room, much less a loop.

Have a happy Independence Day everyone who reads this! Please remember all those who have fought for our freedom these nearly 250 years, and those protecting our freedoms today!!
Attachments
Images (3)


DoubleDAZ posted:Mark Boyce posted:I think you are right about that. I was reluctant to go into the laundry room because of moisture concerns, but enough good folks commented here they haven't had an issue. That's good enough for me. My wife is in favor, so I just have to get back to planning!
Mark, before you go too far with planning, here's a little something for you. I didn't take time to check where there access to the laundry room is, but since the elevation is higher on one end, I used SCARM's "flip" tool to flip all the track vertically. For some reason it wouldn't flip the RH switches even though it flipped the LH switches just fine, so I had to manually replace those.
Anyway, depending on where the window to the laundry room is, you might not have to do too much planning. And since all the yellow track is at the higher elevation, the yard can be flipped if the windows in where the thin rectangle is.
Just food for thought to get you started.
I got to looking at the obstacles in the laundry room area. I realized the room is offset to the left of the train room. Measuring shows that there is 33 inches from the left side of the window to the corner and 34 inches from the right side of the corner. The room looks more like this.
")
I redrew the staging yard in from the other side, because the first way, the shelf restricts opening the top loading washer. This way the tracks are over the front loading washer. One note, the track closest to the wall is much too close in reality. I'm still not sure I even want to do this, or just go with the original plan before it was flipped.
Also, I could not figure out how I captured before, so I did a screen shot. The SCARM file is attached, but I have to click show in the bottom right of the post to see it myself.
Attachments
Images (1)
")
Files (1)
BCL 7-daz-11.scarm
I see what you're saying, Mark. Even if you don't add the yard now, but think you might in the future, you need to decide on orientation before you start building. Also, be mindful of how many cars some of those yard tracks can hold.
Dave,
I agree that planning for it now is key, if I am ever going to do it. I know I will be working in the train room only for a while, so I would never get to that yard until after I retire, which could be the end of next year, or later. Yes, with the 042 switches the shortest track is mighty short. I could go the whole way to 027 switches if I was to use switcher engines only, like my 0-4-0 or my SW-9. That would make the tracks a little longer.
One thing too is that the height of the window is way too low for the yard table. The 46 inches window sill is barely high enough to clear the control panel of the washer and dryer. My wife and I each do about half the wash. Whoever sees it needs done, does it. However, if I make it too awkward to get to the controls, I'll be doing all the wash myself and being mad at myself for having to be a contortionist to do it. The the track height at the upper level would have to be at least 50 inches. I have had layouts that high before, but didn't want to go that high this time. Always compromises!!
I'll fiddle around with this some more; I don't feel very good today, not wanting to do some work outside I wanted to.
Thank you for your observations!
Mark:
IF you do actually use the laundry room, I have a much better idea for you than a switch ladder which eats up space quickly!
Build a "cassette" system. I would make the cassettes about four to six feet long. These cassettes are single 2' by 4s' that have one strip of straight track down the center. The length would be determined by the reach spread of your arms and your confidence/comfort level in picking it up loaded with train cars. You wouldn't be moving it far because the idea would to build one single lane of "fiddle yard" that connects to the rest of you track. The shelf this lane would be sitting on would be about two feet wide. You could place four other cassettes on that same shelf; each having the capability of being placed into the single lane of "fiddle yard" that connects to the rest of you track. When you want to change consists, you could simple arrange the cassettes into whatever order you need. This will save you a lot of money from buying the additional switches for a yard ladder which end-up eating away at your space quickly!
Lastly, if you want to go the switch route---bite the bullet and buy a manual Ross 4-way turnout! I have 2. These awesome space savers spread out from one to four tracks in the space of 2 feet! You can't beat that.
John,
You know, we talked about the cassettes way back in the winter. Yes, I think that could work. I get a one track mind sometimes, so I am glad others are here to remind me or to bring up new ideas. Yes, I think a yard in the laundry would be awkward for trains and laundry. I agree, any savings of money helps.
I have seen the 4-way turnout, and that is a good idea too.
John, how would he fit a 4-way in his example? He has to come through the window and the switch needs to be away from the wall. From what I see, that would put the switch about where the turnout track is on the 2nd switch below the window. That doesn't leave much room for yard tracks.

Attachments
Images (1)
The 4-way switch is a good idea for saving space, but I agree and in fact, I don't think any yard switches would work in my situation. As you point out, the trouble is the window is in the middle of the wall, so however I would do it, I would loose almost half the narrow (just over 9 feet) room anyway. Also, there is no way to turn the corner because a necessary door is on one side, and my wife's needed cabinets are on the other side. Ah, the challenges of building in O gauge in a small house!! ![]()
")
Attachments
Images (1)
")
Mark, my personal opinion says adding a yard in the laundry room is too much trouble and is not going to pay off in the long run. I think your original idea to build some drawers or shelves to store rolling stock and manually build new consists is the way to go. If it were my layout, I'd probably add the hidden yard I mentioned some time ago, but that has it's own challenges with only 8" clearance, especially if you'd want to move cars around and not just store alternate consists.

Attachments
Images (1)
Dave, I think you are right! 8 inches will work okay, because like you say, I'll just store alternate consists there. I'm not much for making up and breaking down trains like some of the series operators are. On the other hand, I want to do more than just run trains in circles. This plan will let me do that. I can figure a way to keep other consists on cassettes on shelves like John suggested.
One last note on the laundry. I took off the two brackets that held the heater shelf above the dryer. Then I put the first spakling in the holes from the lag bolt holes. My wife said she really likes the shelf and window panes gone. I think that confirms it.
If that's the case, she's certainly NOT going to like a deep yard shelf there. ![]() I'm sure you'll make a good decision when you get to that point.
I'm sure you'll make a good decision when you get to that point.
She would tell me go ahead and do it, even if she really didn't like the idea. I've been able to keep her happy for almost 33 years, I don't want to mess up now! ![]()
I like the idea of storage shelves. Even when you have a basement, the space for storing cars in yards goes quickly. On the Glacier Line, we have a fiddle area under the basement stairs landing that holds approximately 125 cars on shelves. We have three bookcases in a hidden area that hold roughly 200 cars. These are fiddled on and off the layout. If every car was on the layout, the layout would be overwhelmed and you couldn't operate.
In my book, I wrote of this subject for small layouts. For whatever the reason, people don't consider using fiddle areas on small layouts when it is the wisest thing to do! People are stuck in the mindset that you must place all your cars on your layout. You do not have to. In Great Britain, many modelers use the fiddle yard because on average they seem to have much less space than we do.
Yesterday, I saw a rolling "shelf" at a store. It had 6 drawers and was 38 inches tall. The drawers were 15 inches deep and 12 inches wide. I thought to myself how perfect something like that would be to store cars under a layout yet have easy access to roll out and trade cars!
Do NOT get your wife upset, but IF and I mean IF you decide to use the laundry room, it would be an ideal hidden fiddle area. All you need is one track. and shelves for the other cars or cassettes.
I lost track of the fact that that window is in the middle of the wall. The 4-way switch or switch ladder isn't worth the expense for the small extra yard you would get. I'd still give some long serious thought to a hidden staging lane with shelves ONLY if the wife was really okay with it....
PS: Mark....stick with the smaller scale stuff on the Blackwater Canyon Route. Get yourself the 0-4-0 and 44 tonner...I think both come in Western Maryland. The smaller stuff makes a layout look bigger. Even on my layout, the smaller stuff looks better. When I use the Premier engine 4-8-4 and it's pulling those awesome passenger cars you sold me that train is 12 to 13 feet long and while looking great really shows how small the layout is...really!
You should focus on running older-time trains that were generally smaller and shorter than the monsters of today. My 0-4-0 is my favorite! I pull a string of wooden stock cars...got a custom painted bobber caboose!
John,
I have seen photos, articles and videos of the fiddle yards the English do. Where a lot of Americans setup large ovals of continuous running at shows, sometimes with a yard in the middle, I see the English often setup just one highly detailed town, and the idea is watching the different trains that are made up in the fiddle yards, go through town, as if we were standing at trackside with camera in hand watching for trains. It is a good idea. I think I like the cassette idea, and the rolling "shelf" with several drawers of individual cars or cassettes with a few cars together would work well. All of my hoppers are two bay, all my boxcars are 40-foot, my tank cars are short, and all my log cars are short as well. Thank you for the ideas!!
Well, it has been almost two months since I last wrote. I haven't made any progress on the layout, but have spent a bit of time on a 2 x 4 module to try some techniques and to give myself a nicer backdrop for photo shoots of rolling stock until the layout progresses.
I made the base of scrap 1 x 4s and some 1" blue foam I had. I glued down the riser for the track and the cork roadbed. I sanded the cork smooth, but the track is just sitting there for now. I plan to spray paint it with Testors CreateFX Gravel Gray. I want to see how that looks for a temporary ballast, as I am thinking of doing that on the impending layout. It takes me so long to get ballast down, I think this will be a good temporary stand in. I also bought the Pennsylvania style tunnel portal and wings last week. I just have them leaning in position to get an idea how I want to build up my mountain. I bought them at Hobby Express in Cranberry Township, Pennsylvania, and thought the manufacturer's name was on the wrapper. I'm thinking Woodland Scenics, but don't know for sure. When I got home, I saw there was only a price tag on the shrink wrap, so I am not sure who made them. They are a slightly flexible foam. So, with my Legacy F7 set and an Atlas 2-bay hopper, you get an idea of how I envision this for photo shooting.


I did get a chance to start accumulating some wood for the layout. More on that later.
Attachments
Images (2)


looking good Mark ! like them W M engines...
Mark,
I think those portals are from Scenic Express. You can learn a lot from mocking up a scene.
George
Thank you George! I'll bet you are right about Scenic Express! My scenery skills have been dormant for so long, besides reacquiring them, I want to try new products and methods.
briansilvermustang posted:looking good Mark ! like them W M engines...
Thank you, Brian! They are sharp! If you consider the set of 3 as one engine, that is the most I have spent on an engine. I bought the A-A from Forum member Alex M and the B unit from a guy on a FaceBook Group.
Looking Good Mark! Just caught up on the older posts. I like the diorama idea as a test platform.
Bob
Thank you, Bob!!
Just a thought, as I finally get to planning my own layout, which will be roughly in the same space as yours (mine is more like 10x12 roughly). It is hard to meet all the requirements we might want in a relatively small layout, for example having a yard or something like an engine facility with turntable).
One of the things I have been thinking about is using stagecraft to allow me to have elements I wouldn't have space for. For example, if you want to have coal hauling capability on your railroad, to have a mine modelled takes a lot of space. Yet you could do something like have a painted backdrop at the end of a siding, and have the tipple portion modelled over the tracks physically (compressed likely), whereas the rest of the mine complex could be represented with a painting of the mine complex and/or a flats of the buildings on the backdrop (I am no expert on mines). For something like logging, a painted backdrop behind a partial mountain covered in trees with a portal to a staging track (looking like a tunnel through the mountain) could represent a logging area, basically a train would go through the tunnel portal to the staging area with empty flat cars, and come out with loaded flats with lumber. It isn't the same thing as a logging branch with geared engines and a logging camp and the like and an interchange to it, but it allows you to get the flavor without taking the space (nice part is you could have a staging area behind a backdrop and at one end of the backdrop have the mining scene, and the other the logging 'portal', sharing the staging area). Like you I also face the dilemma of having some engines that require at least O72 in a relatively small space![]() .
.
Bigkid,
That is an excellent concept, and the ideas you shared to indicate logging and mining in the area are great. There is another I want to use. Since I worked at the power station near Thomas, back in the '90s, and worked at other power stations dating back to the mid '70s, I want to include that. Originally that power station was built near the Laurel Run Mining Company in the '60s, which was owned by Virginia Power also. By the time I got there the right type of coal, low carbon I believe, was mined out, and they were hauling coal in by rail and truck from Maryland. The coal was dumped with the rotating car dump mechanisms. Too bad I don't have room for one of those. The real thing is cool to watch. But I do plan to put in some suggestion of the power station and of course, there is a destination for coal hoppers.
I have partly solved the dilemma of trying to run large locomotives in a small space, by selling two of them, and investing the proceeds into smaller locomotives and GarGraves track and Ross switches. I still have one left that can run on 054 that I am going to keep.
Please clue me in to anything you post about your layout planning, and thank you very much for your comments.
Glad my thoughts were helpful, I think with my layout planning it likely is going to be "trial and error" more than logical planning per se.....but because I don't have a great big space (darn 1950's split level houses with half basements!) I kind of have in terms of space the champagne wishes and bottled beer resources. I am leaning towards a "horseshoe" layout where the open end would be bridged by a removable bridge. By running track that way, I could go for O72 curves (or more) in the 10' approximate width. I also have been toying with a second level, possibly with the lower "country" and the upper "city" (including the hair brained notion of modeling street tracks and something like the High Line in NYC)...but just thoughts. Nice part is I can create my own domain, and if I don't like the approach, can stop and try something else, I have a lot of patience, and if an approach doesn't work, I try another one.
We aren't much better off with our house. The only saving grace was my in-laws replaced the broken down deck with an enclosed sun room, the room below on the walkout level was only built to support the sun room. Now that we have owned the house 6 years, And our girls are married, i finally get the afterthought room as a train room. I thought very similarly as you when I started this topic. I shape, with an 072 loop bridging the gap with an upper level. However some folks here pointed out my high line would over power the lower mountain coal mining, lumbering rural and small town area. Of course there are newer high lines over older winding rural railroads, but how was I going to pull it off in 130 square feet? Many modelers do, but I couldn't envision how I would with the ideas I wanted to do for over 20 years. I actually sold the long locomotives and 72" passenger cars I was going to run on the proposed high line. I just used some of that money to buy more Ross switches and a Legacy 990 recently. I also got a couple shorter engines a while back.
That is no to dissuade you from your idea, because I have seen many layouts like you proposed done convincingly.
I have the concept of what I want to run and what towns, industry, and terrain I want. The track plan is basically ready, but I know there will be changes as I go along. Nothing is etched in stone. We will see how it progresses. Thank you for sharing your ideas.
One of the nice things about all this is there are no 'right' way to do a layout, and thankfully that is true because people come up with all kinds of clever solutions no one else thought of. I can understand what they mean about the high line overwhelming the lower level, that can be a big problem with multi layer layouts, especially where you want the lower level to be the real focal point. I might very well switch to narrower curves if I find having O72 curves is impractical, I only have one engine that would have problems with it, and if it remains a shelf queen while I will be somewhat saddened, it still is a great looking model![]() . My original thoughts were a lot more intensive, I have given up having a big yard/engine facility (would love to have a turntable and roundhouse, not with my limited space), but I'll find other ways around that. It will mean compromises big and small, but whatever I come up with, definitely better than what I have now, an almost complete basement
. My original thoughts were a lot more intensive, I have given up having a big yard/engine facility (would love to have a turntable and roundhouse, not with my limited space), but I'll find other ways around that. It will mean compromises big and small, but whatever I come up with, definitely better than what I have now, an almost complete basement![]()
As Bigkid said, it would be nice to incorporate all kinds of things in a layout, but in a room 130 square feet, there is only so much one can do. Someone asked me on as an aside on an offline email if I had decided on a plan yet. I thought I should check back in, and make clear what plan I have in mind.
")
That said, I quite probably won't be able to get all the staging tracks in under the upper level (Yard in purple near the top of the drawing. I may need to do as John C suggested having some kind of roll out shelves or cassettes to keep cars on. That can be worked out later. The purple tracks are at the 0" level, the pink tracks are the 3.3% grade, and the yellow tracks are at the 8" level. I have most of the track purchased, GarGraves with Ross switches. I need to buy 4 more switches, not counting the possible yard I mentioned above. I have some of the wood needed to build, but not enough yet to really start. The top of the benchwork for the lower level will be somewhere in the 40 to 48" range. I hope to be starting construction this fall after all the leaf cleanup and mowing is done. I want to put in another trak light fixture, that I have in the box in the corner first. Once we get there, I'll start a new build topic.
I haven't gotten very much more done with my diorama either. Here is an updated photograph on that. It is sitting on a child's play table my wife got at the thrift store recently. She is a wishful thinker that we may have grandchildren someday, so we have all kinds of stuff that has come from the thrift store.

Attachments
Images (2)
")

Mark,
That is an intriguing design! ![]()
What sort of trains will you be running?
George
Mark Boyce posted:As Bigkid said, it would be nice to incorporate all kinds of things in a layout, but in a room 130 square feet, there is only so much one can do. Someone asked me on as an aside on an offline email if I had decided on a plan yet. I thought I should check back in, and make clear what plan I have in mind.
That said, I quite probably won't be able to get all the staging tracks in under the upper level (Yard in purple near the top of the drawing. I may need to do as John C suggested having some kind of roll out shelves or cassettes to keep cars on. That can be worked out later. The purple tracks are at the 0" level, the pink tracks are the 3.3% grade, and the yellow tracks are at the 8" level. I have most of the track purchased, GarGraves with Ross switches. I need to buy 4 more switches, not counting the possible yard I mentioned above. I have some of the wood needed to build, but not enough yet to really start. The top of the benchwork for the lower level will be somewhere in the 40 to 48" range. I hope to be starting construction this fall after all the leaf cleanup and mowing is done. I want to put in another trak light fixture, that I have in the box in the corner first. Once we get there, I'll start a new build topic.
I haven't gotten very much more done with my diorama either. Here is an updated photograph on that. It is sitting on a child's play table my wife got at the thrift store recently. She is a wishful thinker that we may have grandchildren someday, so we have all kinds of stuff that has come from the thrift store.
Looks great Mark. What radius are you using on your layout?
G3750 posted:Mark,
That is an intriguing design!
What sort of trains will you be running?
George
George,
Thank you! We had a lot of participation here to get to that point!
I will be running coal trains with 2-bay hoppers in the steam-diesel transition era. I also want to run some log trains, mixed freight and an occasional short passenger train. The lower town will represent Parsons/Hendricks West Virginia, and the upper town will represent Thomas/Davis West Virginia. It is a concept I had started planning back in the late '90s, but never got to build a layout. The grade is the Blackwater Canyon, though we had to loop it around to fit. The curves are 042, so I will run WM consolidation, WM 0-8-0, WM F7, WM BL-2. Also I have the B&O working with WM at the time so I can run a B&O Atlantic, 0-6-0, F3, and SW9. Some folks here have suggested I get one of the MTH WM 44-Tonner, but I haven't freed up the cash for that yet. You can run a train up or down, then change cars, or go up and down, simulating going into the next valley. That would be more modeler's license, but gives a longer run.
gandydancer1950 posted:Mark Boyce posted:As Bigkid said, it would be nice to incorporate all kinds of things in a layout, but in a room 130 square feet, there is only so much one can do. Someone asked me on as an aside on an offline email if I had decided on a plan yet. I thought I should check back in, and make clear what plan I have in mind.
That said, I quite probably won't be able to get all the staging tracks in under the upper level (Yard in purple near the top of the drawing. I may need to do as John C suggested having some kind of roll out shelves or cassettes to keep cars on. That can be worked out later. The purple tracks are at the 0" level, the pink tracks are the 3.3% grade, and the yellow tracks are at the 8" level. I have most of the track purchased, GarGraves with Ross switches. I need to buy 4 more switches, not counting the possible yard I mentioned above. I have some of the wood needed to build, but not enough yet to really start. The top of the benchwork for the lower level will be somewhere in the 40 to 48" range. I hope to be starting construction this fall after all the leaf cleanup and mowing is done. I want to put in another trak light fixture, that I have in the box in the corner first. Once we get there, I'll start a new build topic.
I haven't gotten very much more done with my diorama either. Here is an updated photograph on that. It is sitting on a child's play table my wife got at the thrift store recently. She is a wishful thinker that we may have grandchildren someday, so we have all kinds of stuff that has come from the thrift store.
Looks great Mark. What radius are you using on your layout?
Howard, Thank you! The curves will be 042. My longest engine the WM consolidation will run fine,along with my baby madison passenger cars, being the longest cars.
Very cool, Mark. Can't wait to see it.
George
George, I will be glad to have you up to see it once there is something to look at. ![]()
Well it has been almost 2 months since I wrote anything. That doesn't mean I haven't been doing anything on planning. I have indeed. I have been looking at different benchwork ideas for one. Some of you may have seen me making a bunch of posts on the Mianne benchwork??? topic. The foremost question in my mind has been trying to figure out how the access to the access holes will work. Well maybe the old aging process has been helping me along. My knees have given me a lot of trouble (One was operated on when I was 50), now it is mainly arthritis. I don't want to stoop down, sit down and pull myself through, and for Heaven's sake I don't want to crawl in there. This past week I was leaf blowing and raking, then on the weekend I was crawling in the old closet under the stairs looking for stuff; now my bad knew is giving me trouble like it never has before.
All that is to say, I am really reconsidering the plan everyone has helped me so much with. So, I went back to the drawing board, and came up with a partial revision of the latest plan. If I remove the serpentine down the mountain that causes the need for the access holes, I am left with a loop to loop arrangement. Considering the small space I have to work with, I think I am going to have to go with something like that, and use my imagination a little more. Imagination!! That magic word I remember Barney the big purple dinosaur saying so much as our girls watched him faithfully when they were little.
So here is a feeble attempt to revise the latest plan. Dave or Carl, would you be kind enough to help me? I'm including the latest SCARM file and a screenshot of what I am thinking of. For the purist, I can still run short trains point to point and change out cars. For the longer run folks, I can make a few laps and pretend with my imagination that I am just getting to the other station. What can I say? Trying to cram a railroad in O gauge with no access problems, and a big wide open door on one end of the room only leaves so much. Whatever we come up with, it will be so much better than the double loop Ceiling Central in the other room.

Attachments
Images (1)

Files (1)
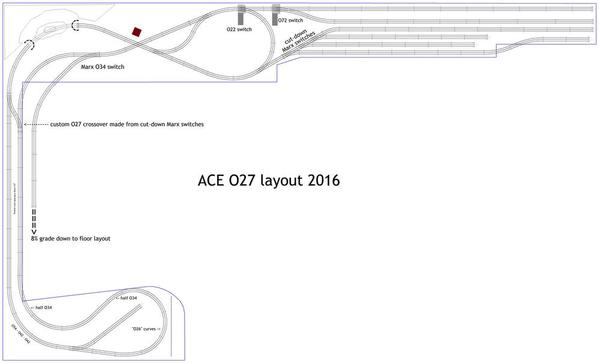
Hi Mark, I hope your knees start feeling better! Above is a layout posted on the forum by ACE to give you some fresh ideas in a very similar design arrangement as yours even though this is in 027+. Obviously, the yard in the top right wont work in your space, but you could perhaps move the yard to a subterranian level underneath your bottom loop by the window and door.
The design and planning process is half (give or take) the fun of the hobby. I'm sure you will come up with a great design while saving your knees and back!
JD
You should just build it. I wonder what is holding you back. Over planning gets you nowhere. The plan is cool with just the mainline and elevation change. A couple spurs and it's perfect. It's a small pile of light lumber, plywood and homasote. Connect a couple skinny wires and bingo. You literally could be running trains before the time spent fooling around with the diorama. That's what I see. I wish you the best of luck, but I don't quite understand why you don't just get it up. Cheers.
Respectfully Mark, I have to agree with William1. You have a good deal of planing already done, this should be a pretty straightforward approach. If it doesn't work as you desire, you can modify or back up, but you really don't get a great feel for how it will work until you start building.
Mark, I'll be glad to help get things connected. I've always been concerned about your being able to get to the access hatches. Anyway, here's attempt #1. Note the elevation is only 5" because of the passing siding. If you don't intend to park cars there, you could put the whole section on the grade, but since you are no longer crossing over any lower tracks, I'm not sure it's worth it to get a higher elevation.


Attachments
Images (2)
Files (1)
JD, William, Rich, Dave,
I've read each of your responses, and thank all of you very much!! A variety of opinions is why I started this topic! I don't have time to reply further right now as we are getting ready to leave for the evening. I will just say there is value in each of your responses!! Thank you!!
Mark, like me, you have your reasons for not moving ahead yet, so there's nothing wrong with exploring alternate designs that will be easier on your body. Having an aunt with severe arthritis, I completely understand your desire to minimize the pain that ducking under a layout will cause you. Only you know what you and your body are willing to deal with. You lose nothing by exploring options, you can still build the original if you decide to try to deal with the pain.
Dear Mark:
If you do decide to amend the plan, how about eliminating the space-hogging loops on each end and set up a true point to point? You could go back to the turntable at both ends plan which would serve two purposes: First, the turntables would act as a run-around for your engines so an engine could get to the "end" of the train front or rear. Secondly, if would provide you with the ability to turn any engine. Or, you could just having run-arounds--engine escapes).
Think about this: I'm a firm believer in the participation element of the design process. If you have a loop to loop continuous arrangement you can pretty much stand there and watch it. There isn't much of a run to begin with. That's not a knock. It's a fact of reality. If you set the Blackwater Canyon Line up as a railroad, like a real railroad, you will have to control the engine, couple and uncouple, start, stop...etc. switch out cars. Much more involvement! Much more fun! Much more interesting than being an observer.
I understand folks wanting a continuous option at times to just sit back and relax and watch. However, anyone could always set up a temporary loop of track on the floor and loop at heart's content. I would make my regular set up a model railroad instead of a display layout. That's just me. You have to decide.
I think you will discover in not too long of a time period you would be bored looping as most people are. You can achieve realism with a continuous run but have to be disciplined enough to not just circle without purpose. Our steamers stop at every water tank. And pick-up, drop-off cars at almost every siding. We only run a train from one "end" to the other "end" and that train's "trick" is complete for that night. Doing those things, keeps our crew busy and entertained for hours and that isn't an operating session. However, everybody has their own interest and opinion. This is your line. It is entirely up to you.
Since your space is limited. I believe that you should seriously consider making your line an actual model railroad instead of a display type layout. I wish that you were closer to us so you could experience operation in action. It is fun operating a layout like a board game or actual line and switch cars in and out, change engines, set up and break down trains etc. I've got several guys coming now who want to dismantle their loops as they see the fun and interaction that their current layouts are missing. One guy has a monster layout--wow--that's going to be an undertaking.
YOU ARE WELCOME HERE ANYTIME. While you are thinking about your layout, you could make a field trip out here to see the Glacier Line in Action. Of course, you would be doing it and not just watching. No one watches here! We operate; including the nice looking women!
REGARDLESS of what others say, including me, you take all the time you need to decide exactly what you want BEFORE you do anything! I think that was in my book, huh? This is NOT a race.
I'm your age. I can appreciate what you are saying about your knees and bending to crawl up through access holes. I think you'd be fine, but admit an ideal layout would be one where you could just walk up to ANY portion of the layout (within 30 inches) and easily reach it. But, you want to design something correctly on your first attempt, because we aren't getting younger and how many more layouts are you wanting to build? Think about the time, money and effort and strain on the knees it takes to build a layout. You do not want to rush, putting something up and then say: OH CRAP! WHAT HAVE I DONE?!
You've got more to think about. I'm going to be very interested in seeing what you finally decide. Wish I was closer to help you construct some L-Girder Bench-work because it is the ideal method for layout support. In your case, if you do just go around three walls and eliminate the space hog loops you could have a minimum of legs for your bench-work making it easy to work on your layout--run wiring--and/or have a hidden staging shelf(s) under it on each end to switch out cars. Great possibilities.
Peace to you! Happy Thanksgiving!
John
Mark, here are a couple of alternate configurations. The 1st has a slight change to the passing siding to let you run longer trains and still be able to pass. The 2nd swaps the passing siding for a small storage yard and increases the elevation to 6". The grades for both might be too high, but I didn't know how small of a grade you were wiling to accept.


Attachments
Images (2)
Add Reply
Sign In To Reply

