I'm in the process of respraying some MPC-era PRR cars for the Razorback Traction Co.'s crack express, "The Crimson Comet", and figured y'all might like a look under the hood, if you've never dismantled one...


GEDC1888

RPO with the top popped.  All MPC Madisons use one standardized roof/window assembly, with the same windows doubling as hold-down latches.


GEDC1890

Closeup of a latch.  Pushing down on these with a non-scratching implement such as a popsicle stick releases the roof.


GEDC1891

The rather Chic Sale lighting arrangements.


GEDC1892

The pickups are also rather spartan.  For all this, the body casting itself is first-rate, and has been reused over the years for sets like the Polar Express, the Major League Baseball trains and so forth.


GEDC1893

The (in)famous MPC plastic truck rivet.  While these do make assembly simpler, they're not the most sturdy or best performers out there. 


GEDC1894

The car entirely dismantled.  Very spartan, really.


GEDC1895

Each MPC Madison came with one roller and one wheel pickup.  For best lighting performance, I recommend 600-9050-150 combined pickups on each truck.


GEDC1896

With a bit of careful soldering iron work, the wheel pickup can be melted free of its frame...


GEDC1897

And melted into place with the roller, to make your own complete roller pickup! 


GEDC1898

(left) Home-made and (right) factory pickup.


GEDC1899

GEDC1900

If you're so inclined, the vestibules are held in place with two tabs.  I'm not bothering...


GEDC1901

Off to the paint shop!  Krylon's claims for its MAXX cherry red spray paint notwithstanding, I think I'm going to prime the rest of the cars before painting 'em...


Stay tuned for more later!


Mitch

Attachments

Images (14)
  • GEDC1888
  • GEDC1889
  • GEDC1890
  • GEDC1891
  • GEDC1892
  • GEDC1893
  • GEDC1894
  • GEDC1895
  • GEDC1896
  • GEDC1897
  • GEDC1898
  • GEDC1899
  • GEDC1900
  • GEDC1901
Original Post

Replies sorted oldest to newest

Very interesting, Mitch.


I like these cars, too. You're right about the nice body castings on these baby Madisons - they are very intricate and detailed, and also there are a variety of different cars with different window arrangements, plus baggage, combo and RPOs, so the consists are not loaded with cookie cutter cars.


The later MPC cars were equipped with diecast six-wheel trucks with dual pickups, which were much nicer. The newer versions, made the past 12 years or so, also have roofs that are removable with two screws (much better) and finished interiors. I don't think the PE cars have these features, though, for some odd reason.

Originally Posted by ADCX Rob:
Originally Posted by breezinup:

I don't think the PE cars have these features, though, for some odd reason.

Cost.


The PE cars all have current collectors on both trucks, though, and are generally flicker-free. Same with the starter set caboose/cabin cars - PA Flyer, etc.

OK. It's nice that they have the flicker-free lighting. I know it has been mentioned that they do have the old-fashioned roof attachment system with tabs (can be a real PITA to get the roofs off) and of course no interiors. It reason may be cost, although if all the other recent baby Madisons have these features, you'd almost think it would be cost-effective to crank out the PE cars the same way on the production line. Apparently not.

Last edited by breezinup

After a few paint mishaps, I got the shell in an acceptable state, so it's time for assembly! 


The pickups wired:


GEDC1919

And installed!


GEDC1920

Trucks and couplers installed, and wiring done.  Note that the bulbs are now wired in parallel, with wires from each pickup to each bulb for flicker-free operation...


GEDC1921

And roof back on!


GEDC1922

Still to be done:  Razorback stickers, and repainting the rest of the consist when it arrives...


Mitch

Attachments

Images (4)
  • GEDC1919
  • GEDC1920
  • GEDC1921
  • GEDC1922
Originally Posted by RadioRon:

Geesh, Mitch, I was just going to agree with the other guys about you re-painting of a Pennsy car, but you just went way over the line with your plans for the Phillies cars, my friend!     (It is hard to believe that those four MLB Lionel passenger sets went over so badly.  I bought the Phillies set ON PURPOSE with the hope that some add-on cars would be made available!)  Of course, I am still waiting in vein for Lionel to produce two more "North Pole Central" Harry Potter-type passenger cars to go with the first two-car set it release 3-4 years ago!! 

Oh, I know, but at approximately $15 a pop, they're nice and cheap and perfect for doing Things to. 


Least I won't have to repaint any Pennsy coaches or observation cars! 


Mitch

Are the new Baby Madison car shells any different than the MPC era cars that used die cast trucks? Are the flat "pad" part on the bottom where the truck is mounted in the same spot? I see on eBay that there are even three cars for $10! I have an MPC Blue Comet set that could use a few more cars, and I have some MPC three axle trucks! Will these trucks fit under those cars though? Isn't there also a way to add a vestibule part to the observation end and make it a coach? 

Originally Posted by Sam Jumper:

Are the new Baby Madison car shells any different than the MPC era cars that used die cast trucks? Are the flat "pad" part on the bottom where the truck is mounted in the same spot? I see on eBay that there are even three cars for $10! I have an MPC Blue Comet set that could use a few more cars, and I have some MPC three axle trucks! Will these trucks fit under those cars though? Isn't there also a way to add a vestibule part to the observation end and make it a coach? 

1) Comparing a new car with the old car, I see that the clearances underneath have been increased.  


2) Yes.


3) I believe the three axle trucks will fit, based on the increased clearances.  You'd have to experiment, though. 


4) Yes, a stock vestibule will snap in where the observation railing is. However, the extended roof will have to be cut back to fit, as the PE/MLB cars have that extended observation platform.  


Mitch


I am trying to improve the pick-up reliability of my early Lionel baby Madison cars (Milwaukee Road).  I essentially decided to replace the trucks with a better pick-up assembly.

So, what will work.  Even though the fixed free swinging couplers are cheap looking they will do for me.  Is there a truck/pick-up assembly that I can screw into the existing rivet holes?  I wouldn't be opposed to a coupler attached to the truck;  it's just that I don't need it.

Any thoughts?

Thanks,

Alan

ajzend posted:

I am trying to improve the pick-up reliability of my early Lionel baby Madison cars (Milwaukee Road).  I essentially decided to replace the trucks with a better pick-up assembly.

So, what will work.  Even though the fixed free swinging couplers are cheap looking they will do for me.  Is there a truck/pick-up assembly that I can screw into the existing rivet holes?  I wouldn't be opposed to a coupler attached to the truck;  it's just that I don't need it.

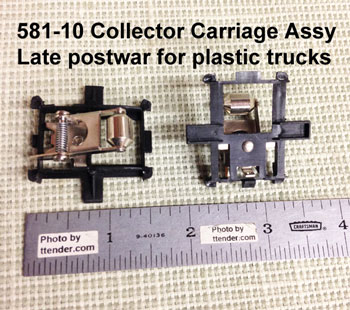
Off the top of my head, you could try the postwar 522-1 lighted pickup trucks.  However, if you'd like a drop-in replacement for the pickups,  try the 581-10 pickup rollers.  They feature better downwards force than the MPC pickups and should just snap in place.  

Good luck, and keep me posted!  

Mitch 

ajzend posted:

I am trying to improve the pick-up reliability of my early Lionel baby Madison cars (Milwaukee Road).  I essentially decided to replace the trucks with a better pick-up assembly.

So, what will work...

No need to change trucks, the ones you have are fine. The existing truck is modified by simply snapping in the collector assembly(part number is 9050-150):

Sources HERE. They fit just about all plastic post-1969 trucks.


Last edited by ADCX Rob

Take the screw out of one of your couplers. I think you’ll see a male stem molded with the car that holds the coupler. IIRC, there’s a counter sunk dip in the plastic that the coupler sits in. I don’t think it would be easy to replace it with something else.

For the lighting issue, two ideas. First I used foil tape inside the roof of the cars. It’s found at hardware stores and used for home duct work. Second, I found something on eBay. It comes in a kit that you wire together. I think it has a capacitor that helps with the flickering. I used them in an MPC Blue Comet set, and I like the results. It’s something like this:

https://www.ebay.com/itm/HO-Pa...8:g:BDkAAOSwHLNZTSBA

Im not the seller and actually I don’t think that’s the exact same thing I bought before. Just an idea.

ADCX Rob posted:
No need to change trucks, the ones you have are fine. The existing truck is modified by simply snapping in the collector assembly(part number is 9050-150):


I think the problem here is that he HAS those pickups and doesn't like 'em.  Can't say as I blame him.  

These are available from the Train Tender and should fit his MPC trucks.   

Mitch 


M. Mitchell Marmel posted:
I think the problem here is that he HAS those pickups and doesn't like 'em.  Can't say as I blame him.  

These are available from the Train Tender and should fit his MPC trucks.   

Mitch 


Unfortunately, those do not have wipers for the axles(there were versions that do), and are for fixed / non-rotating(non-"fast angle") axle sets and will add a lot of drag if used on rotating axles with the fast-angle wheels.

I am not seeing where ajzend "doesn't like 'em". He's just trying to improve the pick-up reliability of the MPC Milwaukee Road cars.

The problem is that the Milwaukee cars only have one wiper & one roller per car. With two wipers & two rollers per car like the Polar Express cars, flickering is virtually eliminated. Even the ChiCom made starter set cabooses all have the 9050-150 collector assemblies on each truck now.

ADCX Rob posted

Unfortunately, those do not have wipers for the axles

Right, right, 'cos postwar trucks grounded through the all-metal sideframes. 

(there were versions that do),

Oh?  Part number?  I wanna try some.   

and are for fixed / non-rotating(non-"fast angle") axle sets and will add a lot of drag if used on rotating axles with the fast-angle wheels.

Oh?  Do they rub against the axles, then?  

I am not seeing where ajzend "doesn't like 'em". He's just trying to improve the pick-up reliability of the MPC Milwaukee Road cars.

The problem is that the Milwaukee cars only have one wiper & one roller per car. With two wipers & two rollers per car like the Polar Express cars, flickering is virtually eliminated. Even the ChiCom made starter set cabooses all have the 9050-150 collector assemblies on each truck now.

Yep!  Which is what I wound up doing in the original posting...   

Mitch 

Here are the steps I took to improve the lighting and pickups on my Milwaukee Road baby madison cars:
 
1) Installed all new 9050-150 collector assemblies for dual pickups and 2 rollers/wipers per car.  (Lionel Part # 6009050150)  I purchased them directly through Lionel during their November 50% off parts sale.  I wired the new collector assemblies with 24 gauge superflex wire purchased on ebay.
2) Installed LED lighting using the LED lighting modules from Hennings.  (http://hennings-trains.shoplig...regulator-2-pcs.html)
3) Installed the following LED lighting strips, mounted to some foamboard.  (https://www.amazon.com/gp/prod...ge?ie=UTF8&psc=1)
4) I used these connectors, so I could connect/disconnect the roof assembly to the passenger car as needed.  (https://www.amazon.com/gp/prod...ge?ie=UTF8&psc=1)
5) Some of the passenger cars needed additional "lightproofing" to prevent light leaking through the body of the car causing them to "glow".  I used some black acrylic paint to paint the inside of the cars for lightproofing as needed.
6) I added some wheel balance weights (6 per car) to add a bit more weight to the cars so they track a bit better.  (https://www.amazon.com/gp/prod...ge?ie=UTF8&psc=1)
 
Here is a photo of the new pickups in place and a view from inside one of the upgraded passenger cars:
IMG_2475IMG_2474
 
 
I'm really pleased with the end result... which is perfect, flicker-free LED lighting.  Here is a video of the Milwaukee Road passenger cars after the upgrade:

Attachments

Images (2)
  • IMG_2475
  • IMG_2474
Videos (1)
Milwaukee_Road_Passenger_Train
Last edited by Joe_pgh

I appreciate the ideas regarding improving my lighting situation.  I think that the path of least resistance would be to add collector assemblies to the other trucks on the cars and wire them together.

My biggest issue is the disassembly of the cars.  These are the worst cars to disassemble of any I've come across.  (maybe that would be an interesting thread on the forum).

Thanks,

Alan

ajzend posted:

I appreciate the ideas regarding improving my lighting situation.  I think that the path of least resistance would be to add collector assemblies to the other trucks on the cars and wire them together.

My biggest issue is the disassembly of the cars.  These are the worst cars to disassemble of any I've come across.  (maybe that would be an interesting thread on the forum).

Thanks,

Alan

Yes, removing the roof assembly from the madison cars was a bit challenging, especially for the baggage car.  (There are a number of forum threads on this topic, with different methods recommended to remove the roofs.) 

For some of the older Milwaukee Road passenger cars, there are 6 white tabs on the bottom of the car that need to be cut with a hobby/exacto knife. Then they are easy to remove.  To "re-secure" those roof assemblies after the upgrade, I just applied a dab of hotglue to the center tab.  (They fit pretty snug, even without taking this step.)

For other passenger cars you have to press the 4 raised window tabs, then release the roof.  The difficulty is finding a way to apply pressure to all four tabs simultaneously, so the roof assembly can be removed.  My solution was to cut some clear adhesive bumpers and attach/stick them to the 4 window tabs, then use a pair of quickgrips to simultaneously apply pressure to all four tabs. Then the roof assembly can be removed.

Here is a photo of the baggage car with the quickgrips used to apply pressure to the 4 tabs to release the roof assembly:

mlw_baggage_car2

These are the type of adhesive bumpers I used:
https://www.amazon.com/100Pack...QL70_&dpSrc=srch

Attachments

Images (1)
  • mlw_baggage_car2

I did go out to my LHS (Eastside Trains), and I picked up a number of the collector assemblies.  They should be really easy to wire-up. ( Also, picked up an MTH RailKing Army troop carrier.  It's really nice.  Now I have to populate it with military guys.  That's another hunt).

I practiced getting the roofs off using my main tool:  frustration.  I like the Quickgrips idea.  I've got a bunch of these cars to go so I'll have the opportunity to see how I can make that work.

Alan

The easiest way i found to remove the roof is as follows: Identify the hold down wedges on the windows; cut pieces of cardstock (index cards) about the width of each window and an inch or so long; press in each wedge with the above mentioned Popsicle stick, pencil (eraser end), or similar; simultaneously slip the piece of cardstock between the window and carbody. Once all wedges are held in with a piece of cardstock pull the roof upward and remove it. It takes me no more than five minutes per car using this method.

I use the popsicle stick method. I filed 4 of them to a chisel point and insert them into the window openings. Place the car on the bench and gently press down until the roof releases. Presto!

I recently did a rebuild on the same PRR RPO car that Mitch defiled in his OP. Shame- Shame- Shame

Still hunting for new couplers. I am considering trying Lionel 9500-60 couplers.

https://i.ebayimg.com/images/m/mhWmqU0OCPqnSP8TJJ08vNA/s-l200.jpg


2018-02-11 13.23.062018-02-11 13.23.152018-02-11 13.23.352018-02-11 13.24.402018-02-11 13.24.52

Attachments

Images (5)
  • 2018-02-11 13.23.06
  • 2018-02-11 13.23.15
  • 2018-02-11 13.23.35
  • 2018-02-11 13.24.40
  • 2018-02-11 13.24.52

Add Reply

Post
×
×
×
×
Link copied to your clipboard.
×
×