
Today I put a second application of earth color on the plaster. When that dried I put down some grass foam and then applied ballast to the areas in the front of the yard. Glued it all down but as I was doing it I had a train running on one of the upper loops......................Paul
Working on an under the city red light district. Found images online then using photo shop was able to design a city block. Put them onto cardstock and spray adhesive them to some wood. Made sidewalks for the front to the buildings.


Attachments
Images (3)
Originally Posted by Bryan in Ohio:
Working on an under the city red light district. Found images online then using photo shop was able to design a city block. Put them onto cardstock and spray adhesive them to some wood. Made sidewalks for the front to the buildings.
Nice Detail
-Pete
I bought a 100 light LED "rope" today, powered by a small solar panel. Let it charge this afternoon and just finished messing with it a little. I didn't pay much attention to the LED discussions earlier. Was wondering if anyone has done anything with these. The base holds one little NiCad battery !! 1 1/2 volts ?? Cut open the plastic tube a little and the light is a little brighter but not a lot of output, for sure.
Bryan: That's a real cute idea, there, decorating the usually left alone, underside of a section. Like what you've done to it. I'd like to try that, myself, on my layout, except that my "underneath" is so far away from actual contact from me that it would be impossible to get there. I'll just have to apologize to my 1/48 passengers for the lack of attention down there.
Paul Fischer
With the decal hunt successful, but other chores to do, just got in some brass bar stock
with which to play with maybe generating an extended pilot on this Lionel 0-8-0, to
accept that pilot truck. Looks like holes to drill and soldering...will see how this goes!
Originally Posted by Choo Choo kenny:
Pingman Eric's Train videos are on Youtube and he explains how to mix up this 2 part foam that is flexable and to put petroleum jelly on the rock molds so the foam wont stick. Choo Choo Kenny![]()
Kenny, big THANK YOU for the tip to check the videos.
Just installed working headlights in my bump and go cable car conversion.

Norma Bates Kitteh decided to help me test out the headlights by playing "Invasion of the Monster Kitteh". ROWR! ![]()
Mitch
Attachments
Images (1)
A couple of pics of what I finished yesterday. I cut down the base of the Korber switch tower and it set in-between the track and hill to the grade up nicely. I guess today I'll start near the top of the grade and work my way down laying down ground foam and planting trees...........................Paul


Attachments
Images (3)
Originally Posted by Big_Boy_4005:
"Belt and suspenders." Exactly! (I've never heard this before. But I like it)
Originally Posted by pelago:
Originally Posted by Big_Boy_4005:
Originally Posted by Adriatic:
Originally Posted by Big_Boy_4005:
While Matt was doing that, I worked on prepping a bunch of uncoupler magnets.
Hot gluing the magnet to the rail.

Have you done this before with hot glue?
Those magnets seem to get hot pretty quick.
I've owned one since I was a boy, but didn't use it much outside of wooden stage coach kits. But, I've been using hot glue "a lot" for the first time recently, urged by the heavy use among folks here.
I avoided it due to heat concerns mostly, but moved past that with the help of people here.
I find it great for fast scenery/structure work.
But (like I thought) I find it really doesn't take much heat to soften it again, and have had a few things "drop" from being around things I consider "warm".
I think silicone would be a better choice, or at least a back up faster considering you likely done hot gluing.
I used the hot glue on the ends farthest away from the magnet coil. Looking back at some of the ones I did a long time ago, I had super glued them. I can still go back and hit the edges, which would be a good idea from the sound of it. Belt and suspenders.![]()
not sure i understand this, hot? they only get hot when power applied for long time arent these used as momentary on/off deal? do you hold the button down and keep it down?
Sometimes...
...but more often when I was a boy![]() .
.
Lean wrong, or leave a kid standing near it alone for 20 second, and you might have a very hot magnet ![]() .
.
"Sometimes"-
My Grandfather also had many modified cars that used the magnets as a trigger too. Not exactly designed for it, but old school PW guys, used what they had on hand, to get what they wanted. Shoe pickups/track were not as common, so this allowed more universal operation visiting "simpler" layouts too. (I still have a giraffe that comes out for a look, only when over a magnet & the button is pressed. I think photos/diagrams of it, are in this thread about twenty pages back.(or one of Mitchell's). The trip mech for the giraffe car hits some engines & cars (which I forget?). They also needed to be down for a long, low, curved tunnel, and the trip mech didn't fit in visually on a hi-rail layout of the day (high-rail to us being a detailed, mostly realistic layout, with realistic track. Not quite 3RS)
Nice work Paul!
What brand of ballast are you using?
Originally Posted by paul 2:
A couple of pics of what I finished yesterday. I cut down the base of the Korber switch tower and it set in-between the track and hill to the grade up nicely. I guess today I'll start near the top of the grade and work my way down laying down ground foam and planting trees...........................Paul
Adriatic - Belt and suspenders is a very old expression. I've actually seen it in real life a couple times. Love the red button video.![]()
Since the layout is really intended for adult use, I doubt there'll be any meltdowns. I plan to keep the buttons away from places where they can accidentally be leaned on. That should help a lot.
Today was a BIG day for me! After two years of not being used, I finally got enough junk moved around to be able to run all six of the mainlines on my layout! It did take all day but I feel very good about it none the less! Oh the crud that can accumulate! I hope never again to be in this position again!
I have been working on the lift bridge and work yard on my layout. I have added wood sidings by using match sticks. The bridge is almost done and now would like to add red and green lights on the side. In the yard area I have ran string to look like power lines and added ground cover. Hope you enjoy the pictures.
David


Attachments
Images (3)


I 'installed' Cranky the Crane today.

Attachments
Images (1)
Originally Posted by Pingman:
Originally Posted by Choo Choo kenny:
Pingman Eric's Train videos are on Youtube and he explains how to mix up this 2 part foam that is flexable and to put petroleum jelly on the rock molds so the foam wont stick. Choo Choo Kenny![]()
Kenny, big THANK YOU for the tip to check the videos.
Anyone still unaware of Eric's YouTube fame needs to befriend Google search.
Great stuff, I watched him long before I saw he was here posting.
Originally Posted by Old Uncle Al:
Today was a BIG day for me! After two years of not being used, I finally got enough junk moved around to be able to run all six of the mainlines on my layout! It did take all day but I feel very good about it none the less! Oh the crud that can accumulate! I hope never again to be in this position again!
Glad you are up and running Al!!
Originally Posted by Mark Boyce:
Originally Posted by Old Uncle Al:
Today was a BIG day for me! After two years of not being used, I finally got enough junk moved around to be able to run all six of the mainlines on my layout! It did take all day but I feel very good about it none the less! Oh the crud that can accumulate! I hope never again to be in this position again!
Glad you are up and running Al!!
Hearing this made me grin ear to ear too ![]()
Six lines![]() Roaring fun there
Roaring fun there![]()
Nothing like those first few runs after a break![]()
.
Likely he's fussing with stuff right now!![]() ...???
...??? ![]() (if asleep more so
(if asleep more so![]() )
)
Mine was buried for months till just before Christmas. Shelf layout was holding all my stock from the table layout move too, so I could only run the Martian loop, a perfect circle of 0-27 doesn't make for long operating sessions. Lots of 5 minute flings, but not long ones. Finally I broke down, and began fiddling again. I was so happy to have it all operating again. Allowing me to..goof...
I only had some gloss paint to use on the tower, and it was really only a tiny bit too glossy after some weathering washes, so I thought a light coat of a dull satin might kill off the remaining sheen. I didn't pre-test it, and it turns out it was a can of high gloss, mislabeled as a dull satin....so for now I guess its a creosote, soot & oil shine.
Yea that's the ticket!![]()
Today was a maintenance day. Lubed and greased all engines and repaired my gang car that had some internal broken wires. Even had some time to clean the tracks. Overall everything ran better and looked cleaner!
-Pete
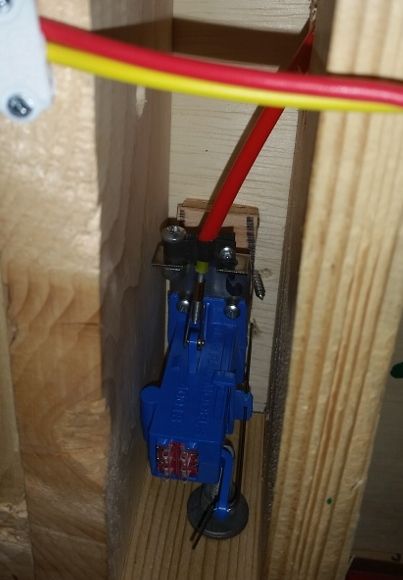
A lot of you have never seen a blue point controller for a turnout, I'd think. They're small and you mount them underneath the turnout directly.
SO, imagine this. You have a slot 2" wide with bolts running through it. You're not 100% sure it'll fit at all in there or line up with the hole. You have to run a section of wire smaller than piano wire, through a hole in the center points tie in a turnout which is exactly the same size, with your arms stretched all the way out because of course, it's the turnout furthest from the edge.
Then, you have to hold it exactly still while you grab a power drill and drill it, one-handed, from above while you hold the rest with your other hand from below. And the pull line is sticking out right into your chest.
Yeah, you could say I'm a little happy it worked out. I was prepared to just buy a ground throw, that's how unsure I was it'd fit at all!
Thought I would change direction and work on the grade planting trees. I had to make up some more last night and today. So here are some pics to show my progress working downhill to the lower mainlines..................Paul


Attachments
Images (5)
Originally Posted by paul 2:
Thought I would change direction and work on the grade planting trees. I had to make up some more last night and today. So here are some pics to show my progress working downhill to the lower mainlines..................Paul
Paul:
Bravo!!! Excellent scenery work!
Got the last black wash on. Going to do some fine detailing with washes tonight after work. Then jump back into scenery. Think my few month long mountain project is nearing completion! Haven't decided how I want the portals to look yet. Not sure if I'm liking the stone or not that's on them.


Attachments
Images (1)
Originally Posted by Lancer:
Got the last black wash on. Going to do some fine detailing with washes tonight after work. Then jump back into scenery. Think my few month long mountain project is nearing completion! Haven't decided how I want the portals to look yet. Not sure if I'm liking the stone or not that's on them.
Absolutely AWESOME!!!!!!!
Very, very nice work, Lance. Really looking good!
Matt was here again this afternoon and continued with wiring.
He got this section finished and all the wires tied up. They had been hanging down above Red Wing for so long, I almost forgot what it used to look like.

He also finished up this section. The black wires are track common. The red are center rail. And the yellow are for detection.

The entire mainline will have detection. Yards and industrial areas will not. Each block on the mainline has 3 detectors, an east, a west and a middle. Matt got these six back to this central location where they can cross under the aisle to a panel where they will be tied to the C/MRI system.

While he was working on that, I continued work on the Ford Plant. With any luck, I should have this done tomorrow.

Attachments
Images (4)
This loco kitbash progress is taking as long as the elevator kitbash, which was finally
finished and photoed: chase parts, brass sheet, strips, etc. I stink at soldering, so
the pilot plate and extension, with the pilot, are not going together well, and one
soldered connection has already broken, to be redone. The extension was cut and
drilled twice, as first did not seen long enough. This second fits the engine's original
pilot mounts much better, too, although engines's original screws would mount and hold either. (if soldering is not successful, will drill and counter sink for screws, so
there is an escape route, except the spoked pilots WILL have to be soldered to the
extender and pilot plate)
With a variety of junk box brass pilot castings to choose, none seem to have the right
steps, so steps may need to be fabricated, and many of the castings would have to be
cut, to provide for swing of Lionel compatible coupler. (next week, Lionel will probably
come out with their own factory version using this boiler casting, so all will be in vain![]() !)
!)
Made up some trees this morning so later today after the glue has dried I'll set them in along with some evergreens and two more sections of the grade will be done. I got halfway down but have to stop because I still have to reach over the grade to do work behind it. Hate to break a tree..............Paul
I didn't want to wake up my wife last night with the drills putting blue points in, so I instead finished painting the boxes for the car cards. I'd bought the ones you can get from micro mark, cut the top inch off the back as they didn't need to be that tall, then painted them the same color as the fascia with natural wood on the insides.
I'll be mounting them sometime before the weekend. Once those and the blue points are in place under the last of the turnouts, I'll finally be able to do op sessions!
I think this is a very entertaining thread, and apparently many others agree, based on the number of views. Thanks for starting it!
Here is my road addition, all done this morning. With snow piled up outside, this was a suitable use of time. 1/64 cars are posed on it, but to my eye they look small. Maybe it's the height of the track on cork roadbed. There are 1/43 models of "small" cars (sports cars, Metropolitan, Karmann-Ghia, Austin, Mini-Cooper) on an adjacent American Flyer section. For some reason they seem to look better.

Attachments
Images (1)

Nicely done, Lance. Thanks for the photo.
Your work looks good, Lancer. And the evergreens fit well with the rocky altitude. ![]()
It was a short work day today. Had a dentist appointment. But I got two more areas just about done. So that puts me about half way down the grade. Can't plant trees because I have to reach over and still do things on the layout behind the grade. But while I have the materials I'll make up trees for later. Anyways here are some pics. I still want to put in some more trees...........Paul


Attachments
Images (6)
Wow Paul! Your layout is looking great!
I had a very productive afternoon working on the layout, and nearly finished the overflow yard for the Ford Plant.
Now that the near ladder is in its proper location, I can finish cutting and fitting the body tracks.

Almost two years ago Patrick and I built the benchwork connection to the helix. I'm not sure what I was thinking back then locating it all the way to the back where that straight edge is sitting.

I put in this new plywood bridge. I had been dreading this project, but it turned out to be fairly easy.

It seems to be a pretty good transition both vertically and horizontally.

I hope to head back down after the hockey game to try and polish this off.
Attachments
Images (4)
I need a refresher course in soldering technique (as if I had one). thechnique, that is...however, since the spool rosin core solder wasn't working, I switched to both paste
solder, between the extender and the pilot plate, and to a thin acid core spool. I clamped them together with miniature C-clamps, applied good hot iron, paste solder boiled out, acid core worked like it was supposed to, and THAT assembly is good. I think I remember there is something you are supposed to use to clean off acid soldered locations? However, none of the pilot trucks I have are right, and the truck wheels and axle have to fit between the coupler and the cylinders. I am now fabricating the truck attachment for possible use with existing trucks, while I wait for another truck to float in. Steps and hand rails will have to be fabricated, too, but that will await getting the
pony truck working.
Since I needed different lengths of girder bridges and one double wide girder bridge, I decided to build my own. I used 3/8" bead board plywood hoping the beads might look a bit like supporting columns. I may add flat pieces to the top and ends of the "girders". I made 7 yesterday and need some suggestions on what color scheme to use on them. I was thinking about black with a rust color dry brushed on top of the black but maybe someone in the Forum might have a better idea.
Thanks, Jim

Attachments
Images (1)
Jim, I would defiantly add the flat trim to both the top and ends, it will be a dramatic change and add to the piece! Looking very nice!
I found out that a 1997 Mercedes E420 CAN fit a Marx store layout, four 6' fold-in-half tables, a dozen or so gym bags and hard cases and a 6 x 10 grass mat...

But it isn't EASY. ;-)
Off to the train show! (Feb 28, Holiday Inn Convention Center, Springdale, AR.)
Mitch
Attachments
Images (1)
Add Reply
Sign In To Reply
