Mark


Thanks for your thoughts


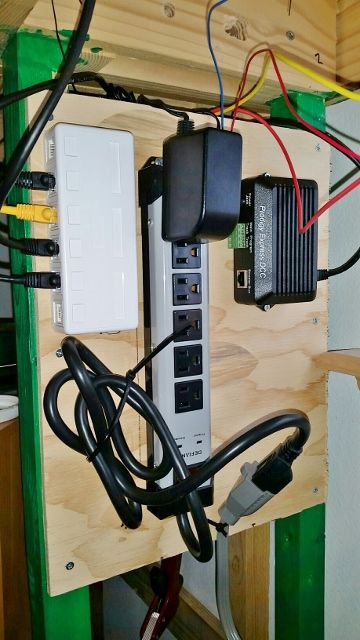
For the wiring, the control stand is located about midway electrically on the layout . I am thinking about wiring feeders back to terminal blocks mounted on the layout benchwork underneath. I plan to use flexible wire pairs from the transformer /TIU outputs to the terminal block inputs which will allow the control stand to move a bit. The control stand is a TV stand from Targets Room Essential collection, and is low cost, nicely finished and easy to put together. There is a terminal strip with on/off switch on the middle shelf that supplies power to the ZW and Legacy set.

Last edited by LIRR Steamer

P51


Thanks for your thoughts.


The window lets in a lot of light into the room. It is a tall window and the lower sash raises and lowers. I can operate the blind and the sash from under the layout if need be. There is a house and trees across the street so with the blind raised, its a bit of a scenic view as you view through the bridge area.

Was not happy with the look of the two corners I redid so I added another coat of black wash to them. While doing that I ran trains. Tomorrow I'll spend time picking up from working on the layout to make some room to move around. I measured for the next two areas to build up. I have an alcove off the one side of the attic. So one side will have a town and the other side will be some small industries with a Rail station for some RDC's to stop at...........................Paul

I actually finished laying track on the entire main level on Sunday when I connected Hiawatha to the rest of the layout via the Short Line Bridge. On Tuesday I got it all powered up, ground throws installed and most of the paint cleaned off the tops of the rails.


In celebration of this milestone, I unpacked some hoppers and shot this short video.


Enjoy!


More updates on the Poor Man's Rectifier: 


GEDC1338

Holes puttied up and ready for sheet styrene covers...  (yeah, I coulda just covered the holes with styrene, but why take chances?)


GEDC1339

Sheet styrene installed and holes drilled for a Lionel pantograph.


GEDC1340

In case anyone wondered, a Lionel Rectifier shell almost fits on a Williams GP-9 chassis, but not quite (a little too long and a little too narrow; the flywheel on the rear motor rubs)...


Mitch

Attachments

Images (3)
  • GEDC1339
  • GEDC1340
  • GEDC1338

Ok, so I shimmed up the back row of the main street buildings of Ironville into position. Vacuumed up about 10 lbs of crud generated during this phase.. Set the "hatch" buildings in place, and plopped the hatch in position, along with some vehicles. Looking good! Not posting a pic here, will post the next update on Scott's Weekend Photo fun thread this weekend... 


Well, I'm still struggling within my giant mountain.  The mountain is big enough to hide a helix within it, allowing me to shift a train from the top level down to the bottom level. 


The problem is, I have to do everything in stages from the top of the mountain all the way down to the bottom of the valley - in sequence.  What that means is I have to make all of the top  of the mountain first, then do the scenery for that including trees, paint, everything.  Then I have to work my way down to the next level, completing all of that level, then work my way down and out to the front of that part of the mountain. 


I'm tempted to do everything of any given stage all the way down.  But if I do, then I no longer have any room to complete the scenery for the upper part.  That is so frustrating!!   It seems like I should have so MUCH MORE done than I do. 

Today I decided to put a black wash on the corner mountain to darken it some more. Took some pics. I think I may have to do another wash on it and add some more trees in spots. This section was hard to work on because it is the section I could not reach to put plaster wrap on first. So I was trying to color the plaster already there which was drywall compound and it colors much different. .......Paul

DSCN1643

DSCN1644

Attachments

Images (2)
  • DSCN1643
  • DSCN1644

Interesting Hack Of The Day:


GEDC1342

I was doing a bit of reading in the Greenberg guide to Lionel repair, which mentioned that Rectifier locos used GP7-GP9 frames interchangeably.  So, I mused, why does my Rectifier shell rub against the rear motor's flywheel?


The answer is above.  See that brace inside the Williams shell?  It spreads the shell just enough that the flywheel no longer rubs against the sides!


Pretty clever, that. 


Mitch

Attachments

Images (1)
  • GEDC1342

Practiced using liquid masking film on a donor LIONEL vista dome before I shoot a new one for NP North Coast Limited train.  Ordered some new files to cut an offset hole in a non-dome 15" aluminum coach for the new dome.  Took some measurements off a Budd drawing to get the dome's offset proportions.


Continued to fill and sand 3 F3 A shells and one B unit shell--mercifully, the B unit is 95% finished (after adding third porthole, filling vents in the LIONEL mold since the prtotoype, as delivered, had none, and repairing minor damage).   

Paul2, If you are asking me about that second treatment, I'd advise you to try doing so on a small area at the base of the rock face to see if you like it. Exposed rock like that is often darker at the bottom, anyway, since such a spot where the rockface meets the horizontal land surface is often more damp (and a little darker as a result). Then, if you like the effect, continue farther up the hillside?
FrankM

Paul, I too agree with Monsoon.  It looks much better with your wash.  I think I might take a while longer to look at it before you add another coat.  You might get to liking it more and more, to the point that you may be sorry if you make it any darker.  Give it a little time. 


I like it well enough that I'll take a look at doing the same thing with mine when I get to that point.  I'm just now finally to the point of adding some plaster cloth to the base of the mountain. 

Thanks for the comments guys. You sure learn as you go along. That corner and the opposite corner were the only two I could not get to apply plaster wrap. So I used diluted colors to try to change it. Learned dry wall compound does not really absorb the colors like the gysolite I used on the rest of the scenery. I did the leopard spotting technique...................Paul

Spent more $$$.  This time it was for hobby tools, primarily, with Amazon.


Sanded the F3 A units and a B unit--they look pretty darn good, but I'll need to see them in daylight.  I'm convinced I'm the worst body man in the hobby.  I'm stunned to see how much Tamiya putty, wet/dry sandpaper, and primer I've used.


Stripped the paint off the plastic parts for two more aluminum cars to be repainted.


Packed and shipped some more of the diecast vehicles I've listed in the For Sale forum.

Last edited by Pingman

Finally spiked down the rest of my #1 loop with the 072 curves but first put the new wheels on the M1000's vestibules. Really runs nice now. Putting in the 072 curves eliminated the need for some 40" straights plus curves so I have enough for another layout ??  But where??  The bath room-too small. Ahhh!! the bedroom !! I could sleep on the sofa-maybe.

Patrick is now 2 for 2 on weekly visits again, and the progress just keeps coming. More backdrop work today.


Before we could hang the sheets, I had to get back in that corner with the Dremel and cut a couple gaps for detection. This area amounts to a short tunnel. It will be fairly easy to rescue a train, but not much more. I used my meter to double check my work.I kept cutting and cutting, and it just kept beeping. I was just about to start tearing my hair out, when I noticed that there was another feeder connected to that segment. DUH!!!


After that Patrick was off to the races.


IMG_5063

This is the end of the line for a while in this area. There is still a lot of work to do over here (around to the right) before we can continue with the backdrop.


IMG_5065

Patrick also finished the section above the workbench. Take a good look at this view, because next time he comes over we are going to add backdrop to the top of the helix, thus closing it off.


IMG_5066

This piece of paper doesn't look like much, but I've been working on it for the last couple days. I figured it was high time I started documenting the electrical. This is a list of all the power districts on the layout. The colors are the color of wire used. I still have a few districts to wire. When the table is complete, and all the feeders are tied to the buses, I'll be done with track power wiring.


IMG_5068


BTW, now that the track is nearly complete, I took a final count of the switches. Exactly 300, with 130 powered and 170 manual.

Attachments

Images (4)
  • IMG_5063
  • IMG_5065
  • IMG_5066
  • IMG_5068

  Inspected my newly purchased K-line Baltimore & Ohio F7 A and B units.  I purchased the units from a fellow Forumite.   I'm really impressed with the detail in these locomotives!  Both the A and B are powered-it should be able to pull a K-line B & O express boxcar and 8 MTH Railking 60 ft B & O passenger cars.  My passenger train is now complete!  I acquired the cars over a 5 year period.  Some were new, others were used. 

I'm a member of the Board of Directors of the J. Reilly McCarren Transportation Museum in Springdale, AR. Since the JRM is having some VIPs this week, I volunteered one of my tinplate trolleys for display. A Razorback Traction Co. Birney has been set up and will be cheerfully bouncing from bumper to bumper to amuse the visitors!


GEDC1384

Mitch

Attachments

Images (1)
  • GEDC1384

Just wiring.


I was tying up loose ends on one of the oldest sections of the layout. Most of the track was in service with only a few of the feeders tied to the buses. Also the detection wires were never connected, so I'm doing that. It will be nice not having all that stuff hanging down over the hidden yard.


There is one track that has never had power before, and that is one of the tracks leading to the upper deck.


The plot thickens.

Add Reply

Post
×
×
×
×
Link copied to your clipboard.
×
×