Adriatic posted:
(helpless laughter)
Now see what you've done! You've driven Fortescue to drink!
Mitch
|


|
Adriatic posted:
(helpless laughter)
Now see what you've done! You've driven Fortescue to drink!
Mitch
Nothing very intricate. I installed an LED headlight and illuminated number boards in my Williams PRR Baldwin Shark. And working LED class lights in my Lionel RDG Fairbanks-Morse.
mike g. posted:

YEP...better stick to the 12 oz. versions... ![]()
cheers MIKE !! https://vimeo.com/33767124

Finished the lights and trucks on my PRR RPO car. Still need to find new couplers.
Fixed my ATSF 0-6-0 too. These engines don't have wired connections to the pick up rollers. One of the screws was just loose enough to cause the reverse unit to cycle when just the one roller was pulling power.
Ran trains too!
briansilvermustang posted:mike g. posted:
YEP...better stick to the 12 oz. versions...
cheers MIKE !! https://vimeo.com/33767124
Was that beer or LSD in that beer can in the warped picture?


RSJB18 posted:
Bob;
Nice job. That was my first set of passenger cars back in the 70's - still have the whole set packed up somewhere in the basement. Found the last car - the observation car - in a little train store in Quebec City when I was there on vacation for the Carnival.
Are you planning on finding the original style dummy couplers??? When I first bought the cars, it didn't matter much, but as time went on, they really annoyed me - especially when going in reverse.
Decided to run to Lowe's this time to get things I was running low on. More white glue, 5/16 washers, 5/16 X 3 Hex bolts. I did manage to find some brackets in the shelving department that will work to hold the legs I placed under the two sections that the bridge abutments are on. I will have to modify them a bit but they will give the legs a second point of support. Taking my time I was able to peel off the wax paper what I made up last night. I put one up. The glue I used is more like the adhesive that comes with the credit cards so if I do not like the look of it I can take it off with no problem or damage. While I am on the computer I might as well place my order with Ross so I can work on the grain elevator area and where I was going to first place it. Tomorrow I want to put together more Weaver TOFC flat cars and wood chip hoppers but first I have to go to Ace to get more of the screws that hold the trucks on the bodies. Open to suggestions since this is my first time trying this. Pic of the vegetation...................Paul
gandydancer1950 posted:TedW posted:Putting the finishing touches on a family room display shelf. Will rotate engines/cars in as the mood strikes. Time to start taking over more of the house.
I like your idea!
Thx HK... And thx to all who clicked the like button. Appreciate your encouragement. TW
Apples55 posted:RSJB18 posted:Bob;
Nice job. That was my first set of passenger cars back in the 70's - still have the whole set packed up somewhere in the basement. Found the last car - the observation car - in a little train store in Quebec City when I was there on vacation for the Carnival.
Are you planning on finding the original style dummy couplers??? When I first bought the cars, it didn't matter much, but as time went on, they really annoyed me - especially when going in reverse.
Paul (apples) you have passenger cars packed away in boxes?? That's choo choo abuse! LOL I have some in plastic totes and I feel guilty!!!
Jim
Ted, That diorama looks great!
Paul 2, The vines on the tunnel portal and wall look great!
Bob, The workbench does seem easier to find things. The lighting in the passenger car is nice and even!
Adriatic, ![]()
RSJB18 posted:Finished the lights and trucks on my PRR RPO car. Still need to find new couplers.
Train Tender can fix you up.

Mitch
M. Mitchell Marmel posted:RSJB18 posted:Finished the lights and trucks on my PRR RPO car. Still need to find new couplers.
Train Tender can fix you up.
Mitch
Mitch;
Close, but no cigar ![]()
![]() Here is a pic of one of my original cars (from '74 - '76) with the dummy coupler (actually the one I picked up in Quebec). Like me, the coupler is a total dummy, and it is 2 1/4" long:
Here is a pic of one of my original cars (from '74 - '76) with the dummy coupler (actually the one I picked up in Quebec). Like me, the coupler is a total dummy, and it is 2 1/4" long:
I found the diner car which apparently was from '88, and it had a coupler with the thumb tack, but it was mounted to the truck, and was close to 2 3/4" and had two plastic tabs which kind of kept the coupler centered:
Bob's is of the earlier vintage, so, without digging further into the tubs, I would assume that the replacement part you found would not work - note in the first photo how close the knuckle is to the end of the car.

carsntrains posted:Apples55 posted:RSJB18 posted:Paul (apples) you have passenger cars packed away in boxes?? That's choo choo abuse! LOL I have some in plastic totes and I feel guilty!!!
Jim
Jim;
In the words of that great British philosopher and philanthropist, Ebenezer Scrooge,
And I said it recently, and I'll say it again, there is no such thing as O-gauge guilt!!!
Apples55 posted:carsntrains posted:Apples55 posted:RSJB18 posted:Paul (apples) you have passenger cars packed away in boxes?? That's choo choo abuse! LOL I have some in plastic totes and I feel guilty!!!
Jim
Jim;
In the words of that great British philosopher and philanthropist, Ebenezer Scrooge,
And I said it recently, and I'll say it again, there is no such thing as O-gauge guilt!!!
Jim, Paul reproved me last week for claiming to be guilty, now he has enlisted this famous personage to reprove you!
Paul, We stand "guilty" as charged! ![]()
Apples55 posted:M. Mitchell Marmel posted:RSJB18 posted:Finished the lights and trucks on my PRR RPO car. Still need to find new couplers.
Train Tender can fix you up.
Mitch
Mitch;
Close, but no cigar

Here is a pic of one of my original cars (from '74 - '76) with the dummy coupler (actually the one I picked up in Quebec). Like me, the coupler is a total dummy, and it is 2 1/4" long:
I found the diner car which apparently was from '88, and it had a coupler with the thumb tack, but it was mounted to the truck, and was close to 2 3/4" and had two plastic tabs which kind of kept the coupler centered:
Bob's is of the earlier vintage, so, without digging further into the tubs, I would assume that the replacement part you found would not work - note in the first photo how close the knuckle is to the end of the car.
These cars have oddball couplers for sure. I have some 2" thumbtack couplers but they are a little short. If I can find the really long ones from some passenger cars they should work. They don't even have springs to keep them centered.
Don't know why Lionel is so infatuated with dummy couplers.
Thanks for the assistance guys😁
Apples55 posted:
(nodnods) I expect that Train Tender has those in stock as well; don't know the part number off the top of my head.
Mitch
RSJB18 posted:These cars have oddball couplers for sure. I have some 2" thumbtack couplers but they are a little short. If I can find the really long ones from some passenger cars they should work. They don't even have springs to keep them centered.
Don't know why Lionel is so infatuated with dummy couplers.
Thanks for the assistance guys😁
Bob;
While putting the cars I photograph back in their boxes, I found something interesting... there was a small envelope in the observation car box with a spare coupler and screw - I assume that is in case you want to add one to the back of the car. If you want it, shoot me an address and I'll send it on during the week.
Apples55 posted:While putting the cars I photograph back in their boxes, I found something interesting... there was a small envelope in the observation car box with a spare coupler and screw - I assume that is in case you want to add one to the back of the car. If you want it, shoot me an address and I'll send it on during the week.
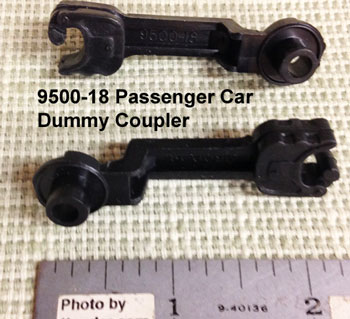
There should be a part number on the coupler. What is it? I wanna order a few of those from TT myself... ![]()
Mitch
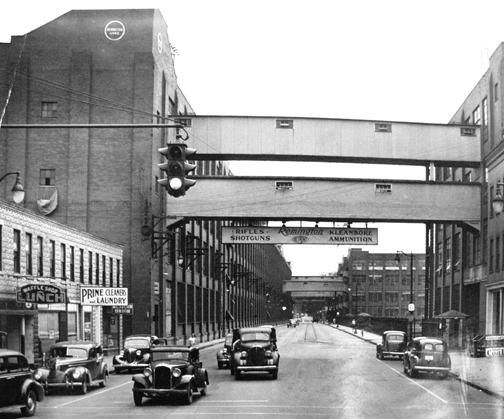
Another building in the works. This is going to be part of a double connect plant complex that are on opposite sides of my double main line above my turntable area. This building will be perched upon the cliff side above the TT. Then there is going to be one multi floor man bridge or a multiple bridge spanning over the tracks connecting to the other plant . This is another Chooch Ultra Scale ll front ( Graham building) . These will tower above the level below and the man bridge(s) will obscure the viewer from seeing down the tracks into the corner of my layout. I am going to make these building into the Remington arms factory.
After washing the front to get rid of the mold release, I trimmed off all the flash from openings etc. I planned on using the brick fill pieces provided for walling up some of the windows but they are smaller than the openings. So I had to glue some styrene pieces to the back of the wall to hold the brick pieces in. Also the center door did not have a brick piece so I had to create one with some styrene brick sheet.
Lots of work yet to finish. ![]()
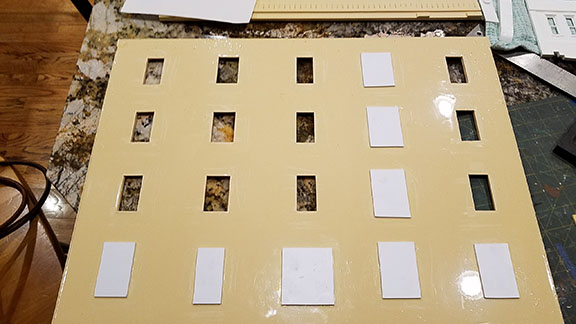
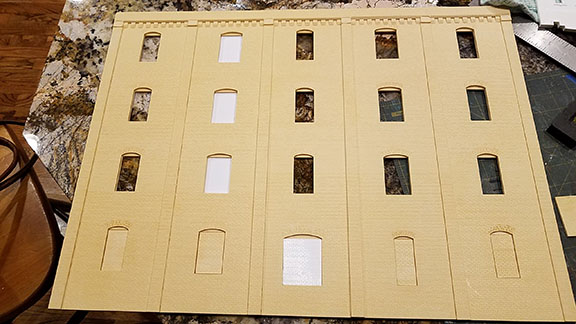
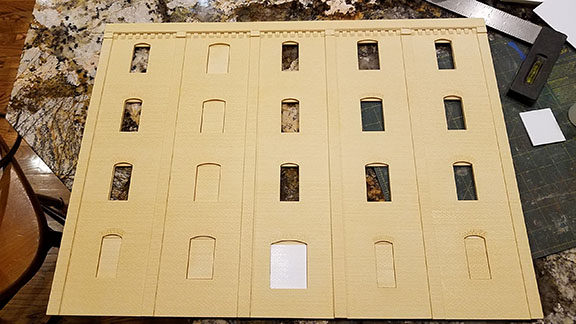
I am thinking of maybe doing the brick like this bldg.
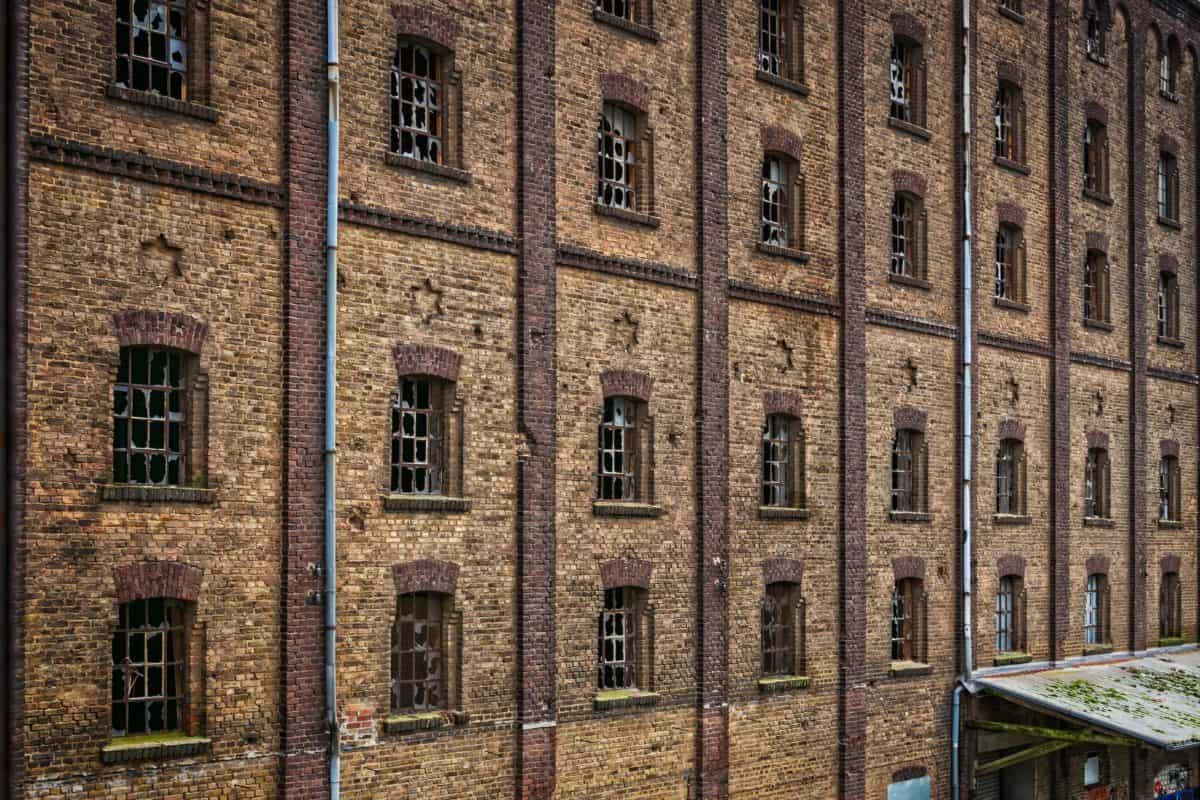
Here are some photos of the man bridges I am getting ideas from, this is the Remington factory
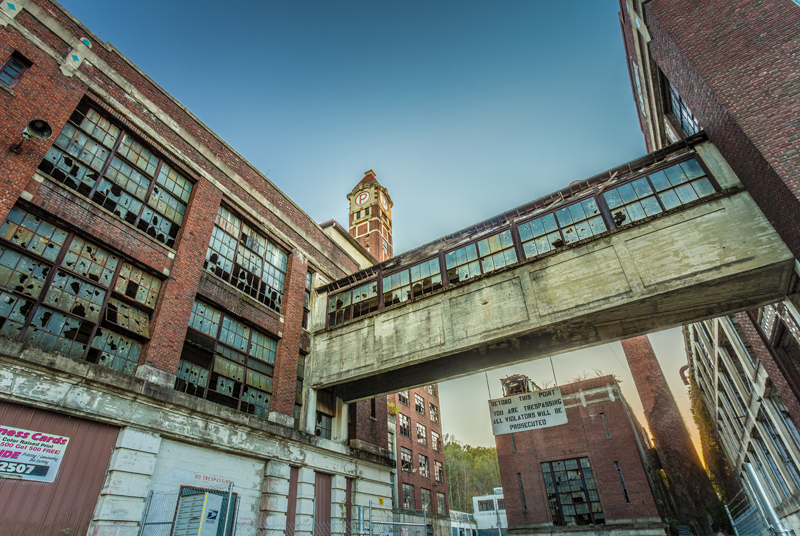
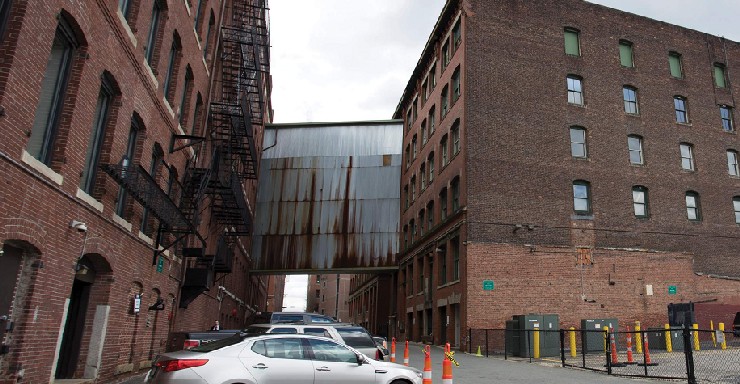
and here are some other factories

M. Mitchell Marmel posted:Apples55 posted:While putting the cars I photograph back in their boxes, I found something interesting... there was a small envelope in the observation car box with a spare coupler and screw - I assume that is in case you want to add one to the back of the car. If you want it, shoot me an address and I'll send it on during the week.
There should be a part number on the coupler. What is it? I wanna order a few of those from TT myself...
Mitch
Part of me wants to ask why, but I think I know better by now ![]()
![]()
![]()
On the top it say 9500-18.
Al, The brick building would look good! I like brick buildings. The old photograph looks great, but the derelict buildings are so sad!
I set in place on my cork floor empire the inexpensive people I glued to plastic strips. Most of this first batch of 100 are waiting passengers. The next batch that arrives I’ll group in conversation groupings and put them around the town and at the carnival. Final step in populating the town will be a few batches of specialty persons. But the cheap folk have worked really well, and I don’t mind the duplication. 
Hi everyone, I would replay to everyone's post. But to be honest I am to tired today so all I can say is!
GREAT JOB BY EVERYONE!![]()
CSX Al posted:Another building in the works. This is going to be part of a double connect plant complex that are on opposite sides of my double main line above my turntable area. This building will be perched upon the cliff side above the TT. Then there is going to be one multi floor man bridge or a multiple bridge spanning over the tracks connecting to the other plant . This is another Chooch Ultra Scale ll front ( Graham building) . These will tower above the level below and the man bridge(s) will obscure the viewer from seeing down the tracks into the corner of my layout. I am going to make these building into the Remington arms factory.
After washing the front to get rid of the mold release, I trimmed off all the flash from openings etc. I planned on using the brick fill pieces provided for walling up some of the windows but they are smaller than the openings. So I had to glue some styrene pieces to the back of the wall to hold the brick pieces in. Also the center door did not have a brick piece so I had to create one with some styrene brick sheet.
Lots of work yet to finish.
I am thinking of maybe doing the brick like this bldg.
Here are some photos of the man bridges I am getting ideas from, this is the Remington factory
and here are some other factories
like your choice of brick color
Constructed a new railing for the East end trolley station platform this past week. Made it from 3/64” hollow brass tubing purchased from Hobby Lobby. Made a profile pattern of the platform then drew up a layout plan on a piece of wood that I taped the brass pieces to for soldering. Brass is so easy to work with as it solders up so quick; no need to wait for glue to dry as you would with wood or plastic. Cutting off the heads of straight pins and inserted into the tubing made it easy to install the railing to the styrofoam i.e. concrete platform. The railing was soldered up, washed, primed, painted and installed all within a days time.
I have also added some signage to the taconite plant buildings in addition to beginning some chalk weathering. I found appropriate signage on the internet that I sized on the computer and printed. Next project will be to power up the plant facilities lights.
It is still too cold in the garage to do much scenic work on the summit so that will have to wait a few more weeks. Yesterday I ordered a couple of CAT Dump Trucks in 1/94 scale from TrainWorld to work at the plant.
Railing brass from Hobby Lobby
Railing layout board and completed railing
Test fit
Washed and primed
Finish coat with mounting pins
Installed and awaiting the trolley
Arrival of inaugural trolley
Entrance and directional sign to Minntac taconite plant on Mt. Iron
Plant welcome sign board and the start of weathering
Left is the administration building
Now I am in need of some warmer weather!
Dave
I finished another milestone in the signal installation project. All mainline signals are in place and connected to the control board, and all of the mainline switches are wired to DZ1008 relays and connected to the control board.
Starting to test interlockings and signal response.
pdxtrains posted:I set in place on my cork floor empire the inexpensive people I glued to plastic strips. Most of this first batch of 100 are waiting passengers. The next batch that arrives I’ll group in conversation groupings and put them around the town and at the carnival. Final step in populating the town will be a few batches of specialty persons. But the cheap folk have worked really well, and I don’t mind the duplication.
I used some of those Chinese figures on my layout also....mostly in the background. They look very nice in small groups as if conversing with one another.
paul 2 posted:Decided to run to Lowe's this time to get things I was running low on. More white glue, 5/16 washers, 5/16 X 3 Hex bolts. I did manage to find some brackets in the shelving department that will work to hold the legs I placed under the two sections that the bridge abutments are on. I will have to modify them a bit but they will give the legs a second point of support. Taking my time I was able to peel off the wax paper what I made up last night. I put one up. The glue I used is more like the adhesive that comes with the credit cards so if I do not like the look of it I can take it off with no problem or damage. While I am on the computer I might as well place my order with Ross so I can work on the grain elevator area and where I was going to first place it. Tomorrow I want to put together more Weaver TOFC flat cars and wood chip hoppers but first I have to go to Ace to get more of the screws that hold the trucks on the bodies. Open to suggestions since this is my first time trying this. Pic of the vegetation...................Paul
Good hide!
gandydancer1950 posted:pdxtrains posted:I set in place on my cork floor empire the inexpensive people I glued to plastic strips. Most of this first batch of 100 are waiting passengers. The next batch that arrives I’ll group in conversation groupings and put them around the town and at the carnival. Final step in populating the town will be a few batches of specialty persons. But the cheap folk have worked really well, and I don’t mind the duplication.
I used some of those Chinese figures on my layout also....mostly in the background. They look very nice in small groups as if conversing with one another.
They do look good. Did you do any touch up to them or are they original? I have been looking to buy some. Which do you recommend?
Dave
Apples55 postedthere is no such thing as O-gauge guilt!!!
YES there is; its just 1/48 the size of normal guilt!
Apples55 posted:Part of me wants to ask why, but I think I know better by now


On the top it say 9500-18.
OK, Train Tender does stock 'em.
No nefarious plans at the moment, but you never know...
Mitch
gandydancer1950 posted:CSX Al posted:Another building in the works. This is going to be part of a double connect plant complex that are on opposite sides of my double main line above my turntable area. This building will be perched upon the cliff side above the TT. Then there is going to be one multi floor man bridge or a multiple bridge spanning over the tracks connecting to the other plant . This is another Chooch Ultra Scale ll front ( Graham building) . These will tower above the level below and the man bridge(s) will obscure the viewer from seeing down the tracks into the corner of my layout. I am going to make these building into the Remington arms factory.
After washing the front to get rid of the mold release, I trimmed off all the flash from openings etc. I planned on using the brick fill pieces provided for walling up some of the windows but they are smaller than the openings. So I had to glue some styrene pieces to the back of the wall to hold the brick pieces in. Also the center door did not have a brick piece so I had to create one with some styrene brick sheet.
Lots of work yet to finish.
I am thinking of maybe doing the brick like this bldg.
Here are some photos of the man bridges I am getting ideas from, this is the Remington factory
and here are some other factories
like your choice of brick color
The last 3 buildings remind me of home (not the foreign writing) lol
Jim
darlander posted:gandydancer1950 posted:pdxtrains posted:I set in place on my cork floor empire the inexpensive people I glued to plastic strips. Most of this first batch of 100 are waiting passengers. The next batch that arrives I’ll group in conversation groupings and put them around the town and at the carnival. Final step in populating the town will be a few batches of specialty persons. But the cheap folk have worked really well, and I don’t mind the duplication.
I used some of those Chinese figures on my layout also....mostly in the background. They look very nice in small groups as if conversing with one another.
They do look good. Did you do any touch up to them or are they original? I have been looking to buy some. Which do you recommend?
Dave
These are right out of the bag, except I e6000 them to plastic squares cut from a q-tip box!
Apples55 posted:RSJB18 posted:These cars have oddball couplers for sure. I have some 2" thumbtack couplers but they are a little short. If I can find the really long ones from some passenger cars they should work. They don't even have springs to keep them centered.
Don't know why Lionel is so infatuated with dummy couplers.
Thanks for the assistance guys😁
Bob;
While putting the cars I photograph back in their boxes, I found something interesting... there was a small envelope in the observation car box with a spare coupler and screw - I assume that is in case you want to add one to the back of the car. If you want it, shoot me an address and I'll send it on during the week.
email sent ![]()
Darlander, that sure is one nice looking rail! Its little details like that which bring out a layout!![]()
Anthony K, Man that is a lot of wires and switches! Looks like someone is giving Elliot a run for his money! LOL![]()
PDXTrains, your plat form sure looks great with all the people waiting for the trains! Nice job!![]()
p51 posted:Apples55 postedthere is no such thing as O-gauge guilt!!!
YES there is; its just 1/48 the size of normal guilt!
In your case Lee would it be On30 size guilt? ![]()
Access to this requires an OGR Forum Supporting Membership
